background image

26

27

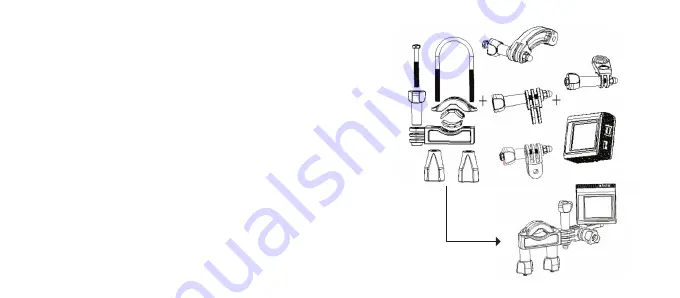
Fixing the camera to a bike 

1. Unscrew both screws and remove the metal ring of Mount A.

2.  Place the plastic section underneath the handlebar and 

place the metal ring over the handlebar. 

3. Replace the screws and tighten them up.

4.  If needed, choose extra connectors from the three shown 

and then fix them to part (i) of Mount A.

5.  Screw connector (ii) directly to the camera or the  

camera case.

6. Attach the camera assembly to the Mount A assembly.

ii.

i.

A.

Summary of Contents for Splash

Page 1: ...c t i o n Ca m e r a JB 3287 Made in China Kitvision 2014 Christchurch Dorset BH23 4FL Li ion Do not dispose of Lithium ion batteries with general waste Please return it to battery recycling collection point User manual ...

Page 2: ...pecifications 32 Care and maintenance 34 Main features Full HD 1080p video 12 Megapixel photo mode Waterproof up to 15 m Box contents Splash action camera Waterproof case Bicycle mount Vented helmet mount Flat adhesive mount 2 x 3M adhesive pads Hook mount Mount adaptor Tripod adaptor 90 degree adaptor User manual USB cable ...

Page 3: ...dicator light 3 Lens 4 Micro USB jack 5 TF micro SD card slot 6 Microphone 7 LCD screen 8 Tripod thread 9 Reset 10 Mode button 11 Waterproof case 12 Securing clip 13 Waterproof power shutter button 14 Micro HDMI port 1 8 4 9 14 10 7 5 6 11 2 13 12 3 ...

Page 4: ...ully charged the status indicator will turn off Note The camera body may be warm after extended use This is normal Inserting the memory card The Splash camera doesn t have any internal memory To be able to record video or capture photos using the camera you must have your micro SD card at least class 4 inserted 1 Ensure the camera is turned off 2 Insert your memory card into the TF micro SD card s...

Page 5: ... MODE button 10 to set the camera to Video mode 2 Use the LCD screen 7 to view your shot then press the SHUTTER button 1 to start recording 3 The LCD screen 7 will display how long it has been recording for 4 Press the SHUTTER button 1 again to stop recording Note The camera will stop recording automatically when the memory capacity is full or it has run out of battery power Video mode For recordi...

Page 6: ...e camera and press the MODE button 10 to set the camera to Capture mode 2 Use the LCD screen 7 to view your shot and then press the SHUTTER button 1 to take a still image 3 After the image has been taken the LCD screen 7 will display the image for a brief second Playback of files 1 Turn on the camera and press the MODE 10 button to set the camera to Playback mode 2 Press and hold the MODE button 1...

Page 7: ... press the SHUTTER button 1 Deleting picture files When viewing a picture file you can delete it if it s not wanted 1 Press the SHUTTER button 1 then the MODE button 10 to select Yes followed by the SHUTTER button 1 to confirm Changing the camera settings General settings 1 To enter the general settings menu press and hold the MODE button 10 whilst in either Video or Capture mode 2 Press the SHUTT...

Page 8: ...nguage Set the on screen language English French Spanish Portuguese German Dutch Italian Frequency Frequency should be set depending on your TV 50HZ 60HZ TV mode You can review images on TV with a mini HDMI cable not supplied TV Out should be set to either NTSC or PAL depending on your TV NTSC PAL Format Format your micro SD card including protected files Removing the micro SD card during formatti...

Page 9: ...anually to compensate for unusual lighting conditions 3EV to 3EV White Balance Adjust the white balance to suit different light sources Auto Daylight Cloudy Fluorescent Incandescent Anti shake Use the function to help stabilise the image On Off Loop recording Set the loop recording time This will determine how long each video recording is per file off 3minutes 5minutes 10minutes Motion Detection S...

Page 10: ... Select image quality for still photos There are three options for choice Super Fine Fine Normal Sharpness Set the sharpness of the picture The sharpness level dictates if the edges of objects in the image are more or less distinct Sharp Normal Soft Exposure Set the exposure value manually to compensate for unusual lighting conditions 3EV to 3EV White balance Adjust the white balance to suit diffe...

Page 11: ...and HDTV before removing the HDMI cable Connecting the camera to a PC There are two ways to download files from the camera s Micro SD to a computer By inserting the Micro SD into a card reader By connecting the camera to a computer using the supplied USB cable Connecting the camera to a PC with the USB cable 1 Connect one end of the supplied USB cable to the camera s micro USB jack 4 and the other...

Page 12: ...e The Splash action camera includes a case that is waterproof up to 15 metres When using the camera in a wet environment always use the waterproof case Using the waterproof case 1 Open the waterproof case 11 by releasing the clip 12 on the side of the case 2 Insert the camera correctly so that the case closes easily and provides a tight seal 3 Snap the clip 12 shut to ensure the case is waterproof...

Page 13: ...mera for various outdoor activities we have provided three different mounts Mount A is used to fix the camera to the handlebars on a bike Mount B is used to fix it to a helmet Mount C is used to attach the camera to flat clean smooth surfaces A B C ...

Page 14: ...erneath the handlebar and place the metal ring over the handlebar 3 Replace the screws and tighten them up 4 If needed choose extra connectors from the three shown and then fix them to part i of Mount A 5 Screw connector ii directly to the camera or the camera case 6 Attach the camera assembly to the Mount A assembly ii i A ...

Page 15: ... then fix them to connector iii 3 Screw connector ii directly to the camera or the camera case 4 Attach the camera assembly to the Mount B assembly 5 After fixing the camera to the mount correctly use the strap to fix it to the helmet Adjust the length according to the helmet s size and then tie the strap up to your helmet 2 1 ii iii B ...

Page 16: ...Peel off adhesive paper and stick the mount in the desired position 3 Fix connector iii to Mount C as shown 4 If needed choose extra connectors from the three shown and then fix them connector iii 5 Screw connector ii directly to the camera or the camera case 6 Attach the camera assembly to the Mount C assembly 2 1 ii iii C ...

Page 17: ... 8 M 5 M 3 M 1 3 M VGA Video 1080 p 720 p VGA QVGA Exposure 3 0 3 0EV Continuous shot 6 frames per shot Storage External memory Micro SD card Up to 32 GB HDMI OUT Micro HDMI Power source Li ion battery 550 mAh Dimension 50 x 50 x 36 mm Ambient temperature Operating 0 C to 40 C Storage 20 to 60 C Microphone Built in Speaker Built in Specification ...

Page 18: ...nconsistencies in these instructions which may occur as a result of product improvement and development Care for your Splash Please DON T Get the Splash wet unless sealed in the included waterproof case Drop the Splash as this will invalidate your warranty Open up the Splash There are no user serviceable parts inside Expose the Splash to extreme temperatures or rapid changes of hot to cold or vice...

Reviews: