background image

ENGLISH

3

PRODUCT SAFETY

IMPORTANT SAFEGUARDS

When using electrical appliances, basic safety precautions should always  

be followed, including the following:

1.  Read all instructions.

2.  To protect against the risk of electrical shock do not put Stand Mixer in water or 

other liquid.

3.  This appliance is not intended for use by persons (including children) with reduced 

physical, sensory, or mental capabilities, or lack of experience and knowledge 

unless they are closely supervised and instructed concerning the use of the 

appliance by a person responsible for their safety. Close supervision is necessary 

when any appliance is used by or near children. Children should be supervised to 

ensure that they do not play with the appliance.

4.  Turn the appliance OFF, then unplug from the outlet when not in use, before 

assembling or disassembling parts and before cleaning. To unplug, grasp the plug 

and pull from the outlet. Never pull from the power cord.

5.  Avoid contacting moving parts. Keep hands, hair, and clothing, as well as spatulas 

and other utensils, away from beater during operation to reduce the risk of injury 

to persons and/or damage to the Stand Mixer.

6.  Do not operate any appliance with a damaged cord or plug or after the appliance 

malfunctions, or is dropped or damaged in any manner. Contact the manufacturer 

at their customer service telephone number for information on examination, repair, 

or adjustment.

7.  The use of accessories or attachments not recommended or sold by the 

manufacturer may cause fire, electric shock or injury.

8.  Do not use the Stand Mixer outdoors.

9.  Do not let the cord hang over the edge of table or counter.

10. Remove the flat beater, wire whip, or spiral dough hook from the Stand Mixer 

before washing.

SAVE THESE INSTRUCTIONS

This product is designed for household use only.

Summary of Contents for KV25G0XAQ

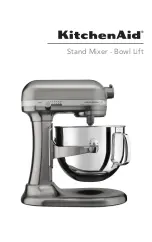
Page 1: ...Stand Mixer Bowl Lift ...

Page 2: ... Attachment Knob 4 Hinged Hub Cover 5 Beater Shaft 6 Speed Control 7 Bowl Lift Lever 8 Beater Height Adjustment Screw 9 Bowl Support 10 Locating Pins 11 Bowl 12 Bowl Handle 13 Flex Edge Beater 14 Flat Beater 15 Spiral Dough Hook 16 Wire Whip 17 11 Wire Stainless Steel Elliptical Whip 18 Pouring Shield 19 Spring Latch and Bowl Pin Not Shown 2 4 6 8 10 RESET OFF 0 STIR 1 3 2 5 6 8 7 9 10 11 12 13 14...

Page 3: ... before assembling or disassembling parts and before cleaning To unplug grasp the plug and pull from the outlet Never pull from the power cord 5 Avoid contacting moving parts Keep hands hair and clothing as well as spatulas and other utensils away from beater during operation to reduce the risk of injury to persons and or damage to the Stand Mixer 6 Do not operate any appliance with a damaged cord...

Page 4: ...erson install an outlet near the appliance The maximum rating is based on the attachment that draws the greatest load power Other recommended attachments may draw significantly less power ACCESSORY GUIDE Accessory Use to mix Description Flat beater Flex Edge Beater Normal to heavy mixtures Cakes creamed frostings candies cookies biscuits pie pastry meat loaf mashed potatoes Spiral Dough Hook Mixin...

Page 5: ...ning into flour mix thin or splashy batters 4 Flat Beater Flex Edge Beater Wire Whip 11 Wire Elliptical Whip Mixing beating For mixing semi heavy batters such as cookies Use to combine sugar and shortening and to add sugar to egg whites for meringues Medium speed for cake mixes Use with food grinder rotor slicer shredder pasta roller and fruit vegetable strainer 6 Flat Beater Flex Edge Beater Wire...

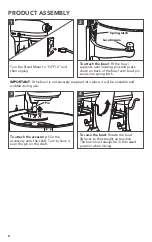
Page 6: ...owl pin snaps into spring latch 2 To attach the accessory Slip the accessory onto the shaft Turn to hook it over the pin on the shaft 3 To raise the bowl Rotate the bowl lift lever to the straight up position The bowl must always be in the raised position when mixing 4 IMPORTANT If the bowl is not securely snapped into place it will be unstable and wobble during use Spring latch Locating pin Pin ...

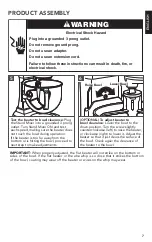
Page 7: ...ight to lower it Adjust the beater so that it just clears the surface of the bowl Check again the clearance of the beater to the bowl 6 Raise Bowl Raise Bowl Lower Bowl Lower Bowl PRODUCT ASSEMBLY WARNING Electrical Shock Hazard Plug into a grounded 3 prong outlet Do not remove ground prong Do not use an adapter Do not use an extension cord Failure to follow these instructions can result in death ...

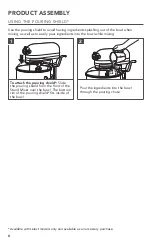
Page 8: ...asily pour ingredients into the bowl while mixing To attach the pouring shield Slide the pouring shield from the front of the Stand Mixer over the bowl The bottom rim of the pouring shield fits inside of the bowl 1 Pour the ingredients into the bowl through the pouring chute 2 Available with select models only and available as an accessory purchase ...

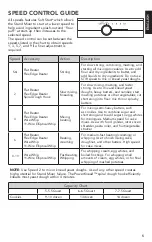
Page 9: ...e or electrical shock WARNING Injury Hazard Unplug mixer before touching beaters Failure to do so can result in broken bones cuts or bruises 2 4 6 8 10 RESET OFF 0 STIR Plug the Stand Mixer into a grounded 3 prong outlet Start with lower speed to avoid splashing and increase it gradually Refer to the Speed Control Guide 1 Do not scrape the bowl while operating Scraping the bowl once or twice durin...

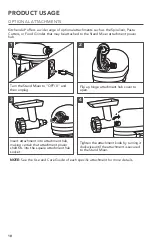
Page 10: ... RESET OFF 0 STIR Turn the Stand Mixer to OFF 0 and then unplug 1 Flip up hinge attachment hub cover to open 2 Insert attachment into attachment hub making certain that attachment power shaft fits into the square attachment hub socket 3 Tighten the attachment knob by turning it clockwise until the attachment is secured to the Stand Mixer 4 NOTE See the Use and Care Guide of each specific attachmen...

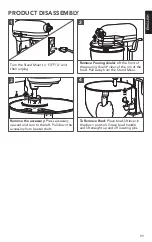
Page 11: ...ld Lift the front of the pouring shield clear of the rim of the bowl Pull away from the Stand Mixer Remove the accessory Press accessory upward and turn to the left Pull down the accessory from beater shaft 3 To Remove Bowl Place bowl lift lever in the down position Grasp bowl handle and lift straight up and off locating pins 4 ...

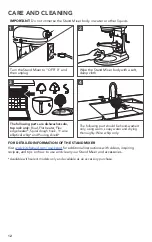
Page 12: ...warm soapy water and drying thoroughly Wire whip only 4 The following parts are dishwasher safe top rack only Bowl Flat beater Flex edge beater Spiral dough hook 11 wire elliptical whip and Pouring shield 3 2 4 6 8 10 RESET OFF 0 STIR Turn the Stand Mixer to OFF 0 and then unplug 1 Wipe the Stand Mixer body with a soft damp cloth 2 IMPORTANT Do not immerse the Stand Mixer body in water or other li...

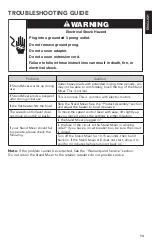
Page 13: ...tand Mixer See the Product Assembly section and adjust the beater to bowl clearance The speed control lever does not move smoothly or easily To move the speed control lever with ease lift slightly up as you move it across the settings in either direction If your Stand Mixer should fail to operate please check the following Is the Stand Mixer plugged in Is the fuse in the circuit to the Stand Mixer...

Reviews: