background image

15

English

OPERATING THE FOOD PROCESSOR ATTACHMENT

TIPS FOR GREAT RESULTS

Using a slicing or_ shr_edding disc

To slice or_ shr_ed fr_uits and vegetables 

that ar_e small: 
Position food vertically or horizontally in 

layers within the feed tube. Fill feed tube 

in order to keep food positioned properly. 

Process using even pressure with the  

food pusher. Or use the small feed tube  

in the two-piece food pusher. Position  

food vertically in the tube and use the  

small food pusher to process food. 
To slice cooked meat or_ poultr_y,  

such as pepper_oni: 
Food should be very cold. Cut in pieces  

to fit feed tube. Process food using firm, 

even pressure with the food pusher. 
To shr_ed spinach and other_ leaves: 
Stack leaves. Roll up and stand up in feed 

tube. Process using even pressure with  

the food pusher.

To shred firm and soft 

cheeses: 

Firm cheese should be very cold. For best 

results, thoroughly freeze soft cheeses, 

such as mozzarella, before processing. This 

may take several hours to achieve proper 

firmness for best processing. 

To slice or_ shr_ed fr_uits or_ 

vegetables that ar_e long 

and r_elatively small in 

diameter_, such as car_r_ots 

and bananas: 

Cut food to fit feed 

tube vertically and 

pack feed tube 

securely to keep 

food positioned 

properly. Process 

using even pressure 

with the food 

pusher. Or use the 

small feed tube in 

the two-piece food 

pusher. Position 

food vertically in the 

tube and use the 

small food pusher to process food.
To slice or_ shr_ed fr_uits and vegetables 

that ar_e r_ound, such as onions, and 

apples: 
Peel, core, and remove seeds. Cut in halves 

or quarters to fit feed tube. Position in feed 

tube. Process using even pressure with the 

food pusher.

W10641290A_ENv13.indd   15

5/28/14   4:32 PM

Summary of Contents for KSM2FPA

Page 1: ...our être utilisé exclusivement avec des batteurs sur socle à usage domestique KitchenAid Pour des renseignements complets sur l utilisation de ces batteurs sur socle lire le guide d instructions fourni avec le batteur sur socle El accesorio procesador de alimentos KitchenAid está diseñada exclusivamente para usarse con todas las batidoras domésticas con base KitchenAid Para obtener la información ...

Page 2: ...evity and performance of your appliance keep this guide handy It will empower you with the best way to use and care for your product Your satisfaction is our 1 goal Remember to register your product online at www kitchenaid com or by mail using the enclosed Product Registration Card Join us in the kitchen at www kitchenaid com KitchenAid com KitchenAid ca W10641290A_ENv13 indd 2 5 28 14 4 31 PM ...

Page 3: ...nable us to contact you in the unlikely event of a product safety notification and assist us in complying with the provisions of the Consumer Product Safety Act This card does not verify your warranty Please complete the following for your personal records FOOD PROCESSOR ATTACHMENT SAFETY Important safeguards 4 PARTS AND FEATURES 6 GETTING STARTED Before first use 7 Selecting the right tool 7 INST...

Page 4: ... OFF and detach Food Processor attachment from Stand Mixer after each use of the Food Processor attachment and before cleaning Make sure the motor stops completely before disassembling 5 Do not put your fingers or other objects into the Food Processor attachment opening or discharge chute while it is in operation Never feed by hand Always use the pusher If food becomes lodged in opening or dischar...

Page 5: ...r or electrical or mechanical adjustment 11 Do not let the Stand Mixer cord hang over the edge of table or counter 12 Keep hands and utensils away from moving blades or discs while processing food to reduce the risk of severe injury to persons or damage to the Food Processor attachment 13 Blades are sharp Handle carefully 14 Do not remove the lid until discs or blades stop 15 Do not attempt to def...

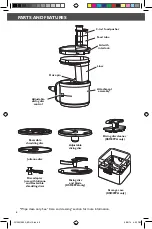
Page 6: ... discs Dicing disc and blade KSM2FPA only Dicing disc cleaner KSM2FPA only Storage case KSM2FPA only Adjustable slicing disc Liner PARTS AND FEATURES Attachment assembly 2 in 1 food pusher Feed tube Reversible shredding disc Wipe clean only See Care and cleaning section for more information G W10641290A_ENv13 indd 6 5 28 14 4 32 PM ...

Page 7: ...esigned for household use only The guide below will help you select the right tool for your recipe See the section Installing the discs for more detailed information for each disc Grasp the feed tube on the interlock lid and turn it clockwise to remove it from the attachment assembly FUNCTION TOOL FOOD Slicing Adjustable slicing disc Soft fruits Soft vegetables Hard vegetables Cooked meats Shreddi...

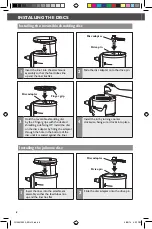
Page 8: ...flat 2 Slide the disc adapter onto the drive pin 1 Insert the liner into the attachment assembly so that the feed tubes line up and the liner lies flat 3 Hold the reversible shredding disc by the 2 finger grips with the desired shredding side facing UP Install the disc on the disc adapter by fitting the adapter through the hole in the bottom of the disc until it is seated against the liner 4 Insta...

Page 9: ...he disc adapter by fitting the adapter through the hole in the bottom of the disc until it is seated against the liner 2 Hold the slicing disc by the finger grips and lower it onto the drive pin You may need to turn the disc drive adapter until it drops down into place 3 Set the desired slicing thickness by moving the control lever to the left for thinner slices or to the right for thicker slices ...

Page 10: ...op of the liner so that the dicing grate aligns with the liner s feed tube 3 Install the blade on top of the dicing disc by sliding it onto the drive pin 4 Install the lid by turning counter clockwise being sure it locks into place 1 Insert the liner into the attachment assembly so that the feed tubes line up and the liner lies flat W10641290A_ENv13 indd 10 5 28 14 4 32 PM ...

Page 11: ...and Mixers with a removable attachment hub cover Turn the attachment knob counterclockwise to remove attachment hub cover 1 Turn Stand Mixer OFF and unplug 3 Insert the attachment into the attachment hub Rotate attachment back and forth if necessary The pin on the attachment housing will fit into the notch of the hub rim when in proper position W10641290A_ENv13 indd 11 5 28 14 4 32 PM ...

Page 12: ...ACHMENT 6 Plug into a grounded 3 prong outlet 4 Tighten attachment knob until the Food Processor attachment is completely secured to Stand Mixer 5 Place a bowl or container under the food exit chute W10641290A_ENv13 indd 12 5 28 14 4 32 PM ...

Page 13: ...ruits Soft vegetables 4 Hard vegetables 10 Different foods require varying degrees of pressure and speed for optimized results In general use light pressure and low speeds for soft delicate foods soft fruits and vegetables like kiwi or ripened tomatoes as well as soft cheeses like mozzarella Use firmer pressure with high speed for harder foods hard vegetables like potatoes and carrots meats like p...

Page 14: ...sembled and attached to the Stand Mixer see Assembling the Food Processor attachment section Place a bowl or container underneath the feed tube to catch all processed food Using the 2 in 1 food pusher The 2 in 1 food pusher features a smaller chute inside of a larger food pusher Use the small feed tube and pusher to process small or slender items like single carrots or celery stalks To slice or sh...

Page 15: ...sure with the food pusher To shred firm and soft cheeses Firm cheese should be very cold For best results thoroughly freeze soft cheeses such as mozzarella before processing This may take several hours to achieve proper firmness for best processing To slice or shred fruits or vegetables that are long and relatively small in diameter such as carrots and bananas Cut food to fit feed tube vertically ...

Page 16: ...several pieces and pack the feed tube with the food For processing small or slender items the small feed tube in the 2 piece food pusher will prove especially convenient For best results cut a small amount off the end to create a flat surface when processing a single carrot or celery stalk Different foods require varying degrees of pressure and speed for optimal results In general use light pressu...

Page 17: ... Makes 12 16 latkes TIP If a thermometer is unavailable test the oil heat by placing a piece of potato mixture into the pan Oil is ready when it bubbles 5 Russet potatoes scrubbed and peeled large white onion peeled 2 large eggs beaten 2 tablespoons all purpose flour teaspoon salt teaspoon pepper cup oil for frying DISCS USED Preheat oven to 375 F 191 C Lightly brush each baguette round with extra...

Page 18: ... of each jar Slide the external lever to the 6th notch Feed the cucumbers through the large feed tube to slice Remove the cucumbers and fill each jar evenly with the slices packing them in as necessary In a large saucepan combine the sugar salt cider vinegar and water and bring to a boil stirring occasionally to help dissolve the sugar and salt Remove from heat and pour 1 to 1 cups of brine overto...

Page 19: ...nutes or until potatoes are well cooked and begin to brown Turn the heat to low add bacon and green onion and cook for an additional 3 minutes Remove from heat and serve with over medium eggs Potato Red Pepper Breakfast Hash Makes 6 cup servings TIP Hash can be made one day ahead then reheated on a baking sheet at 400 F 204 C for 10 minutes 3 Russet potatoes washed and dried red pepper cored and s...

Page 20: ...chment and slide the external lever to the 6th notch Use the small food feed tube and slice the strawberries kiwi and banana Remove the slicing disc and set the fruit aside Line the plastic cups side by side and place 4 5 slices of each of the fruit around the bottom sides of the cup Spoon approximately to 1 cup of the sorbet into the middle of the fruit and up to the rim of the cup Stick one pops...

Page 21: ...damaging the Food Processor attachment do not wash or immerse the attachment assembly in water or other liquids IMPORTANT To avoid damaging the Food Processor attachment do not immerse the attachment assembly in water or other liquids All other parts are top rack dishwasher safe 1 Turn Stand Mixer OFF and unplug from outlet 4 All other parts may be washed in warm sudsy water or placed in the top r...

Page 22: ...3 prong outlet If it is check the fuse or circuit breaker on the electrical circuit the Stand Mixer is connected to and make sure the circuit is closed Is the fuse in the circuit to the Stand Mixer in working order If you have a circuit breaker box be sure the circuit is closed Unplug the Stand Mixer then plug it back into the outlet Check to make sure the Food Processor attachment was assembled c...

Reviews: