background image

501970902004_GB  26-07-2007  9:14  Pagina 22

Summary of Contents for KDIX 8810

Page 1: ...KDIX 8810 Instructions for use ...

Page 2: ......

Page 3: ...s and features 7 How to run the scale removal cycle 8 How to test ground fault circuit interrupter GFCI 8 Start up guide 9 Dishwasher loading 10 Washing special items 13 Rinse aid dispenser 14 Detergent use 15 Cycle selection charts 16 Dishwasher care 17 Troubleshooting 19 Assistance or service 21 ...

Page 4: ...use in a dishwasher and keep them out of the reach of children When loading items to be washed 1 Locate sharp items so that they are not likely to damage the door seal and 2 Load sharp knives with the handless up to reduce the risk of cut type injuries Do not wash plastic items unless they are marked dishwasher safe or the equivalent For plastic items not so marked check the manufacturer s recomme...

Page 5: ...e contact your local dealer or our Customer Care Centre The inlet hose must be securely clamped to the water tap to prevent leaks The inlet water temperature varies according to the model installed Inlet hose marked 25 C Max maximum temperature 25 C All other models maximum temperature 60 C When installing the appliance make sure the drain water discharges correctly if necessary remove drain filte...

Page 6: ...rs switch off the appliance and turn off the water tap On completion of the programme switch off the dishwasher and turn off the water tap Repairs and technical modifications must be carried out exclusively by a qualified technician The water in the dishwasher is not drinkable Do not store inflammable liquids near the dishwasher Do not operate the appliance in the open air Attention Danger be care...

Page 7: ...ap 6 Water inlet opening 7 Control panel 8 Model and serial number label 9 Drain screen basket 10 Drain stopper 11 Drain fine screen 12 Medium rack insert 13 Cutlery basket 14 Small rack insert 15 Lid knob latch 16 Detergent cup 17 Rinse aid dispenser 18 Rinse aid fill 19 Wood cutting board Control Panel ...

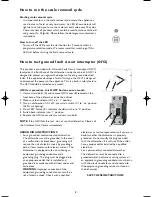
Page 8: ...urn on dishwasher if it is off press main switch C to on position LED s are lighting 4 Press TEST button E Indicator should switch into 0 position 5 Switch back indicator into 1 position 6 Replace the GFCI cover and screw down two bolts NOTE If the GFCI fails this test do not use this dishwasher Please call the Customer Care Centre immediately GROUNDING INSTRUCTIONS For a grounded cord connected d...

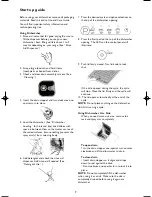
Page 9: ...nser Add rinse aid if needed See Detergent Use 7 Press the desired cycle and option selections on the top of the dishwasher opening 8 Press the Start pad on the top of the dishwasher opening The LEDs on the control panel will illuminate 9 Push lid firmly closed Turn lid knob to lock shut If the lid is opened during the cycle the cycle will stop Close the lid firmly and the cycle will continue 10 T...

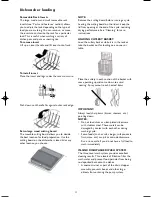
Page 10: ... rack Place items upper surfaces down for cleaning and draining China crystal and other delicate items must not touch each other during dishwasher operation or damage may occur Load small items in the rack secuely Load plastic items so the force of the spray arm does not move them during the cycle Only wash plastic items marked Dishwasher safe To avoid chipping do not led stemware touch other item...

Page 11: ...cycle reducing drying performance See Cleaning for care instructions LOADING CUTLERY BASKET Load the cutlery basket while it is in the rack or take the basket out for loading on a couner or table Place the cutlery in each section of the basket with some pointing up and some down to avoid nesting Spray cannot reach nested items IMPORTANT Always load sharp items knives skewers etc pointing down NOTE...

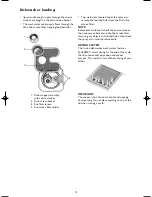
Page 12: ...screen filter removing any objects and soil particles Also check the spray arm it should rotate easily DRYING SYSTEM The In sink dishwasher wash system features FLASHDRY instant drying At the end of the cycle the lid automatically pops open and vapour escapes This results in fast efficient drying of your dishes IMPORTANT The vapour is hot Do not touch the lid opening during drying Do not place any...

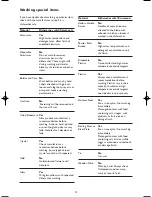
Page 13: ... Gold coloured flatware will discolour Glass Yes Milk glass yellows with repeated dishwasher washing Material Dishwasher safe Comments Hollow Handle No Knives Handles of some knives are attached to the blade with adhesives which can loosen if washed in the dishwasher Pewter Brass No Bronze High water temperatures and detergent can discolour or pit the finish Disposable No Plastics Cannot withstand...

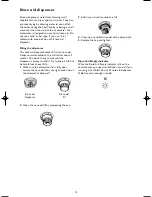
Page 14: ... last for about 3 months You do not have to wait until the dispenser is empty to refill it Try to keep it full but be careful not to overfill it 1 Make sure the dishwasher lid is fully open Locate the rinse aid fill on the right hand side of the dishwasher back wall 2 Open the rinse aid fill by unscrewing the cap 3 Add rinse aid until container is full 4 Clean up any spilled rinse aid with a damp ...

Page 15: ...by asking your local water department water softener company or county extension agent Different brands of dishwasher detergent have different amounts of phosphorus for softening water If you have hard water and use a detergent with a phosphorous content of less than 8 7 you might need to use more detergent or use a detergent with a phosphorous content higher than 8 7 NOTE Fill amounts shown are f...

Page 16: ... time indicates the cycle time will be longer depending on the temperature of water entering the dishwasher The cooler the water the longer the cycle time Main Wash Rinse Final Heated Rinse Energy Consumption kWh Time min Water Usage L 1 04 115 11 2 Main Wash Rinse Final Heated Rinse Energy Consumption kWh Time min Water Usage L 1 08 137 14 7 Main Wash Rinse Final Heated Rinse Energy Consumption k...

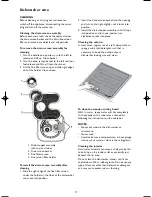
Page 17: ...osition 3 Install the drain stopper assembly until it drops into position and turn one quarter turn clockwise to lock into place Cleaning the exterior In most cases regular use of a soft damp cloth or sponge and a mild detergent is all that is necessary to keep the outside of your dishwasher looking nice and clean To clean the wooden cutting board Wash in warm soapy water and dry completely Oil fr...

Page 18: ...k See Installation Instructions To clean the drain air gap Clean the drain air gap periodically to ensure proper drainage of your dishwasher Lift off the outer cover Unscrew the plastic cap Then check for any soil build up Clean if necessary NOTE The fill air gap is located to the right of the drain air gap and does not require maintenance STORING Storing for the summer Protect your dishwasher dur...

Page 19: ...EAN Food soil left on the dishes Is the dishwasher loaded correctly Refer to the Dishwasher Loading section Is the water temperature too low For best dishwashing results water should be 49 C 120 F as it enters the dishwasher Did you use the correct amount of fresh detergent Use recommended dishwasher detergents only For best results use 3 in 1 or 4 in 1 tablets Refer to the Detergent Use section I...

Page 20: ... or grey marks on dishes Are aluminium items rubbing dishes during washing Disposable aluminium items can break down in the dishwasher and cause marking Handwash these items Remove aluminium markings by using a mild abrasive cleaner Orange stains on plastic dishes or dishwasher interior Are large amounts of tomato based foods on dished placed in the dishwasher Stains gradually fade over time Stain...

Page 21: ...se parts will fit right and work right because they are made with the same precision used to build every new KITCHENAID appliance To locate factory specified replacement parts in your area contact the Customer Care Centre Our consultants provide assistance with Features and specifications on our full line of appliances Installation information Use and maintenance procedures Accessory and repair pa...

Page 22: ......

Page 23: ......

Page 24: ...5019 709 02004 Printed in Italy n 07 07 GB ...

Reviews: