background image

18

3. Hand wash, rinse, and dry removable parts and interior 

surfaces thoroughly. Use a clean sponge or soft cloth and a 
mild detergent in warm water. 

Do not use abrasive or harsh cleaners such as window 
sprays, scouring cleansers, flammable fluids, cleaning 
waxes, concentrated detergents, bleaches or cleansers 
containing petroleum products on plastic parts, interior 
and door liners or gaskets. 

Do not use paper towels, scouring pads, or other harsh 
cleaning tools. These can scratch or damage materials.

To help remove odors, you can wash interior walls with a 
mixture of warm water and baking soda (2 tbs to 1 qt. [26 
g to .95 L] of water).

4. Wash stainless steel and painted metal exteriors with a clean 

sponge or soft cloth and a mild detergent in warm water. Do 
not use abrasive or harsh cleaners. Dry thoroughly with a soft 
cloth.

For additional protection against damage to painted metal 
exteriors, apply appliance wax (or auto paste wax) with a 
clean, soft cloth. Do not wax plastic parts. 

5. Clean the condenser coils regularly. Coils may need to be 

cleaned as often as every other month. This may help save 
energy.

Style 1 - Condenser coils behind base grille:

Remove the base grille (see the “Base Grille” section).

Use a vacuum with an extended attachment to clean the 
condenser coils when they are dusty or dirty. 

Replace the base grille when finished.

Style 2 - Condenser coils in back of the refrigerator:

Pull refrigerator out away from the wall (see the 
“Unpacking Your Refrigerator” section). 

Vacuum coils when they are dusty or dirty.

Roll refrigerator back into place. Make sure to leave 1 in. 
(2.5 cm) between the cabinet back and the wall.

Check to see if the refrigerator is level.

6. Plug in refrigerator or reconnect power.

Changing the Light Bulbs

NOTE: Not all appliance bulbs will fit your refrigerator. Be sure to 
replace the bulb with one of the same size and shape. The 
dispenser light requires a heavy duty 10-watt bulb. All other lights 
require a 40-watt appliance bulb. Replacement bulbs are 
available from your dealer.

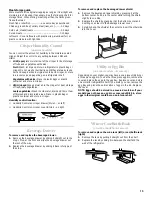
1. Unplug refrigerator or disconnect power.

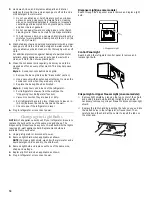
2. Remove light shield when applicable as shown. 

NOTE: To clean a light shield, wash it with warm water and a 
liquid detergent. Rinse and dry the shield well.

3. Remove light bulb and replace with one of the same size, 

shape and wattage.

4. Replace light shield when applicable as shown.

5. Plug in refrigerator or reconnect power.

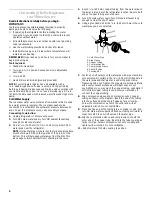
Dispenser Light (on some models)

Reach through the dispenser area to remove and replace light 
bulb.

1. Dispenser Light

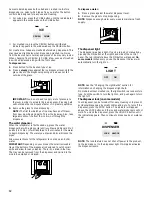
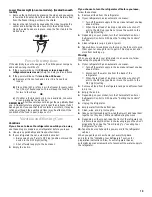
Control Panel Light 

Reach behind the refrigerator control panel to remove and 
replace light bulb.

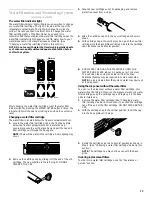
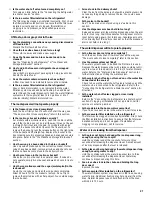
Crisper Light or Upper Freezer Light (on some models):

Remove light shield by grasping the top center of the shield 
and pulling forward while turning it slightly to one side. If 
necessary, remove top crisper drawer to access crisper light 
shield. 

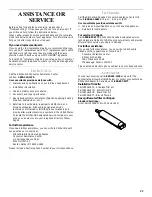
Replace the light shield by inserting the tabs on one end into 
the slotted holes in the refrigerator or freezer liner. Then, 
carefully bend the shield at the center to insert the tabs on 
the other end.

Summary of Contents for Cabinet Depth Side-by-Side Refrigerator

Page 1: ...for installation and service call 1 800 807 6777 or visit our website at www kitchenaid com or www kitchenaid com canada RÉFRIGÉRATEURCÔTEÀCÔTEÀ PROFONDEURD ARMOIRE Guided utilisationetd entretien Au Canada pour assistance composer le 1 800 461 5681 pour installation ou service le 1 800 807 6777 ou visitez notre site web à www kitchenaid com canada Table of Contents Table des matières 2 2210719 ...

Page 2: ...TION DU RÉFRIGÉRATEUR 28 Déballage de votre réfrigérateur 28 Espacement requis 28 Spécifications électriques 29 Préparation du système d eau 29 Raccordement du réfrigérateur à une canalisation d eau 30 Panneaux de porte sur commande 31 Grille de la base 32 Nivellement du réfrigérateur 32 Les bruits de l appareil que vous pouvez entendre 33 UTILISATION DU RÉFRIGÉRATEUR 34 Pour s assurer d une circu...

Page 3: ...in this manual and on your appliance Always read and obey all safety messages This is the safety alert symbol This symbol alerts you to potential hazards that can kill or hurt you and others All safety messages will follow the safety alert symbol and either the word DANGER or WARNING These words mean IMPORTANT SAFETY INSTRUCTIONS WARNING To reduce the risk of fire electric shock or injury when usi...

Page 4: ...rator opening The water hookup and electrical hookup must be placed near the bottom of the refrigerator A trim kit is available for those installations where the refrigerator will not fit flush See the Assistance or Service section for ordering information NOTE Do not install the refrigerator near an oven radiator or other heat source nor in a location where the temperature will fall below 55 F 13...

Page 5: ... desired setting WaterSystemPreparation Please read before using the water system Immediately after installation follow the steps below to make sure that the water system is properly cleaned 1 Turn off the ice maker by opening the freezer door and lifting up the wire shut off arm as shown 2 Flush the water system by dispensing and discarding 2 to 3 gallons approximately 6 to 7 minutes of water thr...

Page 6: ...k but the following procedure must be followed Drill on the top side of the pipe not the bottom This will help keep water away from the drill This also keeps normal sediment from collecting in the valve 4 Route in 6 35 mm copper tubing from the water pipe to the lower rear corner of the refrigerator location Be sure both ends of copper tubing are cut square 5 Turn OFF main water supply Turn ON nea...

Page 7: ... less than in 6 35 mm thick are not recommended Raised panels A raised panel design can be created by screwing or gluing wood panels to in 6 35 mm backing or by using in 19 05 mm stock with routed edges Raised panels should be spaced 2 in 5 70 cm from the back edge of the handle to allow room for fingers to grasp the handle Weight requirements for raised panel inserts Refrigerator door panel shoul...

Page 8: ...t of the product If your refrigerator seems unsteady or you want the doors to close easier adjust the refrigerator s tilt using the instructions below 1 Check the installation location to be sure that you have the proper clearance for the refrigerator See the Space Requirements section 2 Plug into a grounded 3 prong outlet 3 Move the refrigerator into its final position 4 Open the refrigerator and...

Page 9: ...nding SoundsYouMay Hear Your new refrigerator may make sounds that your old one didn t make Because the sounds are new to you you might be concerned about them Most of the new sounds are normal Hard surfaces like the floor walls and cabinets can make the sounds seem louder than they actually are The following describes the kinds of sounds and what may be making them If your product is equipped wit...

Page 10: ...inside your refrigerator refer to the Troubleshooting section SettingtheControls Give your refrigerator time to cool down completely before adding food It is best to wait 24 hours before you put food into the refrigerator IMPORTANT If you add food before the refrigerator has cooled completely your food may spoil Turning the Refrigerator and Freezer Controls to a cooler than recommended setting wil...

Page 11: ...h the chute When you release the dispenser lever the trap door closes and the ice dispensing stops The dispensing system will not operate when the freezer door is open CONDITION REASON RECOMMENDED ADJUSTMENT REFRIGERATOR section too warm Door opened often Large amount of food added Room temperature very warm Press the REFRIGERATOR Control arrow down to the next lower number FREEZER section too war...

Page 12: ...he water you draw and discard rinses the pipes Allow several hours for the refrigerator to cool down and chill water IMPORTANT Depending on your model the small removable tray at the bottom of the dispenser is designed to catch small spills and allow for easy cleaning There is no drain in the tray The tray can be removed from the dispenser and carried to the sink to be emptied or cleaned To dispen...

Page 13: ...d of the old cartridge The cap will slide to the left or right DO NOT DISCARD THE CAP 3 Take the new cartridge out of its packaging and remove protective cover from o rings 4 Slide the cartridge cap onto the new cartridge as shown in Step 2 5 With cartridge cap in the vertical position push the new filter cartridge into the base grille until it stops Rotate the cartridge cap clockwise to a horizon...

Page 14: ... of the shelf up until the rear shelf hooks drop into the shelf supports 3 Lower the front of the shelf and check to make sure that the shelf is securely in position Fixed Shelves on some models To remove and replace the shelf in a fixed metal frame 1 Remove the shelf by pushing up on the front of the shelf until it snaps free 2 Slide the shelf forward and lift up 3 Replace the shelf by positionin...

Page 15: ...ontrol on crisper drawer Style 1 on left Humidity Control on crisper cover Style 2 on right BeverageDrawer To remove and replace the beverage drawer 1 Remove the beverage drawer by sliding it straight out to the stop Lift up at the front and slide the beverage drawer out the rest of the way 2 Replace the beverage drawer by sliding it back in fully past the stop To remove and replace the beverage d...

Page 16: ...harp to break up the ice in the bin or bucket This can cause damage to the ice container and the dispenser mechanism 2 Wash with a mild detergent rinse well and dry thoroughly Do not use harsh or abrasive cleaners or solvents REMEMBER Allow 24 hours to produce the first batch of ice Discard the first three batches of ice produced to avoid impurities that may be flushed out of the system The qualit...

Page 17: ...he buttons on the sides of the door liner Firmly snap bracket and rail assembly onto the tabs above the shelf as shown Drop in Door Rails To remove and replace the rails 1 Remove the rails by pulling straight up on each end of the rail 2 Replace the rails by sliding the shelf rail into the slots on the door and pushing the rail straight down until it stops DoorBins Large door bins hold gallon cont...

Page 18: ...way from the wall see the Unpacking Your Refrigerator section Vacuum coils when they are dusty or dirty Roll refrigerator back into place Make sure to leave 1 in 2 5 cm between the cabinet back and the wall Check to see if the refrigerator is level 6 Plug in refrigerator or reconnect power ChangingtheLightBulbs NOTE Not all appliance bulbs will fit your refrigerator Be sure to replace the bulb wit...

Page 19: ...ow these steps 1 Remove all food from the refrigerator 2 If your refrigerator has an automatic ice maker Turn off the water supply to the ice maker at least one day ahead of time When the last load of ice drops raise the wire shut off arm to the OFF up position or move the switch to the OFF right setting 3 Depending on your model turn the Thermostat Control or Refrigerator Control to OFF See the S...

Page 20: ...ill not close completely later in this section Are the condenser coils dirty This prevents air transfer and makes the motor work harder Clean the condenser coils Refer to the Cleaning Your Refrigerator section Are the door gaskets not sealed all the way around Contact a qualified person or a technician NOTE If the problem is not due to any of the above remember that your new refrigerator will run ...

Page 21: ...he melted ice with a sharp object You could damage the ice bucket Is ice stuck in the delivery chute Clear the ice from the delivery chute with a plastic utensil Do not use anything sharp to remove the ice You could cause damage Is there ice in the bucket See The ice maker is not producing ice earlier in this section Has the dispenser arm been held in too long Release dispenser arm Ice will stop d...

Page 22: ...is humid Is the food packaged correctly Check that all food is securely wrapped Wipe off damp food containers before placing in the refrigerator Are the controls set correctly for the surrounding conditions Refer to the Setting the Controls section Was a self defrost cycle completed It is normal for droplets to form on the back wall after the refrigerator self defrosts The doors will not close com...

Page 23: ...To locate the KitchenAid designated service company in your area you can also look in your telephone directory Yellow Pages For further assistance If you need further assistance you can write to KitchenAid with any questions or concerns at KitchenAid Brand Home Appliances Consumer Assistance Center c o Correspondence Dept 2000 North M 63 Benton Harbor MI 49022 2692 Please include a daytime phone n...

Page 24: ...r is used in other than normal single family household use 3 Pickup and delivery Your refrigerator is designed to be repaired in the home 4 Damage resulting from accident alteration misuse abuse fire flood improper installation acts of God or use of products not approved by KitchenAid or KitchenAid Canada 5 Any food loss due to product failure 6 Repairs to parts or systems resulting from unauthori...

Page 25: ...25 WATERFILTERCERTIFICATIONS ...

Page 26: ...uidelines Water Supply Parameters Test requirement is 0 15 mg L 10 These contaminants are not necessarily in your water supply Performance may vary based on local water conditions NSF is a registered trademark of NSF International Substance Reduction Average Influent Maximum Effluent Average Effluent Minimum Reduction Average Reduction NSF Test Number Chlorine Taste Odor 2 0 mg L N A 0 1 mg L N A ...

Page 27: ...NT Ces mots signifient DANGER AVERTISSEMENT Assurez vous de toujours lire tous les messages de sécurité et de vous y conformer à vous et à d autres Voici le symbole d alerte de sécurité vous ne suivez pas immédiatement les instructions blessure et ce IMPORTANTES INSTRUCTIONS DE SÉCURITÉ AVERTISSEMENT l utilisation du réfrigérateur prendre quelques précautions fondamentales y compris les suivantes ...

Page 28: ...ion électrique doivent être placées près de la base du réfrigérateur Un ensemble de garniture est disponible pour les installations où le réfrigérateur ne sera pas à ras Voir la section Assistance ou Service pour des renseignements de commande REMARQUE Ne pas installer le réfrigérateur près d un four d un radiateur ou d une autre source de chaleur ni dans un endroit où la température baissera au d...

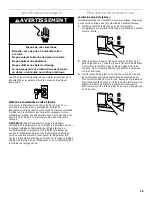
Page 29: ...u réglage désiré Préparationdusystèmed eau Veuillez lire avant l installation Immédiatement après l installation suivre les étapes ci dessous pour avoir la certitude que le système d eau est bien nettoyé 1 Arrêter la machine à glaçons en ouvrant la porte du congélateur et en soulevant le bras de commande en broche comme illustré 2 Vider le système d eau en laissant couler et en jetant 2 à 3 gallon...

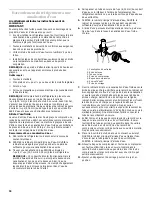
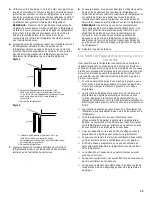
Page 30: ...ais le procédé suivant doit être suivi percer par le dessus de la canalisation et non pas par le dessous Ainsi l eau ne risquera pas d arroser la perceuse Ceci empêche également les sédiments qu on trouve normalement dans l eau de s accumuler dans le robinet d arrêt 4 Faire passer un tube en cuivre de po 6 35 mm du conduit d eau au coin inférieur à l arrière de l emplacement du réfrigérateur Veill...

Page 31: ...vous avez l intention d installer des panneaux décoratifs en bois sur commande vous devrez créer les panneaux vous même ou consulter un ébéniste ou un menuisier Voir dessins dimensionnels pour les insertions de panneaux en bois Panneaux unis Vous pouvez créer un panneau uni sur commande d un maximum de po 6 35 mm d épaisseur pour remplacer vos panneaux décoratifs Les panneaux en bois unis de moins...

Page 32: ...vant du réfrigérateur et replacer les vis Style 2 Pour enlever la grille de la base 1 Ouvrir les portes du réfrigérateur et du congélateur à 90 2 Saisir la grille avec les deux mains 3 Soulever la grille et incliner le sommet de la grille vers vous REMARQUE Ne pas enlever la fiche technique fixée derrière la grille de la base Pour replacer la grille de la base 1 Ouvrir les portes du réfrigérateur ...

Page 33: ...e pour empêcher les portes de toucher à la charnière lors de l ouverture Si vous avez un ensemble de garniture de panneau sur les portes du réfrigérateur un dégagement additionnel de po 19 05 mm est requis pour empêcher que les portes de l armoire frappent la garniture de la porte du réfrigérateur 9 Réinstaller la grille de la base Lesbruitsdel appareilquevouspouvez entendre Il est possible que le...

Page 34: ...l intérieur de votre réfrigérateur se référer à la section Dépannage Réglagedescommandes Donner au réfrigérateur le temps de se refroidir complètement avant d y ajouter des aliments Il est préférable d attendre 24 heures avant d ajouter des aliments au réfrigérateur IMPORTANT Si vous ajoutez des aliments avant que le réfrigérateur ne soit complètement refroidi les aliments pourront se gâter Tourne...

Page 35: ...rme et la distribution de glaçons s arrête Le système de distribution ne fonctionne pas lorsque la porte du congélateur est ouverte CONDITION RAISON AJUSTEMENT RECOMMANDÉ RÉFRIGÉRATEUR trop chaud Ouverture fréquente de la porte Grande quantité d aliments ajoutée Température ambiante chaude Appuyer sur la flèche de la commande du RÉFRIGÉRATEUR vers le bas jusqu au chiffre plus bas suivant CONGÉLATE...

Page 36: ... de grandes quantités de glaçons du bac à glaçons plutôt que par l entremise du distributeur Le distributeur d eau Lors du branchement initial du réfrigérateur appuyer sur la barre du distributeur d eau avec un verre ou bocal pour puiser de 2 à 3 pintes 1 9 à 2 8 L d eau qui devra être jetée Il faudra de 3 à 4 minutes pour que la distribution de l eau commence Cette eau ainsi puisée et jetée rince...

Page 37: ...plus loin dans cette section REMARQUE Ne pas utiliser avec de l eau microbiologiquement dangereuse ou de qualité inconnue sans une désinfection adéquate avant ou après le système Après avoir changé la cartouche de filtre à eau régler de nouveau le témoin lumineux de l état du filtre à eau en appuyant sur le bouton WATER FILTER filtre à eau 5 fois Le témoin lumineux de l état du filtre passera du r...

Page 38: ...bles ensemble dans le réfrigérateur et le réglage des tablettes pour convenir aux différentes hauteurs d articles vous permettra de trouver l article désiré plus facilement et réduira aussi le temps d ouverture de la porte du réfrigérateur ce qui économisera de l énergie Tablettes sur roulettes sur certains modèles Pour faire glisser la tablette vers l extérieur retirer la tablette soigneusement v...

Page 39: ...Poulet boeuf haché viandes spéciales foie etc 1 2 jours Charcuteries steaks rôtis 3 5 jours Viandes traitées 7 10 jours Restes Recouvrir les restes avec de la pellicule en plastique papier d aluminium ou utiliser des contenants en plastique avec couvercle hermétique Réglagedel humiditédanslesbacsà légumes surcertainsmodèles On peut contrôler le degré d humidité dans les bacs à légumes étanches La ...

Page 40: ...èle ne comporte pas un oeufrier ou un bac utilitaire à couvercle ranger les oeufs dans leur contenant original sur une tablette intérieure Porte cannettes bouteillesoucasierà vin Accessoiresurcertainsmodèles Pour retirer et replacer le casier à vin à gauche ou le porte cannettes bouteilles à droite 1 Enlever le porte cannettes bouteilles en le tirant tout droit vers l extérieur de la tablette 2 Re...

Page 41: ... être expulsées du système La qualité de vos glaçons dépendra de la qualité de l eau fournie à votre machine à glaçons Éviter de brancher la machine à glaçons à un approvisionnement d eau adoucie Les produits chimiques adoucisseurs d eau tels que le sel peuvent endommager les pièces de la machine à glaçons et fournir des glaçons de qualité médiocre Si un approvisionnement d eau adoucie ne peut pas...

Page 42: ...t et retirer de chaque côté de la languette interne Répéter ces étapes pour l autre extrémité de la tringle 2 Replacer les tringles en alignant les extrémités de la tringle avec les boutons sur les côtés de la surface interne de la porte Enclencher fermement le montage du crochet et de la tringle dans les languettes au dessus de la tablette tel qu indiqué Tringles déposées dans la porte Pour retir...

Page 43: ...ait aider à économiser de l énergie Style 1 Serpentins du condenseur derrière la grille de la base Ôter la grille de la base voir la section Grille de la base Employer un aspirateur avec un accessoire long pour nettoyer les serpentins du condenseur lorsqu ils sont sales ou poussiéreux Replacer la grille de la base Style 2 Serpentins du condenseur à l arrière du réfrigérateur Éloigner le réfrigérat...

Page 44: ...liments congelés durant deux à quatre jours OU c S il n y a pas d entrepôt frigorifique ni de neige carbonique consommer ou mettre immédiatement en conserve les aliments périssables NOTER Un congélateur plein restera froid plus longtemps qu un congélateur partiellement rempli Un congélateur plein de viandes demeure froid plus longtemps qu un congélateur rempli de pains et de pâtisseries Si les ali...

Page 45: ...rement un programme automatique de dégivrage Les ampoules n éclairent pas Le cordon d alimentation électrique est il débranché Brancher sur une prise à 3 alvéoles reliée à la terre Une ampoule d éclairage est elle desserrée dans la douille Tourner le réglage du réfrigérateur ou du congélateur à OFF arrêt Débrancher le réfrigérateur de la source d alimentation électrique Enlever délicatement l ampo...

Page 46: ...ment du réfrigérateur à une canalisation d eau REMARQUE Si cette situation n est pas attribuable à ce qui précède il peut exister un problème avec la canalisation d eau Faire un appel de service La machine à glaçons produit trop peu de glaçons La machine à glaçons vient elle juste d être installée Attendre 72 heures pour le commencement de la production complète de glaçons Une fois que le réfrigér...

Page 47: ...eau a besoin d être rempli la première fois qu il est utilisé Abaisser la barre de distribution avec un grand contenant jusqu au retrait de 2 ou 3 gallons 8 12 L d eau Jeter l eau et se référer à la section Distributeur d eau et de glaçons Le robinet de fermeture d eau est il ouvert ou la canalisation d eau est elle raccordée à la source Vérifier pour s assurer que le robinet d arrêt d eau est ouv...

Page 48: ...age des commandes Un programme autodégivreur vient il de se terminer Il est normal que des gouttelettes se forment sur la paroi arrière après que le réfrigérateur se dégivre automatiquement Les portes ne se ferment pas complètement Les emballages d aliments empêchent ils la porte de fermer Réorganiser les contenants de sorte qu ils soient plus rapprochés et prennent moins d espace Le bac à glaçons...

Page 49: ...vice après la garantie partout aux États Unis Pour localiser la compagnie de service KitchenAid autorisée dans votre région vous pouvez consulter les pages jaunes de votre annuaire téléphonique Pour plus d assistance Si vous avez besoin de plus d assistance vous pouvez écrire à KitchenAid en soumettant toute question ou problème à KitchenAid Brand Home Appliances Consumer Assistance Center c o Cor...

Page 50: ... 2 Les réparations lorsque le réfrigérateur est utilisé à des fins autres qu un usage unifamilial normal 3 La prise en charge et la livraison du réfrigérateur Le réfrigérateur est conçu pour être réparé à domicile 4 Les dommages causés par accident modification mésusage abus incendie inondation mauvaise installation actes de Dieu ou l utilisation de produits non approuvés par KitchenAid Canada 5 T...

Page 51: ...imitée du fabricant Directives d application Paramètres d approvisionnement en eau L exigence de test est de 0 15 mg L 10 Ces contaminants ne sont pas nécessairement dans votre approvisionnement d eau Le rendement peut varier d après les conditions locales de l eau NSF est une marque de commerce déposée de NSF International Réduction de substances Affluent moyen Effluent max Effluent moyen de réd ...

Page 52: ...tered Trademark TM Trademark of KitchenAid U S A KitchenAid Canada licensee in Canada Printed in U S A Tous droits réservés Marque déposée de KitchenAid Marque de Commerce de KitchenAid U S A Emploi licencié par KitchenAid Canada Imprimé aux É U ...

Reviews: