background image

7

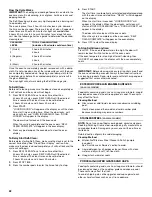
COOKTOP USE

Cooktop Controls

IMPORTANT: Your cooktop is factory-set for use with Natural 
gas. If you wish to use LP Gas, an LP Gas Conversion Kit is 
included with your new range. Models with the TripleTier

®

 Flame 

Burner will include a TripleTier

®

 LP Gas Conversion Kit and a kit 

for standard ranges. See “Installation Instructions” for details on 
making this conversion.

Electric igniters automatically light the surface burners when 
control knobs are turned to LITE.

Before setting a control knob, place filled cookware on the grate. 
Do not operate a burner while using empty cookware or without 
any cookware on the grate.

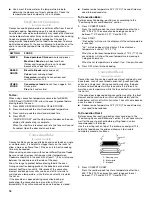
NOTE: Visually check that the burner has lit. If the burner does 
not ignite, listen for the clicking sound. If you do not hear the 
igniter click, turn the burner off. Check for a tripped circuit 
breaker or blown fuse.

Check that the control knob is pressed completely down on the 
valve shaft. If the spark igniter still does not operate, call a trained 
repair specialist.

Proper grounding and polarity are necessary for correct operation 
of the electric ignition system. If the wall receptacle does not 
provide correct polarity, the igniters will become grounded and 
occasionally click, even after the burner has ignited. Contact a 
trained repair specialist to check the wall receptacle to see 
whether it is wired with the correct polarity.  

Power failure

In case of prolonged power failure, the surface burners can be lit 
manually. Hold a lit match near a burner and turn knob 
counterclockwise to LITE. After burner lights, turn knob to 
setting.

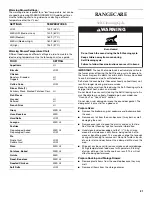
TripleTier

®

 Burner with High Power Settings and Low 

Simmer Settings (on some models)

NOTE: Settings are marked on the control knob.

The TripleTier

®

 Flame Burner (15,000 Btu/h [British Thermal 

Units]) can provide the highest heat setting and 3 levels of 
simmer control. It is ideal for cooking large quantities of food or 
liquid and using large pots and pans.

High Power Settings

To Set:

1. Push in and turn knob counterclockwise to LITE.

All surface burners will click. Only the simmer burner with the 
control knob turned to Lite will produce a flame.

2. Push in and turn knob counterclockwise to POWER BURNER 

HI. All 3 burner rings will produce a flame. 

3. Turn knob anywhere between POWER BURNER HI and 

POWER BURNER LO.

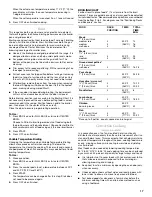
Use the following chart as a guide when setting Power Burner 
heat levels.

Simmer Settings

1. Push in and turn knob counterclockwise to LITE.

All surface burners will click. Only the simmer burner with the 
control knob turned to Lite will produce a flame.

2. Push in and turn knob counterclockwise anywhere between 

SIMMER BURNER HI and SIMMER BURNER LO.

WARNING

Fire Hazard

Do not let the burner flame extend beyond the edge of
the pan.

Turn off all controls when not cooking.

Failure to follow these instructions can result in death
or fire.

REMEMBER: When range is in use or (on some models) 
during the Self-Cleaning cycle, the entire cooktop area may 
become hot.

HIGH POWER 
SETTING

RECOMMENDED USE

HI

Start food cooking.

Bring liquid to a boil.

Wok cooking.

MED
(Medium)

Maintain a slow boil.

Fry poultry or meat.

Cook pudding, sauce, icing or 
gravy.

LO

Fry or sauté foods.

Hold a slow boil.

S

IM

M
E

R

B

U

R

N

E

R

PO

WE

RB

UR

N

E

R

Hi

Med

Lo

Hi

Med

Lo

Lite

OFF

Summary of Contents for ARCHITECT KGSS907

Page 1: ...0 or visit our website at www kitchenaid com In Canada call for assistance installation and service call 1 800 807 6777 or visit our website at www KitchenAid ca CUISINIÈRE ÀGAZ ARCHITECT SÉRIEII Guided utilisationetd entretien Au Canada pour assistance installation ou service composez le 1 800 807 6777 ou visitez notre site web à www KitchenAid ca Table of Contents Table des matières 2 ...

Page 2: ...0 PIÈCES ET CARACTÉRISTIQUES 31 UTILISATION DE LA TABLE DE CUISSON 33 Commandes de la table de cuisson 33 Brûleur TripleTier avec grille InstaWok 34 Brûleurs de surface scellés 35 Ustensiles de cuisson 36 Préparation de conserves à la maison 36 COMMANDE ÉLECTRONIQUE TACTILE DU FOUR 37 Touches de commande électroniques 37 Afficheurs du four 37 Start mise en marche 38 Control Lock verrouillage des c...

Page 3: ...l injury or death Do not store or use gasoline or other flammable vapors and liquids in the vicinity of this or any other appliance WHAT TO DO IF YOU SMELL GAS Do not try to light any appliance Do not touch any electrical switch Do not use any phone in your building Immediately call your gas supplier from a neighbor s phone Follow the gas supplier s instructions If you cannot reach your gas suppli...

Page 4: ...ottom or cover an entire rack with materials such as aluminum foil Doing so blocks air flow through the oven and may cause carbon monoxide poisoning Aluminum foil linings may also trap heat causing a fire hazard CAUTION Do not store items of interest to children in cabinets above a range or on the backguard of a range children climbing on the range to reach items could be seriously injured Proper ...

Page 5: ...ob 6000 Btu h D Left front dual valve TripleTier flame burner knob 15 000 Btu h E Electronic oven control F Right front control knob 6000 Btu h G Right rear control knob 12 500 Btu h A Surface burner locator B Oven display C Left rear control knob 6000 Btu h D Left front control knob 14 000 Btu h E Electronic oven control F Right front control knob 6000 Btu h G Right rear control knob 12 500 Btu h...

Page 6: ...rface burner G Oven vent H Standard grate I Right rear surface burner J Right front surface burner K Control panel L Automatic oven light switch self clean latch M Door gasket N Model and serial number plate O Oven door window Parts and Features not shown on some models Broiler pan and grid Temperature probe A B C D E F G I H J K M L N O A Oven lights B Broil burner C Broil element D Oven cavity s...

Page 7: ...LITE After burner lights turn knob to setting TripleTier Burner with High Power Settings and Low Simmer Settings on some models NOTE Settings are marked on the control knob The TripleTier Flame Burner 15 000 Btu h British Thermal Units can provide the highest heat setting and 3 levels of simmer control It is ideal for cooking large quantities of food or liquid and using large pots and pans High Po...

Page 8: ...ner that produces everything from a rapid boil down to a low simmer The TripleTier Flame Burner with InstaWok Grate is functioned by a dual valve control knob which controls 2 separate burners See TripleTier Burner with High Power Burner and Low Power Simmer Settings section The InstaWok Grate supports 12 to 14 30 5 cm to 35 6 cm Wok pans and can be flipped over to become a flat grate for use with...

Page 9: ...opening for the burner to light properly Keep this area free of soil and do not allow spills food cleaning agents or any other material to enter the gas tube opening Protect it from spillovers by always using a burner cap Burner ports Check burner flames occasionally for proper size and shape as shown below A good flame is blue in color not yellow Keep this area free of soil and do not allow spill...

Page 10: ...evenly heat is transferred which affects cooking results A nonstick finish has the same characteristics as its base material For example aluminum cookware with a nonstick finish will take on the properties of aluminum Cookware with nonstick surfaces should not be used under the broiler Use the following chart as a guide for cookware material characteristics HomeCanning When canning for long period...

Page 11: ...splay an invalid pad was pressed Press OFF and retry your entry When the oven is not in use this display is blank except for clock display A EasyConvect conversion B Convection oven settings C Oven settings D Proof bread setting E Oven display F Clock time of day display G Number pads H Start control lock I Off J Options selection pad K Clock set start L Timer M Stop time N Cook time length of coo...

Page 12: ...mer completion tones will sound then reminder tones will sound approximately every 10 seconds 4 Press TIMER OFF anytime to cancel the Timer and or stop reminder tones If OFF is pressed the oven will turn off The time can be reset during the countdown by repeating the above steps OPTIONS OptionsSelectionPad The OPTIONS selection pad allows you to access special functions within the Electronic Oven ...

Page 13: ...er by the displayed amount The absence of a sign means the oven will be warmer by the displayed amount Use the following chart as a guide To Adjust Oven Temperature Calibration 1 Press OPTIONS and then 6 to set the calibration 2 Press 3 to increase the temperature or press 6 to decrease the temperature 3 Press START to end calibration SabbathMode Option7 The Sabbath Mode sets the oven to remain on...

Page 14: ... WARMING DRAWER ON key continue pressing until desired temperature level is displayed before the oven is placed into its Sabbath Mode compliant state See To Regularly Set Untimed section for instructions on placing the oven into its Sabbath Mode compliant state Once the oven is in its Sabbath Mode compliant state the warming drawer cannot be turned on or off and its temperature cannot be changed u...

Page 15: ...oven and connect the temperature probe to the jack Keep probe as far away from heat source as possible Close oven door 1 Press the number pads to enter a probe temperature The probe temperature can be set between 130 F and 190 F 54 C and 88 C 2 Press BAKE CONVECT BAKE or CONVECT ROAST Press number pads to enter a temperature other than the one displayed 3 Press START The set oven temperature will ...

Page 16: ... following chart as a guide Bake The BAKE function is ideal for baking roasting or heating foods During baking or roasting the bake burner and broil element will cycle on and off in intervals to maintain oven temperature If the oven door is opened during baking or roasting the broil element will turn off immediately and the bake burner will turn off in 30 seconds to 2 minutes They will come back o...

Page 17: ...ise control when cooking The lower the temperature the slower the cooking Thicker cuts and unevenly shaped pieces of meat fish and poultry may cook better at lower broiling temperatures To Use 1 Close oven door 2 Press BROIL once for FULL BROIL or twice for CENTER BROIL 3 Press the number pads to set a temperature between 300 F and 500 F 149 C and 260 C 4 Press START The temperature can be changed...

Page 18: ... 25 F 14 C The cook time may need to be reduced also To Convection Bake Before convection baking position racks according to the Positioning Racks and Bakeware section 1 Press CONVECT BAKE Press the number pads to enter a temperature other than 325 F 163 C The convection bake range can be set between 170 F and 500 F 77 C and 260 C 2 Press START Preheating will show in the display until the set tem...

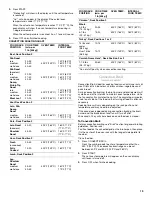
Page 19: ... BROIL Press the number pads to enter a temperature other than 450 F 232 C The convection broil range can be set between 300 F and 500 F 149 C and 260 C 2 Press START The set oven temperature will appear on the oven display until oven is turned off 3 Press OFF when finished cooking FOOD RACK POSITION COOK TIME min per 1 lb 454 g OVEN TEMP INTERNAL FOOD TEMP Beef Rack Position 2 Rib Roast rare medi...

Page 20: ...her than the one displayed 2 Press COOK TIME 3 Press number pads to enter the length of time to cook 4 Press STOP TIME 5 Press the number pads to enter time of day to stop 6 Press START The start time is automatically calculated and displayed DELAY and the stop time will also appear on the oven display When the start time is reached the oven will automatically turn on The cook time countdown will ...

Page 21: ... them shiny and easy to slide See General Cleaning section for more information Hand clean inside door edge and the 1 3 8 cm area around the inside oven cavity frame being certain not to move or bend the gasket This area does not get hot enough during self cleaning to remove soil Do not let water cleaner etc enter slots on door frame Use a damp cloth to clean this area Wipe out any loose soil to r...

Page 22: ... START The start time is automatically calculated and displayed along with the clean time and stop time DELAY will also appear on the display When the start time is reached LOCKING DOOR will appear in the display When the door locks self clean will start and OVEN IS CLEANING then DOOR LOCKED will appear in the display The door will not unlock until the oven cools When the cycle is complete and the...

Page 23: ...Cycle first Remove racks or they will discolor and become harder to slide If this happens a light coating of vegetable oil applied to the rack guides will help them slide Steel wool pad BROILER PAN AND GRID Do not clean in the Self Cleaning cycle Cleaning Method Mildly abrasive cleanser Scrub with wet scouring pad Solution of cup 125 mL ammonia to 1 gal 3 75 L water Soak for 20 minutes then scrub ...

Page 24: ...llation procedures StorageDrawer The storage drawer can be removed Before removing make sure drawer is cool and empty To Remove 1 Pull drawer straight out to the first stop 2 Lift up the back of the drawer and pull out To Replace 1 Fit the ends of the drawer rails into the guides in the cavity 2 Slide the drawer closed WarmingDrawer onsomemodels Remove all items from inside the warming drawer and ...

Page 25: ...inuous sparking but the burner does not light Discontinue use of the surface burner and contact a service technician Excessive heat around cookware on cooktop Is the cookware the proper size Use cookware about the same size as the surface cooking area element or surface burner Cookware should not extend more than 1 25 cm outside the cooking area Cooktop cooking results not what expected Is the pro...

Page 26: ...ee Self Cleaning Cycle section Has a delay start been set See Timed Cooking section Oven cooking results not what expected Is the appliance level Level the appliance See the Installation Instructions Is the proper temperature set Double check the recipe in a reliable cookbook Is the proper oven temperature calibration set See Oven Temperature Calibration section Was the oven preheated See Bake Bro...

Page 27: ...ith any questions or concerns at KitchenAid Brand Home Appliances Customer eXperience Center 553 Benson Road Benton Harbor MI 49022 2692 Please include a daytime phone number in your correspondence Accessories U S A To order accessories call the KitchenAid Customer eXperience Center toll free at 1 800 442 9991 and follow the menu prompts Or visit our website at www kitchenaid com and click on Shop...

Page 28: ...pliance if it is installed in an inaccessible location or is not installed in accordance with published installation instructions DISCLAIMER OF IMPLIED WARRANTIES LIMITATION OF REMEDIES CUSTOMER S SOLE AND EXCLUSIVE REMEDY UNDER THIS LIMITED WARRANTY SHALL BE PRODUCT REPAIR AS PROVIDED HEREIN IMPLIED WARRANTIES INCLUDING WARRANTIES OF MERCHANTABILITY OR FITNESS FOR A PARTICULAR PURPOSE ARE LIMITED...

Page 29: ...ures graves à vous et à d autres Tous les messages de sécurité suivront le symbole d alerte de sécurité et le mot DANGER ou AVERTISSEMENT Ces mots signifient AVERTISSEMENT Pour votre sécurité les renseignements dans ce manuel doivent être observés pour réduire au minimum les risques d incendie ou d explosion ou pour éviter des dommages au produit des blessures ou un décès Ne pas entreposer ni util...

Page 30: ...ous ou passages d air au fond du four ou couvrir entièrement une grille avec des matériaux tels que du papier d aluminium Le non respect de cette instruction empêche la circulation de l air dans le four et peut entraîner une intoxication au monoxyde de carbone Les feuilles de papier d aluminium peuvent également retenir la chaleur et créer un risque d incendie MISE EN GARDE Ne pas remiser dans des...

Page 31: ...mmande arrière gauche 6 000 BTU h D Bouton de commande du brûleur TripleTier avant gauche à double valve 15 000 BTU h E Commande électronique du four F Bouton de commande avant droit 6 000 BTU h G Bouton de commande arrière droit 12 500 BTU h A Repère de brûleur de surface B Afficheur du four C Bouton de commande arrière gauche 6 000 BTU h D Bouton de commande avant gauche 14 000 BTU h E Commande ...

Page 32: ...rd I Brûleur de surface arrière droit J Brûleur de surface avant droit K Tableau de commande L Interrupteur automatique de la lampe du four loquet d autonettoyage M Joint d étanchéité de la porte N Plaque signalétique des numéros de modèle et de série O Hublot de la porte du four Pièces et caractéristiques non illustrées sur certains modèles Lèchefrite et grille Sonde thermométrique A B C D E F G ...

Page 33: ...ace Tenir une allumette allumée près d un brûleur et tourner le bouton dans le sens antihoraire à LITE Une fois le brûleur allumé tourner le bouton au réglage Brûleur TripleTier avec réglages à haute puissance et réglages de mijotage à basse puissance sur certains modèles REMARQUE Les réglages sont indiqués sur le bouton de commande Le brûleur TripleTier 15 000 BTU h unités thermales britanniques ...

Page 34: ...des niveaux de chaleur BrûleurTripleTier avecgrilleInstaWok Le brûleur TripleTier avec grille InstaWok est un brûleur multifonctions permettant d exécuter différentes fonctions de l ébullition rapide au mijotage à faible puissance Le brûleur TripleTier avec grille InstaWok fonctionne avec un bouton de commande à double valve qui commande 2 brûleurs séparés Voir Brûleur TripleTier avec brûleur haut...

Page 35: ...que le gaz puisse passer librement à travers l orifice Garder cette zone propre et ne pas laisser les produits renversés les aliments les agents de nettoyage ou tout autre produit pénétrer dans l ouverture du tube d arrivée de gaz La protéger contre les renversements en utilisant toujours un chapeau de brûleur Orifices de brûleur Examiner occasionnellement les flammes des brûleurs pour en vérifier...

Page 36: ... la transmission de la chaleur et contribue aux résultats de cuisson Un fini antiadhésif a les mêmes caractéristiques que son matériau de base Par exemple un ustensile de cuisson en aluminium avec un fini antiadhésif aura les propriétés de l aluminium Les ustensiles de cuisson avec surface antiadhésive ne doivent pas être utilisés sous le gril Utiliser le tableau suivant comme guide pour les carac...

Page 37: ...ppuyé sur la mauvaise touche Appuyer sur OFF arrêt puis recommencer Lorsque le four n est pas utilisé cet affichage est vierge sauf pour l affichage de l horloge A Conversion EasyConvect B Réglages du four à convection C Réglages du four D Réglage de la levée du pain E Afficheur du four F Afficheur horloge heure G Touches numériques H Mise en marche verrouillage des commandes I Off arrêt J Touche ...

Page 38: ...RQUE La minuterie ne met pas en marche le four et ne l éteint pas Réglage de la minuterie 1 Appuyer sur TIMER SET START réglage mise en marche de la minuterie Appuyer à nouveau pour passer des MIN SEC aux HR MIN 2 Appuyer sur les touches numériques pour régler la durée 3 Appuyer sur TIMER SET START réglage mise en marche de la minuterie pour mettre la minuterie en marche À la fin de la durée réglé...

Page 39: ...marche Calibragedelatempératuredufour Option6 IMPORTANT Ne pas utiliser de thermomètre pour mesurer la température du four car l ouverture de la porte du four peut provoquer des lectures incorrectes Le four fournit des températures précises toutefois il peut cuire plus rapidement ou plus lentement que votre ancien four de sorte que le calibrage de la température peut être ajusté Il peut être chang...

Page 40: ...uyer sur START mise en marche Fonctionnement du tiroir réchaud pendant le mode Sabbat Le tiroir réchaud peut être utilisé pendant le mode Sabbat Ceci peut s effectuer en appuyant sur la touche WARMING DRAWER ON appui continu jusqu à ce que la température désirée s affiche avant que le four soit réglé au mode Sabbat Voir la section Réglage normal non minuté pour des instructions sur le réglage du f...

Page 41: ... la sonde thermométrique à la prise Garder autant que possible la sonde loin d une source de chaleur Fermer la porte du four 1 Appuyer sur les touches numériques pour régler la température de la sonde La température de la sonde peut être réglée entre 130 F et 190 F 54 C et 88 C 2 Appuyer sur BAKE cuisson au four CONVECT BAKE cuisson au four par convection ou CONVECT ROAST rôtissage par convection ...

Page 42: ...acer d aliments ou d ustensiles de cuisson directement sur la porte ou le fond du four GRILLES REMARQUES Placer les grilles avant d allumer le four Ne pas installer les grilles lorsque des ustensiles de cuisson se trouvent dessus S assurer que les grilles sont d aplomb Pour déplacer une grille la tirer jusqu à la butée d arrêt soulever le rebord avant et la tirer pour la sortir du four Se servir d...

Page 43: ...coulement approprié ne pas couvrir la grille de papier d aluminium Le fond de la lèchefrite peut être garni de papier d aluminium pour en faciliter le nettoyage Enlever l excès de gras pour réduire les éclaboussures Entailler le gras résiduel sur les côtés pour éviter le cintrage de la viande Sortir la grille jusqu à la butée d arrêt avant de tourner ou d enlever les aliments Utiliser des pinces p...

Page 44: ... catégorie choisie la conversion EasyConvect peut réduire automatiquement la température standard de la recette et ou la durée réglée pour la cuisson par convection Les aliments sont groupés dans 3 catégories générales Choisir la catégorie la plus appropriée pour l aliment à faire cuire Afin d assurer des résultats de cuisson optimaux le four incitera à faire la vérification des aliments à la fin ...

Page 45: ...que les augmentations de température par tranches de 1 Lorsque la température réglée est atteinte un signal sonore se fait entendre si activé 3 Appuyer sur OFF arrêt lorsque la cuisson est terminée Rôtissageparconvection surcertainsmodèles Le rôtissage par convection peut être utilisé pour rôtir la viande et la volaille faire cuire des aliments tels pains à la levure tartes pain et gâteaux Bundt s...

Page 46: ...isson au gril par convection peut être réglée entre 300 F et 500 F 149 C et 260 C 2 Appuyer sur START mise en marche La température réglée du four apparaît sur l afficheur du four jusqu à ce que le four soit éteint 3 Appuyer sur OFF arrêt lorsque la cuisson est terminée ALIMENT POSITION DE LA GRILLE DURÉE DE CUISSON en minutes lb 454g TEMP DU FOUR TEMP INTERNE DE L ALIMENT Boeuf position de grille...

Page 47: ...ise en marche Sur certains modèles l heure de mise en marche l heure d arrêt le compte à rebours de la durée de cuisson en minutes apparaîtront sur l afficheur du four Lorsque l heure d arrêt est atteinte le four s arrête automatiquement et End fin apparaît sur l afficheur du four Réglage de la durée de cuisson et de l heure d arrêt mise en marche différée Avant le réglage s assurer que l horloge ...

Page 48: ... OFF arrêt du tiroir réchaud après avoir terminé Réglages du tiroir réchaud Le tiroir réchaud est préréglé à une température basse mais peut être modifié en appuyant sur WARMING DRAWER ON plusieurs fois Utiliser le tableau suivant comme guide lors de la sélection d une température autre que Low bas Tableau des températures du tiroir réchaud Différents aliments nécessitent différents réglages pour ...

Page 49: ...ctionne le programme IMPORTANT Le chauffage et le refroidissement de la porcelaine sur l acier dans le four peuvent causer une décoloration une perte de fini luisant des fissures minuscules et des craquements Le programme d autonettoyage utilise des températures très élevées brûlant les saletés pour les réduire en cendre Le four est préréglé pour un programme d autonettoyage de 2 h 30 mais la duré...

Page 50: ... dès que l appareil a refroidi Ces renversements peuvent affecter le fini Méthode de nettoyage Nettoyant à vitre nettoyant doux liquide ou tampon à récurer non abrasif Nettoyer doucement autour de la plaque signalétique des numéros de modèle et de série car le frottement pourrait en effacer les chiffres ACIER INOXYDABLE sur certains modèles REMARQUE Ne pas utiliser de tampons à récurer savonneux d...

Page 51: ...ROIR DE REMISAGE sur certains modèles S assurer que le tiroir est froid et vide avant le nettoyage Pour plus de renseignements voir la section Tiroir de remisage Méthode de nettoyage Détergent doux TIROIR RÉCHAUD sur certains modèles S assurer que le tiroir est froid Méthode de nettoyage Détergent doux pour les deux Nettoyant et poli pour acier inoxydable KitchenAid échantillon inclus Voir la sect...

Page 52: ...e butée d arrêt 2 Soulever l arrière du tiroir et retirer Réinstallation 1 Insérer les extrémités des rails du tiroir dans les creux dans la cavité 2 Glisser le tiroir jusqu au bout Tiroir réchaud surcertainsmodèles Retirer tous les articles de l intérieur du tiroir réchaud et laisser l appareil refroidir complètement avant d essayer d enlever le tiroir Pour enlever 1 Ouvrir le tiroir complètement...

Page 53: ...u le brûleur de surface L ustensile de cuisson ne doit pas dépasser de plus de 1 3 cm de la surface de cuisson Les résultats de cuisson sur la table de cuisson ne sont pas les résultats prévus Utilise t on un ustensile de cuisson approprié Voir la section Ustensiles de cuisson Le bouton de commande est il réglé au niveau approprié de chaleur Voir la section Commandes de la table de cuisson L appar...

Page 54: ...ut nécessiter des durées de cuisson plus longues Les articles cuits au four ont ils trop bruni à la base Baisser la température du four de 15 F à 25 F 5 C à 15 C ou déplacer la grille à une position plus élevée dans le four Les bords des croûtes de tarte ont ils bruni trop tôt Utiliser du papier d aluminium pour couvrir le bord de la croûte et ou réduire la température de cuisson ASSISTANCE OU SER...

Page 55: ...areil si celui ci est installé dans un endroit inaccessible ou n est pas installé conformément aux instructions d installation fournies CLAUSE D EXONÉRATION DE RESPONSABILITÉ AU TITRE DES GARANTIES IMPLICITES LIMITATION DES RECOURS LE SEUL ET EXCLUSIF RECOURS DU CLIENT DANS LE CADRE DE LA PRÉSENTE GARANTIE LIMITÉE CONSISTE EN LA RÉPARATION PRÉVUE CI DESSUS LES GARANTIES IMPLICITES Y COMPRIS LES GA...

Page 56: ...s réservés Registered Trademark TM Trademark of KitchenAid U S A KitchenAid Canada licensee in Canada Marque déposée TM Marque de commerce de KitchenAid U S A Emploi licencié par KitchenAid Canada au Canada 5 06 Printed in U S A Imprimé aux É U ...

Reviews: