background image

7

English

SETTING UP YOUR STAND MIXER

SETTING UP YOUR STAND MIXER

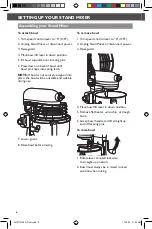
To lower bowl
1. Rotate lever back and down. 
To attach flat beater, wire whip,  

or dough hook
1. Turn speed control lever to “0” (OFF).
2.  Unplug Stand Mixer or disconnect power.
3. Raise guard. 
4.  Slip flat beater  

on beater shaft  

and press upward  

as far as possible.

5.  Turn beater to right, hooking beater 

over the pin on shaft.

To remove flat beater, wire whip,  

or dough hook
1. Turn speed control lever to “0” (OFF).
2.  Unplug Stand Mixer or disconnect  

power.

3. Raise guard.
4.  Press beater upward as far as possible  

and turn left.

5. Pull beater from beater shaft.
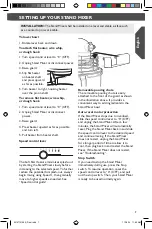
Speed control lever 

INSTALLATION: The Stand Mixer shall be installed on a level and stable surface such  

as a countertop or work table.

The Soft Start feature minimizes splash-out 

by starting the Stand Mixer slowly before 

increasing to the selected speed. To further 

reduce the potential for splash-out, always 

begin mixing using Speed 1, then gradually 

move to higher speeds as needed. See 

“Speed control guide”.

Removable pouring chute 

The removable pouring chute is easily 

attached to the front of the guard as shown 

in the illustration above. It provides a 

convenient way to add ingredients to the 

Stand Mixer bowl.
Auto-reset motor protection 

If the Stand Mixer stops due to overload, 

slide the speed control lever to “0” (OFF) 

and unplug the Stand Mixer. After a few 

minutes, the Stand Mixer will automatically 

reset. Plug the Stand Mixer back in and slide 

the speed control lever to the desired speed 

and continue mixing. If the Stand Mixer 

does not restart, unplug the Stand Mixer 

for a longer period of time to allow it to 

cool, then plug back in and restart the Stand 

Mixer. If the Stand Mixer does not restart, 

see “Troubleshooting”.
Stop Switch 

If you need to stop the Stand Mixer 

immediately during use, press the Stop 

switch. To resume operation, reset the 

speed control lever to “0” (OFF), and pull 

out the stop switch. Then, your Stand Mixer 

is ready to be used normally again.

W10712126A_Final.indd   7

11/18/14   11:42 AM

Summary of Contents for 5KSM180CBALD

Page 1: ...5KSMC895 Instructions W10712126A_Final indd 1 11 18 14 11 42 AM ...

Page 2: ...ling your Stand Mixer 6 Adjusting your beater to bowl clearance 8 USING YOUR STAND MIXER Using your KitchenAid accessories 8 Speed control guide 10 speed Stand Mixers 9 TIPS FOR GREAT RESULTS Planetary mixing action 10 Mixing time 10 Mixer use 10 Mixing tips 10 CARE AND CLEANING 11 TROUBLESHOOTING 11 TABLE OF CONTENTS S W10712126A_Final indd 2 11 18 14 11 42 AM ...

Page 3: ... understand hazards involved Children shall not play with the appliance Cleaning and user maintenance shall not be made by children without supervision 4 Unplug Stand Mixer from outlet when not in use before putting on or taking off parts and before cleaning 5 Avoid contact with moving parts Keep hands hair clothing as well as spatulas and other utensils away from beater during operation to reduce...

Page 4: ...xtension cord If the power supply cord is too short have a qualified electrician or serviceman install an outlet near the appliance The wattage rating is determined by using the attachment that draws the greatest load power Other recommended attachments may draw significantly less power This product is supplied with a Y type power cord If the power cord is damaged it must be replaced by the manufa...

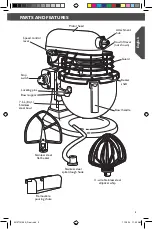
Page 5: ...aft 11 wire Stainless steel elliptical whip 7 6 L 8 qt Stainless steel bowl Stainless steel spiral dough hook Removable pouring chute Stainless steel flat beater Locating pins Bowl support Motor head Bowl handle Stop switch Guard Attachment hub W10712126A_Final indd 5 11 18 14 11 42 AM ...

Page 6: ...rely snapped into place the bowl will be unstable and wobble during use 7 Lower guard 8 Raise bowl before mixing To remove bowl 1 Turn speed control lever to 0 OFF 2 Unplug Stand Mixer or disconnect power 3 Raise guard 4 Place bowl lift lever in down position 5 Remove flat beater wire whip or dough hook 6 Grasp bowl handle and lift straight up and off locating pins To raise bowl 1 Rotate lever cou...

Page 7: ... mixing using Speed 1 then gradually move to higher speeds as needed See Speed control guide Removable pouring chute The removable pouring chute is easily attached to the front of the guard as shown in the illustration above It provides a convenient way to add ingredients to the Stand Mixer bowl Auto reset motor protection If the Stand Mixer stops due to overload slide the speed control lever to 0...

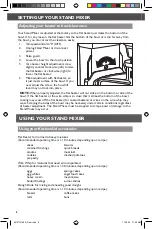
Page 8: ... or is too far away from the bowl you can correct the clearance easily 1 T urn speed control to 0 OFF 2 Unplug Stand Mixer or disconnect power 3 Raise guard 4 Lower the bowl to the down position 5 Turn beater height adjustment screw slightly counter clockwise left to raise the flat beater or clockwise right to lower the flat beater 6 Make adjustment with flat beater so it just clears surface of th...

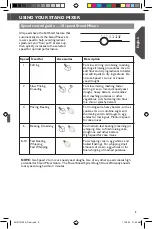
Page 9: ...speed for cake mixes 6 Beating Creaming For medium fast beating creaming or whipping Use to finish mixing cake doughnut and other batters High speed for cake mixes 8 10 Fast Beating For whipping cream egg whites and Whipping boiled frostings For whipping small Fast Whipping amounts of cream egg whites or for final whipping of mashed potatoes All speeds have the Soft Start feature that automaticall...

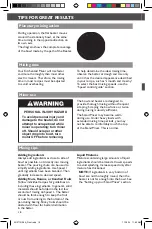
Page 10: ... to avoid overbeating The bowl and beater are designed to provide thorough mixing without frequent scraping Scraping the bowl once or twice during mixing is usually sufficient The Stand Mixer may become warm during use Under heavy loads with extended mixing time periods you may not be able to comfortably touch the top of the Stand Mixer This is normal PERSONAL INJURY HAZARD To avoid personal injur...

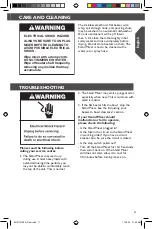
Page 11: ... The Stand Mixer may warm up during use Under heavy loads with extended mixing time periods you may not be able to comfortably touch the top of the unit This is normal 2 The Stand Mixer may emit a pungent odor especially when new This is common with electric motors 3 If the flat beater hits the bowl stop the Stand Mixer See the Adjusting your beater to bowl clearance section If your Stand Mixer sh...

Page 12: ...W10712126A 11 14 2014 All rights reserved Specifications subject to change without notice W10712126A_Final indd 12 11 18 14 11 42 AM ...

Reviews: