background image

12

CUSTOMER SERVICE

In Australia:

For any questions, or to find the nearest Authorised KitchenAid Service Centre, 

please find our contact details below.

NOTE:

 All service should be handled locally by an Authorised KitchenAid Service 

Centre.

Toll free number:

 1-800-990-990  

Phone number:

 02 49026500

Address Australia:


KitchenAid Australia Pty Ltd  

6-8 Billbrooke Close  

Cameron Park NSW 2285, Australia  

Phone: 1-800-990-990  

Mobile: 0249026500  

Email: [email protected]

In New Zealand:

Website: 

www.kitchenaid.co.nz


Email: [email protected]  

Phone: 0800 881 200

In other countries: 

For all product related questions and after-sales matters, please contact your dealer 

to obtain the name of the nearest Authorised KitchenAid Service/Customer Centre. 

For more information, visit our website at:

www.KitchenAid.com.au

Summary of Contents for 5KSB1325A Series

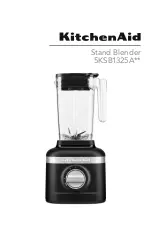
Page 1: ...Stand Blender 5KSB1325A ...

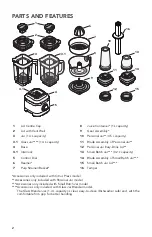
Page 2: ...L capacity 14 Blade Assembly of Small Batch Jar 15 Small Batch Jar Lid 16 Tamper Accessories only included with Citrus Press model Accessories only included with Personal Jar model Accessories only included with Small Batch Jar model Accessories only included with Glass Jar Blender model The Glass Blender Jar 1 4 L capacity is clear easy to clean Dishwasher safe and with the comfortable firm grip ...

Page 3: ...n not in use before assembling or disassembling parts and before cleaning To unplug grasp the plug and pull from the outlet Never pull from the power cord 6 Avoid contacting moving parts 7 Do not operate any appliance with a damaged cord or plug or after the appliance malfunctions or is dropped or damaged in any manner Return appliance to the nearest Authorised Service Facility for examination rep...

Page 4: ...use a risk of injury to persons 20 This appliance is intended to be used in household and similar applications such as staff kitchen areas in shops offices or other working environments farmhouses by clients in hotels motels and other residential type environments bed and breakfast type environments SAVE THESE INSTRUCTIONS PRODUCT SAFETY Electrical Shock Hazard Plug into an earthed outlet Do not r...

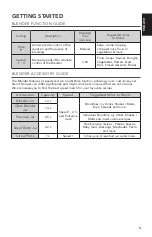
Page 5: ... 0 5 L Individual Smoothie Icy drinks Shakes Malts and lower volume recipes Small Batch Jar 0 2 L Small volume recipes Purées Sauces Baby food Dressings Marinades Pesto and more Citrus Press 1 L Speed 1 Citrus juice Grapefruit juice and more GETTING STARTED BLENDER FUNCTION GUIDE Setting Description Blending Time min sec Suggested Items to Blend Pulse P Allows precise control of the duration and f...

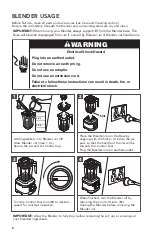
Page 6: ... O Unplug the Blender before removing the Blender Jar 4 IMPORTANT Allow the Blender to fully stop before removing the Lid Jar or pouring out your blended ingredients 1 2 1 4 L 1 0 L Add ingredients into Blender Jar OR Glass Blender Jar max 1 4 L Secure the Lid and Lid Centre Cap 1 Place the Blender Jar on the Base by aligning with the Slot to fit inside the jar pad so that the handle of the Jar wi...

Page 7: ... CRUSH FUNCTION USAGE Your Blender offers a Pulse Ice Crush P function with a soft start to avoid ingredient splatter In this function the Blender will operate at optimal speed to crush ice This function will continue until you release the Control Dial returning to O TIP Use half of standard ice cube tray or 7 8 standard ice cubes at a time for blending The Pulse Ice Crush P function has been opti...

Page 8: ...o desired speed for constant operation 3 When finished turn the Blender off by returning Control Dial to O Always remove the Personal Jar with the Blade Assembly from the Base 4 IMPORTANT Do not blend hot liquids and ingredients in the Personal Jar USING THE PERSONAL JAR The Personal Jar is perfect in size for single servings or smaller recipes and handy to carry with you on the go Before first us...

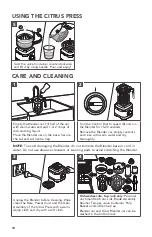
Page 9: ...Cleaning section 1 2 Place the Gear Assembly on the base Then place the Juice Container on the Gear Assembly and twist clockwise to lock in place 1 Place the Pulp Basket and then the Reamer into the Juice Container by aligning them with the Drive Shaft 2 Drive Shaft O 1 2 3 P Turn the Control Dial from O to desired speed for constant operation 3 When finished turn the Blender off by returning Cont...

Page 10: ...ed in the bottom rack NOTE To avoid damaging the Blender do not immerse the Blender base or cord in water Do not use abrasive cleansers or scouring pads to avoid scratching the Blender Empty the Blender Jar Fill half of the Jar with warm water and add 1 or 2 drops of dish washing liquid Place the Blender Jar on the base Secure the Lid and Lid Centre Cap O 1 2 3 P Turn the Control Dial to speed 3 a...

Page 11: ...batches For certain recipes adding liquid to the Blender Jar may also reduce the load on the Blender If Blender stops while blending with Personal Jar or Small Batch Jar Unplug the power cord Remove the Personal Jar or Small Batch Jar from the base with the Blade Assembly Shake it a little bit Place it back on the base and then plug and turn the Blender back on to continue regular use If the probl...

Page 12: ...tralia KitchenAid Australia Pty Ltd 6 8 Billbrooke Close Cameron Park NSW 2285 Australia Phone 1 800 990 990 Mobile 0249026500 Email enquiries kitchenaid com au In New Zealand Website www kitchenaid co nz Email enquiries kitchenaid co nz Phone 0800 881 200 In other countries For all product related questions and after sales matters please contact your dealer to obtain the name of the nearest Autho...

Page 13: ......

Page 14: ......

Page 15: ......

Page 16: ...W11344951D 12 20 2020 All rights reserved ...

Reviews: