background image

KINWEI TECHNOLOGIES(SHENZHEN) CO., LTD 


MANUAL


16


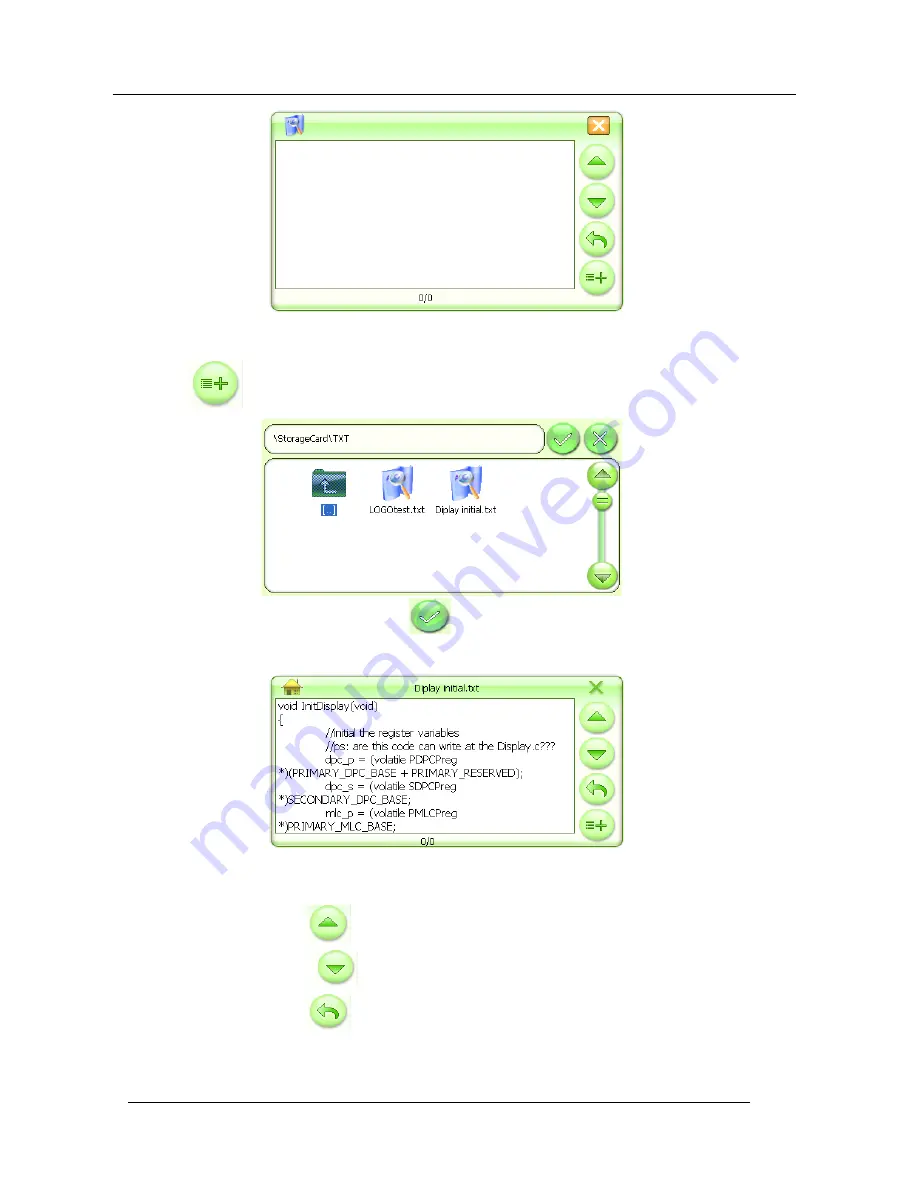
1、Click

 to select the storage path as shown below:  


2、

Click to select a text file and then press 

 or double-click the text file itself to return to the 

interface of E-book Reader as shown below:


Function Description for other Icons: 

Click the icon“

” to page up; 

Click the icon “

”to page down; 

Click the icon“

” to 

set up the target page

Summary of Contents for KW GM7001

Page 1: ...on 7 4 E book Operation Description 7 5 Image Browser Interface Description 7 6 Bluetooth Hand free Operation Description 7 7 Instruction of AV IN function 7 8 Setting Interface Operation 7 8 1 GPS Monitor Interface Operation 7 8 2 FM Setting Interface Operation Optional 7 8 3 Touch Panel Calibration 7 8 4 Language Setup Interface Operation 7 8 5 Brightness Setup Interface Operation 7 8 6 Volume A...

Page 2: ... is mentioned above the product is also capable of playing back music and video browsing images and reading E book as well as other functions etc to meet your various entertainment requirements So that to guide you through the operation of GPS navigator a well prepared user s manual containing details about usage and product introduction etc is provided together Before getting started please read ...

Page 3: ...rates and uses and radiates radio frequency energy and if not installed and used in accordance with the instruction may cause harmful interference to radio communications However there is no guarantee that interference will not occur in a particular installation If this equipment does cause harmful interference to radio or television reception which can be determined by turning the equipment off a...

Page 4: ...n a neither extreme cold nor hot place which could damage the battery 11 Keep this product which is being charged out of the reach of children 12 Never put it under the direct baking sunshine or place it in a place with high temperature to avoid the problem of over heat to the battery or this product which could trigger fault or danger 13 Put this product on an even workbench instead of blanket pi...

Page 5: ...ule Built in GPS receiving antenna which compound outer antenna to use TMC Options Software and Data Storage SD MMC Card Music Playback in the Format of MP3 WAV and MIDI etc Video Playback in the Compatible Format such as ASF AVI MP4 and WMV Image Browse in the Format of BMP JPG PNG and GIF etc FM Transmit Function Options Bluetooth Hand free Function Video Signal Input to Realize the Function of ...

Page 6: ...T Software Compilation Method ARMV4I Navigation Software Supply by third part Basic Parameters Video Input Type CVBS Video Input Power No Screen Dimensions 7 Resolution 480 234 Audio Output Double Channel CD Sound Quality Audio Power Double Channel for Earpieces 0 25W CHANEL Double Channel 8Ω 2W Average Power 7 2W Standby Power 24mW Battery Type Build in Rechargeable 7 4V Lithium Battery 1100mAH B...

Page 7: ... s Acceleration 4g Build in Antenna Type Build in Active Ceramic Antenna Build in Antenna Gain 27dB Build in Antenna Voltage 3 3V 5 Build in Antenna Current 15mA Bluetooth Handfree Parameters optional Maximum Distance 10m Communication Type V1 2 Handfree Type Full Duplex Transmission Chip Set CSR BLUECORE3 TMC parameter optional Signal frequency 87 5 108 mhz Signal received mode RDS Interface USB ...

Page 8: ...ouch Pen E Mini USB Port K Built in Antenna F AV IN L System Reset Hold M Mic Jack N External Antenna Keys Keep press POWER for 3 seconds to turn on or off the navigator press POWER for a short time to enter into or wake up from the SLEEP status Press RESET to restart the system 7 Operation Instructions 7 1Turn on Turn off Hold the button Power for at least 3 seconds till the indicator turns on an...

Page 9: ...mal operation mode resumes within 1 second Hold the button Power for more than 3 seconds when the power is on the system shuts down and the indictor goes off simultaneously as shown in the following picture Plunge the output connector from the Automobile Cigarette Lighter or other 12V DC adapter into the DC jack and the navigator displays the LOGO and startup schematic progress bar After 6 seconds...

Page 10: ... interface as shown in the following picture click the icon to log into the main interface of Music Player as shown in the following picture When the controller is no file and the following picture pop up Click the icon to select the storage directory of audio files as shown in the following picture ...

Page 11: ...e played back and then click the icon or double click the file to return to the interface of Music Player as shown in the following picture Click the icon to select all the files as shown in the following picture Click the icon to return to the interface of Music Player ...

Page 12: ...Click the icon to repeat Click the icon to play at random Click the icon to enable the speaker operate normally Click the icon to silence the speaker Click the icon to delete selected files Click the icon to delete all files Click the icon to quit the interface of Music Player Click the icon to log into the background play Click the icon to adjust volume and the icon or the Playback Progress Bar t...

Page 13: ...the icon to log into the main interface of Video Player as shown in the following picture When the controller is no video file the machine will come out the below interface Click the icon to select the storage directory of video files and log into the following interface Select the desired video file and click the icon or double click the file to play back the ...

Page 14: ...picture Or click the icon to select all the files as shown below Click the icon to return to the interface of Video Player Click the icon to add more video files and then the icon to return to the interface of Video Player Click the icon or double click the file to start playback as shown below ...

Page 15: ...elect next video file Click the icon to select previous video file Click the icon to delete selected files Click the icon to delete all files Click the icon to quit the interface of Video Player Click the icon to adjust volume and the Playback Progress Bar to set up the speed of playback 7 3 E book Reader Interface Operation Description In the interface of Programs as shown in the following pictur...

Page 16: ... shown below 2 Click to select a text file and then press or double click the text file itself to return to the interface of E book Reader as shown below Function Description for other Icons Click the icon to page up Click the icon to page down Click the icon to set up the target page ...

Page 17: ... Reader and then turn to the page referring to the number just put in Click to exit the E book Reader 7 4 Image Browser Interface Description As for the interface of Programs please refer to the following picture Click the icon to log into the main interface of Image Browser as shown below ...

Page 18: ...interface as shown below Function Description for other Icons Click the icon to enlarge the screen to the full size Click the icon to move to the previous image Click the icon to move to the next image Click the icon to enter the Image Slide mode Click the icon to zoom out Click the icon to zoom in Click the icon the rotate the image 900 clockwise Click the icon to quit the interface of Image Brow...

Page 19: ...k for paired Bluetooth devices If there is any cell phone Bluetooth device the system will auto establish a communication with it otherwise 6 seconds later the system will quit automatically from the search mode to the Bluetooth main menu Click to enter the setting menu of Bluetooth Configure whether to remain the Bluetooth pair established last time in the non Bluetooth interface To configure whe...

Page 20: ...con to looking for a pair of devices To make a partnership user need use a cell phone with blue tooth function to search the GPS navigator Please refer to the cell phone manual for more details of Bluetooth function on cell When the cell searched a GPS Bluetooth device it demands input the latter s password The default password is 1234 and device name is GPS Once the pair match is successfully com...

Page 21: ... Bluetooth Device Management Click the icon in the Bluetooth mode to check out the history of match up as shown in the following picture Connect with all selected devices Disconnect with all selected devices Delete all Bluetooth devices Click the icon in the Bluetooth mode to log into the Dial Communication Setup Please refer to the following Dial interface ...

Page 22: ...KINWEI TECHNOLOGIES SHENZHEN CO LTD MANUAL 22 Back Button Answer Button Redail Button Call Recording Button Process of Getting through Hang up Volume Adjustment Communication Status ...

Page 23: ...V IN Function As for the interface of Programs please refer to the following picture In the interface of Programs click the icon log into the AV model interface There is an AV cable attached in package to use on the rearview mirror and other video VCD DVD signal output devices Connect the video output device with the GPS navigator by AV cable and the interface of the GPS will switch automatically ...

Page 24: ...n AV Color Setup Press to setup the color Video Display Picture and Menu Language Video display propotion support 16 9 4 3 Menu language can be select Chines and English 7 8 Setting Operation As for the interface of Programs please refer to the following picture 7 8 1 GPS Monitor Interface Operation Click the icon to log into the interface as shown in the following picture ...

Page 25: ...o log into the function of GPS Monitor as shown below 1 Click the icon to reset the GPS satellite test 2 Click the icon on the right to log into the interface of Satellite Data stream as shown below 3 Click the icon on the right to log into the interface of Satellite Number Signal Reception Status as shown below ...

Page 26: ...carried out in an open space Otherwise the satellite signal can not be received leading to a bad signal reception status It will take less than one minute to get current satellite position and check the receiving situation on the GPS monitor before you move the vehicle It will take much longer if the vehicle is running as the longitude and latitude vary and it s hard to get the position 7 8 2 FM S...

Page 27: ... of charger i e onboard DC power supply as the DC power cable serves as antenna for the FM transmitter Therefore the FM mode can not be initiated and operate normally without antenna Click to log into FM setup interface as shown below 1 Press to turn on the FM transmitter 2 Press to turn off the FM transmitter 3 Press to decrease frequency 4 Press to increase frequency ...

Page 28: ...lower right corner and upper right corner in sequence If the callibration is achieved the screen displays OK and the user can use the Touch Pen to click any spot on the screen to quit And all the information concering screen caliabration is memorized even the power is off Therefore it is unneccessary to carry out screen calibration each time at startup And the screen of this product must be calibr...

Page 29: ...tup Interface Operation In the setup interface as shown below Click the icon to log into the interface of Brightness Setup as shown below Through this option the brightness and duration of backlight can be configured When completing setup click the icon to return to the interface of Setup 7 8 6 Volume Adjustment Operation In the setup interface as shown below ...

Page 30: ...is interface users are allowed to adjust the volume enable or disable the speaker and the tone while pressing any button or the touch panel Click the icon to return to the interface of Setup 7 8 7 Power Setup Operation In the setup interface as shown below Click the icon to log into the interface of Power Management as shown below ...

Page 31: ...n for the system before entering the standby mode according to the actual conditions 7 8 8 Time Setup Operation In the setup interface as shown below Click the icon to log in the following interface Click the icon to log into the interface of Time Setup as shown below ...

Page 32: ...n press the button to adjust When completed click the icon to return to the interface of Setup 7 8 9 Interface Style Setup In the setup interface as shown below Click the icon to log into Select your desired style and then click the icon to return to the interface of Setup 7 8 10 System Information As for the interface of Setup please refer to the following picture ...

Page 33: ...ion Repair files stored in the flash memory ID GPS body number VER Software version number FLASH Built in Flash memory 7 8 11 Operation Description In the interface of Programs click the icon to log into the interface of AV Setting Click Auto Back Car storage the setting while quit the interface Click the icon in the AV Setting to setup the contrast as shown below ...

Page 34: ...tandby invalid when power off Please do not shut down the navigator press the button Power for a short time when get off the car The system will wake up automatically when has back car signal input in the standby state the screen will display the back car AV vedio it will log into the state of standby automatically again when back car is over 7 8 12 Navigation Software Operation Description Insert...

Page 35: ... 35 Click the icon to log into the relevant interface as shown below Click the icon to log into Locate the navigation software according to the storage directory and click the icon to quit and return to the interface of Programs as shown below ...

Page 36: ...er 8 3 Running Environment Hardware Platform PC with PIII or plus Software Platform Microsoft Windows 98 ME2000 2003 XP Requirements This software is packed in Windows Installer package so it is necessary to install the MSI service support patch in the CD ROM before installing the software For the Windows 98 ME system InstMsiA exe should be installed and the Windows 2000 InstMsiW exe 8 4 NOTES 1 A...

Page 37: ...o enter the Installation interface as below Click the button to continue installation Select a new installation directory by pressing the button If unnecessary to change the installation directory press the button to continue and log into the following interface ...

Page 38: ...zation Software install success 8 6 Synchronization Software Installation and use 1 Turn on the GPS and connect with PC then a icon found new Hardware Wizard appear on the desktop as below 2 After connection there is a message to display Select no for a while no T to stop the installation Or Click Next N to continue Find Anchor USB EZ Link Cable then select Install from a list or special location ...

Page 39: ...HNOLOGIES SHENZHEN CO LTD MANUAL 39 the CD driver Select USB ActveSync_V3 5 in the 1 Waiting for the drive copy show as below There will come out dialog box when copy the drive show as below Click Continue Anyway ...

Page 40: ...py the install is succeed 6 Check the drive whether working click My computer on desktop then find System Restore hardware Device Manager show as below 7 If Anchor USB EZ Link Cable can be found in Device Manager that means GPS drive install and connect succeed ...

Page 41: ...nchronization software show not connected and a icon appear in the Synchronization window 2 When GPS succeed connect with the computer GPS will show as below 3 In the meanwhile the connect process of computer synchronization software show as below the icon of will turn green and circumgyrate 4 After succeed connect will come out show as below ...

Page 42: ...eded in My computer will show Mobile device when connect with the GPS navigation can use the Mobile device visit copy and delete the file of the GPS navigation memory Show as Double click enter then show as below in this time can copy stick delete the file which in NANDFLSH Note NAND Flash is the memory built in the GPS 7 Handle the SD card Mobile Device have the files are as below the Storage Car...

Page 43: ... save the movie file MUSIC folder save the music file PHOTO folder is save the photo file 9 Software Update Click file copy to SD card and insert the SD card to GPS navigation then turn on the GPS navigation show as below Click enter to setting interface show as below Click enter to Navigation setup show as below ...

Page 44: ...KINWEI TECHNOLOGIES SHENZHEN CO LTD MANUAL 44 Click enter to Storage card show as below Select as shown in the following picture Double click to select the path of software ...

Page 45: ...KINWEI TECHNOLOGIES SHENZHEN CO LTD MANUAL 45 Click the icon to return the setup interface Click back to the main menu Click again to enter the update interface ...

Page 46: ...The film playing is only an additional function of the GPS You can convert films that are in other formats and can not be played in the GPS using the converting software in the CD ROM before you load them into the device This is not the problem of the GPS itself There are so many coding methods for even the same format in Internet so the device could not be compatible with unknown formats or witho...

Page 47: ...KINWEI TECHNOLOGIES SHENZHEN CO LTD MANUAL 47 Click to select a language then click Click Select the install path Click ...

Page 48: ...erter Double click then show as below Select the destination where the converted files need to be saved Click to set the save path Set the conversion quality high normal and low Full screen 4 3 and 16 9 three options Set the Start time of source video fragment Set the end time of source video fragment ...

Page 49: ...rates map data and navigation software and the navigation function is implemented with the help of the software and the navigator 2 How long would be the positioning completed after turning on A The navigator should meet the requirement of getting position parameters with 60s at the same point under clear sky But the time to position is affected sometimes by factors such as satellite signal shelte...

Page 50: ... USA s GPS satellite signal According to the official data the precision is within 10 meters and commonly it may be more precise in 6 meters at more than 90 time 8 How to do in the case of abnormal shutdown of the navigator A 1 Press the RESET Key on the back of the device and observe if the restarting is normal or not 2 The electrical capacity of the Li ion battery is not adequate Recharge it wit...

Reviews: