background image

250GK (double-seat): Ownr`s Manual                                                

37 

(5) Avoid speeding up suddenly or running the engine at a high speed without loading. 

(6) Maintain the vehicle according to service intervals. Repair as soon as possible if necessary. 

(7) After the running-in period, clean the crankcase and replace oil; remove the carbon on the top of the 

      piston and in the combustion chamber; adjust the spark plug electrode gap and valve clearance; check 

      if the oil lines are smooth; Maintain the whole vehicle according to the requirements specified in the 

   Owner’s Manual. 


A. Service Air Cleaner 

Service air cleaner every 20 hours 

NOTE: Service more often under dusty conditions. 

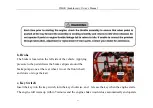
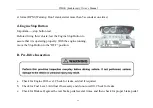
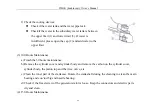
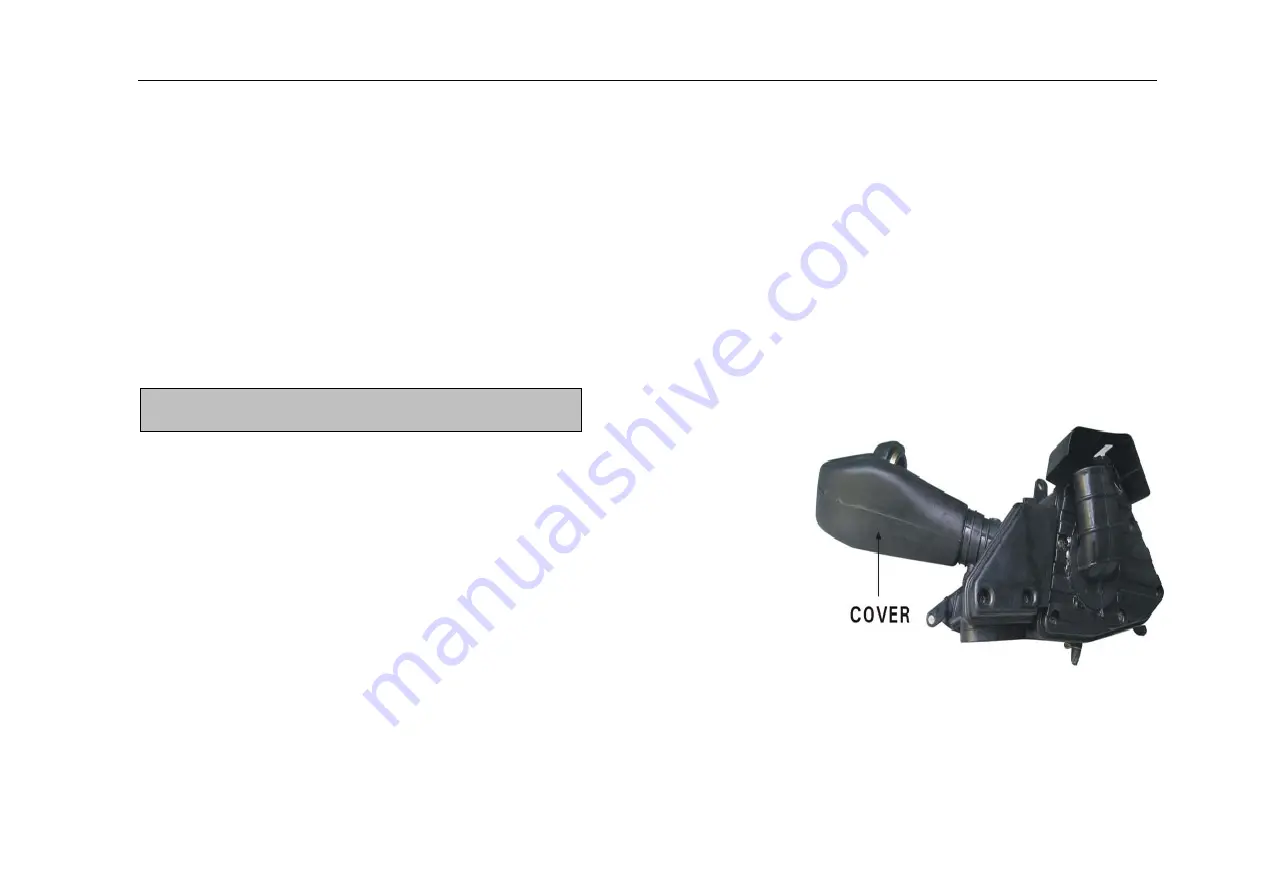
a. Remove cleaner cover. 

b. Remove air cleaner element. 

c. Fill the non-flammable cleaning agent into a basin and dip the 

    element in it. 

d. Dry it after cleaning. Dip it into the engine oil specified by the manufacture and dry again. 

SERVICE INSTRUCTIONS


Summary of Contents for 250GK

Page 1: ...250GK double seat Ownr s Manual 1 ...

Page 2: ...ETY 4 3 IMPORTANT SAFETY INFORMATION 5 4 SAFETY LABELS 10 5 ARE YOU READY TO DRIVE 10 6 IS YOUR VEHICLE READY TODRIVE 15 7 SAFE DRIVING PRECAUTIONS 18 8 SPECIFICATIONS 23 9 OPERATION 26 10 SERVICE INSTRUCTIONS 36 11 REPAIR 45 12 PERIODICAL CHECK AND SERVICE 47 13 WIRING DIAGRAM 48 ...
Page 3: ...low the warnings contained in this manual can result in serious injuries Be sure to follow the recommended maintenance schedule and service your vehicle accordingly Preventive maintenance is extremely important to the longevity of your BUGGY Beginners should drive this BUGGY in a large open area to practice handle of this BUGGY Protective gears should be worn at all time when driving or riding thi...

Page 4: ...nd in this manual These information alerts you to potential hazards that could hurt you or others It is not practical or possible to warn you about all hazards associated with operating or maintaining a BUGGY so you must use your own good judgment You will find important safety information in a variety of forms including Safety Labels On the BUGGY Safety Messages Preceded by a safety alert symbol ...

Page 5: ...y Reminders or Important Safety Precautions Safety Section such as Buggy Safety Instruction how to use this BUGGY correctly and safety This entire manual is filled with important safety information please read it carefully Your BUGGY will provide you with many years of service and pleasure providing you take responsibility for your own safety and understand the challenges you can meet while drivin...

Page 6: ... Always Wear a Helmet It s a proven fact that helmets significantly reduce the number and severity of head injuries Always wear an approved motorcycle helmet We also recommend that you wear eye protection sturdy boots gloves and other protective gear Drive Off Road Only without no EEC certificate Your BUGGY is designed and manufactured for off road use only The tires are not made for pavement and ...

Page 7: ...te Check with your dealer for more information on training courses Be Alert for Off Road Hazards The terrain can present a variety of challenges when you drive off road Continually read the terrain for unexpected turns drop offs rocks ruts and other hazards Always keep your speed low enough to allow time to see and react to hazards Drive within Your Limits Pushing limits is another major cause of ...

Page 8: ...s BUGGY at night Dark vision can greatly reduce a driver s visibility and judgment So driving at night is dangerous and can increase possibility for accident Never run your BUGGY indoors The exhaust from the engine contains a tasteless odorless and poisonous gas called carbon monoxide Keep away from moving parts of the BUGGY The operator of the BUGGY should never place their hands or other parts o...

Page 9: ...n slippery surfaces such as snow ice mud and loose gravel If you skid on ice you may lose all directional control To avoid skidding on slippery terrain keep your speed low and drive carefully This section presents some of the most important information and recommendations to help you drive your BUGGY safely Please take a few moments to read these pages ...

Page 10: ...r dealer for warning labels replacements Before each drive you need to make sure you and your BUGGY are both ready to drive To help you get prepared this section discusses how to evaluate your driving readiness what items you should check on your BUGGY and adjustments to make for your comfort convenience and safety SAFETY LABELS ARE YOU READY TO DRIVE ...

Page 11: ...and are in good physical and mental condition You are wearing an approved motorcycle helmet with chin strap tightened securely eye protection and other protective clothing You don t have any alcohol or drugs in your body system Protective Apparel For your safety we strongly recommend that you always wear an approved motorcycle helmet eye protection boots gloves long pants and long sleeved shirt or...

Page 12: ...ece of driving gear because it offers the best protection against head injuries A helmet should fit your head comfortably and securely An open face helmet offers some protection but a full face helmet offers more Regardless of the style look for a DOT Department of Transportation sticker in any helmet you buy Always wear a face shield or goggles to protect your eyes and help your vision ...

Page 13: ...ants with knee and hip pads a driving jersey with padded elbows and a chest and shoulder protector Driver Training Developing your driving skills is an on going process Even if you have driven other Buggies take time to become familiar with how this BUGGY works and handles Practice driving the BUGGY in a safe area to build your skills Do not drive in rough terrain until you ve gotten accustomed to...

Page 14: ...GY without adult supervision No Alcohol or Drugs Alcohol drugs and Buggies don t mix Even a small amount of alcohol can impair your ability to operate a BUGGY safely Likewise drugs even if prescribed by a physician can be dangerous while operating a BUGGY Consult your doctor to be sure it is safe to operate a vehicle after taking the medication ...

Page 15: ...nly for safety but because having a breakdown or even a flat tire can be a major inconvenience If your BUGGY has overturned or has been involved in a collision do not drive it until your BUGGY has been inspected by your dealer There may be damages or other problems you can t see Pre drive Inspection Check the following items before you get on the BUGGY IS YOUR VEHICLE READY TO DRIVE ...

Page 16: ...emove any dirt vegetation or other debris that could be fire hazard or interfere with the proper operation of the BUGGY Air Cleaner Housing Drain Tube Check for carbon deposits in the drain tube If necessary clean the tube and check the air cleaner housing Leaks Loose Parts Walk around your BUGGY and look for anything that appears unusual such as a leak or loose cable Lights Make sure the headligh...

Page 17: ... firstly Open the water filling cover to fill water until it is full 2 Start the engine after adding water completes Rotate speed of the engine shall be controlled under 4500RPM Until warming up finishes bubble appears on the water filling opening and the water level begins to reduce at the same time antifreezer shall be filled After several times filling no bubbles occurs and add more water until...

Page 18: ...ly not for pavement Driving on pavement can affect handling and control You should not drive your BUGGY on pavement When driving off road also remember to always obey local off road driving laws and regulations Obtain permission to drive on private property Avoid posted areas and obey no trespassing signs You should never drive your BUGGY on public streets roads or highways even if they are not pa...

Page 19: ...legal to operate Buggies on public streets roads and highways Keep Hands and Feet on Controls Always keep both hands on the steering wheel and both feet on the foot controls when driving your BUGGY It is important to maintain your balance and to control the BUGGY Removing hands or foot away from the controls can reduce your ability to react control of the BUGGY ...

Page 20: ... capability of your BUGGY the terrain visibility and other operating conditions plus your own skills and experience Use Care on Unfamiliar or Rough Terrain Before driving in a new area always check the terrain thoroughly Don t drive fast on unfamiliar terrain or when the visibility is limited It s sometimes difficult to see obstructions like hidden rocks bumps or ...

Page 21: ... Manual 21 holes in time to react Never drive past the limit of visibility Maintain a safe distance between your BUGGY and other off road vehicles Always exercise caution and use extra care on rough slippery and loose terrain ...

Page 22: ...250GK double seat Ownr s Manual 22 Do Not Perform Stunts You should always operate your BUGGY in a safe and reasonable manner When driving always keep all four wheels on the ground ...

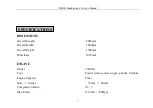
Page 23: ...l Length 2485mm Overall Width 1480mm Overall Height 1500mm Wheelbase 1605mm ENGINE Model 172MM Type Forced water cooled single cylinder 4 Stroke Engine Capacity 250cc Bore Stroke 72mm 60mm Compression Ratio 10 1 Max Power 12 5 0kw 7000rpm SPECIFICATIONS ...

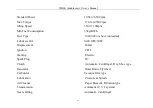
Page 24: ...SAE 90 or above unleaded Lubricate Oil SAE 10W 30SF Displacement 244ml Ignition C D I Starting Electric Spark Plug D7 Clutch Automatic Centrifugal Dry Shoe type Generator Outer Rotor Flywheel Carburetor Vacuum Film type Lubrication Pressure Splash Air Cleaner Paper Element Filtration type Transmission Automatic C V T system Gear shifting Automatic Centrifugal ...

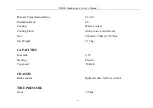
Page 25: ...0 9 Reduction Ratio 6 6 Cooling Water cooled Cooling Fluid Anticorrosive Anti freeze Size 422mm 430mm 527mm Net Weight 31 5 kg CAPACITIES Fuel tank 9 5L Starting Electric Top speed 65km h CHASSIS Brake system Hydraulic disc left foot control TIRE PRESSURE Front 175kpa ...

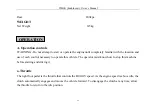
Page 26: ...of each control necessary to operate this vehicle The operator must know how to stop this machine before starting and driving it a Throttle The right foot pedal is the throttle that controls the BUGGY speed As the engine speed is above idle the clutch automatically engages and moves the vehicle forward To disengage the clutch at any time allow the throttle to return to the idle position OPERATION ...

Page 27: ...ws the brake calipers around the brake pumps one at the rear wheel two at the front wheel and slows or stops the kart c Key Switch Insert the key into the key switch turn the key clockwise and release the key when the engine starts The engine will warm up within 5 minutes and the engine choke would close automatically and operate ...

Page 28: ...e Engine Stop Button to assure that it is operating properly With the engine running move the Stop Button to the OFF position B Pre Drive Inspection a Check for Engine Oil Level Check for leaks add oil if required b Check for Fuel Level Add fuel if necessary and do not overfill Check for leaks c Check for Brakes Depress the rear brake pedal several times and then check for proper brake pedal ...

Page 29: ...eck Engine Stop Button Perform engine stop button test Repair if necessary h Check all Nuts Bolts and fasteners Check wheels to see that all axle nuts are tightened properly Check and tighten if necessary all other fasteners to specified condition i Check Roll Cage Bar Ensure all protective roll cage bar are in place before operating the BUGGY j Check Brake Light Check for proper operation k Check...

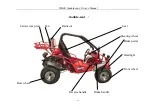
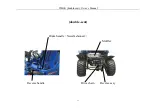
Page 30: ...250GK double seat Ownr s Manual 30 double seat Carrier comp rear Fan Radiator Seat Steering wheel Brake pedal Headlight Fro Front wheel Rear wheel Reverse handle Brake handle ...

Page 31: ...250GK double seat Ownr s Manual 31 double seat Brake handle Newsfashioned Muffler Reverse handle Drive chain Reverse assy ...

Page 32: ...ed water tank 300cc Total 1050cc Way of adding antifreeze a Remove the radiator cover and add antifreeze to the top b Fasten the radiator cover c Start the vehicle d Stop the vehicle when the water temperature reaches 80 e Open the radiator cover 5 min after stopping the engine Fill in cooling fluid to the top Fasten the adiator cover f Repeat c d e steps to re add the cooling fluid for the third ...

Page 33: ...r for the double seat unit should not exceed 180kg or 400lbs Combine maximum weight of driver and the passenger for the single seat unit should not exceed 90kg or 200lbs E Seat Adjustment The seat must always be securely fastened in the position which best affords the operator control of the foot pedals steering wheel and the engine stop button a Pull seat adjustment handle upward to disengage sea...

Page 34: ...lace and that seat is locked into position F Starting and Operating Instructions a Before starting the engine be sure that the driver is seated properly in the BUGGY and tighten the seatbelt b Test the BUGGY in the beginning to learn how to start turn and stop c Operate the BUGGY slowly until you are familiar with it ...

Page 35: ...foot pedal you can feel the vehicle is stable because of the gravity is adjusted and it won t roll over G Starting the Engine 1 Check if the fuel line is smooth 2 Check if the ignition system is working 3 Press the starting button when the throttle is closed 4 Warm up the engine for 2 3 min after starting the cold engine Note 1 Release the button and cut the power of the starting motor immediately...

Page 36: ... the Engine 1 Run the engine for about 3 5 min at the idle speed to cool down 2 Turn off the throttle 3 Turn off the ignition switch I Running in of the New Engine The running in distance is 1000km During this period please follow the following instructions 1 Run the engine according to the requirements for the running in engine 2 Rotate the throttle slowly after starting the engine Don t speed up...

Page 37: ...ion chamber adjust the spark plug electrode gap and valve clearance check if the oil lines are smooth Maintain the whole vehicle according to the requirements specified in the Owner s Manual A Service Air Cleaner Service air cleaner every 20 hours NOTE Service more often under dusty conditions a Remove cleaner cover b Remove air cleaner element c Fill the non flammable cleaning agent into a basin ...

Page 38: ... using a wire feeler gauge This specification is 0 025 0 030 b Before installing spark plug coat threads lightly with graphite grease if possible to ensure easy removal next time the spark plug needs inspection c It is advisable to replace the spark plug at least once a year to insure easy starting and good engine performance C Carburetor Adjustment Never make unnecessary adjustments The factory r...

Page 39: ...ne stop adjusting as the RPM reaches the top speed e Adjust the screw and adjust the idle speed to an ideal value f Repeat step 4 and 5 until the rotate speed of engine stables D Cleaning Instructions Keep your vehicle clean With a clean rag wipe off the dirt and oil from around controls Wipe off any spilled fuel and oil Keep the engine clean of foreign objects and be sure to check that water tank...

Page 40: ...chain lubricant G Chain Adjustment Check the chain adjustment after first two hours of use Readjust if it has more than 1 2 flex a Unscrew the eight nuts M20 2 of swing arm comp using spanner 32 b Adjusting apart two screw M20 2 until the chain reaches appropriate tightness c Screw the eight nuts M20 2 NUT M20 2 SCREW M20 2 ...

Page 41: ... to be operated for periods in excess of 30 days or at the end of each driving season prepare for storage as follows a Drain fuel tank and carburetor by allowing engine to run out of fuel or use a fuel stabilizer b Lubricate engine cylinder by removing the spark plug and pour one ounce of clean lubricating oil through the spark plug hole into the cylinder Crank the engine slowly to spread oil and ...

Page 42: ...eck all the exterior fasteners at the joints Fasten or replace if necessary c Check the oil leakage and the compression at the mating surface d Check the engine oil Add if necessary The oil level should between the upper index line and the lower index line of the gauge 2 50 Hours Maintenance a Finish the daily maintenance ...

Page 43: ... oil on the element Otherwise it may cause damage to the transmission belt c Remove the carbon on the spark plug d Clean the crankcase and replace the oil e Clean the transmission box and replace the gear oil Remove the cap 2 Remove the filling bolt 1 Remove the drain bolt 3 Note When you drain oil the engine should be at some temperature which will ensure that the oil will drain quickly and compl...

Page 44: ...mit 3 100 Hours Maintenance a Finish the 50 hours maintenance b Remove the cylinder cover and cylinder body and remove the carbon on the cylinder cover cylinder body the piston top and the in ex valve etc c Clean the inner part of the crankcase Rotate the crankshaft during the cleaning to clean the main bearing and con rod big end needle bearing d Check if the fixed screw of the generator stator i...

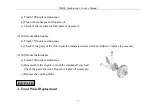
Page 45: ... Maintenance a Finish 150 hours maintenance b Check if the parts of the clutch and the transmission are normal Adjust or replace if necessary 6 500 Hours Maintenance a Finish 300 hours maintenance b Disassemble the engine except the crankshaft con rod Check the parts for wear Repair or replace if necessary c Replace the cooling fluid A Front Wheel Replacement REPAIR ...

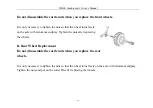
Page 46: ...eel turns freely on the axle with minimum endplay Tighten the nuts after replacing the wheels B Rear Wheel Replacement Do not disassemble the castle nuts when you replace the rear wheels It is only necessary to tighten the nuts so that the wheel turns freely on the axle with minimum endplay Tighten the nuts and put on the cotter Pin after replacing the wheels ...

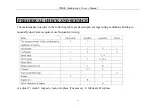
Page 47: ...nce intervals in the following table are based upon average riding conditions Riding in unusually dusty areas require more frequent servicing A adjust C clean I inspect clean or replace if necessary L lubricate R replace PERIODICAL CHECK AND SERVICE ...

Page 48: ...S STOP LIGHT SWITCH V 6 5AH BATTERY G A BR G G BR A B OFF ON HORN SWITCH BR B B W G R Y B R IGNITION SWITCH SKY BLUE SB R G CDI COIL COMP IGNITION BR BR G G B B Y W G W G Y B Y R R G R STARTING RELAY G Y G BR RECTIFIER resistance Y W G W B G HORN SPEED SENSOR ...

Reviews: