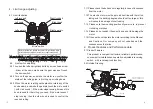
4.2 Limit switch adjusting
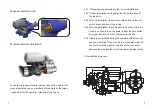
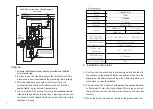
4.2.1 Loosen the left and right lock bolts by a cross head screw
-driver, at the same make sure the gear pins don’t touch
the micro switch.
4.2.2 Turn on the power, and make the motor run, confirm the
status of the rolling pipe, is it rolling up or rolling down.
4.2.3 When the motor is rolling up the plastics, rotate any of the
knobs slowly, and make the gear pin touch the micro switch
( with click sound) , if the motor stops running, it means this
knob is used for the rolling you need; if the motor doesn’t
stop running, then the other knob is used to control the
required rolling.
4
、
Limit range adjusting
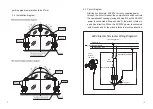
4.1 Limit illustration
Before limit adjust, please loosen“left or right fasten bolts”
After limit adjust, please fasteb“left or right fasten bolts”
CAUTION: After the limit adjust is finished, please fasten the bolts. Or the
limit will not be accurate and there would be dange of power shock.
2
1.11 Please check the bolt and nuts regularly,in case of looseness
from the motor.
1.12 The electric motor must keep in a direct line with the roll up
tubing,and the bending degree should not too large,or this
will cause the damage of overloading.
1.13 Please note the mounting position of power cord, to prevent
it winding or broken.
1.14 Please do not switch it frequently,so as not to damage the
motor.
1.15 If the user do not operate the motor according to the Manual
and Cautions, Our company will not undertake all the
consequences that arise.
2
、
Product Features and Performance data
2.1 Product Features
This product is compact in structure, reliable in performance,
convenient in installation and operation, adjustable reversing
switch
,
with reversing-lock function;
2.2 Outside Drawing
Motor
Gear box
Limit
device
Side opening
bracker
Manual
operation part
Top opening
bracker
Coupling
Suit(subject to
the diameter of
the pipe used)
Plugs
Left gear pin
Left lock bolt
Left knob
Right gear pin
Right lock bolt
Right knob
Micro switch


