background image

PAGE

07

TROUBLESHOOTING

PUMP NOT INFLATE/GAUGE NOT REGISTER

1.There are two ports on the pump, IN and OUT. Make sure you use the OUT port on the handle to inflate.
2.Do not bend too much when connec ng the pipe to the valve, otherwise the pipe will easily fall off the valve. Please try to keep the 
ver cal connec on.
3.Check the pump gauge. Make sure the hose is detached. Pull up the pump handle. Block the OUT port with one hand, and then push 
the handle down with the other hand. You should feel resistance, and the gauge pointer should move. If you don't feel resistance, then 
the pump is leaking air. If you feel resistance, but the pointer does not move, the gauge is defec ve.

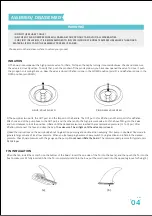
FIN FALL OFF

1)Press the clip down fully to lock the fin.
2)There is a screw underneath the clip. Tighten the screw to secure the installa on.

LEAK

1)HIGH PRESSURE VALVE LEAKING

If the board is losing pressure check the board for leaks star ng with the high-pressure valve, Inflate the board to around 7 psi and spray 
the valve area with water, Ch6ck and see if there are air bubbles.
If leak is iden fied,  deflate the board (a) and  ghten the valve using the supplied wrench in the repair kit, Insert the wrench into the valve 
and rotate clockwise (b), A er  ghtening, Inflate the board to check if leaking is fixed.

(a)

(b)

If  ghtening the valve does not fix leaking, the valve needs to be replaced. Take out the defec ve 
valve using the wrench to rotate counterclockwise. Install a new valve and check if leaking is fixed.

2)SMALL PUNCTURE LEAKING

If leak is not found at the valve, you may have a small puncture.
Small punctures-can be easily found by spraying all around the board to see where air bubbles
become visible. If you can't find any bubbles, inflate the board to 15 psi and listen for an air leak.
Note that for the repair to be successful, the humidity level should be less than 60%, temperature
between 18

/25

 or 65

/77

. Avoid carrying out repairs in the rain or in direct sunlight.

1)  Draw the shape of the patch exactly where it will be applied, cut a round patch at least 1  cm/l/2" larger than the cut/damaged area.
2)  Clean the damaged area and the corresponding side of the patch with a grease remover and allow it to dry for 5 minutes.
3)  Apply 3 thin layers of glue on both the damaged area and the patch and allow each layer to dry for 5 minutes un l the glue feels tacky.
PAGE EIGHT

Summary of Contents for KD27-01

Page 1: ......

Page 2: ...embly Opera on instruc on Troubleshoo ng Warran es To ensure safety and prevent tragic accidents please read it carefully and familiarize yourself with the product before using it The cau ons and warnings below are advisories rela ve to various types of situa ons Please read them before you use the product DENOTES AN IMMINENT HAZARD WHICH WILL RESULT IN SEVERE INJURY IF YOU DO NOT COMPLY WITH THE ...

Page 3: ...in off shore winds or windy condi ons Be sure not to exceed your paddling ability and beware of your limits Be aware of changing weather condi ons Do not use alcohol or mind altering drugs while using this product Never use this product in dark without proper ligh ng Never let a minor use the board without adult supervision Before going on a long paddle be sure to inflate your board 24 hours prior t...

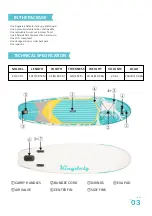
Page 4: ... inflate deflate double ac on hand pump One 10 coiled leash One storage and carry roller backpack One repair kit MODEL LENGTH WIDTH THICKNESS WEIGHT VOLUME LOAD KD27 01 10FT 305CM 31IN 80CM 6IN 15CM 20 9LB 9 5KG 246 L 230LB 104 KG CARRY HANDLES BUNGEE CORD D RINGS EVA PAD AIR VALVE CENTER FIN SIDE FINS IN THE PACKAGE TECHNICAL SPECIFICATION ...

Page 5: ... infla on and the IN port is for defla on A ach one end of the pump hose to the OUT port and the other end to the high pressure valve Push the hose fi ng into the valve and turn clockwise to lock the posi on Inflate un l the desired pressure is reached the recommended pressure 12 to 15 psi A er infla on disconnect the hose and close the cap The valve won t be air ght un l the valve cap is closed 3 Read...

Page 6: ...board is fully deflated detach the hose push the valve pin to close the valve and then close the cap STORAGE 1 Clean and check the board and all the accessories a er each use Rinse it thoroughly with clean water and make sure to remove any residues or salt if used in salt water Do not use detergents or any type of silicone based products Make sure the product is completely dry before pu ng away 2 R...

Page 7: ...o om usually knee deep 3 Most people start with kneeing on the board Hold the paddle in the middle while blade angled to the rear Take 2 small strokes then swap paddle to the other side and take two more 4 Once you feel comfortable try stand up Place one foot on each side of the center of the board shoulder width apart If standing up makes your feel nervous you can knee down and try again 5 A er s...

Page 8: ...ed deflate the board a and ghten the valve using the supplied wrench in the repair kit Insert the wrench into the valve and rotate clockwise b A er ghtening Inflate the board to check if leaking is fixed a b If ghtening the valve does not fix leaking the valve needs to be replaced Take out the defec ve valve using the wrench to rotate counterclockwise Install a new valve and check if leaking is fixed 2...

Page 9: ...e or defects caused by transport loading unloading dropping or out of water handling Including marks le by over ghtening transport straps Damage or defects caused by heel dents also known as pressure dings Damage or defects caused by inappropriate storage in temperatures over32 90 and under 0 32 Damage or delamina on caused by overhea ng as a result of exposure to direct sunlight while not in use ...

Page 10: ......

Reviews: