background image

OPERATION 


For safety concerns, please follow Electric Staple Gun procedures below: 
 

1.


Connect the plug to a power outlet or extension cord. 

2.


Place the Staple Gun so that the bottom of the Staple Gun is lightly touching the 

work piece you have prepared to staple/nail. 

3.


Push the Switch Pin to the right. 

4.


Press the Trigger and the Staple Gun down simultaneously to ensure sufficient 

impact. 

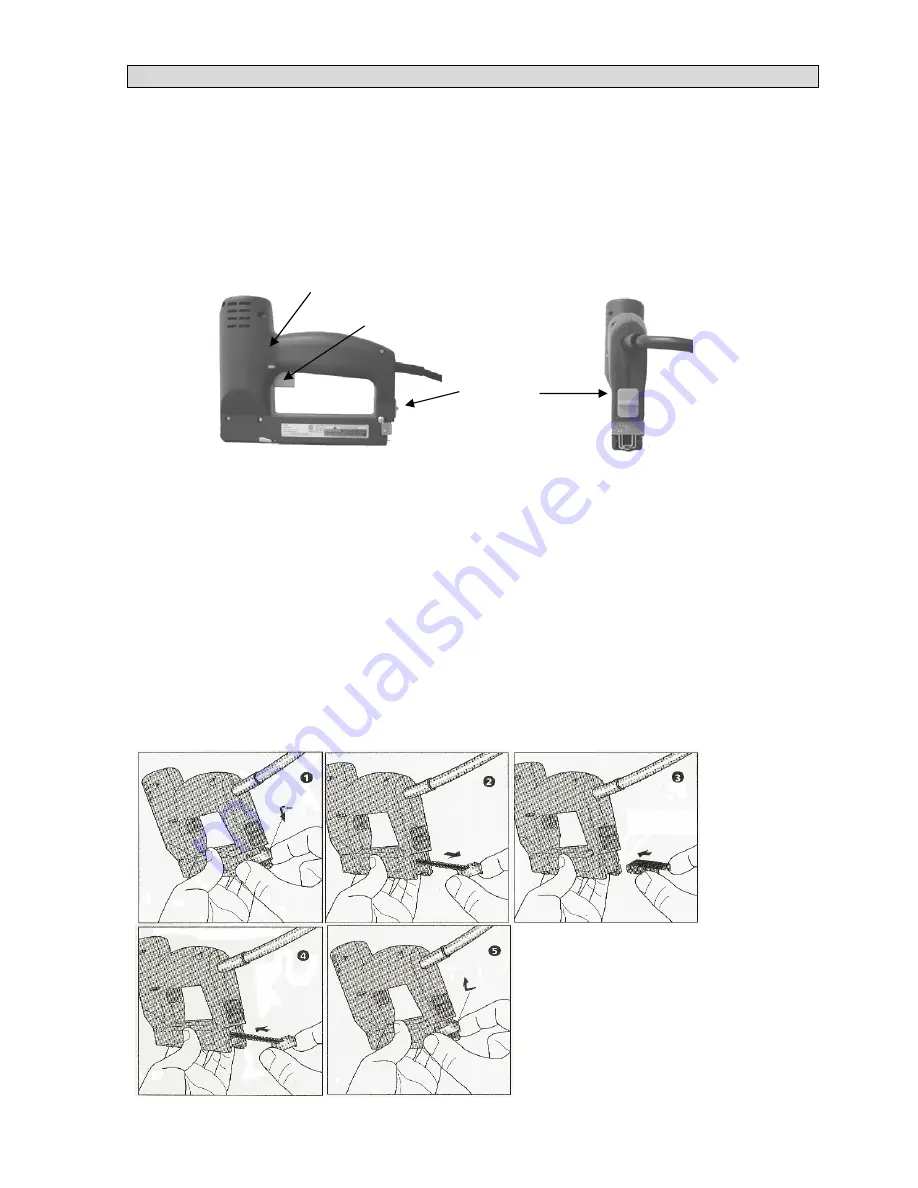
   Switch Pin 


6

                                       Trigger 


Open/Lock 
  Switch 


STAPLE AND NAIL LOADING  

1.


First press sides of Staple Feeder down, than pull Staple Feeder away from 
Open/Lock Switch to pull out empty Staple Feeder (photo 1). 

2.


Pull the empty Staple Feeder all the way out of Staple Gun before loading 

staples/nails into Staple Channel (photo 2). 

3.


Load strip of staples into the Staple Channel (photo 3). Load nails into the side of 

the Staple Channel with the head of the nail facing up. 

4.


Slide Staple Feeder back into Staple Channel making sure that the Staple Feeder 

hook is pointed upward and the end bar is flat side up and open side down (photo 
4). 

5.


Once Staple Feeder is placed into Staple Channel secure Staple Feeder by 
pressing downward and hooking Staple Feeder near Open/Lock Switch.  This 
procedure will lock Staple Feeder into position. 


Summary of Contents for Model # A688

Page 1: ...Electric Staple Gun Item 6525 Model A688 PLEASE READ AND SAVE THESE INSTRUCTIONS TO ENSURE THE SAFE AND EFFECTIVE USE OF THIS TOOL 1 ...

Page 2: ...eguards P 3 General Safety Rules P 3 4 List of Main Parts P 5 Tech Specifications Contents of Packing P 5 Operation P 6 Determining Proper Staple or Nail Length P 7 Maintenance P 7 Trouble Shooting P 8 Warranty Information P 9 Warranty Card P 11 ...

Page 3: ...nts 2 Do not operate power tools in explosive atmosphere such as in the presence of flammable liquids gases or dust Power tools create sparks which may ignite the dust or fumes 3 Keep bystanders children and visitors away while operating a power tool Distractions can cause you to lose control ELECTRICAL SAFETY 1 Double insulated tools are equipped with a polarized plug one blade is wider than the ...

Page 4: ... loss of control 2 Do not force tool Use the correct tool for your application The correct tool will do the job better and safer at the rate for which it is designed 3 Do not use tool if switch does not turn ON or OFF Any tool that cannot be controlled with a switch is dangerous and must be repaired 4 Disconnect battery pack from tool or place the switch in locked or OFF position before making any...

Page 5: ...ck Switch Staple Feeder Staple Channel TECHNICAL SPECIFICATIONS Model Number A688 Rating Voltage 120Volts Nominal power 6AMPS Weight 2Lbs CONTENTS OF PACKAGING 1 Electric Staple Gun 2 400 Staples 10mm 3 100 Nails 15mm If any of the above items are missing please contact our service department at 1 888 367 7373 http wwwk wk usa com for replacement ...

Page 6: ...ll Staple Feeder away from Open Lock Switch to pull out empty Staple Feeder photo 1 2 Pull the empty Staple Feeder all the way out of Staple Gun before loading staples nails into Staple Channel photo 2 3 Load strip of staples into the Staple Channel photo 3 Load nails into the side of the Staple Channel with the head of the nail facing up 4 Slide Staple Feeder back into Staple Channel making sure ...

Page 7: ...ommend the next shorter length for desired results BRANDS AND TYPES OF STAPLES AND NAILS AVAILABLE FOR THE STAPLE GUN Available Staples ARROW T50 Available Nails ARROW 5 8 STANLEY 5 8 MAINTENANCE CAUTION Always be sure that the tool is switched OFF CLEANING Clean dust and debris form the staple gun vents Keep the staple gun clean dry and free of oil and grease Use only mild soap and a damp cloth t...

Page 8: ...el to remove jammed staples photo 7 4 Close Staple Channel and push down Open Lock Switch Lock will click ensuring that the lock switch is in locked position photo 8 ENVIRONMENTAL PROTECTION If the tool should no longer work at all please make sure that it is disposed in an environmentally friendly way by handing it into a public collection point Please do not put it with your household waste 8 ...

Page 9: ...ct Under no circumstances shall there be liability for any loss direct indirect incidental special or consequential damage arising out of in connection with use of this product This warranty is valid only in the United States of America This Warranty gives you specific legal rights However you may have other rights that vary from state to state Some states do not allow limitation on implied warran...

Page 10: ...10 ...

Page 11: ...arts and workmanship until March 13th 2006 or 1 year with proof of purchase Please fill in your details below and send it together with the product and purchase receipt Please read the Limited Warranty conditions mentioned in this instruction manual Customer Name Street City State ZIP Code Purchase Date Description of Defect PLEASE DETACH THIS SECTION AND RETURN IT WITH YOUR PRODUCT To arrange pic...

Page 12: ...12 ...

Reviews:

Related manuals for Model # A688