KING IPOD-SBS2IRV Notes On Safety Download Page 28


24 


Network Camera User Manual


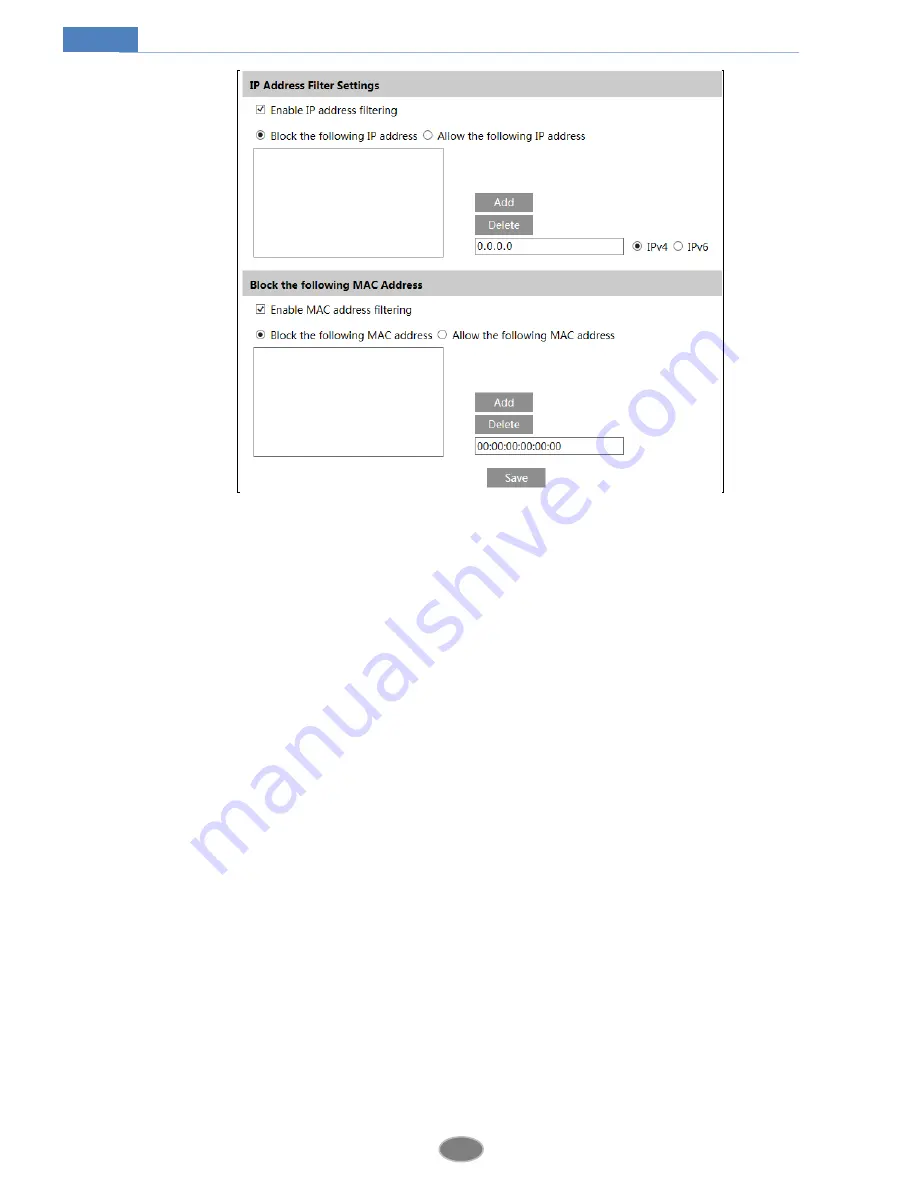
Setting steps are as follows: 
Check “Enable IP address filtering” check box. 
Select “Block the following IP address”, input IP address in the IP address list box and click 
“Add” button. The operation step of “Allow the following IP address” and MAC address filter 
settings are the same with “Block the following IP address”.   
After you set the IP address or MAC address, the system will block or allow the user using the 
added IP address or MAC address to access the camera. 


4.6


Maintenance Configuration 

4.6.1


Backup and Restore 

Go to Config

Maintenance

Backup & Restore. 


Summary of Contents for IPOD-SBS2IRV

Page 1: ...IPOD SBS2IRV...

Page 2: ...be received Do not operate it incase temperature humidity and power supply are beyond the limited stipulations Keep away from heat sources such as radiators heat registers stove etc Do not expose the...

Page 3: ...uration 11 4 2 3 OSD Configuration 12 4 2 4 Video Mask 12 4 2 5 ROI Configuration 13 4 3 Alarm Configuration 14 4 3 1 Motion Detection 14 4 3 2 Alarm Server 16 4 4 Network Configuration 17 4 4 1 TCP I...

Page 4: ...Network Camera User Manual Appendix 1 Q A 28 Appendix 2 Specifications 30...

Page 5: ...complies with the TCP IP protocol SoC etc to ensure this system more stable and reliable This product is widely used in banks telecommunication systems electricity power departments law systems facto...

Page 6: ...to the LAN and the IP Tool is installed in the PC from the CD Double click the IP Tool icon on the desktop to run this software as shown below Modify the IP address The default IP address of this came...

Page 7: ...the system will pop up the IE browser to connect IP CAM IE browser will auto download the Active X control After downloading a login window will pop up as shown below Input the username and password t...

Page 8: ...able Manually set the IP address of the PC and the network segment should be as the same as the default settings of the IP camera Open the network and share center Click Local Area Connection to pop u...

Page 9: ...automatically After downloading Active X control the login dialog box will pop up Input the default username and password and then enter to view 2 2 WAN Access through the router or virtual server Mak...

Page 10: ...e IP address IP Setup Go to the router s management interface through IE browser to forward the IP address and port of the camera in the Virtual Server Router Setup Open the IE browser and input its W...

Page 11: ...to Config Network Port menu to set the port number Go to Config Network TCP IP menu to set the IP address Check Use the following IP address and then input the static IP address and other parameters O...

Page 12: ...ions of the icons on the remote preview interface Icon Description Icon Description Motion alarm indicator icon Start stop live view Original size Snap Appropriate size Start stop record Auto Zoom in...

Page 13: ...ormation Date and Time and Local Config 4 1 1 Basic Information In the Basic Information interface you can check the relative information of the device 4 1 2 Date and Time Go to Config System Date and...

Page 14: ...ictures and video records You can also enable or disable the video audio 4 2 Image Configuration Image Configuration includes Display Video Audio OSD Video Mask and ROI Config 4 2 1 Display Configurat...

Page 15: ...ion effect better but it will reduce the image resolution White Balance Adjust the color temperature according to the environment automatically Frequency 50Hz and 60Hz can be optional Day night Mode P...

Page 16: ...by using H265 video encoding however higher quality of the hardware is required Profile Baseline main high profiles are optional Baseline profile is mainly used in interactive application with low com...

Page 17: ...e mouse to draw the video mask area 3 Click Save button to save the settings 4 Return to the live to see the following picture Clear the video mask Go to video mask interface and then click Clear butt...

Page 18: ...l 4 Click Save button to save the settings Now you will see the selected ROI area is clearer than other areas especially in low bitrate condition 4 3 Alarm Configuration Alarm configuration includes t...

Page 19: ...nd triggered event will be sent into those addresses 2 Set motion detection area and sensitivity Click Area and Sensitivity tab to go to the interface as shown below Move the Sensitivity scroll bar to...

Page 20: ...ate box click Add button to add that date to the list box on the right side and then drag the scroll bar to set the schedule of that day Select a date in the list box on the right side and click Delet...

Page 21: ...for example There are two options for IP setup obtain an IP address automatically by DHCP protocol and use the following IP address Please choose one of the options for your requirements Click IP Chan...

Page 22: ...nly used for connecting network video management system 1 Check Enable 2 Check the IP address and port of the transfer media server in the ECMS NVMS Then enable the auto report in the ECMS NVMS when a...

Page 23: ...Apply for a domain name Take www dvrdyndns com for example Input www dvrdydns com in the IE address bar to visit its website Then click Registration button Create domain name After you successfully re...

Page 24: ...e default number is 554 3 RTSP Address The RTSP address you need to input in the media player 4 Check Allow anonymous login 4 4 6 UPNP If you enable this function you can quickly access the camera via...

Page 25: ...Sender Address Sender s e mail address User name and password Sender s user name and password Server Address The SMTP IP address or host name Select the secure connection type at the Secure Connection...

Page 26: ...PC in Bind MAC textbox After binding physical address to the IP CAM you can access the device on this PC only If the MAC address was 00 00 00 00 00 00 which means it can be connected to any computers...

Page 27: ...k OK button to save the settings Delete user 1 Select the user you want to delete in the user configuration list box 2 Click Delete button to delete the user Note The default super administrator canno...

Page 28: ...ick Add button The operation step of Allow the following IP address and MAC address filter settings are the same with Block the following IP address After you set the IP address or MAC address the sys...

Page 29: ...boot button to reboot the device Timed Reboot Setting Enable Time Settings set the date and time and then click Save button to save the settings 4 6 3 Upgrade Go to Config Maintenance Upgrade In this...

Page 30: ...nual 4 6 4 Operation Log To query and export log 1 Go to Config Maintenance Operation Log 2 Select the main type sub type start and end time 3 Click Search to view the operation log 4 Click Export to...

Page 31: ...rch the record files Double click the record file to play the record The descriptions of the buttons on the playback interface are as follows Icon Description Icon Description Play button After pausin...

Page 32: ...ised contact administrator to get the correct port number D Exclude the above reasons Recover default setting by IP Tool Q IP tool cannot search devices why A It may be caused by the anti virus softwa...

Page 33: ...29 Network Camera User Manual...

Page 34: ...0 D1 CIF 480 240 Main Stream 60Hz 1080P 1 30fps 720P 1 30fps 50Hz 1080P 1 25fps 720P 1 25fps Image Settings Saturation Brightness Chroma Contrast Wide Dynamic Sharpen NR etc adjustable through client...

Page 35: ...Bit Rate 128Kbps 6Mbps Resolution 1080P 1920 1080 720P 1280 720 D1 CIF 480 240 Main Stream 60Hz 1080P 1 30fps 720P 1 30fps 50Hz 1080P 1 25fps 720P 1 25fps Image Settings Saturation Brightness Chroma...

Page 36: ...50Hz 1080P 1 25fps 720P 1 25fps Image Settings Saturation Brightness Chroma Contrast Wide Dynamic Sharpen NR etc adjustable through client or web browser ROI Support Interface s Network RJ45 Fucntion...

Page 37: ...0Hz 1080P 1 30fps 720P 1 30fps 50Hz 1080P 1 25fps 720P 1 25fps Image Settings Saturation Brightness Chroma Contrast Wide Dynamic Sharpen NR etc adjustable through client or web browser ROI Support Int...

Page 38: ...080P 1 30fps 720P 1 30fps 50Hz 1080P 1 25fps 720P 1 25fps Image Settings Saturation Brightness Chroma Contrast Wide Dynamic Sharpen NR etc adjustable through client or web browser ROI Support Interfac...

Reviews: