ASSEMbLY & SETUP
UNPACKING AND SETTING UP YOUR METAL DUST COLLECTOR
Warning! This Metal Dust Collector weighs 225 lbs, use material handling
equipment when moving and removing Metal Dust Collector from its carton. It is
recommended to obtain help from another person to lift and setup this Metal Dust
Collector. Once unpacked, remove all loose items inside the bottom collection
drawer. This Metal Dust Collector must be placed on a flat and even floor capable
of supporting the machine weight.
INSTALLING CASTER WHEELS TO CAbINET
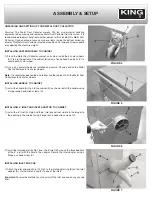
1) Place the Metal Dust Collector cabinet on its side, install the 4 caster wheels
(A) Fig.4 to the bottom of the cabinet (B) using 4 flange head hex. bolts (C) to
secure each caster wheel.
2) Once all 4 caster wheels are installed and secure, lift and position the Metal
Dust Collector onto its caster wheels.
Note:
It is recommended to obtain help from another person to lift the Metal Dust
Collector onto its caster wheels.
INSTALLING HANDLE TO CAbINET
1) Install the handle (A) Fig.5 to the cabinet (B) as shown, install the handle using
4 large round head allen screws (C).
INSTALLING 6” INLET AND INLET ADAPTOR TO CAbINET
1) Install the 6” inlet (A) Fig.6 and the 6” inlet gasket (not visible in the image) to
the opening in the cabinet using 4 large round head allen screws (C).
2) Install the inlet adaptor (A) Fig.7 over the 6” inlet (B). Line up the threaded hole
of the 6” inlet with the hole in the adaptor. Secure the inlet adaptor using a
flange pan head screw (C).
INSTALLING INLET END CAP
1) Attach the inlet end cap chain (D) Fig.7 to the inlet adaptor ring (E) on the inlet
adaptor (A). Install inlet end cap (F) to one of the inlets.
Important:
For maximum efficiency, always install the inlet end cap on any unused
inlet.
FIGURE 4
FIGURE 5
FIGURE 6
FIGURE 7


