1. Perform a scan as indicated in Step 2 OPERATION, and wait for the
lights to turn on indicating all appropriate satellites have been found.
2. On the receiver remote, press
MENU
,
6
,
1
,
1
.
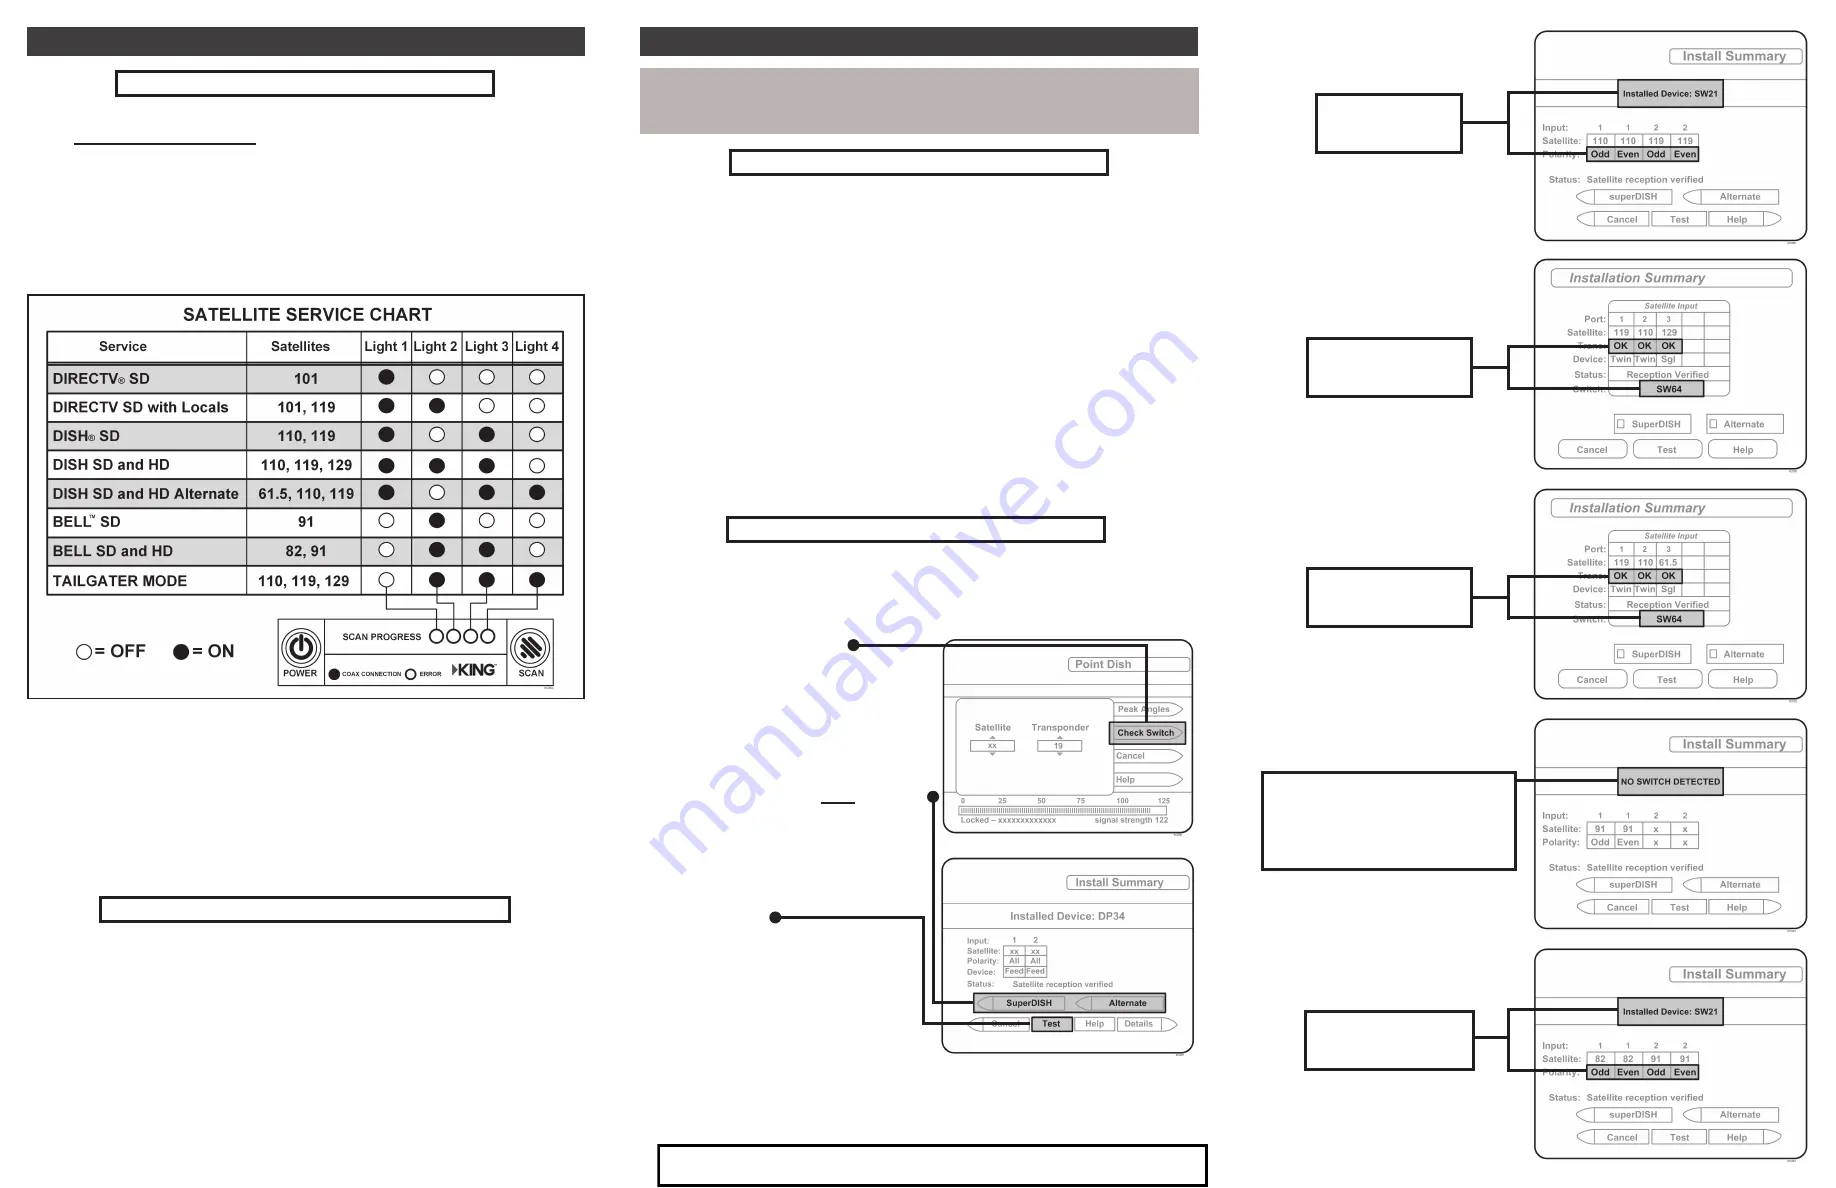
3. Highlight “Check Switch.”
Press
SELECT
on your remote.
Some receivers may prompt you
to select “Check Switch” a second
time to initiate the test.
4. Make sure “SuperDISH” and
“Alternate” boxes are
NOT
selected.
Not all receivers will display
a screen with options that
include “SuperDISH” and
“Alternate” boxes.
5. Highlight “Test.”
Press
SELECT
on your remote.
The receiver will perform a
check switch test,which takes
several minutes.
6. When test is complete, a screen
similar to one on the next page should appear.
7. When the installation summary shows the successful check switch test
results, save the settings, exit to the main menu screen and wait for
programming to download.
First Time Users: RECEIVER CONFIGURATION
For satellite acquisition, there must be a clear “line of sight” to the southern sky.
Mountains, buildings, trees, telephone poles, etc. can all block the satellite signal
from reaching the antenna.
Because receivers are always changing,
screen graphics may vary.
DISH SD
Bell TV SD
Bell TV SD and HD
DISH SD and HD Alternate
DISH SD and HD
DIRECTV SD
If you have a newer receiver or current software, choose the following dish
confi guration settings (do this through the receiver’s satellite set-up menu
screens):
Switch Type: 02:Multiswitch • Dish Type: 01: 18” Round
DIRECTV SD with Locals
If you have a newer receiver or current software, choose the following dish
confi guration settings (do this through the receiver’s satellite set-up menu
screens):
Switch Type: 02:Multiswitch • Dish Type: 02: 3-LNB (18 x 20”)
(older receivers: choose round dish-1 satellite)
(older receivers: choose oval dish-2 satellites)
DIRECTV
DISH AND BELL TV
Must show “SW21”
No “X”s
No “X”s
Must show “SW64”
No “X”s
Must show “SW64”
“NO SWITCH DETECTED”
or
“INSTALLED DEVICE UNKNOWN”
or similar
Must show “SW21”
No “X”s
Antenna confi guration is a one time procedure that
MUST BE COMPLETED
before using your KING Flex antenna.
1. Press
POWER
to turn on KING Flex controller. Wait until the lights stop
fl ashing and only the
COAX CONNECTION
light stays on.
2. Simultaneously press and hold
POWER
and
SCAN
for fi ve seconds.
The
COAX CONNECTION
light and the
SCAN PROGRESS
lights that
indicate the currently selected service will begin fl ashing.
First Time Users: KING FLEX CONFIGURATION
3. Press
SCAN
repeatedly to scroll thru the service provider options.
(Unit is pre-set for DIRECTV SD, so light one will already be fl ashing.)
4. When the correct lights turn on to show your desired satellite
confi guration, simultaneously press and hold
POWER
and
SCAN
for
fi ve seconds.
Your satellite confi guration will be saved. All
SCAN PROGRESS
lights
will turn off and the
COAX CONNECTION
light will continue to fl ash.
The unit is now in ALARM CONFIGURATION mode.
Audible beeping will confi rm alarm condition:
Single Beep (beep...beep...beep) ....................................Alarm is
OFF
.
Double Beep (beep beep...beep beep) ............................Alarm is
ON
.
5. Press and release
SCAN
to toggle between the on and off conditions.
Beep pattern will change to indicate new condition.
6.
When alarm is in desired condition, press
POWER
and
SCAN
for 5
seconds to exit Alarm Mode. Alarm condition will be saved.
COAX CONNECTION
light will turn solid and
SCAN PROGRESS
lights
will stay off. (See manual for more alarm information.)
ANTENNA CONFIGURATION
For Sales Information Please Contact RoadTrucker Inc (www.RoadTrucker.com)
8312 Sidbury Rd.; Wilmington, NC 28411 - (800) 507-0482 / (910) 686-4281