GETTING TO KNOW YOUR TOOL,
PREPARATION & THINNING
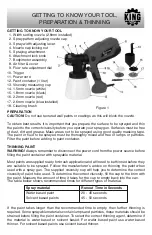
Figure 1
PREPARATION
CAUTION!
Do not use textured wall paints or coatings as this will block the nozzle.
To obtain best results, it is important that you prepare the surface to be sprayed and thin
the paint to the correct viscosity before you operate your spray gun. Surfaces must be free
of dust, dirt and grease. Mask areas not to be sprayed using good quality masking tape.
The paint or fluid to be sprayed must be thoroughly mixed and free of lumps or particles.
Filter the paint before adding to paint container.
THINNING PAINT
WARNING!
Always remember to disconnect the power cord from the power source before
filling the paint container with sprayable material.
Most paints are supplied ready for brush application and will need to be thinned before they
are suitable to be sprayed. Follow the manufacturer’s advice on thinning the paint when
used with a spray gun. The supplied viscosity cup will help you to determine the correct
viscosity of paint to be used. To determine the correct viscosity, fill the cup to the brim with
the paint. Measure the amount of time it takes for the cup to empty back into the can.
The table below shows recommended times for different types of material.
If the paint takes longer than the recommended time to empty, then further thinning is
required. Some sprayable materials contain lumps and particles, these materials should be
strained before filling the paint container. To select the correct thinning agent, determine if
the material is water based or solvent based. For water based paint use water based
thinner. For solvent based paints use solvent based thinner.
GETTING TO KNOW YOUR TOOL
1. Width setting nozzle (2.6mm installed)
2. Spray pattern adjusting nozzle cap
3. Spray width adjusting lever
4. Nozzle cap locking nut
5. Spraying attachment
6. Attachment lock knob
7. Body/motor assembly
8. Air filter & cover
9. Flow rate adjustment dial
10. Trigger
11. Power cord
12. Paint container (1 liter)
13. Viscosity measuring cup
14. 1.5mm nozzle (white)
15. 1.8mm nozzle (black)
16. 2.2mm nozzle (red)
17. 2.6mm nozzle (blue-installed)
18. Cleaning brush
Spray material
Runout Time in Seconds
Water based paint
20 - 45 seconds
Solvent based paints
45 - 50 seconds


