


www.kimray.com
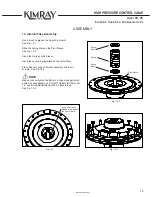
HIGH PRESSURE CONTROL VALVE
Installation, Operation & Maintenance Guide
22
Model: PO, PC
TESTING
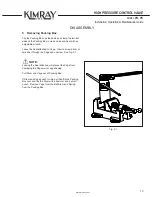
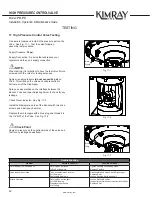
17 High Pressure Control Valve Testing
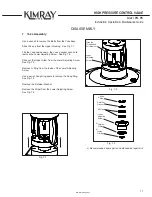
Use a male nipple and install in the pressure port on the
Yoke. See Fig. 17-1. Test the valve following
assembly test procedure.
Supply Pressure:
30 psi
.
Supply Connection: A device that will reduce your
regulator end to any air supply connection.
NOTE:
When testing, it is important to have the test valve fixture
screwed onto the valve for testing purposes.
Apply air supply pressure
(do not exceed 45 psi)
on
Yoke. This will open the valve and will pressurize to
bottom part of the Diaphragm.
Spray a soapy solution on the interface between the
Bonnet, Yoke and lower Adjusting Screw to check for any
leakage.
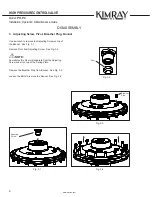
Check Travel Indicator. See Fig. 17-2
Install the Nameplate on top of the Bonnet with two drive
screws and a ball peen hammer.
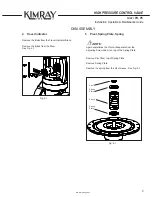
Replace the male nipple with a blue plug and thread it in
the 1/4” NPT of the Yoke. See Fig. 17-3
Check Point
Apply air pressure on the upstream side of the valve and
feel for any leakage downstream.
Blue
Plug
Male
Nipple
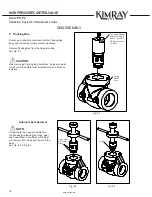
Troubleshooting
Problem
Possible Cause(s)
Possible Solution
Fluid leaking from Packing Box
Packing Box nut loose.
Teflon Packing worn.
Tighten Packing until leaking stops.
Replace Packing.
Valve leaks when closed
Tape or sealant stuck in valve.
Soft Seat worn.
Removable Seat worn.
Disassemble and clean Seat & Diaphragm.
Replace Seat.
Loosen Packing Nut to free shaft.
Erratic Operation
Packing Box nut too tight.
Soft Seat leaking.
Diaphragms hardened.
Wet supply
Loosen Stuffing Box Nut.
Inspect for deformations or obstructions in Seat.
Replace Seat.
Fig. 17-1
Fig. 17-2
Fig. 17-3