www.powertoolrepairohio.com
Power Tool Repair
371 West Ave.
Tallmadge, OH 44278
(330) 630-0022
Air Tool Maintenance and Repair
2) Hammer and Anvil
1) Air Motor Rotor Blades
1) Air Motor Rotor Blades
2) Hammer and Anvil
3) Socket Retainer and O-Ring
This tool contains multiple parts that are “normal wear
items”. These parts can all be serviced/replaced by the
user, or the tool may be sent to the Service Center.
Tools returned to the Service Center for normal wear
parts will incur service charges. Some of the critical
common wear items include:
Manufacturer’s Limited Warranty
This Kimball Midwest product is warranted to be free from
defects in material and workmanship for one year from the
date of purchase. This Warranty applies only to products
purchased new from Kimball Midwest. This Warranty does not
apply to normal wear and tear or to products which have been
abused, misused, modified, or repaired by someone other than
Kimball Midwest’s Authorized Service Center. If this Kimball
Midwest product proves defective in material or workmanship
within one year after purchase, return it to the Kimball Midwest
Authorized Service Center, transportation prepaid, enclosing
your name and address, proof of date of purchase, and a short
description of the defect. Kimball Midwest will, at its option,
repair or replace the defective product free of charge. Repairs
or replacements are warranted as described above for the
remainder of the original warranty period. Kimball Midwest’s
sole liability and your exclusive remedy under this Warranty is
limited to repair or replacement of the defective product.
(There Are No Other Warranties Expressed Or Implied And
Kimball Midwest Shall Not Be Liable For Incidental,
Consequential, Or Special Damages, Or Any Other
Damages, Costs Or Expenses Excepting Only The Cost Or
Expense Of Repair Or Replacement As Described Above.)
Normal wear items are not manufacturer's defects. Some of the
common normal wear items are contained in the following repair
kits: 84-0351, 84-0352 and 84-0353.
Maintenance
– Using filtered, compressed air with
either automatic airline lubrication or frequent manual
lubrication will extend the service life of the Air Motor
Rotor Blades.
Maintenance
– The rotating action of the Hammer as it
impacts the Anvil allows the tool to apply force to
fasteners. These components are greased from the
factory. However, this grease will gradually lose its
lubricating capability over time, causing metal-on-metal
wear. Use a 4mm hex key to remove the 4 socket head
cap screws to take off the back cover of the tool. Clean
out and replace the old grease with fresh, high-quality
impact grease.
3) Socket Retainer and O-Ring
Maintenance
– The Socket Retainer and O-Ring are located
at the very tip of the Anvil (square drive) of the tool. The
Socket Retainer is a round C-clip, and its underlying O-Ring
allows the clip to expand and contract to securely hold impact
sockets and other square drive accessories onto the tool.
They do not require maintenance, but they can become worn
after frequent use.
Repair
– When the free speed of the tool becomes
slower, or the tool begins to vent air without rotating, the
Rotor Blades may be worn or contaminated with sludge
and other debris. Use a 4mm hex key to remove the 4
socket head cap screws to take off the back cover of the
tool and inspect the Air Motor Rotor Blades. If the Rotor
Blades do not slide freely in and out of the slots on the
Air Motor Rotor, they should be replaced. The
General
Maintenance Kit (84-0351*)
contains new Rotor Blades
and several other related common replacement
components. The Rotor Blades can be easily removed
and replaced by hand. Use a high-quality air tool
conditioning oil to clean the Air Motor Rotor when
installing new Rotor Blades.
Repair
– When impact sockets and other square drive
accessories can no longer be securely attached to the tool
without easily falling off, it is time to replace the Socket
Retainer and O-Ring. Use a small metal pick to pry off the old
Socket Retainer and the underlying O-Ring. The
Anvil Repair
Kit (84-0353*)
contains a new Socket Retainer and O-Ring
(along with a replacement Anvil).
Repair
– When the tool begins to skip and/or lose
power during use, it is likely that the Hammer and/or
Anvil have become worn. Remove the 4 socket head
cap screws and the back cover to replace and re-grease
the Hammer and Anvil. If the Hammer and Anvil have
been re-greased and the problem persists, these items
should be replaced. These components easily slide out
of the tool by hand. Ideally, the Hammer and Anvil
should be replaced as a set; however, replacing either
one or the other may restore performance to the tool.
The
Hammer Repair Kit (84-0352*)
contains a new
Hammer and hammer assembly components. The
Anvil Repair Kit (84-0353*)
contains a new Anvil.
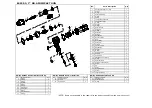
*(Please refer to the Exploded Parts Diagram in this manual
for the complete contents of each repair kit.)


