assembly
9
8
10
11
20mm x 2
Insert with slot pointing toward the edge as shown
x 4
16
x 2
(each side)
3
Wheel at rear
I
L
J
K
(L)
(R)
12
Page 1: ...K oxfordshire dresser Important Keep for future reference Read carefully Instruction Manual ...
Page 2: ...parts A B C D E F G H I J K L M N 2 x 2 L R x 1 x 1 x 1 x 1 x 1 x 1 P x 1 x 1 x 1 x 2 1 each L R L R x 2 L R x 2 L R O x 1 x 1 x 2 1 each L R ...
Page 3: ...exagon key 1 2 3 4 5 6 7 11 12 included included included not included included not x 16 15mm x 22 35mm x 4 x 6 30mm x 6 40mm x 6 x 6 10 20 30 40 50 60 70 80 90 100 0 millimeters Measure 3 10 27mm x 2 13 14 15 8 9 30mm x 4 17mm x 16 x 4 x 4 20mm x 2 16 x 4 20mm x 4 17 35mm x 8 18 x 4 ...
Page 4: ...assembly 1 2 4 x 5 each side G D A L R 13 15 x 2 x 4 x 1 6 x 2 1 H M N L R x 2 1 left 1 right 1 1 1 Repeat for other side ...
Page 5: ...h arrowed slot pointing toward part A Once assembled use a large screwdriver to give 1 2 turn clockwise to lock 30mm x 3 7 A R 5 x 1 Insert fittings 5 with arrowed slot pointing toward part A Once assembled use a large screwdriver to give 1 2 turn clockwise to lock ...
Page 6: ...assembly 5 6 6 x 6 4 20mm x 4 8 F 18 x 4 E ...
Page 7: ...assembly 7 8 7 x 11 each part B 2 B R B L P 14 15 x 4 x 8 10 25mm x 2 12 x 2 C L R ...
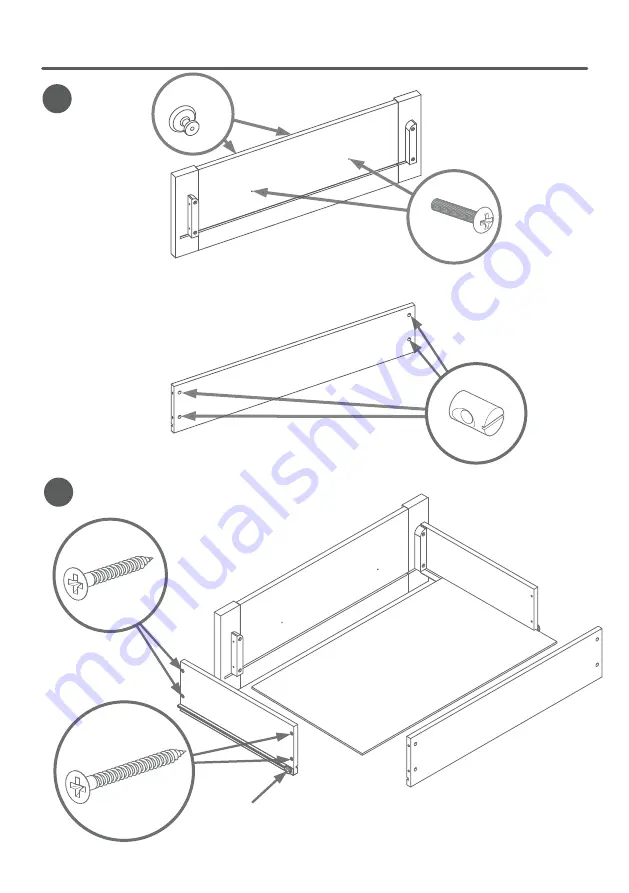
Page 8: ...assembly 9 8 10 11 20mm x 2 Insert with slot pointing toward the edge as shown x 4 16 9 x 2 each side 3 x 2 each side Wheel at rear I L I L J K L K R 12 x 2 ...
Page 9: ... the hinges to adjust the fit of the doors Ensure that the doors are secure before use 1 1 The narrow part of the front screw fits into the slot in the metal plate on the dresser door Loosen the back screw first 2 2 The slot in the hinge fits under the rear screw head Tighten the back screw 2 fully ...
Page 10: ...L M O O N R N L M 17 35mm x 4 each side 5 x 4 Insert fittings 5 with arrowed slot pointing toward part O Once assembled use a large screwdriver to give 1 2 turn clockwise to lock Do not fully tighten the fittings until the frame is located on the dresser ...
Page 11: ... fabric strap to the dresser frame using the 15mm screw and the washer Before use ensure that the strap is securely fixed to both the wall and the dresser 1 2 3 3 The type of wall fixing you will require depends on the construction of the wall See below for details If in doubt seek professional advice Wood If fixing to wood make sure that it isn t chipboard as screws can easily pull away the core ...
Page 12: ... is suitable for use up to 12 months old or 11kg in weight Do not use the dresser if any of the parts are broken torn or missing Any additional or replacement parts can only be obtained from the manufacturer or the distributor This product conforms to BSEN 12221 2008 A1 2013 Ensure that the wall strap is used to securely attach the dresser to the wall to prevent tipping maintenance Take care when ...
Page 13: ...icare kiddicare kiddicare kiddicare kiddicare kiddicare kiddicare kiddicare kiddicare kiddicare kiddicare kiddicare kiddicare kiddicare kiddicare kiddicare kiddicare kiddicare kiddicare kiddicare kiddicare kiddicare kiddicare kiddicare kiddicare kiddicare kiddicare kiddicare kiddicare kiddicare ...
Page 14: ...care kiddicare kiddicare kiddicare kiddicare kiddicare kiddicare kiddicare kiddicare kiddicare kiddicare kiddicare kiddicare kiddicare kiddicare kiddicare kiddicare kiddicare kiddicare kiddicare kiddicare kiddicare kiddicare kiddicare kiddicare kiddicare kiddicare kiddicare kiddicare 06_18 ...