background image

11.

10.

Adjusting the shoulder 

harness height

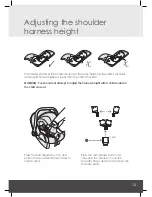
Press the belt adjuster button and 

pull on the shoulder harness straps to 

create slack. 

Press the red release button (A), 

unbuckle the harness, move the 

shoulder straps apart and remove the 

shoulder pads.

A

“click”

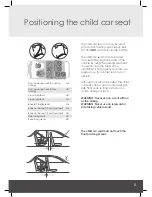
The harness should exit the child car seat at the same height as the child’s shoulder 

and should not exit higher or lower than the child’s shoulder.

WARNING: You should not attempt to adjust the harness height with a child seated in 

the child car seat.

Summary of Contents for KC18949

Page 1: ...n from birth to 13kg approx 12 months Instructions Please read carefully and keep for future reference Your child s safety may be affected if you do not follow these instructions This product conforms to ECE R44 04 This product is tested to BS EN 1888 2003 A1 A3 2005 kiddicare User guide ...

Page 2: ... seat itself WARNING Keep these instructions with the child car seat for future reference WARNING Never leave your child unattended WARNING NEVER use the child car seat on a passenger seat that is fitted with a front airbag THIS CAN BE VERY DANGEROUS The product is only safe if it is used in strict accordance with these instructions The product must be replaced if it is involved in an accident as ...

Page 3: ...airs DO NOT try and fix the child car seat by yourself It might be damaged or cause more damage Safety comes first Vehicle seatbelt The product must only be used with a 3 point vehicle seatbelt that has been approved to ECE R16 or equivalent NEVER use a 2 point seatbelt Your child car seat can be fitted in most cars However some cars are designed so that proper installation is not possible In this...

Page 4: ...assenger seat with an active airbag 7 If in doubt consult manufacturer or the retailer Safety advice when using with the Willz TS Chassis WARNING To avoid injury ensure that your child is kept away when unfolding and folding this product WARNING Do not let your child play with this product WARNING Never leave your child unattended WARNING Ensure that all the locking devices are engaged before use ...

Page 5: ...azards or simply avoid them WARNING Never assume a driver can see you or your child WARNING If your pushchair is to be used by someone who is unfamiliar with it e g grandparents then show them how it works before letting them use it WARNING This pushchair is not suitable for running or skating WARNING Hold onto your pushchair when close to moving vehicles and trains as the draught from the vehicle...

Page 6: ...ly ones that are guaranteed to have been safety tested and designed to fit this seat Plastic Metal Parts 1 Wipe clean using a mild soap and warm water 2 You must not remove dismantle or alter any part of the seat shell 3 You must not oil or lubricate any part of the seat shell Inspection 1 Check your child car seat regularly for wear and tear 2 The child car seat may have a slight rattle when not ...

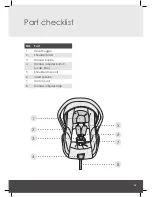
Page 7: ... 6 NO Part 1 Head hugger 2 Shoulder pads 3 Harness buckle 4 Harness adjuster button under flap 5 Shoulder strap slots 6 Insert cushion 7 Crotch pad 8 Harness adjuster strap Part checklist 1 3 4 2 8 6 5 7 ...

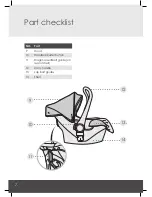
Page 8: ...7 6 NO Part 9 Hood 10 Handle adjuster button 11 Diagonal seatbelt guide on rear of shell 12 Carry handle 13 Lap belt guides 14 Shell Part checklist 9 10 11 12 13 14 ...

Page 9: ... Although not recommended the child car seat can be used on a passenger side front seat so long as there is no active airbag in place WARNING Never use on a seat with an active airbag WARNING Never use on rearward or side facing vehicle seats Front passenger seat no active airbag Yes Front passenger seat active airbag NO 2 point seatbelt NO 3 point seatbelt Yes Back left right seats Yes Back centr...

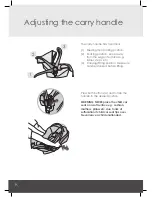
Page 10: ...aces e g tables steps etc 3 Carrying fitting position Make sure handle is locked before lifting Press both buttons A and rotate the handle to the desired position WARNING NEVER place the child car seat on a soft surface e g cushion mattress pillow etc due to risk of suffocation if child car seat tips over Never leave a child unattended A A 1 2 3 ...

Page 11: ...ase button A unbuckle the harness move the shoulder straps apart and remove the shoulder pads A click The harness should exit the child car seat at the same height as the child s shoulder and should not exit higher or lower than the child s shoulder WARNING You should not attempt to adjust the harness height with a child seated in the child car seat ...

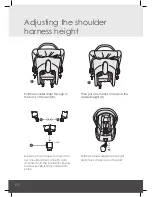
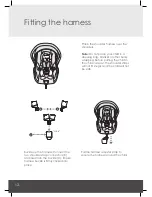
Page 12: ...he seat B Then pass them back through at the desired height C B C E Pull the harness adjuster strap tight and check straps are not twisted D D Buckle up the harness Connect the two shoulder strap connectors D and insert into the buckle E Ensure harness buckle is firmly clicked into place click ...

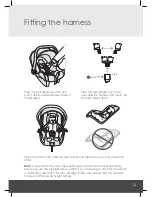
Page 13: ... apart Fitting the harness Place the child in the child car seat and ensure there are no spaces under the child Note A new born baby may need extra support around the head and body Ensure you use the supplied insert cushion if you are going to use it for a newborn or small baby less than 7 months old 9kg or less Also ensure that the shoulder harness is at the lowest height setting ...

Page 14: ...ng before putting the child in the child car seat The shoulder straps will not fit snugly and the child will not be safe Buckle up the harness Connect the two shoulder strap connectors B and insert into the buckle C Ensure harness buckle is firmly clicked into place Pull the harness adjuster strap to secure the harness around the child C B B click ...

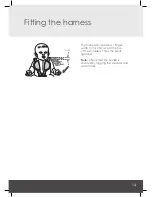
Page 15: ...tting the harness The harness should allow 1 finger width 1cm of space at the top of the shoulders This is the ideal tightness Note Check that the buckle is secured by tugging the shoulder and waist straps 1cm ...

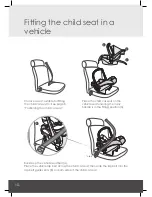
Page 16: ...ning the child car seat Place the child car seat on the vehicle seat ensuring the carry handle is in the fitting position 3 1 2 3 Buckle up the vehicle seatbelt A Place the vehicle lap belt across the child car seat then slide the lap belt into the lap belt guides slots B on both sides of the child car seat B click A ...

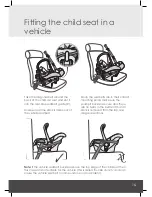
Page 17: ...nce the seatbelts are in their correct mounting points make sure the seatbelt buckle is secure and there are no twists in the belt and that all slack is removed from the lap and diagonal sections Note If the vehicle seatbelt buckle is above the top edge of the child seat then this car seat is not suitable for the vehicle this is called buckle crunch and can cause the vehicle seatbelt to come undon...

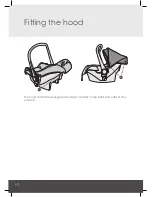
Page 18: ...17 16 The hood is attached using press studs A located on the back and sides of the car seat A A Fitting the hood ...

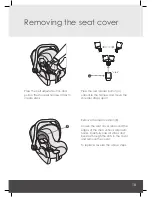
Page 19: ...y pass all straps and buckles through the slots in the cover and remove the cover To replace reverse the above steps Removing the seat cover B Press the belt adjuster button and pull on the shoulder harness straps to create slack Press the red release button A unbuckle the harness and move the shoulder straps apart A click ...

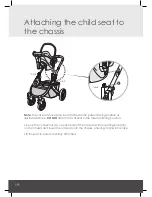
Page 20: ... position as illustrated above DO NOT attach the car seat in the forward facing position Line up the connectors A on each side of the car seat with mounting points B on the chassis and lower the car seat onto the chassis ensuring it clicks into place Lift the seat to ensure it is firmly attached click click click ...

Page 21: ...21 20 Removing the child seat from the chassis A Grip the car seat on both sides and push down the release button A whilst at the same time lifting the seat from the chassis ...

Page 22: ...21 20 Notes ...

Page 23: ...22 Notes ...

Page 24: ...22 K 1 Club Way Cygnet Park Hampton Peterborough Cambridgeshire PE7 8JA Email hello kiddicare com ...

Reviews: