Assembly
Children can be harmed by small parts, sharp edges and sharp points in the vehicles
unassembled state, or by electrical items. Care should be taken in unpacking and
assembling the vehicle. Children should not handle parts, including the battery, or
help in the assembly of the vehicle.
WARNING
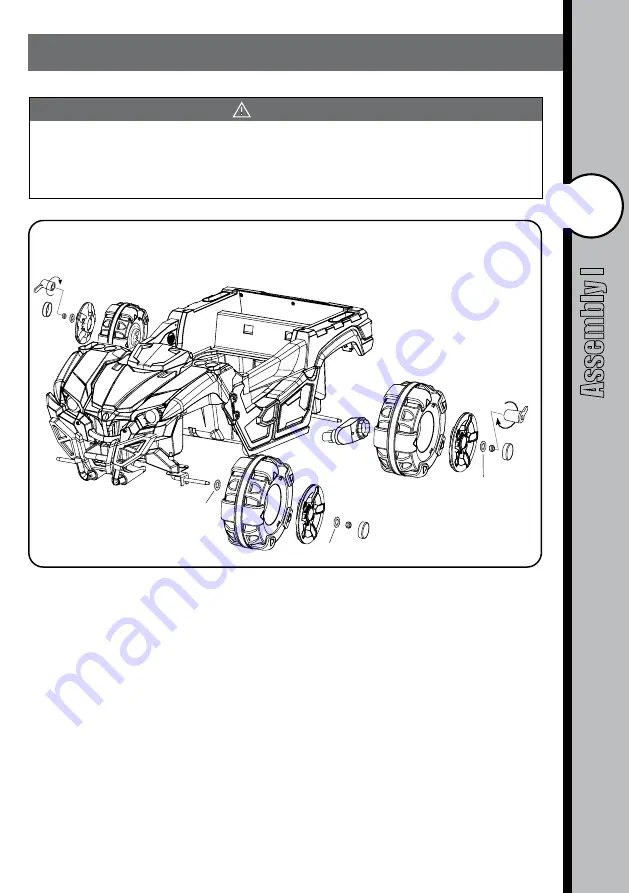
1. Front Wheels Installation
- Loosen a wheel nut and washer from the front axle.
- Slide in a large washer to the front axle.
- Insert a front wheel onto the front axle.
- Snap the wheel cover to the front wheel.
- Insert a small washer and tighten a wheel nut to the end of the front axle with a wrench.
- Snap the wheel cap into the wheel cover.
- Repeat for the other front wheel.
2. Rear Wheels Installation
- Loosen a wheel nut and washer from the rear axle.
- Insert the rear axle to the vehicle.
- Slide the gear boxes to both ends of the rear axle (“R” labeled gearbox should be fit the “R” side
of the vehicle, and “L” labeled gearbox should be fit the “L” side of vehicle) with the motors
pointing inward and insert them into the corresponding holes of the vehicle body. Insert the
gearbox plug into the socket of the vehicle.
- Mate the sleeve of the rear driving wheel into the driving tube of the gearbox through the rear
axle.
- Snap the two wheel covers to the rear wheels.
- Insert a small washer and screw in a wheel nut to both ends of the rear axle.
- Tighten the wheel nuts at both ends with a wrench simultaneously.
- Snap the wheel caps into both wheel covers.
8
Assemb
ly I
Large Washer
(M10)
Small Washer
(M8)
Small Washer
(M8)


