background image

19

AUDIO SYSTEMS

ALWAYS CHECK THE OWNER’S MANUAL FOR COMPLETE OPERATING INFORMATION AND SAFETY WARNINGS  

*IF EQUIPPED                     †LEGAL DISCLAIMERS ON BACK INSIDE COVER


Standard Audio System 
(DA2.0) Video 

  
To view these videos on 
your mobile device, snap 
this QR Code or visit the 
listed website .
Refer to page 2 for more 
information .

www.youtube.com/KiaFeatureVideos

QR CODE

Audio System Setup Options – 

Press the SETUP key, then using the 

touchscreen, press the menu item to enter (Display, Sound, Clock/Calendar, 
Phone, System) . Adjust the available settings for each equipped audio 
system setup option by pressing the onscreen buttons/arrows . Audio 
system setup options may include the following:


Display settings – 

Adjusting  

the Brightness, Mode Popup,  
MP3 Information Display


Sound settings – 

Sound  

Settings, Speed Dependent  
Volume Control, Voice Recognition 
Volume, Touchscreen Beep


Clock/Calendar settings –  

Clock Settings, Time Format,  
Calendar Settings, Clock Display 


System settings – 

Memory 

Information, Prompt Feedback, 
Language

Custom Key  :

 A programmable key to provide quick access to one of 

several available system features .

To Program the Custom Key: 

Press the SETUP key, then press the Custom 

button . Select one of the available features you would like the Custom 
button to open .

Your vehicle’

s audio system may differ from that in the illustration. For further  

audio system operations, refer to pages 17-20 or see your Owner’s Manual. 

Sound Settings – 

To adjust the Standard  

Audio Systems sound settings: 
1 .  Press the SETUP key on the audio control  

unit or the onscreen MENU button when in 
MEDIA mode

2 . Select the onscreen SOUND button 
3 .  Select the menu item (Position, Tone, Speed Dependent Volume, Beep) 
4 .  Using the touchscreen, press arrows to adjust the settings

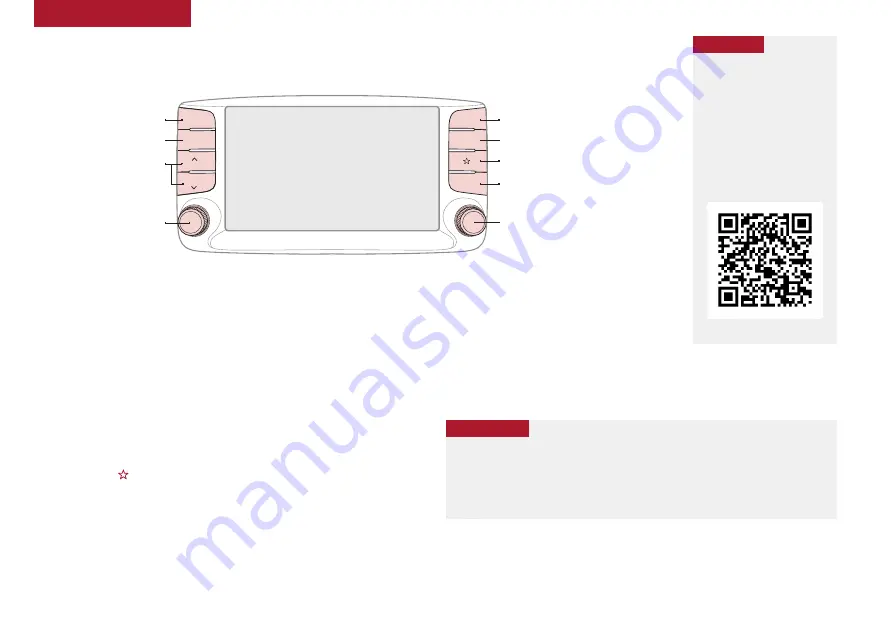
Standard Audio System

* (Type DA2.0 - 7" screen)


FM/AM/Media (USB, iPod

®†11

, AUX, 

Bluetooth

®

 Audio, My Music)*


RADIO

CD-IN

MAP

MEDIA

SEEK

TRACK

PWR VOL

FILE TUNE

PHONE

HOME

SETUP

APPS

Press to enter HOME mode

Press to enter PHONE mode

Press to enter SETUP mode

Press to enter CUSTOM mode

Rotate to change Radio Station/ 
Media tracks/songs/files . Press to select

Press to select previous/

next Radio stations/Media 

tracks/songs/files . Press and 

hold to move quickly through 

stations/tracks/songs/files

Press to Power On/Off . 

Rotate to adjust volume

Press to select FM/AM modes 

Press to select MEDIA modes 

REMINDER: 

To help minimize driver distraction, some audio system functionalities have been 

modified while the vehicle is in Drive, Reverse or moved out of Park .


When connected to Android Auto

 or Apple CarPlay

®

 on your smartphone, the 

smartphone’s navigation

†12

 system may also be available .


A warning screen may appear periodically to remind users that the audio system 
should be operated when the engine is running to prevent battery discharge 


Prolonged use of the audio control unit in ACC mode may drain the vehicle’s battery

QUICK TIPS

Summary of Contents for 2013 Rio

Page 1: ......

Page 2: ... carefully read your Owner s Manual in order to fully familiarize yourself with the important information it contains While Kia endeavors to ensure that the information contained in this guide is accurate at the time of printing Kia may change vehicle specifications without notice in advance or after the fact and assumes no liability in connection with such changes www kia com Consumer Roadside As...

Page 3: ...e Turn Lock Unlock All 26 Fuel Cap Malfunction Indicator 26 Hood Release Lever and Latch 27 Fuel Door Release Lever 27 Trunk Release Lever 4 Door 27 Sunvisor 27 Map Room Lamps 28 Rear Camera Display 29 Child Protector Rear Door Locks 29 Tailgate Release Button 5 Door 29 SAFET Y FEATURES Occupant Detection System ODS Passenger Airbag Off Indicator 30 Seat Belts 30 Seat Belt Retractor Locks 30 NORMA...

Page 4: ...eatureVideos Continue reading for a more in depth look at QR Codes and for instructions on how to use them What are QR Codes A QR Code is a square two dimensional barcode that can be read by mobile devices loaded with an appropriate barcode or QR Code Reader App The app reads the barcode image and then launches uploads the specific information the code contains such as URLs text photos videos and ...

Page 5: ...the LCD warning messages and the function of all indicator and warning lights please refer to the Owner s Manual This illustration is for demonstration purposes only Some indicators and warning lights may not appear in illustration On the vehicle they may appear in the LCD Instrument Cluster Overview A Tachometer B Turn Signal Indicators C Speedometer D Warning and Indicator Lights E Gear Shift Po...

Page 6: ...r Tail Light Indicator Front Fog Light Indicator High Beam Indicator Light Trunk Tailgate Open Warning Indicator Cruise Control Indicator Cruise SET Indicator Cruise Indicator Light Electronic Stability Control ESC Indicator Electronic Stability Control ESC OFF Indicator Low Fuel Level Warning Indicator ECOMINDER Indicator Low Tire Pressure Indicator Engine Coolant Temperature Warning Indicator Ty...

Page 7: ...unction Warning Indicator Check Engine Light to illuminate To view the videos on your mobile device snap these QR Code or visit the listed website Refer to page 2 for more information Tire Pressure Monitoring System Video Fuel Economy Video www youtube com KiaFeatureVideos www youtube com KiaFeatureVideos QR CODE 25 35 35 35 psi Low Tire Pressure A Tire Pressure Monitoring System TPMS 22 Fuel Econ...

Page 8: ... cycle through the screens When displaying TRIP A or TRIP B screens press and hold the OK button C to reset the Tripmeter to zero REMINDERS Appearance of Trip Computer Tripmeter display may differ as equipped All stored driving information except Odometer and Range Distance to Empty is reset if the battery is disconnected Instant Fuel Consumption Mode Press the Mode button A to cycle to Trip Compu...

Page 9: ...y Auto Reset Fuel Economy Unit Temperature Unit Tire Pressure Unit Reset Reset menus in User Settings User Settings Type B cluster To enter the User Settings mode in the LCD Instrument Cluster modes press the Mode button A when the vehicle is at a standstill and with the ignition ON and select User Settings You can navigate the selections on the display by toggling the Move switch B Select the ite...

Page 10: ...nt cluster will be lit momentarily whenever the ESC is active For more information on Electronic Stability Control ESC and its specific features and operations please refer to your Owner s Manual Hill Start Assist Control HAC 7 HAC can help to prevent the vehicle from rolling backwards when accelerating from a stop while on a steep incline The HAC automatically activates whether the ESC is OFF or ...

Page 11: ...ision Avoidance Assist FCA automatically applies the brakes to reduce your speed helping to minimize the effects of a possible collision FCA can be turned ON in the User Settings menu on the instrument cluster display FCA FCW will become active when the Engine Start Stop button is ON Vehicle is traveling more than 5 mph Electronic Stability Control ESC is ON REMINDERS FCA FCW will be activated by ...

Page 12: ...Door Lock Unlock Auto Door Lock Unlock will engage when the gear shift is moved into or out of the P Park position Refer to the User Settings in the LCD Instrument Cluster modes on how to turn Auto Door Lock Unlock ON OFF Power Heated Outside Mirrors Mirror heaters are activated when Rear Defroster is turned on Power Outside Mirrors To adjust outside mirror positions toggle switch D left or right ...

Page 13: ...er to flash Headlights High Beams Turn Signals Fog Lights To operate Turn Signals Move lever Up Down for Right Left Turn Signal Fog Lights Press switch A up down to turn Fog Lights ON OFF REMINDER Headlights must be ON for Fog Light operation One Touch Lane Change Signal is activated by moving the Turn Signal Lever Up Down slightly for less than 1 second and then releasing The lane change signal w...

Page 14: ...iper modes Press switch A up down to adjust Intermittent Wipe Speed Pull lever to spray and wipe Rear Wiper Washer 5 Door To operate Rotate Rear Wiper switch to change wiper modes Push lever to spray and wipe Moving switch up increases intermittent wipe frequency and wipe speed Moving switch down decreases frequency of wipes Set the wiper to OFF position when the wiper is not in use QUICK TIPS LO ...

Page 15: ...VER A C B Tilt Telescoping Steering Wheel 21 To adjust the Steering Wheel position press the lock release lever A down and adjust the desired angle B and then distance C When finished pull the lock release lever A up to lock Steering Wheel in place It may be helpful to pull push bottom of Steering Wheel towards away from you to adjust desired distance QUICK TIP ...

Page 16: ...YSTEM A B C D Type B Bluetooth Wireless Technology 5 19 REMINDER Your vehicle s steering wheel buttons may differ from those in the illustrations See your Owner s Manual for more details Driving while distracted is dangerous and should be avoided Drivers should remain attentive to driving and always exercise caution when using the steering wheel mounted controls while driving For more information ...

Page 17: ...or more information www youtube com KiaFeatureVideos QR CODE Bluetooth Wireless Technology 5 19 continued Pairing a Phone For instructions on how to pair a phone refer to the audio system s user s guide or your vehicle s Quick Start Guide During the pairing process be sure to accept the connection requests on the phone for phonebook download and to allow acceptance of all future Bluetooth connecti...

Page 18: ...set or decrease Cruising Speed F Cruise Control CANCEL button To cancel Cruise Control do one of the following Press the brake pedal Press the CANCEL button Type B Driving while distracted is dangerous and should be avoided Drivers should remain attentive to driving and always exercise caution when using the steering wheel mounted controls while driving A B C D F E Audio Controls 19 Cruise Control...

Page 19: ...ept all terms conditions and requests on the head unit and phone in order to use Apple CarPlay 4 Connect the Apple CarPlay compatible iPhone with the vehicle s USB port using the manufacturer s cable provided with your iPhone 5 From the vehicle s home screen select the Apple CarPlay button where you ll see all the Apple CarPlay supported apps REMINDERS Android Auto compatibility requirements Micro...

Page 20: ...th settings Connections Auto Connection Priority Download Contacts Bluetooth Voice Prompts System settings Language Default System Information Screensaver settings Analog Digital None Display Off setting Off On To adjust the Sound settings Position Tone Back up Warning Priority Speed Dependent Volume Beep When in the SETUP menu select Sound and then Sound Setting Adjust the settings by pressing th...

Page 21: ...further audio system operations refer to pages 17 20 or see your Owner s Manual Sound Settings To adjust the Standard Audio Systems sound settings 1 Press the SETUP key on the audio control unit or the onscreen MENU button when in MEDIA mode 2 Select the onscreen SOUND button 3 Select the menu item Position Tone Speed Dependent Volume Beep 4 Using the touchscreen press arrows to adjust the setting...

Page 22: ... Using Android Auto or Apple CarPlay and a supported smartphone the phone s Navigation App may be displayed on the head unit A warning screen may appear periodically to remind users that the navigation 12 system should be operated when the engine is running to prevent battery discharge At any time you can interrupt UVO eServices Command Feedback by pressing the TALK button on the steering wheel Pr...

Page 23: ... USB iPod 11 Ports Power Outlets USB Charger Use the Aux port B to connect audio devices and the USB port C to connect USB audio devices smartphones and iPod devices Use the power outlets D for mobile phones and other devices designed to operate on a 12V 180W max power outlet REMINDERS Using the power outlets and AUX USB iPod ports for prolonged periods of time with the ignition ON engine OFF coul...

Page 24: ...Set Temperature to desired position 3 Select Front Defrost mode Air Flow Modes To select Air Flow modes rotate the mode selection knob Face Level Bi Level Floor Level Floor Defrost Level Defrost Defog Level front REMINDER Warm air may flow in through vents if Recirculated Air button is not pressed ON LED lit Your Manual Climate Control system may differ from those in the illustrations See your Own...

Page 25: ...CODES Automatic Gear Shift with Sportmatic 18 Shifting P Park R Reverse N Neutral D Drive Manual Mode Upshift Manual Mode Downshift Manual Mode To enter Manual mode move shift lever from D to left gate A To shift while in Manual mode move shift lever up to upshift or down to downshift Press brake pedal and depress release button to move gear shift from N to P N to R or from P to any gear Manual mo...

Page 26: ... Pull lever C to adjust Seatback Recline To raise headrest Pull headrest up To lower headrest Press lock then press the headrest down When adjusting seat forward or backward ensure seat clicks or locks into place before driving the vehicle QUICK TIP REMINDER Do not operate the vehicle with the headrests removed Headrests can provide critical neck and head support in an accident Do not attempt to a...

Page 27: ... lowest position 3 Pull on the Rear Seatback lock release lever C then fold the seat toward the front To Unfold 1 Pull the lock release lever C and lift the Seatback backward until it clicks firmly in place 2 Return the rear seat belt to the proper position REMINDERS Before unfolding Seatback ensure the metal seat belt tab is placed into the holder 5 door model Always make sure the seatback is loc...

Page 28: ...ate Hold for more than 1 second to automatically open Trunk Tailgate E Press and hold more than 1 second for Panic Alarm To turn OFF Alarm press any button REMINDER Remote button configuration may vary depending on vehicle options Double Turn Lock Unlock All Only available with Power Door Locks Turn counterclockwise once to unlock Driver s Door Turn counterclockwise again within 4 seconds to unloc...

Page 29: ... the Hood Release Lever A to unlatch the Hood 2 In the front of the vehicle lift the Hood slightly push the secondary Latch B to the left inside of the hood s center and lift the Hood 3 Pull out the support rod from the Hood and set into place to hold the Hood open Fuel Door Release Lever Pull the lever C upwards to release the fuel door REMINDER Open the Hood only after turning the engine off on ...

Page 30: ...mp turns ON when any door is opened Room Lamp C On In the ON position the lamp stays on continuously D Door In the DOOR position the lamp turns ON when any door is opened E Off In the OFF position the lamp is OFF even if the door is opened REMINDER Using interior lights for an extended period of time may cause battery discharge If your vehicle is equipped with the theft alarm system the interior l...

Page 31: ...cking up procedures Always drive safely and use caution when backing up The Rear Camera Display may not detect every object behind the vehicle Camera located on tailgate handle 5 door or trunk 4 door Tailgate Release button located underneath handle 5 door Child Protector Rear Door Locks Located just below the latch mechanism of the rear passenger doors insert the ignition key into the hole and tu...

Page 32: ...inated OFF because the airbag will not deploy in the event of a crash The driver must instruct the passenger to reposition her himself in the seat Seat Belts 16 To properly fasten your safety belts 1 Insert the belt tongue plate A into the buckle B until it clicks 2 Position the lap portion of the belt across your lap as LOW ON THE HIPS as possible C Adjust the belt to a SNUG FIT by pulling up on ...

Page 33: ...31 ALWAYS CHECK THE OWNER S MANUAL FOR COMPLETE OPERATING INFORMATION AND SAFETY WARNINGS IF EQUIPPED NOTES ...

Page 34: ...RIO F E A T U R E S F U N C T I O N S G U I D E 32 IF EQUIPPED NOTES ...

Page 35: ... alert the driver when the vehicle is approaching another vehicle 9 Front Seat Headrest Adjustment Never attempt to adjust headrests when vehicle is in motion 10 Google Play Store is a trademark of Google Inc 2018 Google Inc All rights reserved Google and the Google Logo are registered trademarks of Google Inc 11 iPhone iPod iPhone and iPod are registered trademarks of Apple Inc Distracted driving...

Page 36: ...ranty program Ensure 100 satisfaction with sales and delivery process and no problems with the vehicle Confirm time and best contact number for initial dealer follow up Cruise Control page 16 Demonstrate operation Bluetooth Wireless Technology pages 14 15 Demonstrate operation Standard Audio System 4 0B 5 screen page 18 Standard Audio System DA2 0 7 screen page 19 UVO eServices page 20 For further...

Page 37: ...User s Manual Air Conditioning Climate Control page 22 Demonstrate Air Flow Modes Defogging and Defrosting Windshield Windshield Rear 5 door model Wipers Washers page 12 IF EQUIPPED R I O C U S T O M E R D E L I V E R Y C H E C K L I S T Owner s Name __________________________________________VIN ______________________________Mileage ______________________ Dealership Name __________________________...

Page 38: ...e mileage for maintenance item schedule B And if necessary adjust correct clean or replace C If TOP TIER detergent gasoline is not available one bottle of additive is recommended Additives are available from your authorized Kia dealer along with information on how to use them Do not mix other additives D Both the fuel filter fuel tank air filter are generally considered to be maintenance free depe...

Reviews: