background image

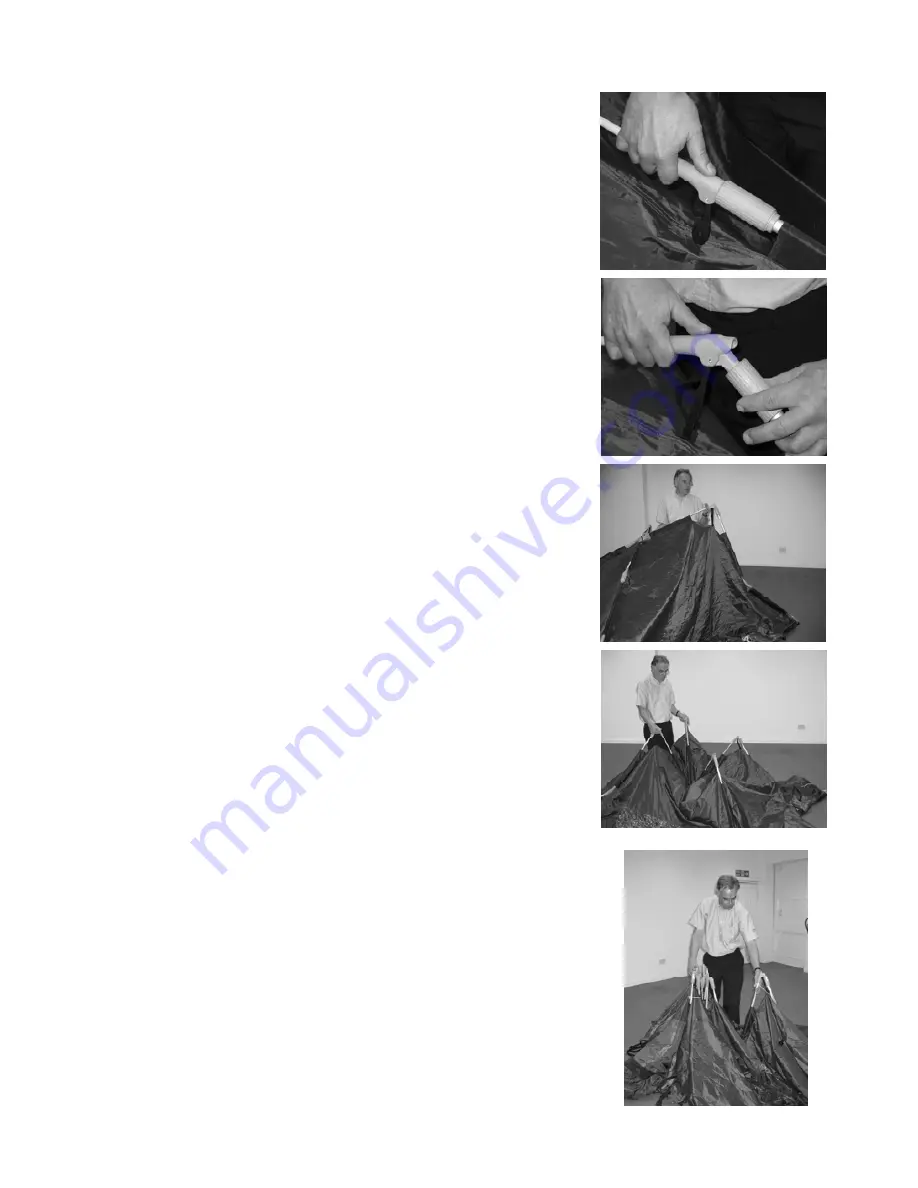
7/ Now that your Ridgi-dome is on its ‘camels knees’ depress 
one of the manual joints closest to the hub (FIG 32) allowing 
the collar to slide past the tongue (FIG 33).  

8/ While supporting the centre hub with one hand lift the joint 
which will cause the automatic joint to fold inwards (FIG 34).  
Repeat point 7 and 8  for the remaining 3 poles.  

9/ The centre hub will now want to fall to the ground, allow 
this to do so and gently gather all the poles to an upright 
position.

First, gather all four of the upper manual joints together, as 
shown in FIG 35 and 36.

Secondly draw the lower manual joint of the poles upwards, 
allowing the auto joint to slide inwards and the foot of the 
pole to remain on the ground, creating a neat bundle of the 
poles.

Fig 32

Fig 33

Fig 34

Fig 35

Fig 36

11

Summary of Contents for RIDGI-DOME XL

Page 1: ...ent is not erected in accordance with the instructions damage could be caused to the joints poles or fabric It is important that the tent is properly guyed at all times particularly in strong winds ot...

Page 2: ...s caused by abuse misuse negligence or damage caused by unusually extreme weather conditions Should you have any problems or questions regarding your new tent you should in the first instance contact...

Page 3: ...nts if they are stiff or will not fold ensure that you are a placing both material and frame joints as the top joints see FIG 3 b folding the pole in the correct direction c the pole joint itself is f...

Page 4: ...eat the process on the 3rd and 4th pole as shown in FIG 8 Your tent is now in the camels knees position FIG 9 IMPORTANT When locking joint B on any of the main poles ensure that point C and it s conne...

Page 5: ...positioning and pegging of tri guys P5 FIG 10 THREADING THE BEDROOM POLES If you have purchased the XXL Excelsior then please refer to the XXL Excelsior Bedroom poles section on page 7 1 One bedroom p...

Page 6: ...ck corded pole Please note that there are 2 sleeves and hence 2 shock corded poles to be threaded through the extended porch fabric 7 All the upright porch poles are exactly the same length however th...

Page 7: ...use pre formed pole sections for the roof section of the bedroom as opposed to the aluminium poles and auto joints referred to and pictured in the XXL Classic section Simply assemble the 3 pre curved...

Page 8: ...has been designed to ensure that you tension the main pole tri guys correctly particularly not over guying The guy runner on the top section of each tri guy is to allow for adjustment when erecting th...

Page 9: ...il the tent is sitting on its knees Striking camp in windy conditions is covered in greater detail in the customer service video enclosed If it is windy we do recommend two people should take the tent...

Page 10: ...of pressure inwards towards the centre of the tent This will take the tension off the joint and it should now be possible to slide the moveable grey collar down approximately 2 3cm see FIG 28 29 The j...

Page 11: ...4 Repeat point 7 and 8 for the remaining 3 poles 9 The centre hub will now want to fall to the ground allow this to do so and gently gather all the poles to an upright position First gather all four o...

Page 12: ...to 2 rectangles either side of the main poles as shown in FIG 37 Take the fabric from one side of the main poles and lay on the fabric on the other side and roll Using the ties supplied with your tent...

Page 13: ...invalidating the guarantee Always use a peg puller or another peg 2 If you break a grey foot this can be easily replaced without any adjustment to the stitching Replacement feet can be fitted quickly...

Page 14: ...achat nous r parerons ou remplacerons selon notre appr ciation gratuitement le produit La garantie intervient seulement si la tente est utilis e dans des conditions normales pour un usage ad quat et...

Page 15: ...s autres m ts en reculant voir fig 8 Votre tente est maintenant agenouill e voir fig 9 IMPORTANT Lorsque vous verrouillez l articulation B d un m t assurez vous bien que le point C et le tissu qui s y...

Page 16: ...ous avons fix les haubans trois points par un n ud D faites les n uds des haubans et rep rez le r gulateur de tension qui se trouve l extr mit du hauban le r gulateur comprend deux anneaux de plastiqu...

Page 17: ...anuelle du bas et exercez une l g re pression en direction du centre de la tente Ainsi l articulation ne force pas Vous tes maintenant en mesure de faire glisser facilement la bague vers le bas sur 2...

Page 18: ...tez nous directement http www khyam fr Q Les tentes Khyam sont elles tanches R Le tissu des doubles toits Khyam sont imperm abilis s et peuvent recevoir jusqu 250 cm d eau au test de r sistance hydros...

Page 19: ...gouttes apparaissent sur les parois de la chambre et plus g n ralement l int rieur du double toit ainsi que sur le tapis de sol sous les matelas gonflables les sacs de couchage etc Il est possible d a...

Page 20: ...Khyam Ltd Unit 5 Bloxwich Lane Estate Bloxwich Walsall WS2 8TF...

Reviews: