background image

5

5

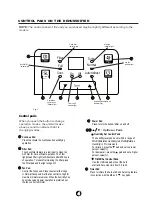
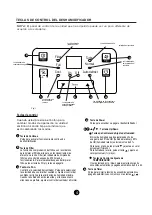
CONTROL PADS ON THE DEHUMIDIFIER

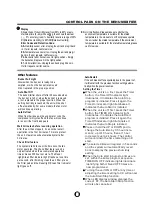
Other features 

Bucket Full Light

Glows when the bucket  is ready to be 
emptied, or when the bucket is removed
or not replaced in the proper position.

When frost builds up on the evaporator coils, the 
compressor will cycle off and the fan will continue 
to run until the frost disappears.

Auto Defrost

Wait 3 minutes before resuming operation

After the unit has stopped,  it can not be restart 
opertation in the first 3 minutes. This is to protect 
the unit. Operation will automatically start after 
3 minutes.

Setting the Timer

 When the unit is on, first  press the Timer 
 button,  the Timer Off indicator light 
 illuminates. It indicates the Auto Stop 
 program is initiated. Press it again the 
 Time On indecator light illuminates.It 
 indicates the Auto Start is initiated.
 

 Press or hold the UP or DOWN pad to 
 change the Auto time by 0.5 hour incre-
 ments,  up to 10 hours, then at 1 hour 
 increments up to 24 hours. The control  
 will count down the time remaining until 
 start. 
 The selected time will register in 5 seconds 
 and the system will automatically revert 
 back to display the previous humidity 
 setting.
 When the Auto start & Auto stop times are
 set, within the same program sequence, 
 TIMER ON OFF indicator lights illuminate 
  identifying both ON and OFF times are
  now programmed.
 Turning the unit ON or OFF at any time or 
 adjusting the timer setting to 0.0 will cancel
 the Auto Start/Stop function.
 When LED display window displays the
 code of  P2, the Auto Start/Stop function 
 will also be cancelled.

When the unit is off, first  press the Timer 

 button, the TIMER ON indicator light 
 illuminates. It indicates the Auto Start 
 program is initiated. Press it again the 
 Time Off indecator light illuminates.It 
 indicates the Auto Stop is initiated.

Check filter feature

The system starts to count the time once the fan 
motor operates. The check filter feature can be 
only activated when the accumulated operation 
time achieves 250 hours or more. The Reset 
 light(Clean filter indicator light) flashes at one time 
per second, after finishing clean the air filter, press 
the Filter pad and the Reset light(Clean filter indicator
light) goes off.  

10

10

Display

Shows the set % humidity level from 35% to 85% or auto 
start/stop time (0~24) while setting, then shows the actual
(

5% accuracy) room % humidity level in a range of 30%

RH(Relative Humidity) to 90%RH(Relative Humidity).

Error Codes and Protection Code:
AS

- Humidity sensor error--Unplug the unit and plug it back

in. If error repeats, call for service.

ES

- Temperature sensor error-- Unplug the unit and plug it 

back in. If error repeats, call for service.

P2

- Bucket is full or bucket is not in right position-- Empty 

the bucket and replace it in the right position.

E1

- Unit malfunction-- Unplug the unit and plug it back in. 

If error repeats, call for service.

Auto Shut Off

The dehumidifier shuts off after 30 seconds when 
the bucket  is full, or when the bucket is removed 
or not replaced in the proper position.When the 
setting humidity is reached, the unit will be shut 
off automatically. For some models,the fan motor
will continue operating.

Auto-Restart

If the unit breaks off unexpectedly due to the power cut, 
it will restart with the previous function setting automa-
tically when the power resumes.

EC

- Unit malfuction--


for

Please make sure whether the 

enviroment temperature is suitable for the stated 
temperature in the manual or not.If not,please operate 
the unit under the stated temperature.If the enviroment 
temperature is suitable for the stated temperature,please 
call  

service.

Summary of Contents for KSTAD224D

Page 1: ...Before operating this product please read the instructions carefully and save this manual for future use DEHUMIDIFIER Model KSTAD224D...

Page 2: ......

Page 3: ...Producto...

Page 4: ...1 866 646 4332 1 866 646 4332 MIDEA AMERICA CORPORATION PRODUCT REGISTRATION CENTER 11800 NW 100 ROAD STE 4 MEDLEY FL 33178 1037...

Page 5: ...ast free of charge to the user B When buying a new product the retailer will take back the old product at least free of charge C The manufacture will take back the old appliance for disposal at least...

Page 6: ...When using the unit 7 Removing the collected water 8 CARE AND MAINTENANCE Care and cleaning of the dehumidifier 9 TROUBLESHOOTING TIPS Troubleshooting tips 10 CONTROL PADS ON THE DEHUMIDIFIER Control...

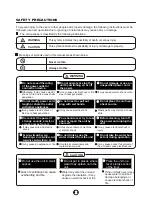
Page 7: ...rd Do not place the unit near a heat source Before cleaning turn off the power and unplug the unit Do not use the machine near flammable gas or combustibles such as gasoline benzene thinner etc CAUTIO...

Page 8: ...unit If water enters the unit turn the unit off and disconnect the power contact a qualified service technician Do not place flower vases or other water container on top of the unit The manufactures n...

Page 9: ...pad and the light will go off 5 5 Humidity Set Control Pads 7 7 Up Down Pads TIMER Set Control Pads Use the Up Down pads to set the Auto start and Auto stop time from 0 0 to 24 The humidity level can...

Page 10: ...ress it again the Time Off indecator light illuminates It indicates the Auto Stop is initiated Check filter feature The system starts to count the time once the fan motor operates The check filter fea...

Page 11: ...ig 3 Air filter behind the grille Control panel Air intake grille Water bucket 1 2 3 4 5 1 2 3 4 NOTE All the pictures in the manual are for explanation purposes only Theactual shape of the unit you p...

Page 12: ...spill water Adehumidifier operating in a basement will have little or no effect in drying an adjacent enclosed storage area such as a closet unless there is adequate circulation of air in and out of...

Page 13: ...perate When you remove the bucket if there is some water in the unit you must dry it Fig 5 Fig 6 OPERATING THE UNIT 2 Continuous draining Water can be automatically emptied into a floor drain by attac...

Page 14: ...using the unit for long time periods CARE AND MAINTENANCE Care and cleaning of the dehumidifier Turn the dehumidifier off and remove the plug from the wall outlet before cleaning 1 Clean the Grille a...

Page 15: ...idity control may not be set low enough Check that all doors windows and other openings are securely closed O O Room temperature is too low below 5 C 41 F There is a kerosene heater or something givin...

Page 16: ......

Page 17: ...Modelo KSTAD224D DESHUMEDECEDOR MANUAL DE INSTRUCCI N Para un funcionamiento eficaz por favor lea las instrucciones cuidadosamente y gu rdelas en un lugar seguro para referencia futura...

Page 18: ...temas de recolecci n donde los residuos electr nicos pueden eliminarse al menos sin cargo alguno al usuario B En la compra de un nuevo producto el minorista puede retirar el producto anterior por lo m...

Page 19: ...e control 4 Otras caracter sticas 5 IDENTIFICACI N DE PARTES Identificaci n de partes 6 Colocaci n de la unidad 7 OPERACI N DE LA UNIDAD Cuando se utiliza la unidad 7 Eliminaci n del agua recogida 8 C...

Page 20: ...Puede causar una descarga el ctrica o incendio Si la unidad se cae puede causar que el agua derramarse y da ar la propiedad o provocar descarga el ctrica o incendio Puede causar fallo en el producto...

Page 21: ...en la parte superior de la unidad No usar en reas donde se manipulan productos qu micos Se debe tener cuidado cuando se utiliza la unidad en una habitaci n con las siguientes personas La placa del fab...

Page 22: ...6 Tecla de Timer 3 Filter Full Cont On Off Turbo Normal Auto defrost 1 2 4 5 6 7 Luz indicadora de limpieza de filtro Luz indicadora de cubeta llena de agua Luz indicadora de funcionamiento continuo L...

Page 23: ...ua est llena o no est en la posici n correcta Vac e la cubeta y coloquela en la posici n correcta E1 Mal funcionamiento de la unidad Desenchufe la unidad y vuelva a enchufela Si se repite el error lla...

Page 24: ...de agua Mango ambos lados Salida de la manguera de drenaje Ruedecilla de mobiliario Cable de alimentaci n y enchufe Banda se utiliza s lo cuando guardar la unidad NOTA Todas las figuras en este manual...

Page 25: ...Utilice la unidad para evitar da os por humedad en libros o art culos de valor guardados Utilice el deshumidificador en un s tano para ayudar a prevenir da os por humedad El deshumidificador debe uti...

Page 26: ...cuando la cubeta est restaurada en su posici n correcta Cuando usted retira la cubeta no tocar ninguna pieza del interior de la unidad Si lo hace podr a da ar el producto Aseg rese de empujar suaveme...

Page 27: ...impia y a ada un poco de detergente suave Revuelva el detergente en la cubeta vac e y enjuague la cubeta NOTA No utilice el lavaplatos para limpiar la cubeta Despu s de la limpieza la cubeta debe esta...

Page 28: ...que no haya cortinas persianas o muebles que bloqueen la parte delantera o trasera del deshumidificador El control de humedad no se puede establecer suficientemente baja Compruebe si todas las puerta...

Page 29: ...s en materiales de la mano de obra Diagn stico retirada transporte y reinstalaci n necesarioS delos costos de los servicios que no sean con respecto al sistema de refrigeraci n Sellado Repuestos de Mi...

Page 30: ...1 866 646 4332...

Reviews: