background image

11

fig.


16

fig.


15

Programming Auto OFF

1. To programme your brewer to turn off 14 

hours after the last brew, follow the steps 
below.

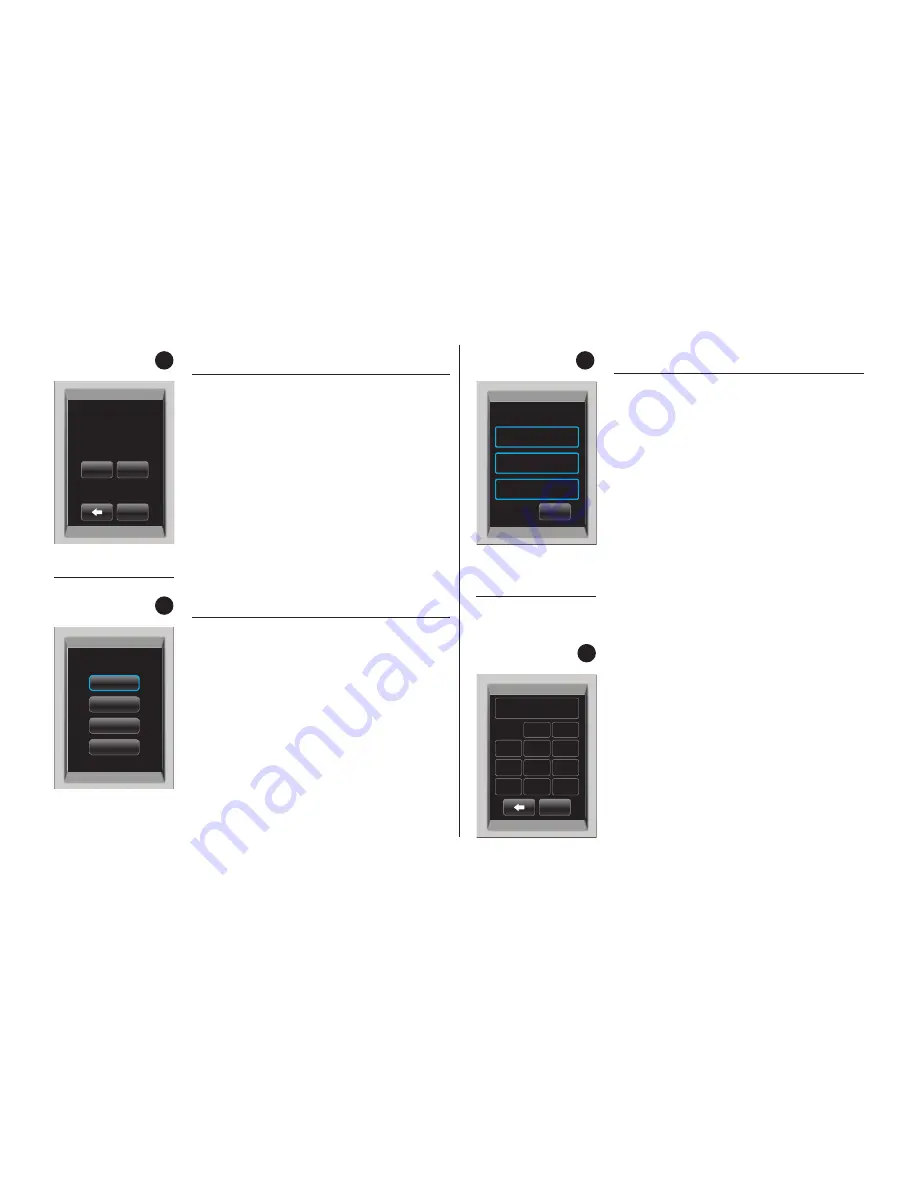
a. From the Menu Mode, press “AUTO OFF”. 

The LCD display will now display the 

“AUTO OFF” programming option (fig. 15).

b. To enable the “ AUTO OFF” feature, press 

“ON”. “ENABLED” will appear on the screen 

and press “OK”. To disable the “AUTO OFF” 
feature, press “OFF”. “DISABLED” will 
appear on the screen and press “OK”. 

Language Settings

The brewer is shipped with English as the 

default language. To change the default to 

Français or Español, follow the instructions 

outlined below.

Set Language

 1.

  From the Menu Mode, press 
“LANGUAGE”.

 2.

  The LCD Screen will now display the 

Language programming options (fig. 16). 

 3. 

Press the desired Language button, then 

press “OK” to confirm your selection.

Language

Español

English

Français

OK

Auto OFF

Auto OFF 14 hours 
After Last Brew

OK

OFF

ON

WWW.KEURIG.CO.UK

SET PHONE #

KEURIG UK LIMITED

Contact

OK

ABC

DEF

GHI

JKL

MNO

PQRS

TUV

WXYZ

Delete

. , -

Space

OK

Set Company

Contact Screen Settings

The contact screen is pre-programmed with 

the following information: Keurig UK 
Limited and www.keurig.co.uk.

You can reprogram the brewer with your 

contact information. The contact screen will 
appear in the screen saver.

 1.

  From the Menu Mode, press “CONTACT”.

The LCD Screen will display the Keurig 

default contact information (fig. 17).

 2.

  Press the Upper (Company Name) Box. 

The Keypad will appear along with the 

current information (fig. 18). 

NOTE:


Unless changed by the user, Keurig contact 
information will be present on the display.

 a. Press the Delete Key repeatedly to 

remove current information. Enter new 
information using the Keypad. 

NOTE:

 To select Upper Case, Lower Case, 

Numerals, Upper Case Accents, Lower 
Case Accents, press the Keypad Change 
Key located at the bottom centre of 
the screen.

 b. Press “OK” to save your changes and 

return to the Main Contact Screen. 

NOTE: 

Pressing the Back Arrow Key will 

return to the Main Contact Screen without 
saving changes.

fig.


17

fig.


18

Summary of Contents for K150C

Page 1: ...K150C Plumbed Brewer Owner s Manual...

Page 2: ...touch hot surfaces 14 To disconnect press the POWER button on the brewer to OFF and then remove the plug from the power socket 15 Close supervision is necessary when any appliance is used by or near c...

Page 3: ...ere is extremely hot water in the K Cup Pod Holder during the brewing process To avoid risk of injury do not lift the handle or open the K Cup Pod Assembly Housing during the brewing process CAUTION P...

Page 4: ...rewing into a travel mug To brew into a travel mug simply remove the drip tray assembly and place the travel mug on the drip tray base 6 Descale the brewer regularly Please refer to pages 13 and 14 fo...

Page 5: ...late H Drip Tray I Drip Tray Base J Housing K BREW Button L Removable Puncture Plate M Power Switch N Power cord O 3 4 BSP Tap Adapter not included P Inlet Plumbing Port Q Drain Hatch and Knob R Drain...

Page 6: ...nd Plumbing Instructions Your K150C Plumbed brewing system requires the use of an external water filter Valid options include an external filter mounted to the rear surface of the brewer or an externa...

Page 7: ...will now be illuminated Press the BREW button to start a cleansing brew NOTE A K Cup pod should not be used for this sequence 5 When the cleansing brew is complete the brewer will go into its idle sta...

Page 8: ...en press the BREW button fig 8 fig 10 fig 9 7 There may be a short pause before the brewing process begins The entire brewing process lasts for approximately 1 minute and ends with a burst of air to r...

Page 9: ...emperature is pre set at 89 C You do not have to program the brew temperature but you can adjust it up or down by 1 increments between 86 and 92 celsius Simply follow the instructions on page 10 Brew...

Page 10: ...gh altitudes over 1 525 meters if boiling occurs use the temperature adjustment 1 to lower the temperature SECTION 3 Menu Controls Indicators Programming Your Brew Size All brew sizes are enabled in t...

Page 11: ...UK SET PHONE KEURIG UK LIMITED Contact OK ABC DEF GHI JKL MNO PQRS TUV WXYZ Delete Space OK Set Company Contact Screen Settings The contact screen is pre programmed with the following information Keur...

Page 12: ...eaning of the brewer s external components is recommended The following section provides instruction for standard cleaning procedures 1 Never immerse the brewer in water or other liquids The housing a...

Page 13: ...ensure proper brewer operation CAUTION There are sharp needles that puncture the K Cup pod above the K Cup pod holder and in the bottom of the K Cup pod holder To avoid risk of injury do not put your...

Page 14: ...the Warranty section of this guide Descaling Procedure STEP 1 FILL AND CLEAN Pour approximately 1 2 L of the vinegar or Keurig Descale Solution into the cold water tank Do not exceed this amount or th...

Page 15: ...s are free Over a large jug or sink remove the plugs fig 25 and drain the water from the cold and hot water tanks respectively CAUTION If the brewer was not allowed to cool sufficiently the water drai...

Page 16: ...may be clogged refer to page 13 LCD Messages If the water flow has been interrupted LCD Screen will state WATER FLOW INTERRUPTED TO RESET PLEASE PRESS BREW BUTTON Press BREW Button to resolve this iss...

Page 17: ...s warranty does not extend to and Keurig is not liable for i any damages of any kind whatsoever which do not directly arise from defects in materials or workmanship of the brewer Such damages include...

Page 18: ...ing Keurig UK Limited One Kingdom Street Paddington Central London W2 6BD United Kingdom This warranty and any non contractual obligations arising from or in connection with it shall be governed by En...

Page 19: ...19...

Page 20: ...www Keurig ie or contact your Keurig Authorised Distributor 2016 Keurig Green Mountain Inc All rights reserved P N DC0000000614 Rev A 04 16 Keurig UK Limited One Kingdom Street Paddington Central Lon...

Reviews: