background image


France, Russian, Spanish, Portugal, and Chinese. It will auto-choose the language upon the language of 

User’s mobile device. If User’s mobile device adopt other language, the APP will auto-choose English 

version to install. Initial Setting as below: 


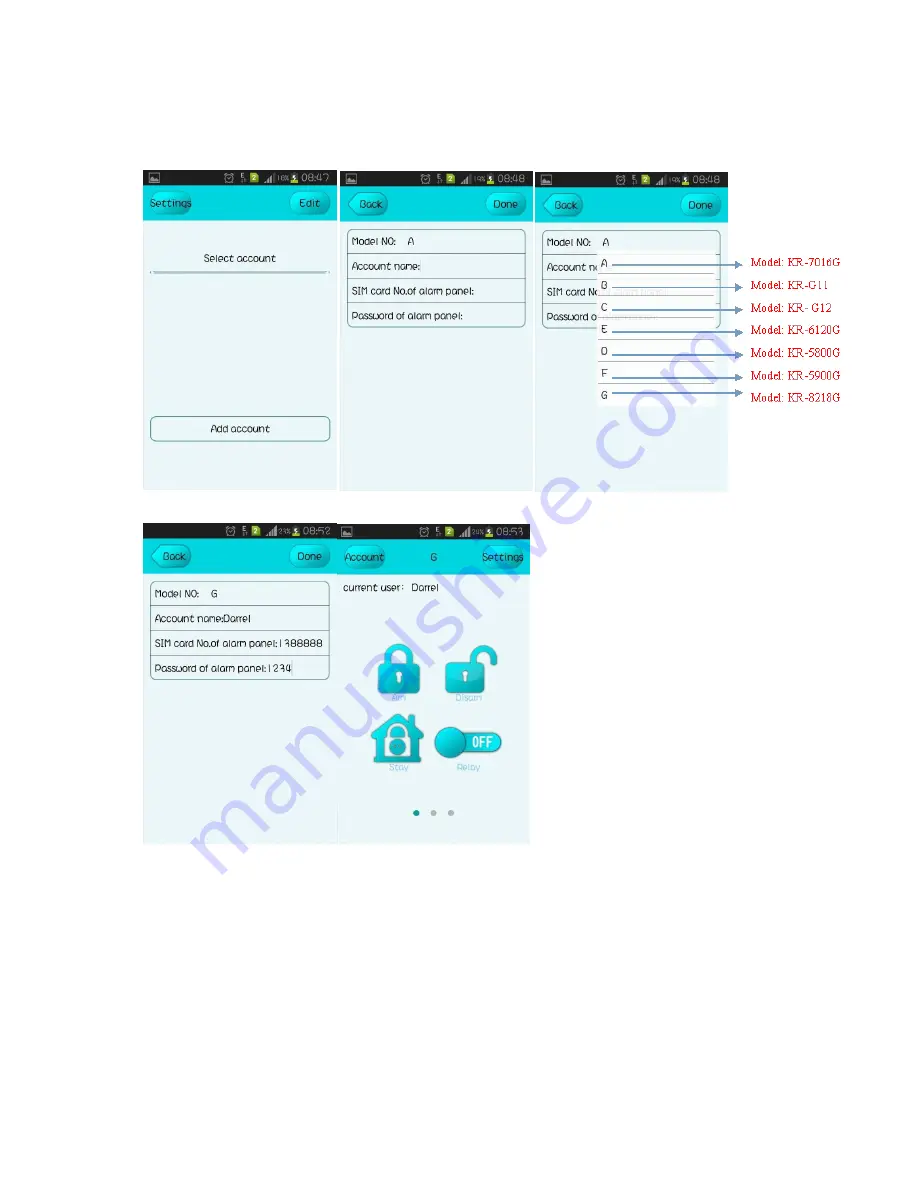
                  P1                                                      P2                                            P3 


                                                                                                      P1: Press Setting for font size and 

                                                                                                            Language 

                                                                                                            Press ‘Ok’ return to P1 and Press 

                                                                                                            ‘Add Account’ to P2 

                                                                                                      P2: Choose the right Model Number 

                                                                                                              Create a User Name 

                                                                                                              Input the Sim card No. Of panel 

                                                                                                              Input the password of panel. 

                                                                                                      Press ‘Done’ to enter P5   


            P4                                                      P5 


3    Introduction of Work Mode (ARM/Disarm/Stay arm/ Emmergency Alarm/ Relay)               

3.1 Arm 

Arm for general protection. In this mode, system will alarm if any detector is triggered.   

The panel will display ‘Arm’ 

3.2    DISARM 

Disarm for dormant. In this mode, system will not alarm if any detector is triggered. 

The Panel will display ‘Disarm’   

Summary of Contents for KR8218G

Page 1: ...0 GSM Alarm System GSM PSTN Contact ID User Guider...

Page 2: ...II Setup Ready To Use 4 Part III System Setting By Keyboard and APP 8 Part IV CID Monitor Center Setting 18 Part V Query Alarm System 21 Part VI Default Factory Setting and System Parameters 21 Part V...

Page 3: ...lbox for playback message upon alert Maximum length of voice message is 10 seconds Remote control for arming disarming monitoring and speaking setting up for relay and siren Wireless intelligent study...

Page 4: ...emergency button Display 97 zone arming The host was defused or moved SIM Card light SIM Card loaded correctly 5 Alarm Process 5 1 Alarm process description and Monitoring Call ARM Detectors was trigg...

Page 5: ...next number on list Remark For host alarm call If not hang up with key or disarm with 2 key the system will retry to call the next phone numbers on list until one connected Note the monitoring and an...

Page 6: ...3 Input Zone No 0 99 or press to delete all remote controls press to delete certain zones remote control or all remote controls 1 3 Add Detector As picture 5 1 press 2 Input Zone No 0 99 Press trigge...

Page 7: ...Ok return to P1 and Press Add Account to P2 P2 Choose the right Model Number Create a User Name Input the Sim card No Of panel Input the password of panel Press Done to enter P5 P4 P5 3 Introduction...

Page 8: ...other operations the initial password is 1234 3 5 Set Relay Output ON OFF Use it to power on off the Appliances Methods to Set Above Work Mode Arm On panel press On remote press on APP click SMS setti...

Page 9: ...mber shouldn t exceed 31 digits As follow Picture 5 2 1 1 1 Set up voice alarm phone number Two Method Method 1 Set it from panel Press Press or to choose then press Choose 1 Alarm numbers and press o...

Page 10: ...s Press or to choose press Press or move the cursor to 3 Help numbers and press or directly input digit 3 to enter help number settings choose group number 1 3 then input help number and Press to save...

Page 11: ...choose group number 1 6 then input SMS number Press to save press back to the menu Method 2 Set from APP page 2 Input Number and press Method 2 is the same as send SMS to panel 1234 4 group No 1 6 ph...

Page 12: ...peak warning alert to the panel for recording System will record 10 seconds and then automatically exit Massage should be simple like This is whose house be intruded please help 2 2 Delay Time Setting...

Page 13: ...t the date and time as picture press to save Note 2 2 1 2 2 2 and 2 2 3 can be setting by APP page 2 Time setting Press Confirm to send it to Panel Send to panel System time will be updated SMS Settin...

Page 14: ...sword 4digits 2 4 Set keyboard password protection feature As picture 5 4 press 2 Password Setting press choose Keypad Lock input new password 4digits and press to save Press the switch ON or OFF 2 5...

Page 15: ...11 Set the anti tampering of telephone call ON OFF As picture 5 4 press 5 Phon SMS setting Test line press switch ON or OFF 2 12 Set the SMS Messaging reply ON OFF As picture 5 4 press 5 Phon SMS sett...

Page 16: ...e Tamper Lcd Save press switch ON or OFF Press to save Same as SMS Setting 1234 84 1 0 1 for OFF 0 for ON 2 16 Set Tamper ON OFF As picture 5 4 press 9 LCD Save Tamper Tamper switch ON or OFF OFF mean...

Page 17: ...f zone with 2 methods System default zone types are User can DIY every zone by two method Method 1 from Panel As picture 5 6 Input zone No 1 99 press move to the Types Press to choose 1 of 8 kinds typ...

Page 18: ...nel As picture 5 6 Input wired zones No 51 52 press move cursor to Wired model press switch the NO NC press to save Same as SMS setting 1234 61 Zone No 51 52 0 1 0 for NO 1 for NC 3 5 Set SMS message...

Page 19: ...phone number Press to save press back to the menu Remark If panel connect with line extention please add a digit before the alarm phone number 1 2 Delete Contact ID phone number Enter CID number press...

Page 20: ...D Input User Code Number Click Send Setting Same As SMS Setting 1234 92 AAAA 0 9 3 Set the Signal Accuracy for CID Set On Panel Press to enter 8 CID setting Input the 0 9 to behind CID Accuracy Press...

Page 21: ...check test day 1234567 behind Test Week then press to save 1 7 means Mon Sun Set by SMS for 5 27 5 28 1234 94 Self checking time 4 digits week number 1 7 7 Event Code Setting On panel enter below 5 6...

Page 22: ...r SMS 1234 40 group NO 07 08 Query the system date and time SMS 1234 56 Query the scheduled time of arm and disarm SMS 1234 57 group NO 01 04 Query the defense zone type SMS 1234 60 zone number 01 99...

Page 23: ...ensor locate b Every door sensor include sensor A as in diagram and magnet B as in diagram B must be the right hand side A and B one on fixed door frame another one on movable door c A and B must alin...

Page 24: ...detection then transmitter signal to avoid fault alarm and missed alarm Part VIII Troubleshooting Troubleshooting Reasons Methods 1 No dial for alarm 1 no arming 2 alerting phone unsetted 3 parts impr...

Page 25: ...plug or jack 2 change the jack line 3 set siren ringing time on the host 8 The transmitter distance for host is shortened 1 a nearby emitter is sending code 2 host receiver stoppage 3 standby battery...

Reviews: