Troubleshooting guide
What might appear to be a malfunction in your unit may just be the result of slight misoperation or miswiring.
Before calling service, first check the following table for possible problems.
PROBLEM
POSSIBLE CAUSE
SOLUTION
No sound.
(No sound from one
side.)
(Blown fuse.)
• Input (or output) cables are disconnected.
• Protection circuit may be activated.
• Volume is too high.
• The speaker cord is shorted.
• Connect the input (or output) cables.
• Check connections by referring to
<Protection function>.
• Replace the fuse and use lower volume.
• After check the speaker cord and fixing the
cause of the short, replace the fuse.
The output level is too
small (or too large).
• The input sensitivity adjusting control is
not set to the correct position.
• Adjust the control correctly referring to
<Controls>.
The sound quality is
bad.
(The sound is distorted.)
• The speakers wire are connected with
wrong
ª
/
·
polarity.
• A speaker wire is pinched by a screw in
the car body.
• The switches may be set improperly.
• Connect them properly checking the
ª
/
·
of the terminals and wires well.
• Connect the speaker wire again so that it is
not pinched by anything.
• Set switches properly by referring to
<Controls>.
故障检修
有时被认为是故障的现象,其实是因微小的操作或配线失误而造成。 在要求维修之前,请参照下表稍做检查为盼。
现象
原因
排除方法
没有声音
(保险丝跳断)
· 输入(或输出)缆线未连接。
· 保护线路可能被触发。
· 音量过大。
· 扬声器电线短路。
· 连接输入(或输出)缆线。
· 参考 <保护功能> 一节,检查连接状况。
· 请更换保险丝,减小音量。
· 确认扬声器线,解除短路原因后,更换保险丝。
输出电平过低(或过高)
· 输入灵敏度调节不当,没有位于妥当位置。 · 调节该控制器。请参考 <控制>。
声音质量很差
(声音失真)
· 扬声器缆线的极性
ª
/
·
连接错误。
· 扬声器缆线的一根被车体螺钉压迫。
· 开关的设定可能不妥。
· 请将缆线的极性
ª
/
·
连接正确。
· 重新连接缆线,使之不再受螺钉压迫。
· 请参考 <控制>,将开关正确设置。
规格
规格可能会变更,恕不另行通知。
音频部
额定输出功率 (+B = 14.4V)
(4 Ω) (20 Hz
–
200 Hz,
≤
1.0 % THD) ................. 400 W × 1
(2 Ω) (100 Hz,
≤
1.0 % THD) .............................. 600 W × 1
扬声器阻抗 .............................................4 Ω (2 Ω
-
8 Ω允许)
频率响应 (+0,
–
1 dB) ........................................ 20 Hz
-
200 Hz
灵敏度 (RCA)......................................................... 0.2 V
-
5.0 V
信噪比 ............................................................................ 100 dB
输入阻抗 .........................................................................10 kΩ
低通滤波器过滤频率 (-24 dB/oct.) ...........50 Hz
–
200 Hz (可变)
低音增强控制(40 Hz) .................................0
–
+18 dB (可变)
共同
使用电压 ............................................... 14.4 V (允许11
-
16 V)
消耗电流 ...........................................................................46 A
安装尺寸(宽×高×深)........................220 × 35 × 169 mm
重量 ................................................................................ 1.6 kg
Connection /
连接
Controls /
控制
1
保险丝 (30 A x 3)
注
万一在销售店等找不到指定容量的保险丝的话,请与建伍专销公司联系。
2
BATT. (蓄电池) 端子
3
P.CON(电源控制)端子
控制本机的接通/关闭。
注
控制本机电源。 应务必与全部系统连接。
4
GND (接地) 端子
5
SPEAKER OUTPUT (扬声器输出) 端子
本机只适用于 2 欧姆以上的阻抗,故请连接的扬声器的阻抗亦为 2 欧姆以上。
6
LINE IN(线输入)端子
7
LINE OUT(线输出)端子
输出从线路输入端子输入的信号。
8
INPUT SENSITIVITY(输入灵敏度)控制
根据与本放大器连接的中心装置的前置输出电平调节本控制钮。
注
关于中心装置的前置输出电平,请参考其使用说明书。
9
BASS BOOST LEVEL(低音提升)控制
设定进行提升的低频范围电平。
0
LPF FREQUENCY(低通滤波频率)控制
可以调节本机的输出频带。
-
电源指示灯
当电源打开时,电源指示灯点亮。
7
RCA cable connections
7
连接RCA 缆线
Center unit (CD receiver, etc.)
中心装置(CD 接收机等)
Power control wire
电源控制缆线
RCA cable
RCA 缆线
产品中有毒有害物质或元素的名称及含量
部件名称
有毒有害物质或元素
铅
(Pb)
汞
(Hg)
镉
(Cd)
六价铬
(Cr(VI))
多溴联苯
(PBB)
多溴二苯醚
(PBDE)
安装基板
×
○
○
×
○
○
框架
×
○
○
×
○
○
其他(附件)
×
○
○
×
○
○
○:表示该有毒有害物质在该部件所有均质材料中的含量均在 GB/T26572-2011 标准规定的限量要求以下。
×:表示该有毒有害物质至少在该部件的某一均质材料中的含量超出 GB/T26572-2011 标准规定的限
量要求。
· 此图标表示了中国《电子信息产品污染控制管理办法》规定的环保使用期限。
只要用户在使用本产品时遵守注意事项中的各项规定,从制造日期开始到此图标标出
的期限为止(环保使用期限)既不会污染环境也不会产生对人体有害的物质。
· 附件和消耗性零件的环保使用期限如下所示:
(不同产品中包含的附件和消耗性零件也不相同。)
电缆类、遥控器、麦克风、天线、蓝牙适配器:10 年
环保使用期限
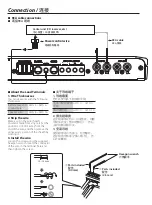
1
Fuse (30 A x 3)
NOTE
If you can’t find the specified capacity fuse at your store etc., consult your Kenwood dealer.
2
Battery terminal (BATT.)
3
Power control terminal (P.CON)
Controls the unit ON/OFF.
NOTE
Controls the unit power. Be sure to connect it with all the systems.
4
Ground terminal (GND)
5
SPEAKER OUTPUT terminals
As this unit accepts speakers with a minimum impedance of 2 ohm, connect speakers with 2- ohm or higher impedance to
these terminals.
6
LINE IN terminal
7
LINE OUT terminal
The signal that’s input from the line input terminal is output.
8
INPUT SENSITIVITY control
Set this control according to the pre-output level of the center unit connected with this unit.
NOTE
For the pre-output level, refer to the <Specifications> in the instruction manual of the center unit.
9
BASS BOOST LEVEL control
Sets the low frequency level to be compensated.
0
LPF FREQUENCY control
This control adjusts the frequency band output from this unit.
-
Power indicator
When the power is turned on, the Power indicator lights.
Specifications
Specifications subject to change without notice.
Audio section
Rated power output (+B = 14.4V)
(4 Ω) (20 Hz – 200 Hz, ≤ 1.0 % THD) .........................400 W × 1
(2 Ω) (100 Hz, ≤ 1.0 % THD) ...........................................600 W × 1
Speaker impedance .................................4 Ω (2 Ω – 8 Ω allowable)
Frequency Response (+0, –1 dB)............................20 Hz – 200 Hz
Input sensitivity (RCA)........................................................... 0.2 V – 5.0 V
Signal to noise ratio........................................................................... 100 dB
Input impedance ...................................................................................10 kΩ
Low pass filter frequency (-24 dB/oct.)
.....................................................................50 Hz – 200 Hz (variable)
Bass Boost Control (40 Hz) ............................. 0 – +18 dB (variable)
General
Operating voltage ................................ 14.4 V (11 – 16 V allowable)
Current consumption ...........................................................................46 A
Dimensions (W × H × D) ...................................220 × 35 × 169 mm
Weight ..........................................................................................................1.6 kg
②
①
③
④
⑦
⑥
⑤
⑧
⑪
⑨
⑩
7
Fuse exchange
7
更换保险丝
7
About the Lead Terminals
1. Wire Thicknesses
You can use wires with the following
thicknesses:
Battery wire and
ground wire
AWG 4 – AWG 6
Speaker wire
AWG 8 – AWG 16
2. Strip the wire
Make a cut in the wire sheath
(insulator made from vinyl, etc.) at the
position 10-13 mm away from the
end of the wire, and then remove the
unnecessary portion of the sheath by
twisting it.
3. Install the wire
Loosen the screw using the supplied
hexagon wrench. Insert the conductor
of the wire in the terminal hole, and
then tighten the screw.
7
关于导线端子
1. 导线截面
您可以使用以下粗细的导线:
电池导线和接地
导线
AWG 4 - AWG 6
扬声器导线
AWG 8 - AWG 16
2. 剥去绝缘皮
在导线端部大约10-13毫米处,切断
导线保护皮(塑料绝缘层),然后
去掉切断的保护皮。
3. 安装导线
使用附带的六角扳手,松开螺钉。
将导线的导体部分插入墩子孔,然
后拧紧螺钉。
10 - 13 mm
Hexagon wrench
六角扳手
3
Parts included
配件
(2.5 mm)
4
Parts included
配件
(4.0 mm)
Insert the tip of thin-nose pliers into the
slit, grasp the fuse and pull it out.
将扁嘴钳的尖端插入缝隙,夹住保险丝并将其
拉出。
XR600̲W̲EnCh.indd 2
XR600̲W̲EnCh.indd 2
12.12.27 9:37:12 AM
12.12.27 9:37:12 AM


