background image

XD-SERIES (EN/M,T)

35

Basic section

Copying tape

 (Tape dubbing)

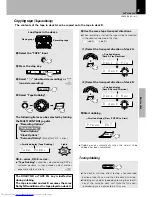
1

Select the “TAPE” input.

2

Press the stop key.

3

Select “

” (double-side recording) or “ ”

(one-side recording).

4

Select “Tape Dubbing”.

The contents of the tape in deck A can be copied onto the tape in deck B.

÷

Dubbing ends automatically when the side(s) to be
dubbed has been completed.

Playing tape

Recording tape

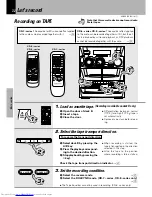
Load tapes in the decks.

+

Scrolled display (Tape Dubbing)

5

Use the same tape transport directions.

6

Start dubbing.

(1) Select the transport direction of deck A.

(2) Select the transport direction of deck B.

÷

When recording is started, the tape will be transported

in the direction selected in this step.

>

 :side A, 

<

 : side B)

+

Scrolled display

(Deck A Play Direction)

+

Scrolled display

(Deck B Record Direction)

+

Scrolled display (Press 'ENTER' to Start)

T

i

a p e   D u b b

Lights

P

T

r e s s   ' E N

INPUT

REV. MODE

ENTER

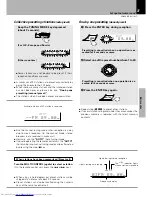
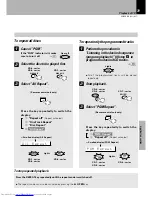
To stop dubbing

÷

The deck B will stop after creating a non-recorded

portion of about 4 sec, and then the deck A will stop.

÷

Dubbing can also be stopped by pressing the stop (

&

)

key of the cassette deck unit. Note that the non-

recorded space is not created in this case.

The DOLBY NR or TAPE EQ. key is ineffective
during dubbing.
The tape recorded on deck B assumes the same
Dolby NR condition as the tape played on deck A.

REC/ARM

MENU

SELECT

M

UL

TI CONTRO

L

&

¡

#

¡

#

Let's record

The following items can be selected by turning

the MULTI CONTROL jog dial.

“Recording Options”

“Tape Dubbing”

“Audio Options”

“Clock Options”

“Surround Setup” 

(Except for XD-7...series)

SELECT

M

UL

TI CONTRO

L

SELECT

M

UL

TI CONTRO

L

A

A

D

a

e c k   A   P l

A


  d e c k     >

D

c

e c k   B   R e

B


  d e c k     >

XD-6...series, XD-8...series :

÷

“Tape Dubbing”

 cannot be selected during DSP or

surround playback. In these modes, select another

equalizer pattern and retry.

E

Summary of Contents for XD-652

Page 1: ...ENWOOD CORPORATION XD SERIES DIGITAL AUDIO DIGITAL AUDIO COMPACT COMPACT TEXT XD 652 XD 852 XD 702 XD 752 XD 772S This instruction manual is used to describe multiple models listed above Model availability and features functions may differ depending on the country and sales area s ...

Page 2: ...THE PRODUCT S ENCLOSURE THAT MAY BE OF SUFFICIENT MAGNITUDE TO CONSTITUTE A RISK OF ELECTRIC SHOCK TO PERSONS THE EXCLAMATION POINT WITHIN AN EQUILATERAL TRIANGLE IS INTENDED TO ALERT THE USER TO THE PRESENCE OF IMPORTANT OPERATING AND MAINTENANCE SERVICING INSTRUCTIONS IN THE LITERATURE ACCOMPANYING THE APPLIANCE CAUTION AC voltage selection The AC voltage selector switch on the rear panel is set...

Page 3: ...Playback of CD 36 Listening in the desired sequence program playback 36 Repeated playback 38 Random playback 40 R D S Radio Data System For U K Europe and Russia 41 Searching for a desired program type PTY search 42 To be able to listen to the desired information at any time EON 44 Convenient CD recording 46 Selection of the recording type 46 Recording only desired titles CD ONE TRACK RECORDING 47...

Page 4: ...s appliance should not be placed in a built in installation such as a bookcase or rack unless proper ventilation is provided or the manufacturer s instructions have been adhered to 5 Water and moisture The appliance should not be used near water for example near a bathtub washbowl kitchen sink laundry tub in a wet basement or near a swimming pool etc Never pull or stretch the cord 6 Temperature Th...

Page 5: ...rge unit size of grounding conductors location of antenna discharge unit connection to grounding electrodes and requirements for the grounding electrode See Figure 18 Power lines An outside antenna system should not be located in the vicinity of overhead power lines or other electric light or power circuits or where it can fall into such power lines orcircuits Wheninstallinganoutsideantennasystem ...

Page 6: ... dimensional audio Multi control jog dial Right dial For use in selecting a function This dial allows you to reproduce realistic audio by setting and registering desired equalizer patterns as well as selecting the preset equalizer patterns Sound control jog dial Left dial For use in selecting the tone and sound field CD text information display CD TEXT compatibility The text information disc title...

Page 7: ...a 1 AM loop antenna 1 Speaker cords Remote control unit 1 Batteries R6 AA 2 Unpacking Unpack the unit carefully and make sure that all accessories are put aside so they will not be lost Examine the unit for any possibility of shipping damage If your unit is damaged or fails to operate notify your dealer immediately If your unit was shipped to you directly notify the shipping company without delay ...

Page 8: ... cords securely If their connections are imperfect the sound may not be produced or noise may interfere 4 Before plugging or unplugging a connection cord be sure to unplug the power cord from the wall AC outlet If connection cords are plugged or unplugged with the power cord left plugged in malfunction or damage may result Notes Notes Malfunction of microcomputer If operation is not possible or er...

Page 9: ...unit Leave a space around the unit from the largest outside dimension including projection equal or greater than shown below Top panel 50 cm Back panel 10 cm LS N472 LS N572 XD 652 XD 852 Speaker Model Name Twist Twist Speaker Unit Main Unit 1 2 3 4 1 2 3 4 FRONT SPEAKERS 6 16Ω R L CENTER SPEAKER 6 16Ω SURROUND SPEAKERS 12 16Ω L R ª ª System connection Speaker left Speaker right Speaker cord Speak...

Page 10: ...m installation is un stableduetothefloorcondition applytheprovidedsta bilizer cushions on four positions on the bottom of each speaker Connection of the surround speakers XD 6 series XD 8 series CAUTION Note on Connection Connectthecomponentsasshowninthediagram Onlyplugthepowercordintoapoweroutletonceconnections are completed The rear panel configuration is variable depending on the models countri...

Page 11: ...an associated system component is connected also read the instruction manual of the component L R L R MD REC OUTPUT MD DVD INPUT DIGITAL OUT OPTICAL Audio output Note Note Note CAUTION Note on Connection Connectthecomponentsasshowninthediagram Onlyplugthepowercordintoapoweroutletonceconnections are completed The rear panel configuration is variable depending on the models countries or area If an e...

Page 12: ... regard to the SURROUND switch 1 2 3 Twist 4 Twist Speaker Unit Main Unit Surround switch Lead the 75Ω coaxial cable connected to the FM out door antenna into the room and connect it to the FM 75Ω termimal FMoutdoorantenna Use a commercially available antenna adapter a small sized model GND FM 75Ω AM ANTENNA 1 Select the TUNER input 2 WhileholdingtheSELECTkeydepressed turn the SOUND CONTROL jog di...

Page 13: ...haracter information display Displays the input selection frequency volume level etc 0 Guideline Blinks during the setting of an item using the jog dial 0 9 8 1 4 2 3 5 7 6 0 9 1 5 2 3 4 6 7 8 1 Cassette deck related indicators This section contains the cassette deck operation indi cators The indicated information includes the tape reverse mode and tape transport direction 2 Sound level meter The ...

Page 14: ...OL UP STANDBY TIMER PRO LOGIC 3 STEREO 0 SUPER WOOFER Main unit DISC SELECTOR keys The disc for playback or recording is selected DISC SELECTOR indicators XD 7 series XD 8 series only The indicators corresponding to the trays accommodat ing discs light up During playback of a CD the indicator corresponding to the CD blinks DISC SKIP key Thediscforplayback orrecording isselected Thisisalso used for...

Page 15: ...ODE key Switches the tuning mode VOLUME CONTROL knob This is used for volume adjustment INPUT key Press to select the input source When TAPE or CD is selected playback starts automatically provided that a tape or disc has already been loaded DISPLAY DEMO key 6 Switches the displayed information When power is STANDBY Switches the demonstration on and off EX BASS Extra bass key XD 6 series XD 8 seri...

Page 16: ...he equalizer and 3D surround settings SUPER WOOFER key INPUT key BAND key º TEXT DISP key y Press to switch the text information recorded in a CD TEXT disc REPEAT key Used for repeated playback of a CD TUNING 1 keys CD TAPE TUNER º When the CD or TAPE input is selected press to fast forward or backward rewind the disc or tape When the TUNER input is selected press to select a station MUTE key This...

Page 17: ... text information recorded in a CD TEXT disc 9 TIME key Press to switch the time information on the CD player unit 0 SOUND CONTROL key E Press to select the equalizer pattern DSP play or surround play EX BASS key LISTEN MODE key E Press to select surround playback mode INPUT key BAND key º MUTE key This is used to mute the sound temporarily MULTI CONTROL VOLUME UP DOWN keys Skip preset call 4 keys...

Page 18: ...yback To cancel the mode for setting using MULTI CONTROL read the description of each item in this manual PresstheBACKkeytoreturntothepreviousstepandrestart operation from there The BACK key is inoperative once scrolling message Press ENTER to Start has been displayed VOLUME MENU BACK SELECT ENTER 4 7 MULTI CONTROL Icon indication example When Tape Dubbing is selected with the MULTI CON TROL jog d...

Page 19: ... of each item in this manual PresstheBACKkeytoreturntothepreviousstepandrestart operation from there The BACK key is inoperative once scrolling message Press ENTER to Start has been displayed Icon indication example When Tape Dubbing is selected with the MULTI CONTROL jog dial or the MULTI CONTROL key on the remote control unit the DUBBING icon indi cator lights up Thefollowingitemscanbeselectedby...

Page 20: ...nt to the remote sensor malfunction may occur In such a case change the installation position to avoid malfunction Operating range approx Remote sensor 2 1 Notes Notes CHANNEL SPACE freq Area 1 2 USA Canada and South American countries Other countries FM 100 kHz AM 10 kHz FM 50 kHz AM 9 kHz The space between radio channels has been set to the one that prevails in the area to which the system is sh...

Page 21: ...ng side Cleaning If fingerprints or foreign matter be come attached to the disc lightly wipe the disc with a soft cotton cloth or similar from the center of the disc outwards in a radial manner Storage When a disc is not to be played for a long period of time remove it from the player and store it in its case Handling Hold the discs so that you do not touch the playing surface Disc handling precau...

Page 22: ...onnected to the MD DVD INPUT jacks Basic use method INPUT 2 2 1 1 ON STANDBY DOWN VOLUME CONTROL UP 3 3 One touch operation function The power can also be turned ON by pressing the play key of the CD player the play key of the cassette deck or the BAND key of the tuner It is also possible to turn the power ON by simply pressing the 0 OPEN key Muting the sound temporarily Reproducing sound with enh...

Page 23: ...ting is also canceled when the volume is controlled Blinks Reproducing sound with enhanced bass EX BASS XD 6 series XD 8 series only MUTE MUTE Reproducing sound with enhanced bass Super woofer XD 7 series only Adjust the super woofer level according to the cat egory of music and your liking 1 Select Audio Options 2 Select SW Level 3 Adjust SELECT MENU M ULTI CONTROL ENTER M ULTI CONTROL CD Program...

Page 24: ...essed again 2 Start playback If a disc has already been loaded in the CD player and the power is OFF simply pressing the CD playkeyturnspowerautomaticallyONandstarts playback OPEN 0 1 1 2 2 Disc played first when the key is pressed The label must be on top C 0 D 0 1 0 0 The recorded track No are shown XD 7 series XD 8 series After a few seconds play starts from track No 1 Playback stops after havi...

Page 25: ...acks Backward search Forward search The tracks in the direction the dial is rotated are skipped and the selected track will be played from the beginning When the jog dial is rotated a little in the direction of counterclockwise once during playback the track being played will be played from the beginning The CD tracks can also be skipped using the 4 or key of the remote control unit To skip backwa...

Page 26: ...he equalizer or 3D surround effect select Effect off with the SOUND CONTROL jog dial 3D surround XD 7 series only WE By loading a tape in the cassette deck to be used in playback beforehand simply pressing the play key auto matically turns the power ON and starts playback 0 PUSH OPEN 1 1 A B 2 2 3 3 A A To wind tape at high speed To stop playback To stop playback Selection of Tape Equalizer Select...

Page 27: ...aybackorrecord ing is started automatically by the one touch opera tionfunction etc Thisdirectionisthedirectionstored in memory when the tape was last stopped Toswitchthetapetransportdirection presstheplay keycorrespondingtothedesireddirectionthenpress the stop key Transport direction indicators TAPE EQ Tape direction indicators of currently selected deck XD 6 series XD 7 series XD 8 series XD 6 s...

Page 28: ...or play back of the back side while the 2 tape transport in dicator is lit To set the tape counter to 0000 open the cassette holder once Then the counter will be reset T 0 A P E 0 0 0 Let s put out some sound Relay play Relay play is not possible in the reverse modes and If a tape is loaded only in either deck playback stops after having played both sides of the tape When tapes are set in the deck...

Page 29: ...pe Tapes in which large noise is recorded in blanks between programs Tapes containing blanks between programs that are shorter than 4 seconds Tapes recorded at low level Tapes recorded by cross fade recording in which the beginning of next program is overlapped on the end of previous program Notes Notes To play the next program Press once To play the 4th program after the current program Press 4 t...

Page 30: ...have been memorized Auto tuning Turn the MULTI CONTROL jog dial to receive the next tuned station automatically On the remote control unit press the 1 or key Manual tuning Turn the MULTI CONTROL jog dial to select a station On the remote control unit press the 1 or key Let s put out some sound M ULTI CONTROL 3 3 BAND 2 2 TUNING MODE 3 Select a station Each press alternates the mode Auto Auto tunin...

Page 31: ...t 3 Press the ENTER key again Presetting is cancelled when no operation is ex ecuted for 5 seconds or more 2 Select one of the preset numbers from 1 to 30 Presetting is cancelled when no operation is ex ecuted for 5 seconds or more 1 Press the ENTER key during reception M ULTI CONTROL ENTER 0 F M 8 9 0 ENTER Frequency display Lights during auto tuning The indicator lights whenastationisreceived Li...

Page 32: ...et the recording condition 1 Select the reverse mode 2 Select the DOLBY NR mode XD 7 series XD 8 series only 0 PUSH OPEN 1 1 A 2 2 The Tape Equalizer cannot be used in recording XD 6 series only Note that this cassette deck cannot record onto Metal tapes Note Note Note REV MODE DOLBY NR 3 3 Differentiation between normal TYPE and high TYPE tape is set automatically Remove tape slack before load in...

Page 33: ... ON be sure to set the DOLBY NR ON for playback Selection of DOLBY NR Noise Reduction Main unit only XD 7 series XD 8 series only Lit when DOLBY NR is ON DOLBY NR To pause recording Main unit only Pressing the key pauses recording after leaving a non recorded space of about 4 seconds If the key is pressed again in less than 4 seconds after it has been pressed recording resumes from that instant Ea...

Page 34: ...g stops when the stop key of the CD player is pressed Let s record There may be cases in which beat noise interferes with recording of AM MW LW broadcasting In such a case press the A B key during recording to reduce or suppress the beat noise Beat cancel function For U K and Russia A B Switching the sound level meter display mode Each press switches the modes as follows Display Auto Display 1 Dis...

Page 35: ...ress ENTER to Start T i a p e D u b b Lights P T r e s s E N INPUT REV MODE ENTER To stop dubbing The deck B will stop after creating a non recorded portion of about 4 sec and then the deck A will stop Dubbing can also be stopped by pressing the stop key of the cassette deck unit Note that the non recorded space is not created in this case The DOLBY NR or TAPE EQ key is ineffective during dubbing ...

Page 36: ...crolled display Select Disc Track No Even if you program a disc or track which does not exit in the tray it is deleted automatically in playback Press the BACK key to return to the previous step and restart operation from there Up to 32 tracks can be programmed When Full is displayed no more tracks can be programmed Scrolled display Press ENTER to Start JOG to Check MENU SELECT M ULTI CONTROL SELE...

Page 37: ...ressed during playback normal playback in order of tracks resumes from the current track The program mode can also be canceled by pressing the 0 OPEN key 1 Select the programmed disc or track to be replaced and press the SELECT key 2 Select a disc or track to re placethediscortrackselected above step 3 1and 2 1 Select the display as shown on the right and press the SELECT key 2 Perform the same op...

Page 38: ...epeat canceled 2 One Track Repeat 3 Disc Repeat 4 All Repeat Scrolled display One Track Repeat a c k r O n e T Goes off Lights Press the key repeatedly to switch the display 1 Repeat off Repeat canceled 2 One Track Repeat 3 Disc Repeat 4 All Repeat XD 6 series XD 7 series XD 8 series Scrolled display Disc Repeat D a i s c R e p e To stop repeated playback Press the REPEAT key repeatedly until the ...

Page 39: ...ce program playback till step 3 to program the desired CD tracks fl 2 Start playback 3 Select PGM Repeat ENTER All of the programmed tracks will be played repeatedly P t G M R e p e a XD 6 series XD 7 series XD 8 series Press the key repeatedly to switch the display 1 PGM Repeat 2 Repeat off Repeat canceled Scrolled display PGM Repeat Lights Lights Remote control unit only REPEAT XD 6 series XD 8 ...

Page 40: ...k Select Random off RANDOM To select another track in the middle of playing one To repeat random playback Select Random Repeat REPEAT Pressing the 4 key once returns to the beginning of the track being played Playback stops after each title has been played once When the TIME key of the remote control unit is pressed during playback the time display appears but it soon returns to the original displ...

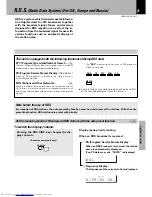
Page 41: ... station in the same network starts broadcasting of such information the reception automatically will be switched to that station The RDS indicator lights up when an RDS broadcast signal is received Some functions may not be provided or be given differ ent names depending on countries or areas Pressing the RDS DISP key changes the dis play contents Display mode priority ranking When an RDS broadca...

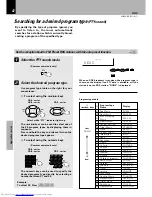
Page 42: ... NONE is displayed Program type table Select while PTY indicator lights up N 0 E W S 1 0 2 5 TP PTY EON TA NEWS RDS POP M ROCK M EASY M LIGHT M CLASSICS OTHER M NEWS AFFAIRS INFO SPORT EDUCATE DRAMA CULTURE SCIENCE VARIED WEATHER FINANCE CHILDREN SOCIAL RELIGION PHONE IN TRAVEL LEISURE JAZZ COUNTRY NATION M OLDIES FOLK M DOCUMENT 01 02 03 04 05 06 07 08 09 00 10 11 12 13 14 15 16 17 18 19 20 21 22...

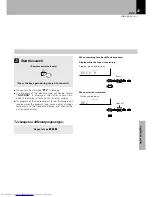
Page 43: ...nd NO PROG is displayed then after several sec onds the display returns to the original display If a program of the desired type is found that program is received and the program type name display changes temporarily to the frequency display and then to the station name display Station name display Program type name display Press the key again during search to cancel it 3 Start the search PTY R 0 ...

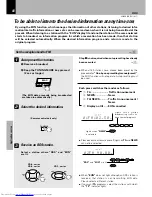
Page 44: ...ive an RDS station The EON data presently being broadcasted are taken in automatically Step1 isnotrequiredwhenautopresettinghasalready been executed When all 30 stations have already been preset by the procedurefor One by onepresetting manualpreset the EON function will not operate Auto presetting must be used 1 Receive a broadcast 2 Keep the TUNING MODE key pressed 2 sec or longer RDS and EON are...

Page 45: ...om the point of interruption CD or tape playback may also be started As long as the unit is ON the unit is always ready for the reception Waiting for information while a RDS station without EON function is tuned If the EON indicator does not light with the RDS station in steps 3 and 4 the tuner will wait for only the desired information broadcast from the tuned RDS station pro vided that the desir...

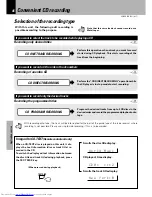
Page 46: ...Recording the programmed titles o Program the desired tracks from up to 3 CD discs in the desiredorderandrecordtheprogrammedplaybackonto tape CD PROGRAM RECORDING If you want to record only the desired tracks Note Note Note With recording onto tape the track will be interrupted for the part of the guide tape at the tape reversal where recording is not possible Please use single side recording if t...

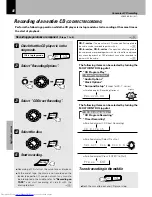
Page 47: ... Recording Both the cassette deck and CD player stop Scrolled display Press ENTER to Start Scrolled display Recording Options Lights SELECT M ULTI CONTROL ENTER R e c o r d i n g C a D O n e T r P T r e s s E N Thefollowingitemscanbeselectedbyturningthe MULTI CONTROL jog dial CD Program Play Recording Options Audio Options Clock Options Surround Setup Except for XD 7 series Whenrecordinghasbeencom...

Page 48: ...D player stop Scrolled display CD Direct Recording Scrolled display Select Disc No Scrolled display Press ENTER to Start SELECT M ULTI CONTROL SELECT M ULTI CONTROL ENTER C D D i r e c t D i s c N o 1 S s e l e c t D i P T r e s s E N Scrolled display Recording Options Lights R e c o r d i n g Thefollowingitemscanbeselectedbyturningthe MULTI CONTROL jog dial CD Program Play Recording Options Audio...

Page 49: ...byturningthe MULTI CONTROL jog dial CD Program Play Recording Options Audio Options Clock Options Surround Setup Except for XD 7 series MENU SELECT M ULTI CONTROL 1 Check that the CD player is in the stop mode 2 Select Recording Options 3 Select CD Program Recording 4 Program the desired tracks 5 Start recording 1 Select tracks in the order you want to play them Perform step 3 on page 36 2 Check r...

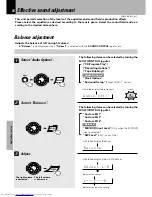
Page 50: ...m EQ 3 Balance MD DVD Input Level Only when the MD DVD input is selected SW Level XD 7 series Only Indicates the balance setting Scrolled display Balance Scrolled display Adjust L R Balance Adjusts the balance of left and right volume Balance adjustment SELECT M ULTI CONTROL Scrolled display Audio Options A i u d i o O p t B a l a n c e A R d j u s t L L R Indicates the center Thefollowingitemscan...

Page 51: ... dial Custom EQ 1 Custom EQ 2 Custom EQ 3 Balance Only when S direct is not selected MD DVD Input Level SW Level XD 7 series Only Scrolled display MD DVD Input Leve Scrolled display Adjust Level Adjustment is possible in the range from 0 to 7 INPUT M p D D V D I n A v d j u s t L e L e v e l 2 Effective sound adjustment SELECT M ULTI CONTROL ENTER M ULTI CONTROL Scrolled display Audio Options A i ...

Page 52: ... EQ 1 Custom EQ 2 Custom EQ 3 S direct Pure sound reproduction by turningtheequalizeror3Dsur round circuitry off Effect off Normal playback Equalizer s manual memory created by the user Main unit Remote control unit This unit permits selection of a variety of preset equalizer patterns as well as registration of equalizer patterns created by the user The S direct Source direct mode allows you to re...

Page 53: ...emote control unit Each press switches the modes as follows Dolby Pro logic Dolby 3 stereo Dolby Virtual surround Effect off Normal playback TheLISTENMODEkeyoftheremotecontrolunitcan be used to select the surround play mode LISTEN MODE The following items can be selected by turning the SOUND CONTROL jog dial Rock Rock music Pop Pop music Jazz Jazz music Classic Classical music Hall Disco Live Chur...

Page 54: ...tions 2 Select the number to be used for storage Custom EQ1 EQ3 3 Adjust the equalizer pattern With a XD 7 series model go to step 4 4 Establish the 3D surround level Scrolled display Adjust Bass Each frequency band can be adjusted in the range be tween 8 and 8 Repeat step 3 to adjust the Bass low sound range Mids middle sound range or Highs high sound range axis A s d j u s t B a B a s s 8 3 D L ...

Page 55: ...eater like surround sound from Dolby Surround encoded sources such as video and Laserdisc software marked This unit is equipped with a Dolby Surround decoder to let youenjoythewidevarietyofcurrentlyavailableDolbySur round home video software Optional in this mode Front speakers Super woofer The surround signals output in the Dolby Pro Logic and Dolby 3 Stereo modes have usually been set to offer r...

Page 56: ...sized speaker No When the center speaker is not used Surround setting XD 6 series XD 8 series Effective sound adjustment Be sure to adjust from your listening position Scrolled display Select Center Speaker S S u r r o u n d S m a S n e l e c t C e l l Scrolled display Select Surround Speaker Y e s S r e l e c t S u 4 2 3 MULTI CONTROL MENU SELECT 4 2 3 MULTI CONTROL SELECT 4 2 3 MULTI CONTROL SEL...

Page 57: ...e surround speakers with respect to that output from the front speakers The delay time setting consists of adjusting this difference in time Effective sound adjustment 2 0 m S l e l e c t d e s Scrolled display Select delay time Scrolled display Select Channel Level T e s S a e l e c t C h t L C c h 8 4 2 3 MULTI CONTROL SELECT 4 2 3 MULTI CONTROL ENTER SELECT 1 Press the MULTI CONTROL key while T...

Page 58: ...e To adjust correct time press the ENTER key at the same moment as a time announcement To decrease the figure To increase the figure Scrolled display Clock Options Lights In standby mode When the key is pressed while the TIMER indicator is lit the timer setup mode is displayed after the clock display The clock display blinks after the power cord has been unplugged from the AC power outlet and plug...

Page 59: ...eep timer Set the number of minutes after which the power is to be turned OFF 1 Select Clock Options 2 Select Sleep Timer 3 Set the time 10Ô20Ô30 80Ô90Ô Sleep off Ô10 Ô20 The displayed time changes in 10 minute steps The maxi mum time that can be set is 90 minutes The power is turned OFF automatically after the set time has elapsed To cancel the sleep timer turn the power off or select Sleep off T...

Page 60: ...l Sleep Timer Adjust Time O T T Timer Play Auto Power Save Timer operation Thefollowingitemscanbeselectedbyturningthe MULTI CONTROL jog dial O T T off Canceled O T T on To cancel the O T T timer select O T T off TIMER STANDBY Lights Scrolled display Set on time Scrolled display Clock Options Lights C i l o c k O p t Thefollowingitemscanbeselectedbyturningthe MULTI CONTROL jog dial CD Program Play ...

Page 61: ...mer can set timer playback and timer recording and both of these functions can be reserved concurrently Either Everyday executing a timer program once every day or One Time executing it only once can be selected for each timer program Once the time range and content of a timer program has been set it can be activated or deactivated as desired If you made a mistake during timer setting Press the BA...

Page 62: ... 0 0 The time is advanced The time is returned The time is advanced The time is returned Adjust the clock before setting the timer Timer operation Auto Power Save When the power is ON and neither recording nor playback is executed for 30 minutes or more the power is switched off automatically by this function 1 Select Clock Options 2 Select Auto Power Save 3 Select A P S on or A P S off The auto p...

Page 63: ... playback or AI timer playback 1 Select the mode Select Play or AI Play 2 Select the input source Select the source to be played 3 Selectthebroadcaststation onlywhenTUNER is selected above Select the preset station No SELECT M ULTI CONTROL SELECT M ULTI CONTROL SELECT M ULTI CONTROL 1 Play Timer play 2 AIPlay Timer play with gradually increas ing volume 1 TUNER Radio 2 CD 3 TAPE 4 MD DVD Externali...

Page 64: ...Amplifier POWER status ON or OFF Input selection Volume control value Balance level Equalizer s manual memory created by the user 3D surround level Tuner unit Receiving band Frequency Preset stations Program timer setting con tents Cassette deck unit Transport direction DOLBY NR Tape Equalizer Reverse mode Memory backup function Important Items INMOSTCASESITISANINFRINGEMENTOFCOPYRIGHT TO MAKE COPI...

Page 65: ...ircuited The speaker cords are disconnected The left and right volumes are not balanced The center speaker and surround speakers are set to No There was a power failure The power cord was unplugged from the outlet The present time has not been ad justed or there was a power failure The timer program or the timer ON OFF time has not been set properly The antennas have not been con nected A proper b...

Page 66: ...mode Reset the microcomputer Clean the head referring to Mainte nance Try another tape Remedy Symptom Cause Sound cannot be produced by pressing the play key No operation occurs even when an operation key is pressed The DPSS malfunctions XD 7 series XD 8 series only In dubbing the tape stops at different moments in decks A and B The cassette holders cannot be opened by pressing the 0 PUSH OPEN are...

Page 67: ... Dew is condensed on the optics lens The disc has not been placed The player is not put to the play mode The disc is extremely dirty The disc is scratched The disc is dirty The disc is scratched The player is subject to vibration Place the disc properly with the label side facing upward Place the disc properly Clean the disc referring to Handling of discs and tapes Try another disc Referto Caution...

Page 68: ...n attempt is made to play the cas sette deck which is recording some thing The MULTI CONTROL setting mode is activated Replace with new batteries Operate the unit inside the remote controllable range Set a tape or CD in the component to be played Wait until the recording ends Cancel the MULTI CONTROL setting mode Remote control unit In case of difficulty Remedy Symptom Cause No operation occurs wh...

Page 69: ...Hz 74 0 MHz AM MW Tuner section Tuning frequency range For U K Europe and Russia 531 kHz 1 602 kHz Other countories 9 kHz step 531 kHz 1 602 kHz 10 kHz step 530 kHz 1 610 kHz LW Tuner section For U K and Russia Tuning frequency range 153 kHz 279 kHz SW Tuner section XD 772S only Tuning frequency range 5 9 MHz 17 9 MHz Cassette deck section Track 4 track 2 channel stereo Recording system AC bias sy...

Page 70: ...nnel driven 100 W 100 W Effective output power during SURROUND operation FRONT 1 kHz 10 T H D 6 Ω One channel driven 70 W 70 W CENTER 1 kHz 10 T H D 6 Ω 30 W SURROUND 1 kHz 10 T H D 12 Ω One channel driven 15 W 15 W Signal to noise ratio MD DVD INPUT 90 dB IHF 66 Input sensitivity inpedance MD DVD INPUT 380 mV 47 kΩ Output level impedance SUPER WOOFER PREOUT 2 0 V 620 Ω MD REC OUTPUT CD 0 dB 1 0 V...

Page 71: ...uration Woofer 160 mm cone type Tweeter 50 mm cone type Super tweeter 25 mm dome type Impedance 6 Ω Maximum input level 120 W Dimensions W 220 mm H 330 mm D 297 mm Weight net 4 2 kg 1 piece Surroundspeakersystem CRS N572 Surround speaker Enclosure Bass reflex type Speaker configuration 100 mm cone type Impedance 12 Ω Maximum input level 15 W Dimensions W 199 mm H 96 mm D 212 mm Weight net 1 0 kg 1...

Page 72: ... U K and Russia YES For U K and Russia SUPER WOOFER key YES YES This instruction manual is used to describe multiple models Model availability and features functions may differ depending on the country and sales area XD 652 XD 852 XD 702 XD 752 XD 772S R D S q YES For U K Europe and Russia YES For U K Europe and Russia YES For U K Europe and Russia SURROUND switch YES YES SUPER WOOFER PRE OUT YES ...

Reviews: