background image

23

 EN

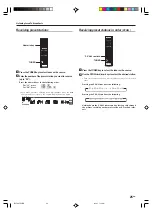
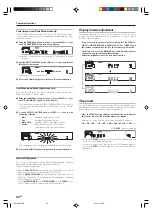
Recording audio (digital sources)

Switch on the 

REC MODE

 to record a digital input source.

Usually use the 

REC MODE AUTO

 to record audio input sources. When

the digital mode changes during recording in the 

REC MODE AUTO

, the

audio input source may be interrupted momentarily.

Recording music in REC MODE AUTO or MANUAL

Input Selector keys

Input Selector
keys

DIMMER

1

Use the Input Selector keys to select the source (CD/DVD, DVD/

6CH, VIDEO 2, VIDEO 3) you want to record.

2

Set the MD or TAPE recorder to record.

3

Press and hold the DIMMER key for more than 2 seconds to select

the REC MODE AUTO or MANUAL.

1

REC MODE off

:

The digital input record mode is switched
off.

2

REC MODE AUTO

:

The digital input signals (DTS, Dolby Digi-
tal, or PCM) are identified automatically
and converted into stereo signals that
are ready for recording.

3

REC MODE MANUAL :

The input signal type at the moment this
mode is selected is held throughout this
mode.

• When the 

REC MODE MANUAL

 is selected, the digital input signal

is converted to stereo signals (down-mix). But once the digital signal
is changed to other signal, no signal is output.
When the

 REC MODE AUTO

  is selected, the digital input signal is

converted to stereo signals even if the digital signal is changed.

Recording

For REC MODE AUTO :

L

S

SB

SL

SR

C

R

SP

MUTE

A B

CLIP

LFE

L

S

SB

C

R

SP

MUTE

A B

CLIP

LFE

SL

SR

DIGITAL

 STEREO

AUTO DETECT

DIGITAL

 STEREO

AUTO DETECT

For REC MODE MANUAL :

L

SL

S

SB

SR

C

R

LFE

SP

MUTE

A B

CLIP

DIGITAL

 STEREO

L

SL

S

SB

SR

C

R

LFE

SP

MUTE

A B

CLIP

DIGITAL

 STEREO

4

Start playback, then start recording.

• If the audio reproduction stops in the middle due to change in the

input signals, etc., press the 

DIMMER

 key.

*5534/17-25/EN

05.2.7, 7:12 PM

23

Summary of Contents for VR-9050

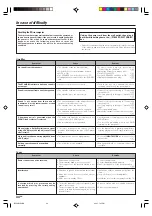
Page 1: ...o effectively use the remote control it is important to read the operating instructions and obtain a proper understanding of the remote control and how to switch its operation modes etc Using the remote control without completely understanding its design and how to switch the operation modes may result in incorrect operations Register Online Register your Kenwood Home Audio product at www kenwoodu...

Page 2: ...BE OF SUFFICIENT MAGNITUDE TO CONSTITUTE A RISK OF ELECTRIC SHOCK TO PERSONS THE EXCLAMATION POINT WITHIN AN EQUILATERAL TRI ANGLE IS INTENDED TO ALERT THE USER TO THE PRES ENCE OF IMPORTANT OPERATING AND MAINTENANCE SERVICING INSTRUCTIONS IN THE LITERATURE ACCOM PANYING THE APPLIANCE FCC WARNING This equipment may generate or use radio frequency energy Changes or modifications to this equipment m...

Page 3: ...d sound 17 Speaker settings 17 Normal playback 20 Preparing for playback 20 Listening to a source component 20 Input level adjustment analog sources only 21 Adjusting the sound 21 Recording 22 Recording audio analog sources 22 Recording video 22 Recording audio digital sources 23 Listening to radio broadcasts 24 Tuning radio stations 24 Presetting radio stations manually 24 Receiving preset statio...

Page 4: ... change the location of the system installation to prevent malfunction Before applying the power Loading the batteries 1 Remove the cover 2 Insert the batteries 3 Close the cover Insert two AAA size R03 batteries as indicated by the polarity markings Preparing the remote control Operating range Approx Remote sensor Infrared ray system Unpacking Unpack the unit carefully and make sure that all acce...

Page 5: ...EQ mode will produce a more dynamic sound quality in any condition You can enjoy a more impressive sound effect when ACTIVE EQ is turned on GAME mode function When you connect a game machine to the AV AUX jacks on the front panel the input selector of the receiver switches automatically to GAME and the optimum sound field for enjoying games is set This feature improves your convenience in playing ...

Page 6: ...rned ON by remote control unit a Display Input channel indicators Output channel indicators AUTO indicator MEMORY indicator STEREO indicator TUNED indicator Frequency display Input display Preset channel display Surround mode display Speaker indicators MUTE indicator CLIP indicator Input mode indicators Listen mode indicators SLEEP indicator 6 LOUDNESS key Use to switch the status of LOUDNESS 7 DS...

Page 7: ... Use to turn the DVD player on or off SOUND key º Use to adjust the sound quality and the ambience effects TONE key Use to switch the status of TONE control MULTI keys MULTI fi keys Use to control a variety of settings VOLUME fi keys Use to adjust the receiver s volume BAND key Use to select the broadcast band 3 8 key Use to operate the DVD player AUTO MONO key Use to select the auto or manual tunin...

Page 8: ...ections and turning on the receiver follow the steps below INPUT MODE Input Selector keys LISTEN MODE 1 Use the Input Selector keys to select CD DVD VIDEO 2 VIDEO 3 or DVD 6CH 2 Press the INPUT MODE key Each press switches the setting as follows In DTS play mode 1 FULL AUTO digital input analog input 2 DIGITAL MANUAL digital input In CD DVD VIDEO 2 VIDEO 3 or DVD 6CH play mode 1 FULL AUTO digital ...

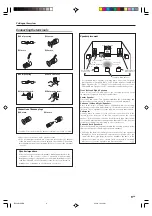
Page 9: ...osition Front Speakers are required for all surround modes Center Speaker Place front and center This speaker stabilizes the sound image and helps recreate sound motion Required for surround playback Surround Left and Right Speakers Place at the direct left and right or slightly behind the listening position at even heights approximately 1 meter above the ears of the listeners These speakers recre...

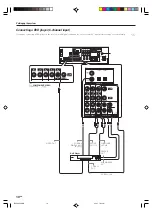
Page 10: ... CD DVD DIGITAL IN DVD 6CH VIDEO 2 MONITOR DVD DVD MONITOR Connecting a DVD player 6 channel input If you have connected a DVD player to the receiver with digital connection be sure to read the Input mode settings section carefully 8 FRONT OUT L R S VIDEO OUT COAXIAL DIGITAL OUT AUDIO DVD Player S VIDEO cord SURROUND OUT L R VIDEO OUT CENTER OUT SUBWOOFER OUT Setting up the system For COMPONENT VI...

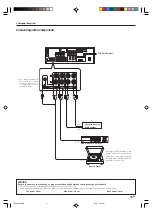
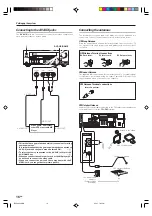
Page 11: ...equal or greater than shown below Top panel 50 cm Side panel 10 cm Back panel 10 cm IN IN REC OUT PLAY IN CD DVD MD TAPE PHONO R L R L Record Player To AC wall outlet Cassette Deck or MD Recorder DVD Player or CD Player IN OUT OUT OUT Moving coil MC cartridge record player cannot be used directly from the receiver unit It can only be used when another equalizer amplifier is connected The earth ter...

Page 12: ...the S VIDEO Jacks to make connections to video c o m p o n e n t s w i t h S VIDEO IN OUT Jacks If you use the S VIDEO jacks to connect your video playback components be sure to use the S VIDEO jacks when connecting your monitor and video recording components Video IN Setting up the system Video Audio DVD Player or LD Player DVD Player or LD Player A video component with digital audio outputs shou...

Page 13: ...CM OUT Component with DTS Dolby Digital or PCM OPTICAL DIGITAL OUT Setting up the system RF digital demodulator Commercially available DVD Player or CD Player OPTICAL DIGITAL OUT AUDIO Optical fiber cable Component with DTS Dolby Digital or PCM COAXIAL DIGITAL OUT Optical fiber cable COAXIAL DIGITAL OUT AUDIO To connect an LD player with a DIGITAL RF OUT connect the LD player to the RF digital dem...

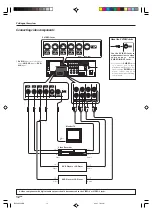
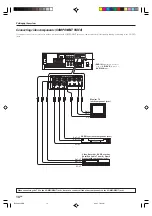
Page 14: ... COMPONENT jacks you can get a better picture quality than by connecting to the S VIDEO jacks When connecting the TV to the COMPONENT jacks be sure to connect all the other components to the COMPONENT jacks Monitor TV with component jacks Video Recorder DVD Recorder Satellite Cable Tuner Game Player with component jacks DVD Player with component jacks DVD IN input jack is used for either CD DVD in...

Page 15: ...ck Speaker s When connecting a single Surround Back Speaker connect it to SURROUND BACK L terminals and se lect SB LARGEx1 or SB NORMALx1 at Speaker settings To make sure that each speaker has been connected properly pay attention to the test tone from each speaker Refer to 5 Adjust the speaker volume level When you wish to connect the second pair of Front speakers or to connect the speakers in a ...

Page 16: ... into the room and connect it to the 75Ω FM terminal S VIDEO OUT S VIDEO cord VIDEO OUT AUDIO OUT AM Loop Antenna FM Indoor Antenna Use an antenna adaptor Commercially available Attach to the stand Setting up the system Connecting to the AV AUX jacks The AV AUX jacks are convenient for connection of video components such as a camcorder or a video game This model has a game function which is conven...

Page 17: ... CONTROL knob or MULTI fi keys to select the appropriate subwoofer setting 1 SUBW ON Subwoofer setting mode to the receiver is ON 2 SUBW OFF Subwoofer setting mode to the receiver is OFF The initial setting is SUBW ON When the setting SUBW OFF is selected the Front Speakers are automatically set to FRNT LARGE and the procedure skips to step 6 WhenSubwooferoutputsoundisrequired select FRNTNORMAL or ...

Page 18: ...NT NORMAL is selected at the Front Speaker setting Subwoofer re mix setting is not visible Press the SETUP key again to return to the main setup displays 4Select the CROSSOVER frequency CROSSOVER function is to adjust the receiver s audio output character istics with the speakers characteristics which differs depending on the size of the speakers You will be able to enjoy a more natural and dynami...

Page 19: ...indicator to be adjusted blinks L SL S SB SR C R SP MUTE A B CLIP SW LFE STEREO Indication in feet Indication in meters The allowable setting range is 1 to 30 feet 0 3 to 9 0 m adjustable in 1 foot 0 3 m increments 4 Repeat steps 3 to input the distance for each of the speakers 5 Press the SETUP key again to return to main setup displays The speakers you have selected should appear on the display ...

Page 20: ...for playback Some preparatory steps are needed before starting playback INPUT MODE SPEAKERS POWER ON STANDBY Turning on the receiver 1 Turn on the power to the related components 2 Turn on the power to this receiver by pressing the POWER ON STANDBY key Selecting the input mode If you have selected a component connected to the CD DVD VIDEO 2 VIDEO 3 or DVD 6CH jacks make sure that the input mode se...

Page 21: ...ic s richness The adjustment can be made when the receiver is in the PCM stereo and analog stereo mode Press the LOUDNESS key to turn the LOUDNESS setting ON This function is available only for speakers connected to FRONT A terminals To cancel Press the LOUDNESS key again so that the LOUDNESS indicator goes off Input level adjustment analog sources only MULTI CONTROL SOUND MULTI fi SOUND Input Sele...

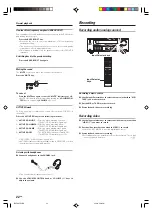
Page 22: ...nnected to FRONT A terminals Switching back to the previous setting Press the BASS BOOST key again Muting the sound The MUTE key lets you mute the sound of the speakers Press the MUTE key Blinks L SL S SB SR C R MUTE A B CLIP LFE SP To cancel Press the MUTE key again so that the MUTE indicator goes off MUTE ON can also be deactivated by turning the VOLUME CON TROL knob or pressing VOLUME fi keys AC...

Page 23: ...utomatically and converted into stereo signals that are ready for recording 3 REC MODE MANUAL The input signal type at the moment this mode is selected is held throughout this mode When the REC MODE MANUAL is selected the digital input signal is converted to stereo signals down mix But once the digital signal is changed to other signal no signal is output When the REC MODE AUTO is selected the dig...

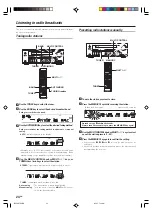
Page 24: ...r TUNING 1 keys to select the station STEREO lights when a broadcast is being received in stereo AUTO MEMO STEREO TUNED STEREO TUNED is displayed when a station is received Auto tuning The next station is tuned automatically Manual tuning Turn the knob or use the MULTI fi keys to select the desired station Presetting radio stations manually MULTI CONTROL MEMORY TUNER MULTI fi TUNER 1Tune to the stat...

Page 25: ... CALL or 4 key lets you skip through the presets receiving each preset station at 0 5 second inter vals Receiving preset stations Numeric keys TUNER 1Press the TUNER key to select tuner as the source 2Enter the number of the preset station you want to receive up to 40 Press the numeric keys in the following order For 15 press 0 5 For 20 press 0 0 If you make a mistake entering a two digit number p...

Page 26: ... Surround Back speaker L Front Left Speaker SW Subwoofer C Center Speaker R Front Right Speaker SL Surround Left Speaker SR Surround Right Speaker SB Surround Back Speaker SBL Surround Back Left Speaker SBR Surround Back Right Speaker The below speaker placements are for 5 1 channel surround sound system which are Dolby Digital Dolby Pro Logic II DTS DTS 96 24 DVD 6 channel The below speaker place...

Page 27: ...mode extends the front stereo image to include the surround speakers for an exciting wraparound effect with side wall imaging The GAME mode provides surrounded and exciting sound when you enjoy game or TV Especially in Pro Logic IIx GAME mode base sound not only from Front and Center but also from Surround channel is added to Subwoofer This provides ever more dynamic surround effects DTS The DTS m...

Page 28: ...ntains identification signals When you choose FULL AUTO during Input mode set tings 8 this amplifier detects the identification signals and selects an optimum LISTEN mode automatically Sometimes we find some discs which are Dolby Digital Surround EX compliant discs but do not contain the identification signals In this case select one of the LISTEN modes which are for 6 1 or 7 1 channel surround mo...

Page 29: ... surround MUSIC mode 6 PLII GAME Pro Logic II surround GAME mode 7 PRO LOGIC Pro Logic surround 8 NEO 6 CINEMA Neo 6 surround CINEMA mode 9 NEO 6 MUSIC Neo 6 surround MUSIC mode 0 STEREO Normal stereo playback Dolby Digital or DTS signal having more channels than the maximum number of playback channels available using the receiver s current settings is input downmixing is performed to match the nu...

Page 30: ...II Music mode only If you have selected SB NORMALx1 or SB LARGEx1 SBR and SBL are not appeared but SB is appeared on the Display 2 Use the MULTI CONTROL knob or MULTI fi keys to adjust the setting as desired The adjustment item is displayed for approximately 20 seconds 3 Press the SOUND key again to return to the input indication Convenient functions DVD 6 channel playback Using a DVD player or the...

Page 31: ...D key again to return to the input indication Dimension mode Pro Logic IIx Music mode and Pro Logic II Music mode only When listening to music with certain recordings you will also be able to achieve a suitable balance from all the speakers by adjusting the dimension mode 1 Press the SOUND key then press the keys or MULTI keys until DIMENSION appears on the display 2 Use the MULTI CONTROL knob or ...

Page 32: ...fs indicator lights up When in FULL AUTO input mode and the listen mode is set to DSP mode the listen mode will automatically be STEREO When in DIGITAL MANUAL input mode and the listen mode is set to DSP mode 96kHz LPCM will appear in the display and no sound can be heard from the speakers Use the LISTEN MODE knob LISTEN MODE key or STEREO key to select STEREO mode to output sound from the speaker...

Page 33: ...yers for the detailed operating instructions To return to the receiver operation mode press other Input Selector key DVD player operation keys You can perform these basic operations using the keys described below when connected to KENWOOD DVD player Basic remote control operations for KENWOOD DVD players STANDBY RECEIVER ON DVD TONE SOUND SLEEP SETUP DIMMER ANGLE REPEAT SUBTITLE AUDIO VOLUME ENTER...

Page 34: ...nected The speaker is not set up correctly The surround speaker cords and or the center speaker cord is disconnected The speaker is not set up correctly A surround mode has not been engaged The surround and or center volume controls are set to the minimum level The audio cord from the record player is not connected to the PHONO jacks The record player is not grounded There are many possible causes...

Page 35: ...rol has not been set to the operation mode for the KENWOOD DVD player you wish to control Remedy Press any of the Input Selector keys to select the appropriate operation mode Replace with new batteries Operate the remote control unit within the controllable range Press the CD DVD key or DVD 6CH key to activate the operation mode for the component you want to control before operation Symptom Remote...

Page 36: ...Hz TREBLE 10 dB at 10 kHz Loudness control VOLUME at 30 dB level 6 dB 100 Hz DIGITAL AUDIO section Sampling frequency 32 kHz 44 1 kHz 48 kHz 96 kHz Input level impedance wave length Optical 15 dBm 24 dBm 660 nm 30 nm Coaxial 0 5 Vp p 75 Ω 100 watts per channel minimum RMS both channels driven at 8 Ω from 20 Hz to 20 kHz with no more than 0 09 total harmonic distortion FTC VIDEO section VIDEO input...

Reviews: