background image

34

6

Press [OK] to program the identified frequency in

place of the currently set tone frequency.

The Tone function will be remained ON.  You may press
[TONE] to switch the Tone function OFF.

Press [ESC] if you do not want to program the identified
frequency.

Press [SCAN] while the identified frequency is blinking,
to resume scanning.

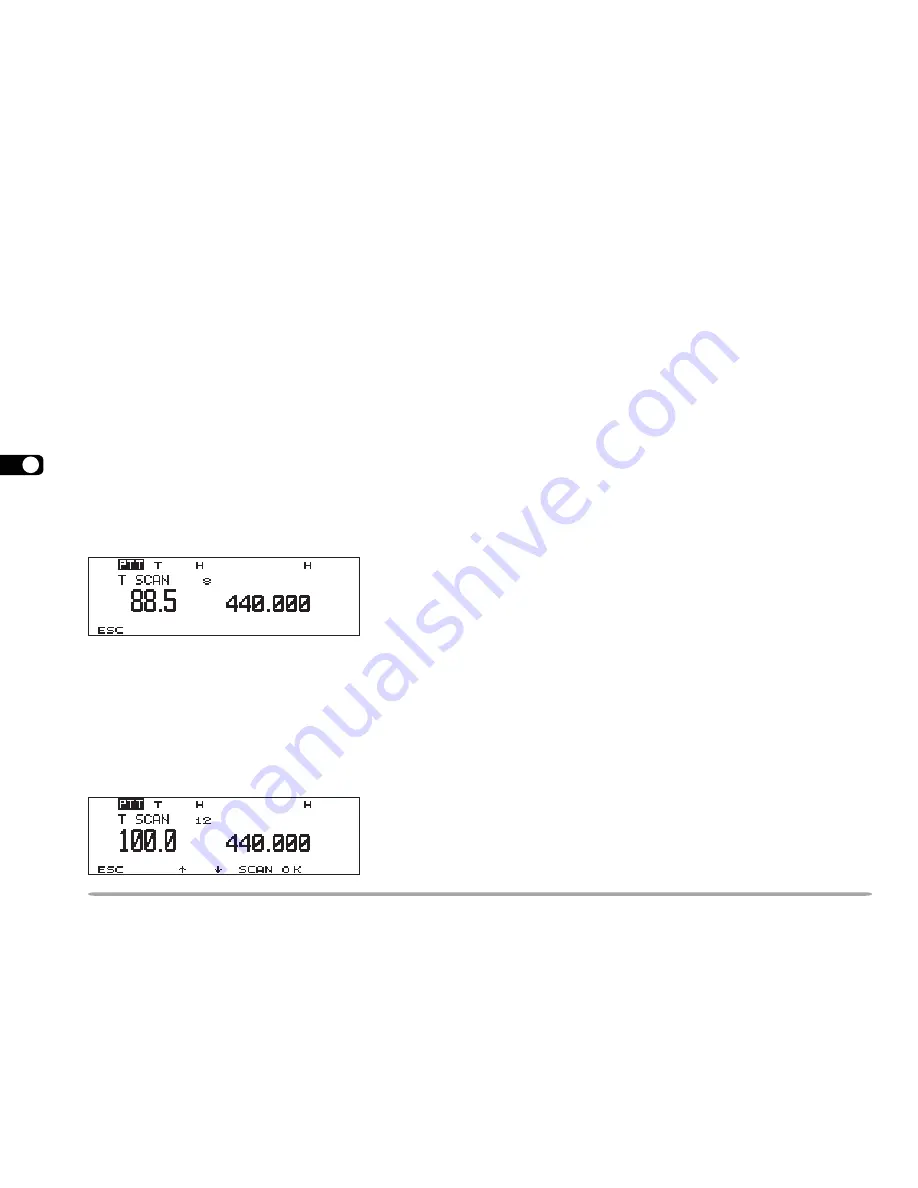
TONE FREQ. ID

This function scans through all tone frequencies to
identify the incoming tone frequency on a received
signal.  You may use the function to find which tone
frequency is required by your local repeater.

Press

 [TONE] to switch ON the Tone function.

“T” appears when the Tone function is ON.

Press [F][T.SEL].

The current tone frequency appears and blinks.

Press [SCAN] to activate the Tone Freq. ID.

“T SCAN” appears and blinks.

Scan starts when signals are received.

To reverse the scan direction, turn the Tuning control
clockwise (upward scan) or counterclockwise
(downward scan).  You can also press Mic [UP]/ [DWN].

To quit the function, press [ESC].

When the tone frequency is identified, the identified
frequency appears and blinks.

Summary of Contents for TM-D700 E

Page 1: ... B62 1228 20 K E M 09 08 07 06 05 04 03 02 01 KENWOOD CORPORATION INSTRUCTION MANUAL 144 440 MHz FM DUAL BANDER 144 430 MHz FM DUAL BANDER TM D700A TM D700A 144 430 MHz FM DUAL BANDER TM D700E ...

Page 2: ...ormats supported by Automatic Packet Position Reporting System APRS Is capable of receiving packet data on one band while receiving audio on the other band Enhanced Programmable Memory PM channels store virtually entire current operating environments for your quick recall Contains a total of 200 memory channels to program frequencies and other various data Allows each memory channel to be named us...

Page 3: ...ication is made INFORMATION TO THE DIGITAL DEVICE USER REQUIRED BY THE FCC This equipment has been tested and found to comply with the limits for a Class B digital device pursuant to Part 15 of the FCC Rules These limits are designed to provide reasonable protection against harmful interference in a residential installation This equipment generates uses and can generate radio frequency energy and ...

Page 4: ...CHANNELS SIMPLEX REPEATER OR ODD SPLIT MEMORY CHANNEL 35 STORING SIMPLEX FREQUENCIES OR STANDARD REPEATER FREQUENCIES 36 SUPPLIED ACCESSORIES 1 CONVENTIONS FOLLOWED IN THIS MANUAL 1 CHAPTER 1 PREPARATION MOBILE INSTALLATION 2 Main Unit Installation 2 Front Panel Installation 3 FIXED STATION INSTALLATION 4 MODULAR PLUG CABLE CONNECTION 4 DC POWER CABLE CONNECTION 5 Mobile Operation 5 Fixed Station ...

Page 5: ...UNCTION PF KEYS CHAPTER 14 AUXILIARY FUNCTIONS DIRECT FREQUENCY ENTRY WITH MC 53DM ONLY 63 CHANGING FREQUENCY STEP SIZE 64 PROGRAMMABLE VFO 64 STORING ODD SPLIT REPEATER FREQUENCIES 36 RECALLING A MEMORY CHANNEL 37 CLEARING A MEMORY CHANNEL 37 NAMING A MEMORY CHANNEL 38 CALL CHANNEL 39 Recalling the Call Channel 39 Reprogramming the Call Channel 39 MEMORY TO VFO TRANSFER 40 CHANNEL DISPLAY 40 PART...

Page 6: ...85 CHAPTER 22 MAINTENANCE GENERAL INFORMATION 87 SERVICE 87 SERVICE NOTE 87 CLEANING 87 TROUBLESHOOTING 88 SPECIFICATIONS INDEX DISPLAY DIMMER 65 AUTO DIMMER CHANGE 65 DISPLAY CONTRAST ADJUST 65 POSITIVE NEGATIVE REVERSAL 65 BLANKING A BAND DISPLAY 66 AUTOMATIC BAND CHANGE A B C 66 TRANSCEIVER LOCK 67 ALL CONTROL LOCK 67 CHANGING MULTI FUNCTION BUTTON LABELS 67 S METER SQUELCH 68 Squelch Hang Time...

Page 7: ... 8 3 0 9 9 N X X 1 3 3 0 9 9 N 1 1 l e n a p t n o r f r o f t e s w e r c S X X 4 1 0 2 9 9 N 1 e l b a c g u l p r a l u d o M X X 1 9 3 3 0 3 E 1 0 1 1 m m 5 2 a h t i w e l b a C g u l p r o t c u d n o c 3 2 X X 0 0 4 3 0 3 E 1 n o i h s u C 3 X X 8 8 4 0 2 0 J 4 d r a c y t n a r r a W y l n o e p o r u E a d a n a C A S U 1 l a u n a m n o i t c u r t s n I n i a M s n o i t a c i n u m m o...

Page 8: ...ur vehicle that minimize danger to your passengers and yourself while the vehicle is in motion Consider installing the units at appropriate positions so that knees or legs will not strike them during sudden braking of your vehicle Try to pick well ventilated locations that are shielded from direct sunlight Note Unlike the previous KENWOOD mobile transceivers this transceiver does not allow the fro...

Page 9: ...supplied 3 self tapping screws and 3 flat washers 4 Position the grooves on the front panel over the bracket tabs 5 Slide the front panel down until its locking tab clicks The tab on the front panel must be completely locked by the bracket otherwise vehicle vibration may cause the front panel to drop off the bracket 6 Determine the angle of the front panel then completely tighten the 2 SEMS screws...

Page 10: ...he rear of the main unit Note Attach all the cushions to the flat surface on the main unit otherwise the installation will be unstable or the cushions may come off easily MODULAR PLUG CABLE CONNECTION Use the supplied modular plug cable to connect the front panel to the main unit Connect the 4 pin plug to the front panel and 6 pin plug to the main unit Note The 6 pin plug is wider than the 4 pin p...

Page 11: ... V Never connect the transceiver to a 24 V battery Be sure to use a 12 V vehicle battery that has sufficient current capacity If the current to the transceiver is insufficient the display may darken during transmission or transmit output power may drop excessively 1 Route the DC power cable supplied with the transceiver directly to the vehicle s battery terminals using the shortest path from the t...

Page 12: ... AC outlet until you make all connections Fixed Station Operation In order to use this transceiver for fixed station operation you will need a separate 13 8 V DC power supply that must be purchased separately The recommended current capacity of your power supply is 12 A 1 Connect the DC power cable to the regulated DC power supply and check that polarities are correct Red positive Black negative D...

Page 13: ...ct installation The transceiver can give excellent results if the antenna system and its installation are given careful attention You should choose a 50 Ω impedance antenna to match the transceiver input impedance Use low loss coaxial feed line that also has a characteristic impedance of 50 Ω Coupling the antenna to the transceiver via feed lines having an impedance other than 50 Ω reduces the eff...

Page 14: ...n the voice modes connect a 600 Ω microphone equipped with an 8 pin modular plug into the modular socket on the front of the main unit Press firmly on the plug until the locking tab clicks For the U S A Canada version a microphone hanger is supplied Attach the hanger to an appropriate position using the screws included in the screw set UP DC 8 V 200 mA max GND STBY PTT GND MIC MIC NC No connection...

Page 15: ... in your most comfortable operating chair with this manual and your favorite drink for an hour or two The time spent will be worthwhile YOUR FIRST QSO Switch ON the DC power supply then press the PWR switch Turn the VOL and SQL controls to approximately 9 o clock Press BAND SEL to select the VHF or UHF band Turn the Tuning control to select a frequency Press and hold Mic PTT then speak in a normal...

Page 16: ... to scan a programmed range of frequencies page 52 e e e e e M R b u t t o n Selects the Memory Recall mode page 37 In this mode you can change memory channels using the Tuning control or Mic UP DWN Also starts Memory Scan page 50 r r r r r T u n i n g c o n t r o l When turned selects Operating frequencies when in VFO mode page 20 Memory channels when in Memory Recall mode page 37 Menu Nos when i...

Page 17: ...an control using the front panel buttons or the microphone keys page 17 2 2 2 2 2 V O L c o n t r o l s B A N D S E L b u t t o n s When turned adjusts the level of receive audio from the speaker page 19 Turn the left control band A or the right control band B depending on which band you want to operate When pressed these buttons select the desired TX band Press the left button band A or the right...

Page 18: ... for 1 second or longer to perform Full Reset page 41 No confirmation message appears Use this switch when the microcomputer and or the memory chip malfunction because of ambient factors Note With the transceiver power ON do not connect cables to or remove from the front panel of the main unit MAIN UNIT REAR q q q q q A n t e n n a c o n n e c t o r Connect an external antenna page 7 When making t...

Page 19: ...hone keys except PTT and if equipped the DTMF keypad t t t t t CALLkey y y y y y VFOkey u u u u u MRkey Identical to the front panel CALL VFO and MR buttons These keys can be reprogrammed if desired page 62 i i i i i PF key Depending on which function you select in Menu 1 8 1 PF1 the function of this key differs Refer to PROGRAMMABLE FUNCTION PF KEYS page 62 o o o o o DTMF keypad MC 53DM only The ...

Page 20: ...S W h e n y o u r e c e i v e a s i g n a l BUSY appears when the squelch page 20 is open The S meter shows the strength of received signals r o t a c i d n I u o Y t a h W d e t c e l e S o t s s e r P u o Y t a h W l e c n a C f e R e g a P n o i t c n u f e n o T E N O T E N O T E N O T 0 3 S S C T C E N O T E N O T 5 5 S C D E N O T 7 5 t e s f f o s u l P n o i t c e r i d F T F I H S F T F I...

Page 21: ...ss PM to select You can select the transceiver environment by pressing 1 to 5 that you stored in PM channels Refer to PROGRAMMABLE MEMORY PM page 42 Menu mode Press MNU to select You can change Menu Nos using the Tuning control or c c c c c d d d d d Refer to MENU SET UP page 22 APRS mode Packet mode Press F 1 s TNC to select APRS mode Press F 1 s TNC again to select Packet mode InAPRS mode you ca...

Page 22: ...e different labels See Programmable Memory PM mode page 15 You can also select different combinations of buttons labels See CHANGING MULTI FUNCTION BUTTON LABELS page 67 The labels of the 5 buttons beside the display are shown at the left end or right end of the display These labels will change depending on the current mode Basic State Display Labels Labels after Pressing F Labels after Pressing F...

Page 23: ...b band in band A and the VHF sub band in band B at the same time The 118 MHz 220 MHz 300 MHz or 1 2 GHz sub band cannot be used for transmitting For the range of each band see SPECIFICATIONS page 90 TX BAND AND CONTROL BAND What confuses you on this radio first could be the ideas of the TX band and Control band To avoid confusion please note the differences between the TX band and the Control band...

Page 24: ... send a DTMF number press and hold Mic PTT then press the DTMF keys on the Mic keypad page 59 in sequence You can also use the Mic keypad to program a memory channel name pages 38 and 60 Power ON message page 71 or other character strings Each press of a Mic key switches entry of characters as below You can always use Mic A as a a a a a B as b b b b b C as DEL and D as OK When programming call sig...

Page 25: ...ELECTING A BAND Press the left BAND SEL to select band A or the right BAND SEL to select band B PTT moves to the selected band For band A and B see page 17 SWITCHING POWER ON OFF 1 Switch ON the DC power supply If operating mobile skip this step 2 Press the PWR switch to switch ON the transceiver 3 To switch OFF the transceiver press the PWR switch again 4 If operating as a fixed station switch OF...

Page 26: ...FO to select VFO mode 2 To increase the frequency turn the Tuning control clockwise or press Mic UP To decrease the frequency turn the Tuning control counterclockwise or press Mic DWN Pressing and holding Mic UP DWN causes the frequency to step repeatedly To change frequencies in steps of 1 MHz press MHz Tuning control first Pressing MHz again cancels this function To change frequencies in steps o...

Page 27: ...ut time to 3 or 5 minutes page 70 Selecting Output Power It s wise to select lower transmit power if communication is still reliable This lowers the risk of interfering with others on the band When operating from battery power you will enjoy more operating time before a charge is necessary Press LOW to select high H medium M or low L power The default is high You can program a different power for ...

Page 28: ...select the appropriate level 2 No To move back to level 1 press BACK To exit Menu mode press ESC 5 Press OK 6 For Menu 1 1 to 1 9 and 1 A repeat steps 4 and 5 to select level 3 7 Press c c c c c d d d d d to select a parameter The procedure in this step differs depending on which menu item you selected See the appropriate sections in the manual 8 Press OK to complete the setting 9 Press MNU to exi...

Page 29: ... i t l u M 3 2 1 e d o M 1 e d o M 7 6 2 O I D U A 1 e m u l o v p e e B x a m 7 n i m 1 l e v e L F F O 5 l e v e L 9 6 2 p e e B y e K F F O N O N O 9 6 3 n o i t a r u g i f n o c r e k a e p S 2 1 e d o M 1 e d o M 2 7 4 r e z i s e h t n y S e c i o V 1 y l n o S R P A h s i l g n E F F O e s e n a p a J F F O 3 8 5 e m u l o v e c i o V 1 x a m 7 n i m 1 l e v e L 5 l e v e L 3 8 3 X R X T 1...

Page 30: ... 1 c e s m 0 0 5 1 6 6 C N T 1 d n a b a t a D e g a p e c n e r e f e r e e S A d n a B 5 2 e s n e s D C D X R a t a D s d n a b B A d n a b X R a t a D d n a b 5 3 e m i T e g a p e c n e r e f e r e e S 2 1 4 e t a D e g a p e c n e r e f e r e e S 2 1 5 e n o z e m i T e g a p e c n e r e f e r e e S 3 1 7 R E T A E P E R 1 y c n e u q e r f t e s f f O s p e t s n i z H M 5 9 9 2 0 0 0 z H k...

Page 31: ...F M T D F F O N O F F O 9 5 9 X U A 1 e m u s e R n a c S d e t a r e p O e m i T k e e S d e t a r e p O r e i r r a C e m i T d e t a r e p O 9 4 2 r o f s l e n n a h C f o r e b m u N n a c S l a u s i V 1 8 1 1 9 1 6 1 3 1 6 7 4 3 O P A f f O r e w o P c i t a m o t u A F F O N O F F O 0 7 4 T O T r e m i T t u O e m i T s e t u n i m 0 1 5 3 s e t u n i m 0 1 0 7 5 t r o p M O C 2 0 0 4 8 3 ...

Page 32: ...W 7 3 7 e t u c e x E n o i t i s o p m i r e p u S e g a p e c n e r e f e r e e S 7 3 8 e d o m V T S S e g a p e c n e r e f e r e e S 8 3 9 l o r t n o C 1 H C V F F O N O F F O 8 3 3 S R P A 1 n g i s l l a c y M e g a p e c n e r e f e r e e S 7 1 2 r e v i e c e r S P G 6 9 A E M N A E M N d e s u t o N d e s u t o N 0 1 3 t n i o p y a W e g a p e c n e r e f e r e e S F F O 5 1 4 n o i t ...

Page 33: ... t a r e p m e t r o f t i n U F C C 1 6 1 I d n a b a t a D e g a p e c n e r e f e r e e S A d n a B 3 1 J e t a r r e f s n a r t t e k c a P s p b 0 0 6 9 0 0 2 1 s p b 0 0 2 1 3 1 K r e t a e p i g i D F F O N O F F O 7 2 L h t a p g n i t a e p i g i D e g a p e c n e r e f e r e e S Y A L E R 7 2 M y l p e R r e w s n A o t u A F F O N O F F O 3 3 N e g a s s e m y l p e R e g a p e c n e r...

Page 34: ...h a standard or non standard offset odd split In addition some repeaters must receive a tone from the transceiver to allow it to access For details consult your local repeater reference Offset Programming Flow If you store the above data in a memory channel you need not reprogram every time See MEMORY CHANNELS page 35 Select a band q w e r t y Select a receive frequency Select an offset direction ...

Page 35: ...nge the offset direction Selecting Offset Frequency To access a repeater which requires an odd split frequency pair change the offset frequency from the default which is used by most repeaters The default offset frequency on the VHF band is 600 kHz no matter which market version the default on the UHF band is 5 MHz TM D700A or 1 6 MHz TM D700E 1 Press MNU to enter Menu mode 2 Press c c c c c d d d...

Page 36: ... 38 standard frequencies The selection you make here will not affect transmission of a 1750 Hz tone Selecting a Tone Frequency Note The procedures for transmitting a 1750 Hz tone are described on page 32 1 Press TONE to activate the Tone function T appears when the Tone function is ON 2 Press F T SEL The current tone frequency appears and blinks The default is 88 5 Hz o N q e r F z H o N q e r F z...

Page 37: ... not function when Reverse is ON However pressing REV after Automatic Repeater Offset has selected an offset split status exchanges the receive and transmit frequencies 1 Press MNU to enter Menu mode 2 Press c c c c c d d d d d to select RADIO 1 then press OK 3 Press c c c c c d d d d d to select REPEATER 1 7 then press OK 4 Press c c c c c d d d d d to select AUTO OFFSET 1 7 2 then press OK 5 Pre...

Page 38: ...Menu 1 7 3 All market versions allow any Mic PF key to be assigned the 1750 Hz Tone function page 62 The transceiver continuously transmits a 1750 Hz tone until you release Mic CALL or CALL Some repeaters in Europe must receive continuous signals for a certain period of time following a 1750 Hz tone This transceiver is also capable of remaining in the transmit mode for 2 seconds after transmitting...

Page 39: ... receive audio to be momentarily intermitted every 3 seconds REVERSE FUNCTION The reverse function exchanges a separate receive and transmit frequency So while using a repeater you can manually check the strength of a signal that you receive directly from the other station If the station s signal is strong both stations should move to a simplex frequency and free up the repeater Press REV to switc...

Page 40: ...quency on a received signal You may use the function to find which tone frequency is required by your local repeater 1 Press TONE to switch ON the Tone function T appears when the Tone function is ON 2 Press F T SEL The current tone frequency appears and blinks 3 Press SCAN to activate the Tone Freq ID T SCAN appears and blinks Scan starts when signals are received To reverse the scan direction tu...

Page 41: ...a non standard offset Note Not only can you store data in memory channels but you can also overwrite existing data with new data If you have recalled a memory channel on the non control band A or B you cannot select the same channel on the control band to program data The data listed below can be stored in each memory channel Yes Can be stored in memory N A Cannot be stored in memory r e t e m a r...

Page 42: ...all an odd split memory channel appears on the display To confirm the transmit frequency press REV Transmit Offset status and Reverse status are not stored in an odd split memory channel STORING SIMPLEX FREQUENCIES OR STANDARD REPEATER FREQUENCIES 1 Select the desired band 2 Press VFO 3 Select the desired frequency 4 If storing a standard repeater frequency select the following data Offset directi...

Page 43: ...to enter Memory Recall mode The memory channel used last is recalled 3 Turn the Tuning control or press Mic UP DWN to select the desired memory channel You cannot recall an empty memory channel To restore VFO mode press VFO If using a MC 53DM you can also use its keypad to recall a desired memory channel First program one of the Mic PF keys as the ENTER key page 62 In Memory Recall mode press ENTE...

Page 44: ...ss c c c c c d d d d d to select RADIO 1 then press OK 4 Press c c c c c d d d d d to select MEMORY 1 4 then press OK 5 Press c c c c c d d d d d to select MEMORY NAME 1 4 4 then press OK The display for entering a memory name appears the first digit blinks 6 Turn the Tuning control to select the first digit You can enter alphanumeric characters plus special ASCII characters 7 Press a a a a a The ...

Page 45: ...the Call channel CALL appears To restore the previous mode press CALL again Reprogramming the Call Channel 1 Select the desired band 2 Press VFO 3 Select the desired frequency and related data Tone CTCSS etc When you program the Call channel as an odd split channel select a receive frequency 4 Press F C IN The selected frequency and related data are stored in the Call channel The previous mode is ...

Page 46: ...tents to the VFO The frequency however is changed by one step CHANNEL DISPLAY When in this mode the transceiver displays only memory channel numbers and memory names if stored instead of frequencies 1 Press MNU to enter Menu mode 2 Press c c c c c d d d d d to select RADIO 1 then press OK 3 Press c c c c c d d d d d to select MEMORY 1 4 then press OK 4 Press c c c c c d d d d d to select CHANNEL D...

Page 47: ...rs Press ESC to quit resetting 6 Press OK After switching the power OFF you may press VFO POWER ON for Partial Reset or MR POWER ON for Full Reset This allows you to skip steps 1 to 5 You can also use the RESET button to perform Full Reset See page 12 Note When in All control Lock or Channel Display mode you cannot perform Partial Reset nor Full Reset r e t e m a r a P A d n a B B d n a B q e r f ...

Page 48: ... n e u q e r f r e p p U O F V e l b a m m a r g o r P r o f t i m i l y c n e u q e r f r e w o L O F V e l b a m m a r g o r P r o f e z i s p e t s y c n e u q e r F e d o m M A M F n o i t a i v e d X T w o r r a n e d i W 1 1 TM D700E only 1 The menu items listed below will not be stored 1 4 1 Auto PM Channel Store 1 4 3 Memory Channel Lockout 1 4 4 Memory channel name 1 5 1 DTMF Number Store...

Page 49: ...nnel It is too much trouble to change back the settings after somebody else has reconfigured them So this application may avoid having a feature rich transceiver but never using many useful features While operating mobile on the way to work every morning you prefer a silent transceiver that does not interrupt the morning calm In addition you feel that a bright display is a waste of electricity in ...

Page 50: ...Press 1 to 5 corresponding to the desired PM channel The settings listed in page 42 are stored in the PM channel RECALLING A PM CHANNEL 1 Press PM The PM channel numbers 1 to 5 appear at the bottom of the display 2 Press 1 to 5 corresponding to the desired PM channel The contents of the selected channel are recalled The current PM channel number appears at the upper right corner s before PM indica...

Page 51: ... press OK 3 Press c c c c c d d d d d to select MEMORY 1 4 then press OK 4 Press c c c c c d d d d d to select AUTO PM STORE 1 4 1 then press OK 5 Press c c c c c d d d d d to switch the function ON default or OFF 6 Press OK to complete the setting 7 Press MNU to exit Menu mode PM CHANNEL RESET If you want to reprogram the PM channels from the beginning reset all the PM channels to the factory def...

Page 52: ...arting Scan switches OFF the Automatic Simplex Check Scan is a useful feature for hands off monitoring of your favorite frequencies Becoming comfortable with all types of Scan will increase your operating efficiency 145 430 MHz Stop e p y T n a c S e g n a R n a c S n a c S O F V d n a b e h t n o e l b a n u t s e i c n e u q e r f l l A n a c S y r o m e M y r o m e m e h t n i d e r o t s s e i...

Page 53: ... and the number of channels The default number of channels is 61 Selecting the Number of Channels 1 Press MNU to enter Menu mode 2 Press c c c c c d d d d d to select RADIO 1 then press OK 3 Press c c c c c d d d d d to select AUX 1 9 then press OK 4 Press c c c c c d d d d d to select VISUAL SCAN 1 9 2 then press OK 5 Press c c c c c d d d d d to select 31 61 default 91 or 181 6 Press OK to compl...

Page 54: ...ncy press PAUSE to halt Scan Memory Recall or Call Channel mode A frequency in the 118 220 or 1200 MHz band was selected in VFO mode Depending on conditions Visual Scan and the conventional S meter may indicate different signal strength levels Using Visual Scan 1 Select the desired band 2 Turn the Tuning control or press Mic UP DWN to select the operating frequency This frequency will also be used...

Page 55: ... mode you select You can choose one of the following modes The default is Time operated mode Time Operated mode The transceiver remains on a busy frequency or memory channel for approximately 5 seconds and then continues to scan even if the signal is still present Carrier Operated mode The transceiver remains on a busy frequency or memory channel until the signal drops out There is a 2 second dela...

Page 56: ...ust contain data and must not be locked out The L0 to L9 and U0 to U9 memory channels are not scanned You can also start Memory Scan when in Channel Display mode While Scan is being interrupted the channel number blinks VFO SCAN VFO Scan monitors all frequencies tunable on the band using the current frequency step size 1 Select the desired band 2 Press VFO 1 s Scan starts at the frequency currentl...

Page 57: ...s with each group containing 20 channels Group Scan monitors only the 20 channels which belong to the specified group The channels are grouped as below 1 Recall one of the memory channels in the desired group 2 Press MHz Tuning control 1 s Scan starts with the channel last recalled The 1 MHz decimal blinks while scanning is in progress To reverse the scan direction turn the Tuning control clockwis...

Page 58: ...The lower limit must be lower in frequency than the upper limit The lower and upper frequency step sizes must be equal The lower and upper limits must be selected on the same band PROGRAM SCAN Program Scan is identical with VFO Scan except that you select the frequency range of the scan Setting Scan Limits You can store up to 10 scan ranges in memory channels L0 U0 to L9 U9 1 Select the desired ba...

Page 59: ...f the current VFO frequency is within more than one programmed scan range the range stored in the smallest channel number is used MHz SCAN MHz Scan monitors a 1 MHz segment of the band using the current frequency step size The current 1 MHz digit determines the limits of the scan For example if the current frequency is 145 400 MHz then the scan range would be from 145 000 MHz to 145 995 MHz The ex...

Page 60: ...ss 5 To quit Call VFO Scan press CALL again CALL MEMORY SCAN Use Call Memory Scan to monitor both the Call channel and the desired memory channel 1 Recall the desired memory channel 2 Press CALL 1 s to start Call Memory Scan The 1 MHz decimal blinks while scanning is in progress The Call channel on the same band as of the selected memory channel is used for Scan 3 To quit Call Memory Scan press CA...

Page 61: ...If necessary press F then the same BAND SEL to recall the sub band 2 Press TONE to activate the CTCSS function CT appears when the CTCSS function is ON Each press of TONE changes the selection as Tone CTCSS DCS No selection 3 Press F T SEL The current CTCSS frequency appears and blinks 4 Press c c c c c d d d d d to select a CTCSS frequency The selectable frequencies are the same as for the tone f...

Page 62: ...lso use its keypad to select a CTCSS frequency First program one of the Mic PF keys as the ENTER key page 62 In step 3 press ENTER then enter 01 to 38 shown in the table page 30 To select 79 7 Hz for example press ENTER 0 5 Note You can select a separate tone frequency for the CTCSS and Tone functions You cannot use the CTCSS with the Tone or DCS function If you select a high tone frequency receiv...

Page 63: ... 0 4 3 1 2 1 2 1 6 2 2 3 3 3 2 4 6 6 4 4 2 6 2 3 7 6 2 0 2 7 0 3 4 1 3 2 2 3 6 2 3 4 3 1 3 4 3 0 5 7 2 6 4 3 7 1 3 0 3 7 0 5 4 1 5 2 2 5 6 2 6 4 3 2 3 4 6 0 5 1 3 6 3 4 7 2 3 0 4 7 0 2 5 1 6 2 2 6 6 2 1 5 3 5 4 4 6 1 5 2 3 6 4 5 7 6 3 0 4 1 1 5 5 1 3 4 2 1 7 2 6 5 3 6 4 4 3 2 5 4 5 6 3 4 0 5 1 1 6 5 1 4 4 2 4 7 2 4 6 3 2 5 4 6 2 5 2 6 6 7 4 0 6 1 1 2 6 1 5 4 2 6 0 3 5 6 3 4 5 4 2 3 5 4 6 6 1 5 0 2...

Page 64: ... incoming DCS code on a received signal You may find it useful when you cannot recall the DCS code that the other persons in your group are using 1 Press TONE to switch ON the DCS function DCS appears when the DCS function is ON 2 Press F T SEL The current DCS code appears and blinks 3 Press SCAN to activate the DCS CODE ID DCS SCAN appears and blinks Scan starts when signals are received To rever...

Page 65: ...ccess the public telephone network via such a repeater by sending DTMF tones For further information consult your local repeater reference MANUAL DIALING Manual Dialing requires only two steps to send DTMF tones 1 Press and hold Mic PTT 2 Press the keys in sequence on the Mic keypad to send DTMF tones The corresponding DTMF tones are transmitted DTMF Monitor When pressing the Mic DTMF keys you wil...

Page 66: ... Press MNU to enter Menu mode 2 Select Menu 1 5 1 STORE then press OK 3 Press c c c c c d d d d d to select from channels 0 to 9 then press OK The display for entering a memory name appears the first digit blinks To skip naming the channel press OK again You can jump to step 8 4 Turn the Tuning control to select a character You can enter alphanumeric characters plus special ASCII characters 5 Pres...

Page 67: ...red in memory channels the default is 500 msec In Menu mode access Menu 1 5 3 PAUSE and select from 100 250 500 750 1000 1500 and 2000 msec Transmitting a Stored DTMF Number 1 Press Mic PTT Mic PF 2 Release only Mic PF then press Mic UP DWN to select the desired DTMF memory channel 3 While still holding Mic PTT press 0 to 9 corresponding to the channel number The number stored in the channel scrol...

Page 68: ... l e S d n a B R M 2 F P l l a c e R y r o m e M O F V 3 F P t c e l e S O F V L L A C 4 F P t c e l e S l e n n a h C l l a C X T e n o T z H 0 5 7 1 E 0 0 7 D M T For the shaded functions see the separate manual SPECIALIZED COMMUNICATIONS The Programmable Function keys are PF MR VFO and CALL located on the face of the microphone These keys have the following default functions If you prefer you c...

Page 69: ...Y WITH MC 53DM ONLY If the desired operating frequency is far from the current frequency using the Mic keypad is the quickest way to change frequency First program one of the Mic PF keys as the ENTER key page 62 1 Press the left or right BAND SEL to select band A or B If necessary press F then the same BAND SEL to recall the sub band 2 Press VFO 3 Press Mic ENTER The display for Direct Frequency E...

Page 70: ... MHz is displayed with a 5 kHz step size selected changing to a 12 5 kHz step size corrects the displayed frequency to 144 9875 MHz PROGRAMMABLE VFO If you always check frequencies within a certain range set upper and lower limits for frequencies that are selectable using the Tuning control or Mic UP DWN For example if you select 145 MHz for the lower limit and 146 MHz for the upper limit the tuna...

Page 71: ...ess a front panel button or Mic key or turn the Tuning control No change occurs if you have selected the brightest level Access Menu 1 1 4 AUTO DIMMER and select ON DISPLAY CONTRAST ADJUST The display visibility changes depending on ambient conditions for example between daytime and nighttime When you find the display is not clear use this function to select the optimum display contrast Access Men...

Page 72: ... will temporarily switch the RX only band to the TX band immediately after a signal is received on the RX only band This function allows you to reply to a caller without manually selecting the correct band Press F A B C to switch the function ON or OFF A B C appears when the function is ON Pressing BAND SEL or Mic PTT also cancels A B C The original TX band is restored 2 seconds after signals drop...

Page 73: ... LOCK appears when the function is ON CHANGING MULTI FUNCTION BUTTON LABELS The functions to be frequently used may differ among persons You can change the defaults of the 5 buttons located below the display Access Menu 1 1 5 KEY FUNC and select mode 1 default 2 or 3 R W P h c t i w s F F z H M L Q S s l o r t n o c L O V s l o r t n o c s y e k c i M 1 e d o M Y E K E N O T V E R W O L E T U M L ...

Page 74: ...METER SQUELCH then press OK 4 Press c c c c c d d d d d to switch the function ON or OFF 5 Press OK to complete the setting 6 Press MNU to exit Menu mode The S meter setting segments appear 7 To select the desired S meter setting turn the left band A or right band B SQL control depending on which band you selected Squelch Hang Time When using S meter Squelch you may want to adjust the time interva...

Page 75: ...larms SWITCHING FM AM MODE This transceiver is also capable of receiving not transmitting in AM on band A The default mode on the 118 MHz band is AM while the default on the 144 220 300 or 440 MHz band is FM After recalling the desired band on band A access Menu 1 3 4 FM AM MODE and switch between FM and AM The 1 MHz decimal becomes elongated when AM is selected Note You cannot switch between FM a...

Page 76: ...9 4 TOT and select 3 5 or 10 default minutes for the TOT time AUTOMATIC POWER OFF APO Automatic Power Off is a background function that monitors whether any buttons or keys have been pressed or whether the Tuning control has been turned After 3 hours pass with no operations APO turns OFF the power However 1 minute before the power turns OFF APO appears and blinks and a series of warning tones soun...

Page 77: ...ear You still can normally use the transceiver in this mode Pressing a front panel button or Mic key or turning the Tuning control restores the operating display immediately If there is no button key entry or Tuning control adjustment for approximately 10 seconds the transceiver reverts back to Demonstration mode Press F POWER ON to switch the function ON or OFF c i r e m u n a h p l a f o s t e s...

Page 78: ...alid on the data band CHANGING SPEAKER CONFIGURATIONS This transceiver has two speaker jacks You can enjoy a variety of speaker configurations by using one or two external speakers Access Menu 1 2 3 SPEAKER and select mode 1 default or 2 depending on how the internal and or external speakers should function n o i t c e n n o C e d o M A d n a B B d n a B k c a j 1 P S y l n O n a h t i w d e t c e...

Page 79: ...C D S S C T C e n o T 0 e g n a h C r e w o P X T 3 e s r e v e R A r e t n E 4 e g n a h C p e t S z H M 1 B t c e l e S d n a B l o r t n o C 5 r o t i n o M C r e t a e p e R 6 t u o d a e R y c n e u q e r F s p e e B y b 1 D F y e k 7 e g n a h C e m u l o V 3 2 n w o D 4 8 e t u M r e k a e p S p U 4 MICROPHONE CONTROL WITH MC 53DM ONLY 1 The transceiver announces the displayed information i...

Page 80: ...t you to send control codes only on the 440 MHz band PREPARATION Let us assume band A VHF of the mobile transceiver will be controlled On the handy transceiver 1 Program a 3 digit secret number For the programming method see the instruction manual for the handheld If using a TH D7A see WIRELESS REMOTE CONTROL on its instruction manual 2 Select the transmit frequency on the UHF band 3 Make the hand...

Page 81: ...nd a control acknowledgment to the handheld access Menu 1 A 2 ANSWER BACK and select ON DTMF tones which represent the secret number will be used as an acknowledgment 8 Access Menu 1 A 3 CONTROL and select ON REMOTE CON and LOCK appear when the mobile enters Remote Control mode CONTROL OPERATION When in Remote Control mode the DTMF keys of the handheld will function as shown in the table Each time...

Page 82: ...mmander and the HF transceiver This system allows you for example to watch for and hunt DX while washing your car or to operate the HF transceiver while relaxing in your car living room or patio instead of in your shack HF freq VHF freq UHF freq Your shack PF ATT PRE AMP VOX PROC SEND CH1 MIC CW FSK LSB USB FM AM AT TUNE POWER HF TRANSCEIVER TS 570D PHONES 1 CH2 2 CH3 3 ANT 4 REC 5 FINE 6 NB 7 AGC...

Page 83: ...vals because of legal requirements therefore transmit sidetone must be output from the HF transceiver On TS 570D or TS 570S do not select OFF in Menu 21 On TS 870S use the MONI control to adjust the sidetone volume When the Transporter is too close to the HF transceiver unwanted feedback may cause malfunction Do not share a regulated power supply between the Transporter and the HF transceiver Unwa...

Page 84: ... w On the Commander r On the Transporter t On the Transporter Access Menu 4 2 to program a call sign 9 digits max for the Transporter page 79 This call sign must be different from the one for the Commander So you may add SSID characters ex WD6BQD 1 Now the Commander and Transporter are in Sky Command mode For operations in this mode see CONTROL OPERATION on page 80 First switch ON the HF transceiv...

Page 85: ...umeric characters in step 3 See page 18 PROGRAMMING A TONE FREQUENCY On receiving a tone from the Commander the Transporter causes the HF transceiver to enter Transmit mode On both the Commander and Transporter access Menu 4 3 TONE FREQUENCY and select the desired same tone frequency r e d n a m m o C n O 1 4 N G I S L L A C D M C r e d n a m m o C r o f n g i s l l a C 2 4 N G I S L L A C P R T r...

Page 86: ...q e r f c i M s s e r P 2 d n a b F H U e h t r o t i n o m o T r e d n a m m o C e h t n o y e k F P c i M e h t s s e r P r o t i n o M e h t d e n g i s s a n o i t c n u f y e K c i M n o i t c n u F 1 F F O N O r e w o P 2 F F O N O e v i e c e r y c n e u q e r f F H 3 h c t i w s e d o m n o i t a l u d o M 4 F F O N O T I R 5 F F O N O T I X 6 r a e l c t e s f f o T I X r o t e s f f o T ...

Page 87: ...M or AM y SPLIT A VFO A is used for transmitting SPLIT B VFO B is used for transmitting SPLIT M A memory channel is used for transmitting u FS appears when Mic is pressed Note After pressing MENU you can access only Menu 4 4 The Transporter will transmit its call sign in Morse every 10 minutes using the 144 MHz band The APO timer does not operate on the transceiver with Transporter ON q e y r u w ...

Page 88: ...ore accessing Menu 1 7 6 select one band as the TX band and the other band as the control band Cross band Repeater If receiving a signal on the TX band the transceiver switches the current RX only band to the TX band Before accessing Menu 1 7 6 select the same band as the TX and control bands If necessary you can cause this transceiver to remain in the transmit mode for 500 ms after signals drop A...

Page 89: ...ontrol mode page 73 or the PF key programmed with Voice page 62 The transceiver announces the displayed information as follows depending on the current mode d e s s e r P y e K e d o M w e N t n e m e c n u o n n A O F V O F V O F V R M l l a c e R y r o m e M R M L L A C l e n n a h C l l a C l l a C M P e l b a m m a r g o r P y r o m e M M P U N M u n e M t n e r r u c d n a u n e M r e b m u n...

Page 90: ...nteractive Visual Communicator SP 50B Communications Speaker PG 5A Data Cable PG 3B DC Line Noise Filter MJ 89 Modular Plug Microphone Switch MC 45 Multi function Microphone MC 53DM Multi function Microphone with DTMF MC 80 Desktop Microphone MJ 88 required PG 4X Extension Cable Kit PS 33 Regulated DC Power Supply ...

Page 91: ...face downward 3 Replace the lower cover 6 screws INSTALLING THE PG 4X EXTENSION CABLE KIT The PG 4X kit is available to extend the various connection cables For the cable connections see the next page With two sets of PG 4X kits you can extend the cables to the maximum length The PG 4X kit also includes noise filters modular plug adapter cushions and cable clamps The following diagrams illustrate ...

Page 92: ...4X Kit Connections Using Two Sets of PG 4X Kits 4 m 4 m 4 m 6 m For 6 pins For 8 pins Note Always connect the 4 pin plug on the modular plug cable supplied with the transceiver to the front panel For 6 pins For 6 pins For 8 pins For 8 pins ...

Page 93: ...lease do not send subassemblies or printed circuit boards Send the complete product A copy of the service report will be returned with the product SERVICE NOTE If you desire to correspond on a technical or operational problem please make your note legible short complete and to the point Help us help you by providing the following Model and serial number of equipment Question or problem you are hav...

Page 94: ...e r r o C t i n u n i a m d n a l e n a p t n o r f e h t n e e w t e b 4 n e v e m i d o o t s i y a l p s i d e h T h g i h a d e t c e l e s u o y h g u o h t l e v e l r e m m i d w o l o o t s i e g a t l o v y l p p u s e h T s i t n e m e r i u q e r e g a t l o v y l p p u s e h T C D V 8 3 1 C D V 8 5 1 o t V 7 1 1 5 1 e g r a h c e r e g n a r s i h t e d i s t u o s i e g a t l o v t u ...

Page 95: ...e s r e v i e c s n a r t F H e h t n O n o i t c n u f p u t e S u n e M e h t g n i s u t i b p o t s 8 7 3 d e e p s s n o i t a c i n u m m o c d e t c e l e s u o Y 5 9 1 u n e M n i s p b 0 0 6 9 n a h t r e h t o T R O P M O C 3 s p b 0 0 6 9 t c e l e s o t 5 9 1 u n e M s s e c c A 5 2 o i d u a t i m s n a r t t o n n a c u o Y r e v i e c n a r t F H e h t m o r f e n o t e m a s e h t ...

Page 96: ...e d o M K S F D 2 F K S M G D 1 F M F E 3 F e c n a d e p m i a n n e t n A 0 5 Ω e g n a r e r u t a r e p m e t e l b a s U 0 2 0 6 C 4 C 0 4 1 F F y l p p u s r e w o P C D V 8 3 1 V 8 5 1 7 1 1 5 1 d o h t e m g n i d n u o r G d n u o r g e v i t a g e N t n e r r u C x a m t i m s n a r T s s e l r o A 5 1 1 s s e l r o A 0 0 1 t u p t u o W 2 t a e v i e c e R s s e l r o A 0 1 0 1 y t i l ...

Page 97: ... e c n a d e p m i e n o h p o r c i M 0 0 6 Ω r e v i e c e R d n a B F H V d n a B F H U y r t i u c r i C e n y d o r e t e h r e p u s n o i s r e v n o c e l b u o D d n 2 t s 1 y c n e u q e r f e t a i d e m r e t n I z H k 0 5 4 z H M 5 8 8 3 z H k 5 5 4 z H M 5 0 5 4 D A N I S B d 2 1 y t i v i t i s n e S d n a b F H U r o F H V 6 1 0 µ s s e l r o V d n a b F H U r o F H V b u S 5 2 0 µ...

Page 98: ...ynthesizer VS 3 83 Volume Audio 19 Beep 69 Wireless Remote Control 74 Frequencies Selecting Microphone UP DWN 20 Tuning Control 20 Frequency Step Size 64 Fuses Replacing 7 Keypad Direct Entry CTCSS Freq Number 56 Frequency 63 Memory Channel Number 37 Tone Freq Number 30 Lock All control Lock 67 Transceiver Lock 67 Memory Channels Call Channel Changing 39 Call Channel Recalling 39 Clearing 37 Locki...

Page 99: ......

Reviews: