background image

vii

• 

Use only the specifi ed charger and observe charging 
requirements!


If the battery is charged in unspecifi ed conditions (under high 
temperature over the regulated value, excessive high voltage or 
current over regulated value, or with a remodeled charger), it may 
overcharge or an abnormal chemical reaction may occur.  The 
battery may generate heat or smoke, rupture, or burst into fl ame.

• 

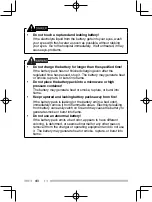
Do not pierce the battery with any object, strike it with an 
instrument, or step on it!


This may break or deform the battery, causing a short-circuit.  The 
battery may generate heat or smoke, rupture, or burst into fl ame.

• 

Do not jar or throw the battery!


An impact may cause the battery to leak, generate heat or smoke, 
rupture, and/or burst into fl ame.  If the battery’s protection circuit 
is damaged, the battery may charge at an abnormal current (or 
voltage), and an abnormal chemical reaction may occur.  The 
battery may generate heat or smoke, rupture, or burst into fl ame.

• 

Do not use the battery pack if it is damaged in any way!


The battery may generate heat or smoke, rupture, or burst into 
fl ame.

• 

Do not solder directly onto the battery!


If the insulator is melted or the gas release vent or safety function 
is damaged, the battery may generate heat or smoke, rupture, or 
burst into fl ame.

• 

Do not reverse the battery polarity (and terminals)!


When charging a reversed battery, an abnormal chemical reaction 
may occur.  In some cases, an unexpected large amount of current 
may fl ow upon discharging.  The battery may generate heat or 
smoke, rupture, or burst into fl ame.

• 

Do not reverse-charge or reverse-connect the battery!


The battery pack has positive and negative poles.  If the battery 
pack does not smoothly connect with a charger or operating 
equipment, do not force it; check the polarity of the battery.  If the 
battery pack is reverse-connected to the charger, it will be reverse-
charged and an abnormal chemical reaction may occur.  The 
battery may generate heat or smoke, rupture, or burst into fl ame.
Summary of Contents for TK-2400

Page 1: ...INSTRUCTION MANUAL B62 2478 20 K VHF FM TRANSCEIVER TK 2400 UHF FM TRANSCEIVER TK 3400 ...

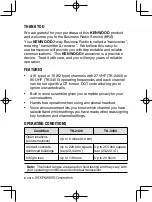
Page 2: ... can be set up with a QT tone or DQT code allowing you to ignore unwanted calls Built in voice scrambler gives you complete privacy for your conversations Hands free operation when using an optional headset Voice announcement lets you know which channel you have selected and which settings you have made when reassigning key functions and channel settings OPERATING CONDITIONS Condition TK 2400 TK 3...

Page 3: ...x On Demand system Call 1 202 418 0177 from your fax machine and request document number 000601 for the form schedules and instructions MAIL Forms can be ordered by telephone and will be sent to you by first class mail Call the FCC Forms Hotline at 1 800 418 FORM 1 800 418 3676 INTERNET Form 601 and instructions can be downloaded from the FCC Forms website at http www fcc gov formpage html Before ...

Page 4: ...ill not occur in a particular installation If this equipment does cause harmful interference to radio or television reception which can be determined by turning the equipment off and on the user is encouraged to try to correct the interference by one or more of the following measures Reorient or relocate the receiving antenna Increase the separation between the equipment and receiver Connect the e...

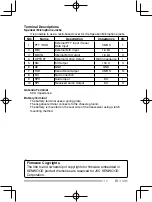
Page 5: ...nce I 5 5M 5V Output 100 O 6 AE GND GND 7 TXD Serial Data Output CMOS O 8 NC No Connection 9 SPO Audio Input 8 I 10 SPI Received Audio Output 8 O Antenna Terminal 50 impedance Battery Terminal The battery terminal uses a spring plate The negative terminal connects to the chassis ground The battery is mounted on the rear side of the transceiver using a latch mounting method Firmware Copyrights The ...

Page 6: ...aged parts If a headset or headphone is connected to the transceiver reduce the transceiver volume Pay attention to the volume level when turning the squelch off Do not place the microphone cable around your neck while near machinery that may catch the cable Do not place the transceiver on unstable surfaces Ensure that the end of the antenna does not touch your eyes When the transceiver is used fo...

Page 7: ...sed from the antenna covering Transmitting at such a time may result in a high frequency burn If an abnormal odor or smoke is detected coming from the transceiver switch the transceiver power off immediately remove the battery pack from the transceiver and contact your KENWOOD dealer Use of the transceiver while you are driving may be against traffic laws Please check and observe the vehicle regul...

Page 8: ...also cause metal objects to heat up Do not incinerate or apply heat to the battery If the insulator is melted the gas release vent or safety function is damaged or the electrolyte is ignited the battery may generate heat or smoke rupture or burst into flame Do not leave the battery near fire stoves or other heat generators areas reaching over 80 C 176 F If the polymer separator is melted due to hi...

Page 9: ... battery may generate heat or smoke rupture or burst into flame Do not use the battery pack if it is damaged in any way The battery may generate heat or smoke rupture or burst into flame Do not solder directly onto the battery If the insulator is melted or the gas release vent or safety function is damaged the battery may generate heat or smoke rupture or burst into flame Do not reverse the batter...

Page 10: ...e the battery pack into a microwave or high pressure container The battery may generate heat or smoke rupture or burst into flame Keep ruptured and leaking battery packs away from fire If the battery pack is leaking or the battery emits a bad odor immediately remove it from flammable areas Electrolyte leaking from battery can easily catch on fire and may cause the battery to generate smoke or burs...

Page 11: ...CHECKING EQUIPMENT Carefully unpack the transceiver If any of the items listed below are missing or damaged file a claim with the carrier immediately SUPPLIED ACCESSORIES Antenna 1 Battery charger AC adapter KSC 35S 1 Li ion Battery pack KNB 45L 1 Speaker microphone jack cover 1 Speaker microphone locking bracket 1 Belt clip KBH 10 1 Screw M3 x 8 mm 2 Warranty card 1 Instruction manual 1 Note Refe...

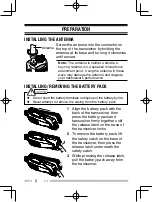
Page 12: ...rformance INSTALLING REMOVING THE BATTERY PACK Do not short the battery terminals or dispose of the battery by fire Never attempt to remove the casing from the battery pack 1 Align the battery pack with the back of the transceiver then press the battery pack and transceiver firmly together until the release latch on the base of the transceiver locks 2 To remove the battery pack lift the safety cat...

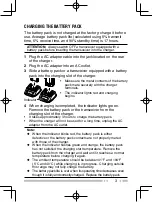
Page 13: ...or lights green Remove the battery pack or the transceiver from the charging slot of the charger It takes approximately 3 hours to charge the battery pack When the charger will not be used for a long time unplug the AC adapter from the AC outlet Note When the indicator blinks red the battery pack is either defective or the battery pack contacts are not properly mated with those of the charger When...

Page 14: ...r the speaker microphone jacks when not using an optional speaker microphone Note To keep the transceiver water resistant you must cover the speaker microphone jacks with the supplied cap 1 Place the cap over the jacks so that the locking tabs insert into the transceiver grooves 2 While holding the cap in place push it towards the bottom of the transceiver until the tabs on the cap click into plac...

Page 15: ...phone jacks of the transceiver 2 Place the locking bracket over the speaker microphone or headset plugs so that the locking tabs insert into the transceiver grooves Push down on the locking bracket to slide it into place 3 While holding the locking bracket in place push it towards the bottom of the transceiver until the tabs on the bracket click into place To remove the locking bracket push the br...

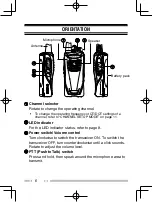
Page 16: ...e 11 LED indicator For the LED indicator status refer to page 8 Power switch Volume control Turn clockwise to switch the transceiver ON To switch the transceiver OFF turn counterclockwise until a click sounds Rotate to adjust the volume level PTT Push to Talk switch Press and hold then speak around the microphone area to transmit Battery pack Antenna Microphone Speaker ...

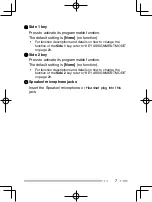
Page 17: ... of the Side 1 key refer to KEY ASSIGNMENT MODE on page 20 Side 2 key Press to activate its programmable function The default setting is None no function For function descriptions and details on how to change the function of the Side 2 key refer to KEY ASSIGNMENT MODE on page 20 Speaker microphone jacks Insert the Speaker microphone or Headset plug into this jack ...

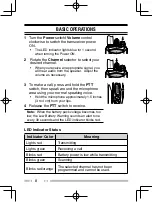
Page 18: ...witch then speak around the microphone area using your normal speaking voice Hold the microphone approximately 1 5 inches 3 to 4 cm from your lips 4 Release the PTT switch to receive Note When the battery pack voltage becomes too low the Low Battery Warning sounds an alert tone every 30 seconds and the LED indicator blinks red LED Indicator Status Indicator Color Meaning Lights red Transmitting Li...

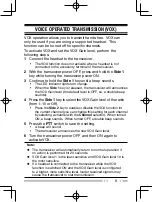
Page 19: ... beep sounds 4 Press the Side 1 key to select the VOX Gain level of the radio from 1 10 or Off Press the Side 2 key to enable or disable the VOX function for the current channel you can change this setting for each channel by selecting a channel with the Channel selector When turned ON a beep sounds When turned OFF a double beep sounds 5 Press the PTT switch to save the setting A beep will sound T...

Page 20: ...nds If you continuously transmit for the duration transmission will stop and an alert tone will sound To stop the tone release the PTT switch LOW BATTERY WARNING While operating the transceiver the Low Battery Warning sounds an alert tone every 30 seconds and the LED indicator blinks red when the battery needs recharged or replaced ...

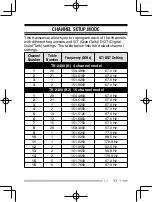
Page 21: ...4 channel model 1 20 154 4900 67 0 Hz 2 21 154 5150 67 0 Hz 3 1 151 6250 67 0 Hz 4 2 151 9550 67 0 Hz TK 2400 K2 16 channel model 1 20 154 4900 67 0 Hz 2 21 154 5150 67 0 Hz 3 1 151 6250 67 0 Hz 4 2 151 9550 67 0 Hz 5 10 151 5125 67 0 Hz 6 12 151 6850 67 0 Hz 7 15 151 7750 67 0 Hz 8 26 158 4000 67 0 Hz 9 1 151 6250 77 0 Hz 10 1 151 6250 88 5 Hz 11 1 151 6250 179 9 Hz 12 2 151 9550 82 5 Hz 13 2 151...

Page 22: ...0 461 0625 67 0 Hz 5 11 461 0875 67 0 Hz 6 12 461 1125 67 0 Hz 7 13 461 1375 67 0 Hz 8 14 461 1625 67 0 Hz 9 1 464 5000 67 0 Hz 10 3 467 7625 67 0 Hz 11 4 467 8125 67 0 Hz 12 5 467 8500 67 0 Hz 13 6 467 8750 67 0 Hz 14 7 467 9000 67 0 Hz 15 15 461 1875 67 0 Hz 16 16 461 2125 67 0 Hz Note Due to FCC regulations the default values of TK 2400 TK 2300 VHF are different from TK 2200 VHF series Make sur...

Page 23: ...pressing and releasing the PTT switch a beep will sound and the transceiver announces Table zero 4 Press the Side 1 or Side 2 key to increment decrement the Table number to select the new channel frequency Press and hold the Side 1 or Side 2 key to increment decrement the number by 5 at a time Table numbers and their corresponding operating frequencies are provided in the table on page 14 A voice ...

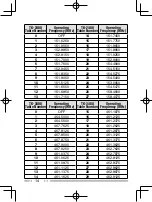
Page 24: ...1 5125 24 153 0050 11 151 6550 25 154 5475 12 151 6850 26 158 4000 13 151 7150 27 158 4075 TK 3400 Table Number Operating Frequency MHz TK 3400 Table Number Operating Frequency MHz 0 OFF 15 461 1875 1 464 5000 16 461 2125 2 464 5500 17 461 2375 3 467 7625 18 461 2625 4 467 8125 19 461 2875 5 467 8500 20 461 3125 6 467 8750 21 461 3375 7 467 9000 22 461 3625 8 467 9250 23 462 7625 9 461 0375 24 462...

Page 25: ... 466 1625 70 451 5375 40 466 1875 71 451 6375 41 466 2125 72 452 3125 42 466 2375 73 452 5375 43 466 2625 74 452 4125 44 466 2875 75 452 5125 45 466 3125 76 452 7625 46 466 3375 77 452 8625 47 466 3625 78 456 1875 48 467 7875 79 456 2375 49 467 8375 80 456 2875 50 467 8625 81 468 2125 51 467 8875 82 468 2625 52 467 9125 83 468 3125 53 469 4875 84 468 3625 54 469 5125 85 468 4125 55 469 5375 86 468...

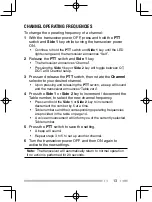
Page 26: ...e PTT switch and Side 1 key until the LED lights orange and the transceiver announces Self 2 Release the PTT switch and Side 1 key The transceiver announces Channel Pressing the Side 1 key or Side 2 key will toggle between QT DQT and Channel setup 3 Press the Side 1 or Side 2 key to select QT or DQT setup The transceiver announces QT or DQT depending on your selection 4 Press and release the PTT s...

Page 27: ... Frequency QT Number QT Frequency 1 67 0 Hz 17 118 8 Hz 33 210 7 Hz 2 71 9 Hz 18 123 0 Hz 34 218 1 Hz 3 74 4 Hz 19 127 3 Hz 35 225 7 Hz 4 77 0 Hz 20 131 8 Hz 36 233 6 Hz 5 79 7 Hz 21 136 5 Hz 37 241 8 Hz 6 82 5 Hz 22 141 3 Hz 38 250 3 Hz 7 85 4 Hz 23 146 2 Hz 39 69 3 Hz 8 88 5 Hz 24 151 4 Hz 40 67 0 Hz 9 91 5 Hz 25 156 7 Hz 41 67 0 Hz 10 94 8 Hz 26 162 2 Hz 42 67 0 Hz 11 97 4 Hz 27 167 9 Hz 43 67 ...

Page 28: ...072N 42 D311N 72 D632N 102 D125I 13 D073N 43 D315N 73 D654N 103 D131I 14 D074N 44 D331N 74 D662N 104 D132I 15 D114N 45 D343N 75 D664N 105 D134I 16 D115N 46 D346N 76 D703N 106 D143I 17 D116N 47 D351N 77 D712N 107 D152I 18 D125N 48 D364N 78 D723N 108 D155I 19 D131N 49 D365N 79 D731N 109 D156I 20 D132N 50 D371N 80 D732N 110 D162I 21 D134N 51 D411N 81 D734N 111 D165I 22 D143N 52 D412N 82 D743N 112 D17...

Page 29: ...47 D516I 161 D712I off OFF 134 D371I 148 D532I 162 D723I CHANNEL CONFIRMATION MODE To confirm your channel settings 1 With the transceiver power OFF press and hold the PTT switch while turning the transceiver power ON Continue to hold the PTT switch until the LED lights orange and the transceiver announces Confirm 2 Release the PTT switch Transceiver announces the channel table number tone number ...

Page 30: ...AMMABLE FUNCTIONS on page 22 Table Number Function Name 0 None no function default 1 Calling Alert 2 Key Lock 3 Key Lock with Status Memory 4 Monitor 5 Monitor Momentary 6 Scan 7 Scan Temporary Delete 8 Scrambler 9 Squelch Off 10 Squelch Off Momentary 11 Super Lock 12 Low Transmit Power 13 RX TX Frequency Scan 14 Speaker Switch To use this function the Repeater Mode must be activated by Programmin...

Page 31: ...hold both keys or if you release both keys the operation will cancel in 20 seconds 3 Release the key 4 Press the Side 1 or Side 2 key to increment decrement the number to select the new key function Table numbers and their corresponding functions are provided in the table on page 20 A voice announcement will inform you of the currently selected Table number 5 Press the PTT switch to save the setti...

Page 32: ...ey Lock Monitor Monitor Momentary PTT Squelch Off Squelch Off Momentary Channel selector Super Lock Key Lock with Status Memory and Volume Control When the transceiver power is turned OFF and then ON again the Key Lock function will be cancelled Key Lock with Status Memory This operates the same as Key Lock except that when the transceiver power is turned OFF and then ON again the keys remain lock...

Page 33: ...nel you can remove that channel from the scanning sequence by pressing and holding this key for 3 seconds Scrambler Press this key to activate a single beep sounds and deactivate a double beep sounds the scrambler function of the selected channel The Scrambler function allows you to hold a conversation in complete privacy When the Scrambler function is activated any other party that is listening t...

Page 34: ...sceiver power ON When the LED lights orange release the Side 2 key A confirmation tone will sound Low Transmit Power Press this key to change the transmit power to low power Each time you press this key the transmit power toggles between high and low Speaker Switch Use this key to switch between the external speaker earpiece speaker or internal speaker transceiver speaker Press this key to activat...

Page 35: ...h a new one Cannot talk to or hear other members in your group Make sure you are using the same frequency and QT DQT settings as the other members in your group Other group members may be using the Scrambler function Turn on your transceiver s Scrambler Other group members may be too far away Make sure you are within range of the other transceivers Other voices besides group members are present on...

Page 36: ...nd all keys to their default functions To reset the transceiver 1 With the transceiver power OFF press and hold the PTT switch the Side 1 key and the Side 2 key while turning the transceiver power ON Continue to hold the keys for 2 seconds until the LED lights orange 2 Release the keys The transceiver announces Confirm and returns to normal operation If the keys are released before the LED lights ...

Page 37: ...MANUAL DE INSTRUCCIONES TRANSCEPTOR FM VHF TK 2400 TRANSCEPTOR FM UHF TK 3400 ...

Page 38: ......

Page 39: ... cada canal con un tono QT o código DQT para no atender las llamadas no deseadas Codificador de voz incorporado que aporta total privacidad a sus conversaciones Funcionamiento manos libres cuando se utiliza un micrófono aurícular opcional El anuncio de voz le permite saber el canal seleccionado y la configuración realizada al reasignar las funciones de las teclas y los ajustes de canal CONDICIONES...

Page 40: ...Demand de la FCC Marque el 1 202 418 0177 desde su aparato de fax y solicite el número de documento 000601 para recibir el modelo anexos e instrucciones CORREO Los modelos se pueden solicitar por teléfono y se le remitirá por correo preferente Llame a la Línea Directa de solicitud Modelos de la FCC al 1 800 418 FORM 1 800 418 3676 INTERNET El Modelo 601 y las instrucciones se pueden descargar del ...

Page 41: ...Salida de datos serie CMOS S 8 NC Sin conexión 9 SPO Entrada de audio 8 Ω E 10 SPI Salida de audio recibido 8 Ω S Terminal de la antena Impedancia de 50 Ω Terminal de la batería El terminal de la batería utiliza una placa de resorte El terminal negativo está conectado a la masa del chasis La batería se coloca por la parte posterior del transceptor mediante un sistema de montaje picaporte Derechos ...

Page 42: ... de dichas piezas Si conecta un casco o micrófono auricular al transceptor reduzca el volumen del aparato Tenga cuidado con el nivel de volumen cuando desactive el silenciador No líe el cable del micrófono alrededor del cuello cuando esté cerca de máquinas que pudieran pillar el cable No coloque el transceptor sobre superficies inestables Asegúrese de que el extremo de la antena no le roce los ojo...

Page 43: ...esale alguna pieza metálica del recubrimiento de la antena Si transmite en ese momento podría sufrir una quemadura por alta frecuencia Si detecta un olor anormal o humo procedente del transceptor desconecte la alimentación retire la batería del aparato y póngase en contacto con su distribuidor KENWOOD El uso del transceptor mientras conduce puede infringir las leyes de tráfico Consulte y respete e...

Page 44: ...metálicos No incinere la batería ni le aplique calor Si se funde el aislante se daña la función de seguridad o el ventilador de salida de gases o se prende el electrolito la batería podría recalentarse desprender humo romperse o incendiarse No use o deje la batería cerca del fuego estufas u otros generadores de calor zonas por encima de 80 C 176 F Si el separador de polímeros se funde debido a alt...

Page 45: ...ir una reacción química anormal La batería podría generar calor o desprender humo romperse o incendiarse No utilice la batería si presenta algún tipo de daño La batería podría generar calor o desprender humo romperse o incendiarse No suelde nada directamente a la batería Si se funde el aislante se daña la función de seguridad o el ventilador de salida de gases la batería podría generar calor o hum...

Page 46: ...e la batería dentro de un horno microondas o un recipiente de alta presión La batería podría generar calor o desprender humo romperse o incendiarse Mantenga las baterías perforadas o con fugas alejadas del fuego Si la batería tiene fugas o desprende un mal olor retírela de inmediato de las zonas inflamables La fuga del electrolito de la batería puede prender en llamas fácilmente y hacer que la bat...

Page 47: ...ptor con cuidado Si falta o ha resultado dañado alguno de los artículos siguientes presente inmediatamente una reclamación a la empresa de transporte ACCESORIOS SUMINISTRADOS Antena 1 Cargador de la batería Adaptador de CA KSC 35S 1 Batería de iones de litio KNB 45L 1 Cubierta de los jacks del micrófono altavoz 1 Soporte de traba del micrófono altavoz 1 Gancho para cinturón KBH 10 1 Tornillo M3 x ...

Page 48: ...N EXTRACCIÓN DE LA BATERÍA No cortocircuite los terminales de la batería ni arroje la batería al fuego No intente retirar la carcasa de la batería 1 Alinee la batería con la parte posterior del transceptor y luego apriete la batería y el transceptor fuertemente hasta que la pestaña de liberación situada en la parte inferior del transceptor chasquee 2 Para extraer la batería suba el cierre de segur...

Page 49: ...no se vaya a utilizar el cargador durante un tiempo prolongado desenchufe el adaptador de CA de la toma de CA Notas Cuando el indicador parpadea en rojo el paquete de batería está defectuoso o los contactos no están bien acoplados a los del cargador Cuando el indicador parpadea en vede y naranja la temperatura de la batería no se ajusta a la temperatura de inicio de carga Retire la batería del car...

Page 50: ...ilice un micrófono altavoz opcional coloque la tapa sobre los jacks del micrófono altavoz Nota Para preservar la hermeticidad del transceptor debe cubrir los conectores del micrófono altavoz con la tapa suministrada 1 Coloque la tapa sobre los jacks de forma que las pestañas de bloqueo entren en las ranuras del transceptor 2 Sujetando la tapa en posición presiónela hacia la parte inferior del tran...

Page 51: ... transceptor 2 Coloque el soporte de fijación sobre las clavijas del micrófono altavoz o micrófono auricular de forma que las pestañas de bloqueo entren en las ranuras del transceptor Presione hacia abajo el soporte de traba para deslizarlo a su sitio 3 Sujetando el soporte de fijación en posición presiónelo hacia la parte inferior del transceptor hasta que las pestañas del soporte queden encajada...

Page 52: ...onocer el estado del indicador LED consulte la página 8 Interruptor de encendido control de volumen Gírelo hacia la derecha para encender el transceptor Para apagar el transceptor gírelo hacia la izquierda hasta que suene un chasquido Gírelo para ajustar el nivel de volumen Conmutador PTT presionar para hablar Presiónelo prolongadamente y hable cerca del micrófono para transmitir Antena Paquete de...

Page 53: ...lte MODO DE ASIGNACIÓN DE TECLAS en la página 20 Tecla Lateral 2 Púlsela para activar su función programable El valor predeterminado es Ninguno ninguna función Para obtener una descripción de las funciones e información detallada sobre cómo cambiar la función de la tecla Lateral 2 consulte MODO DE ASIGNACIÓN DE TECLAS en la página 20 Jacks del micrófono altavoz Inserte la clavija del micrófono alt...

Page 54: ...mutador PTT y hable cerca del micrófono con su tono de voz habitual Sostenga el micrófono a unos 1 5 pulgadas 3 ó 4 cm de la boca 4 Suelte el conmutador PTT para recibir Nota Cuando el voltaje de la batería es demasiado bajo la función Aviso de batería baja hace sonar un tono de aviso cada 30 segundos y el indicador LED parpadea en rojo Estados del indicador LED Color del indicador Significado Se ...

Page 55: ...la tecla Lateral 1 para seleccionar el Nivel de ganancia VOX de la radio 1 10 o desactivado Pulse la tecla Lateral 2 para activar o desactivar la función VOX en el canal actual puede cambiar este ajuste para cada canal seleccionando un canal con el selector Canal Al activarse suena un pitido breve Al desactivarse suenan dos pitidos breves 5 Presione el conmutador PTT para guardar el ajuste Oirá un...

Page 56: ...undos Si transmite de forma ininterrumpida durante dicho tiempo la transmisión se detendrá y sonará un tono de aviso Para detener el tono suelte el conmutador PTT AVISO DE BATERÍA BAJA Durante el uso habitual del transceptor la función Aviso de batería baja hace sonar un tono de aviso cada 30 segundos y el indicador LED parpadea en rojo para indicarle que debe cargar o cambiar la batería ...

Page 57: ...te de QT DQT TK 2400 K modelo de 4 canales 1 20 154 4900 67 0 Hz 2 21 154 5150 67 0 Hz 3 1 151 6250 67 0 Hz 4 2 151 9550 67 0 Hz TK 2400 K2 modelo de 16 canales 1 20 154 4900 67 0 Hz 2 21 154 5150 67 0 Hz 3 1 151 6250 67 0 Hz 4 2 151 9550 67 0 Hz 5 10 151 5125 67 0 Hz 6 12 151 6850 67 0 Hz 7 15 151 7750 67 0 Hz 8 26 158 4000 67 0 Hz 9 1 151 6250 77 0 Hz 10 1 151 6250 88 5 Hz 11 1 151 6250 179 9 Hz...

Page 58: ...461 0625 67 0 Hz 5 11 461 0875 67 0 Hz 6 12 461 1125 67 0 Hz 7 13 461 1375 67 0 Hz 8 14 461 1625 67 0 Hz 9 1 464 5000 67 0 Hz 10 3 467 7625 67 0 Hz 11 4 467 8125 67 0 Hz 12 5 467 8500 67 0 Hz 13 6 467 8750 67 0 Hz 14 7 467 9000 67 0 Hz 15 15 461 1875 67 0 Hz 16 16 461 2125 67 0 Hz Nota Por motivos del reglamento de la FCC los valores predeterminados de la serie TK 2400 TK 2300 VHF difieren de los ...

Page 59: ... y soltar el conmutador PTT sonará un pitido y el transceptor anunciará Table zero Tabla cero 4 Pulse la tecla Lateral 1 o Lateral 2 para incrementar disminuir el número de Tabla para seleccionar la frecuencia de canal nueva Pulse prolongadamente la tecla Lateral 1 o Lateral 2 para incrementar disminuir el número de 5 en 5 En la tabla de la página 14 se muestran los números de Tabla y sus frecuenc...

Page 60: ...51 5125 24 153 0050 11 151 6550 25 154 6550 12 151 6850 26 158 4000 13 151 7150 27 158 4075 TK 3400 Número de tabla Frecuencia operativa MHz TK 3400 Número de tabla Frecuencia operativa MHz 0 APAGADO 15 461 1875 1 464 5000 16 461 2125 2 464 5500 17 461 2375 3 467 7625 18 461 2625 4 467 8125 19 461 2875 5 467 8500 20 461 3125 6 467 8750 21 461 3375 7 467 9000 22 461 3625 8 467 9250 23 462 7625 9 46...

Page 61: ...75 39 466 1625 70 451 5375 40 466 1875 71 451 6375 41 466 2125 72 452 3125 42 466 2375 73 452 5375 43 466 2625 74 452 4125 44 466 2875 75 452 5125 45 466 3125 76 452 7625 46 466 3375 77 452 8625 47 466 3625 78 456 1875 48 467 7875 79 456 2375 49 467 8375 80 456 2875 50 467 8625 81 468 2125 51 467 8875 82 468 2625 52 467 9125 83 468 3125 53 469 4875 84 468 3625 54 469 5125 85 468 4125 55 469 5375 8...

Page 62: ...tor anuncie Self Mismo 2 Suelte el conmutador PTT y la tecla Lateral 1 El transceptor anuncia Channel Canal Al pulsar la tecla Lateral 1 o Lateral 2 alternará entre la configuración QT DQT y Canal 3 Pulse la tecla Lateral 1 o Lateral 2 para seleccionar la configuración de QT o DQT El transceptor anuncia QT o DQT según la selección realizada 4 Presione y suelte el conmutador PTT y luego gire el sel...

Page 63: ...e QT 1 67 0 Hz 17 118 8 Hz 33 210 7 Hz 2 71 9 Hz 18 123 0 Hz 34 218 1 Hz 3 74 4 Hz 19 127 3 Hz 35 225 7 Hz 4 77 0 Hz 20 131 8 Hz 36 233 6 Hz 5 79 7 Hz 21 136 5 Hz 37 241 8 Hz 6 82 5 Hz 22 141 3 Hz 38 250 3 Hz 7 85 4 Hz 23 146 2 Hz 39 69 3 Hz 8 88 5 Hz 24 151 4 Hz 40 67 0 Hz 9 91 5 Hz 25 156 7 Hz 41 67 0 Hz 10 94 8 Hz 26 162 2 Hz 42 67 0 Hz 11 97 4 Hz 27 167 9 Hz 43 67 0 Hz 12 100 0 Hz 28 173 8 Hz ...

Page 64: ... D116I 12 D072N 42 D311N 72 D632N 102 D125I 13 D073N 43 D315N 73 D654N 103 D131I 14 D074N 44 D331N 74 D662N 104 D132I 15 D114N 45 D343N 75 D664N 105 D134I 16 D115N 46 D346N 76 D703N 106 D143I 17 D116N 47 D351N 77 D712N 107 D152I 18 D125N 48 D364N 78 D723N 108 D155I 19 D131N 49 D365N 79 D731N 109 D156I 20 D132N 50 D371N 80 D732N 110 D162I 21 D134N 51 D411N 81 D734N 111 D165I 22 D143N 52 D412N 82 D7...

Page 65: ...723I MODO DE CONFIRMACIÓN DE CANAL Para confirmar la configuración de un canal 1 Con el transceptor apagado presione prolongadamente el conmutador PTT mientras enciende el transceptor Mantenga presionado el conmutador PTT hasta que el indicador LED se ilumine en naranja y el transceptor anuncie Confirm Confirmación 2 Suelte el conmutador PTT El transceptor anuncia el número de tabla de canal el nú...

Page 66: ...Función 0 Ninguno ninguna función valor predeterminado 1 Aviso de llamada 2 Bloqueo de teclas 3 Bloqueo de teclas con memoria de estado 4 Monitor 5 Monitor momentáneo 6 Exploración 7 Exploración Borrado temporal 8 Mezclador Scrambler 9 Desactivar silenciamiento 10 Desactivar silenciamiento momentáneo 11 Súperbloqueo 12 Potencia de transmisión baja 13 Exploración de frecuencias de RX TX 14 Conmutad...

Page 67: ...en suelta ambas teclas la operación se cancelará en 20 segundos 3 Suelte la tecla 4 Pulse la tecla Lateral 1 o Lateral 2 para incrementar disminuir el número para seleccionar la función de tecla nueva En la tabla de la página 20 se muestran los números de Tabla y sus funciones correspondientes Un anuncio de voz le indicará el número de Tabla actualmente seleccionado 5 Presione el conmutador PTT pa...

Page 68: ...var silenciamiento Desactivar silenciamiento momentáneo Selector de canales Súperbloqueo Bloqueo de teclas con memoria de estado y Control de volumen Cuando se apague y se vuelva a encender el transceptor la función Bloqueo de teclas quedará anulada Bloqueo de teclas con memoria de estado Esta función es parecida a Bloqueo de teclas salvo que las teclas permanecen bloqueadas cuando el transceptor ...

Page 69: ...no deseado puede eliminar dicho canal de la secuencia de exploración pulsando prolongadamente la tecla durante 3 segundos Mezclador Scrambler Pulse esta tecla para activar suena un solo pitido breve y desactivar suenan dos pitidos breves la función Mezclador del canal seleccionado La función Mezclador le permite mantener una conversación con total privacidad Cuando se activa la función Mezclador l...

Page 70: ...r Cuando el indicador LED se ilumina en naranja suelte la tecla Lateral 2 Sonará un tono de confirmación Potencia de transmisión baja Pulse esta tecla para cambiar la potencia de transmisión a baja potencia Cada vez que pulsa esta tecla la potencia de transmisión alterna entre alta y baja Conmutador de altavoz Utilice esta tecla para conmutar entre el altavoz externo altavoz del auricular y el alt...

Page 71: ...ede hablar u oír a otros miembros del grupo Asegúrese de que utiliza la misma frecuencia y los mismos ajustes de QT DQT que los demás miembros del grupo Es posible que otros miembros del grupo estén utilizando la función Mezclador Active el Mezclador del transceptor Es posible que los otros miembros del grupo estén demasiado lejos Asegúrese de que se encuentra dentro del radio de acción de los otr...

Page 72: ... las teclas Para restablecer el transceptor 1 Con el transceptor apagado presione prolongadamente el conmutador PTT la tecla Lateral 1 y la tecla Lateral 2 mientras lo enciende Mantenga pulsadas las teclas durante 2 segundos hasta que el indicador LED se ilumine en naranja 2 Suelte las teclas El transceptor anuncia Confirm Confirmación y vuelve al modo de funcionamiento normal Si las teclas se sue...

Reviews: