Kenwood KVT-627DVD Instruction Manual Download Page 9

English


|


9

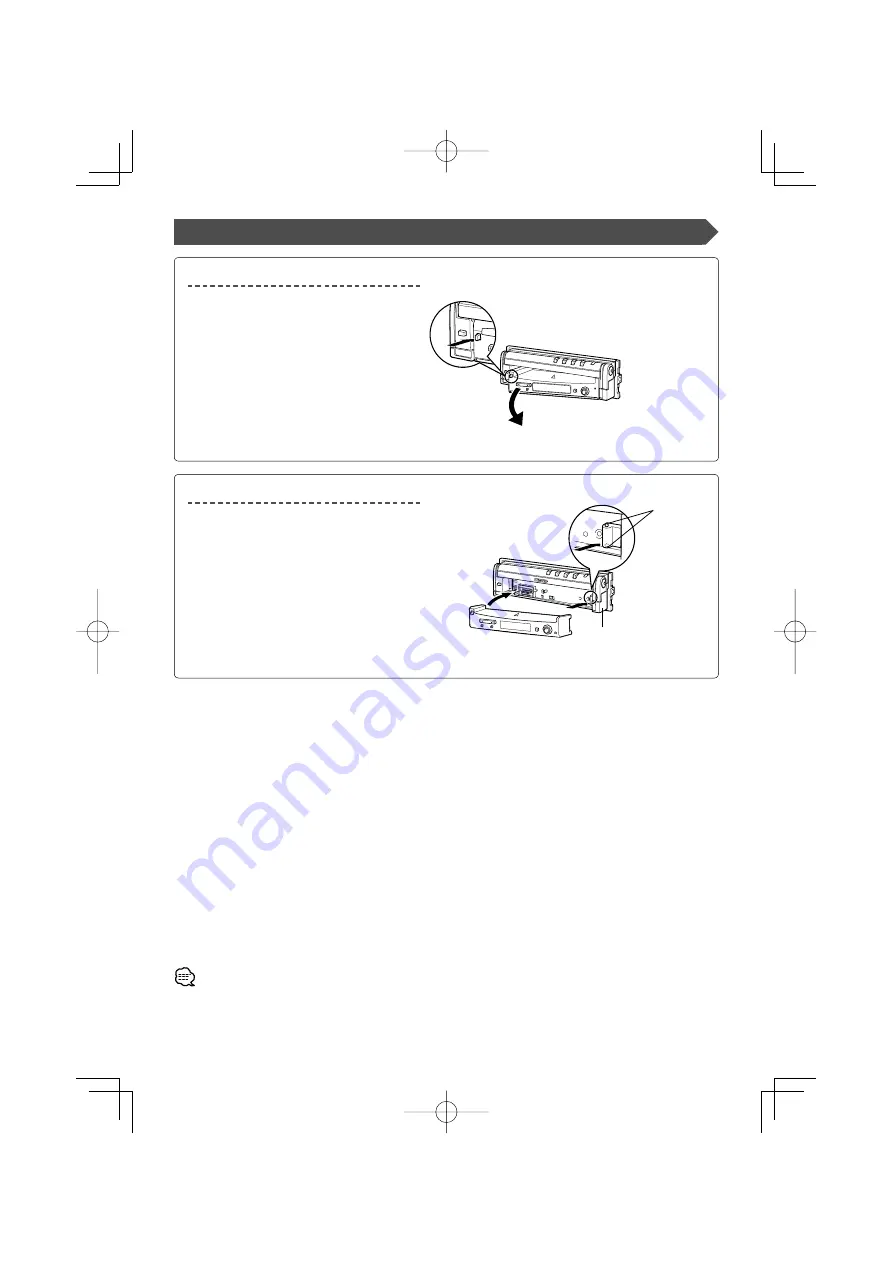
Removing/Attaching the Protection Panel

Remove the protection panel

Attach the protection panel

Place the right end of the protection panel onto
hooks and push it until clicked and locked.
Then, push the left end of the panel to lock it.

Two hooks

• 

Close the monitor first, then remove or attach the protection panel.

•  After you have removed the protection panel, you cannot operate the receiver.

•    After you have removed the protection panel, you can flash the burglar alarm lamp (page 70).

B64-3103-00̲00̲E̲En.indd   9

B64-3103-00̲00̲E̲En.indd   9

05.5.19   9:59:35 AM

05.5.19   9:59:35 AM

Summary of Contents for KVT-627DVD

Page 1: ...B64 3103 00 00 EV E2V MONITOR WITH DVD RECEIVER KVT 727DVD KVT 627DVD INSTRUCTION MANUAL KVT 627DVD KVT 727DVD B64 3103 00 00 E En indd 1 B64 3103 00 00 E En indd 1 05 5 19 9 59 27 AM 05 5 19 9 59 27 AM ...

Page 2: ... WMA JPEG MPEG play ID3 WMA TAG Display during MP3 WMA play Disc Select during play by disc changer Direct Search Tuner Control 32 Displaying the Easy Control Panel Displaying the Tuner Control screen Displaying the Tuner Menu screen Seek Mode Auto Memory Manual Memory Preset Select Direct Search Traffic Information Search for Program Type Radio Text TV VIDEO Control 38 Displaying the TV Picture s...

Page 3: ...reen RDS Setup 74 Displaying the RDS Set UP1 screen Displaying the RDS Set UP2 screen AMP Control 75 Displaying the AMP Control screen DAB Set Up 76 Displaying the DAB Set Up screen Announcement Selection Sound Effects Menu KVT 727DVD 78 Sound Effects Menu 78 Displaying the Control screen Displaying the Sound Effects Menu screen Audio Control 79 Displaying the Audio Control 1 screen Displaying the...

Page 4: ...udio units you can control from the KVT 727DVD 627DVD Receiver As of June 2005 KTC V500E KTC 9090DAB KHD C710 KDC CPS89 KDC CPS87 KDC CPS85 KDC CPS82 KDC C719 KDC C717 KDC C715 KDC C712 KDC C669 KDC C667 KDC C665 KDC C662 KDC C469 KDC C467 KDC C465 KDC C462 KDV C820 KDC C719MP KDC D301 KDC D300 KMD D400 KMD D401 Set the O N switch to N position if provided Navigation units you can control from the...

Page 5: ...t play back the DVD R RW and DVD R RW discs if not recorded in the DVD Video format Restrictions due to difference between discs Inhibition icon Some DVD and VCD discs can be played only in certain playback modes according to the intentions of the software producers As this player plays discs according to their intentions some functions may not work as intended by you Please be sure to read the in...

Page 6: ...4x480 NTSC 704x576 PAL Audio format MPEG1 Audio Layer2 Transfer bit rate 32 384 kbps CBR Sampling frequency 32 44 1 48 kHz When you use your CD DVD writer to record MP3 WMA JPEG MPEG up to the maximum disc capacity disable additional writing For recording on an empty disc up to the maximum capacity at once check Disc at Once Play mode may not be possible when portions of the functions of Windows M...

Page 7: ...dized image compression mecha nism JPEG stands for Joint Photographic Experts Group the original name of the committee that wrote the standard JPEG is designed for compress ing either full color or gray scale images MPEG 1 The most common implementations of the MPEG 1 standard provide a video resolution of 352 by 240 at 30 frames per second fps This produces video quality slightly below the qualit...

Page 8: ...to open or close the monitor by hand You can automatically open or close the monitor when you turn on or off the ignition key page 50 If the monitor movement is stopped by the shift lever or another obstacle when the monitor is opened this movement is canceled by the safety function If an obstacle is pinched by the monitor when closed the monitor movement is also canceled by the safety function If...

Page 9: ...nd locked Then push the left end of the panel to lock it Two hooks Close the monitor first then remove or attach the protection panel After you have removed the protection panel you cannot operate the receiver After you have removed the protection panel you can flash the burglar alarm lamp page 70 B64 3103 00 00 E En indd 9 B64 3103 00 00 E En indd 9 05 5 19 9 59 35 AM 05 5 19 9 59 35 AM ...

Page 10: ...t it 2 Stop to Play 7 key Stops to play 3 Play Pause 38 key Pauses and replays a disc 4 Search Selectors 22 33 key Searches a disc backward or forward 5 Eject Disc Eject key The disc is ejected 6 Video source selection V OFF V SEL key Video source selection changes in the following order each time you press the key B64 3103 00 00 E En indd 10 B64 3103 00 00 E En indd 10 05 5 19 9 59 35 AM 05 5 19 ...

Page 11: ...key Hold down more than 1 second to turn the Traffic Information function On or Off page 36 q Screen Setup SCREEN key Displays the Screen Setup or Angle Setup screen page 50 w Function AV OUT SEL FNC key The video source function changes in the following order each time you press the key Picture Easy Control Panel Source Control Picture Switches the source that is output at the AV OUTPUT terminal ...

Page 12: ...NAV Zooms in or out the navigation map 5 V SEL key Video source selection changes in the following order each time you press the key Navigation R CAM TV Video Optional accessory DVD VCD It is necessary to engage the shift knob of car to Reverse to switch to rear view camera R CAM video display ZOOM OUT POSITION ZOOM IN BAND RETURN VOL ATT VOICE VIEW SC1 SC2 MODE 2 ZONE AV OUT REAR VOL OPEN 38 4 d ...

Page 13: ...function on or off each time you press the key see page 92 for the Zone Control NAV Plays Voice guidance e REAR VOL key DISC TV TUNER You can adjust the rear channel volume when Zone function is on r MENU key DVD When 1 is set to DVD Stops to play the built in disc play NAV Displays Main menu t CANCEL key DVD VCD When 1 is set to DVD Returns to the previous screen when the DVD VCD Disc Menu is dis...

Page 14: ... VCD CD When 1 is set to DVD 1 Fast Backward Rewind The speed changes each time it is pressed Fast Forward The speed changes each time it is pressed key DVD VCD When 1 is set to DVD Slow Backward Slow Forward ANGLE key DVD When 1 is set to DVD 0 Switches the view angle DIRECT key Selects the Direct Search mode see page 23 31 36 for Direct Search a CLEAR key DVD When 1 is set to DVD Clears a numeri...

Page 15: ...enter of the disc to outward Removing discs When removing discs from this unit pull them out horizontally Discs that cannot be used Discs that are not round cannot be used Discs with coloring on the recording surface or that are dirty cannot be used This unit can only play the CDs with one of labels Discs without the label may not be played on the unit A CD R or CD RW that hasn t been finalized ca...

Page 16: ...T Cinema picture mode CINEMA Zoom picture mode ZOOM Normal picture mode NORMAL When the Menu Easy Control screen or Navigation is selected it is shown in the full size display mode automatically Their Screen mode cannot be changed The Screen mode can be set for each of DVD VCD TV and video images B64 3103 00 00 E En indd 16 B64 3103 00 00 E En indd 16 05 5 19 9 59 46 AM 05 5 19 9 59 46 AM ...

Page 17: ...English 17 B64 3103 00 00 E En indd 17 B64 3103 00 00 E En indd 17 05 5 19 9 59 48 AM 05 5 19 9 59 48 AM ...

Page 18: ... PBC is Off p Backward Scene Track Search Area Selects the previous scene when PBC is On or track when PBC is Off q Zoom Control Button Area Displays the Zoom Control buttons page 23 w Information Display Button Area page 23 For DVD VCD playback DVD VCD picture selection or controller key operations see KVT 727DVD 627DVD Basic Operations page 10 The information display is cleared automatically aft...

Page 19: ...lects the previous folder or file y Picture Control Button Area page 23 JPEG playback only u Information Display Button Area page 23 i Play Time Display The Easy control panel functions are seeing page 24 o Adjusts the volume Switches the source a Stops to play When pressed twice the disc is played from its beginning when you play it in the next time s Fast Forwards or Fast Backwards d Chapter Sea...

Page 20: ...unction of VCD On or Off VCD Ver 2 0 b Switches the Repeat Play operations in the following sequence DVD Title Repeat Chapter Repeat Repeat Off VCD Track Repeat Repeat Off Available when the PBC is off n Scrolls the display text m Switches the play time display in the following sequence DVD Title chapter remaining titles VCD Track disc remaining discs Available when the PBC is off Title Number Dis...

Page 21: ...English 21 Controlling during DVD Video Video CD JPEG or MPEG Playback B64 3103 00 00 E En indd 21 B64 3103 00 00 E En indd 21 05 5 19 9 59 53 AM 05 5 19 9 59 53 AM ...

Page 22: ... DVD Menu 1 KENWOOD 2 KENWOOD 3 KENWOOD 4 KENWOOD 5 KENWOOD 6 KENWOOD To cancel Highlight Control press MODE key page 11 2 Select Disc Menu options Disc Menu Cancel 1 1 1 0 1 0 1 1 SUB MenuCtrl Zoom Audio Audio Exit Angle 1 2 5 4 3 6 1 Calls the Menu Control 2 Switches the picture angle during program playback only 3 Switches the caption language during program playback only 4 Switches the voice l...

Page 23: ...d AV information Information Display Button Area page 18 19 The information is displayed for 5 seconds Direct Search You can search for a DVD VCD chapter scene or track by entering its number 1 Select the Direct Search mode DIRECT BS The following items can be searched directly each time it is pressed DVD Title Chapter Time Direct number VCD when PBC is On Scene Direct number VCD when PBC is Off T...

Page 24: ...k on the disc changer For CD MP3 WMA JPEG MPEG Disc Changer playback and receiver key operations see KVT 727DVD 627DVD Basic Operations page 10 The Easy Control Panel is hidden when you touch a central area of the monitor Displaying the Easy Control Panel The CD MP3 WMA JPEG MPEG Disc Changer Play Control Panel is displayed in a floating position of the selected picture F Displaying the Easy Contr...

Page 25: ...y the present track Starts or stops Random Play to play songs in random order a Selects the Disc Name see Set Disc Name page 29 Disc Text or Track Text mode for text display s Scrolls the display text d Switches the play time display between Track Disc and Disc Remaining Time f Track Number Display g Play Time Display h Appears when a disc is inserted j Stops to play the built in disc player When ...

Page 26: ...m Play to play songs of the present folder in random order Selects the Folder name File name Title ID3 WMA tag Artist name ID3 WMA tag or Album name ID3 tag for text display P Scrolls the display text Q Switches the button display W Repeats to play the song or data of the present folder E Folder and File Number Display R Play Time Display T Appears when a disc is inserted Y Function Indicator MP3 ...

Page 27: ...ger in random order Function of Disc Changer H Switches the button display J Selects the Disc Name see Set Disc Name page 29 Disc Text or Track Text mode for text display K Scrolls the display text L Switches the play time display between Track Disc and Disc Remaining Time Disc Number Display Function of Disc Changer Track Number Display Play Time Display Function Indicator The functions that can ...

Page 28: ...unctions Me n u CD Menu screen Selects options from various function menus Returns to the CD MP3 WMA JPEG MPEG Disc Changer Control screen The available functions vary depending on the source used D V D C D Name Set 64 65 B64 3103 00 00 E En indd 28 B64 3103 00 00 E En indd 28 05 5 19 10 00 03 AM 05 5 19 10 00 03 AM ...

Page 29: ... Call the MP3 WMA JPEG MPEG Menu Me n u 2 Start the Directory List Directory List DVD MEDIA Fo l d e r Name F i l e Name Upper Fo l d e r Name F i l e Name Fo l d e r Name F i l e Name F i l e Name F i l e Name F i l e Name Root Fol Open 0 35 27 1 3 7 7 6 2 4 5 1 Returns to the root directory 2 Displays the next higher level of hierarchy 3 Displays a directory if the subdirectory has a directory W...

Page 30: ...uick disc selection 1 Call the Disc Changer Menu Me n u 2 Call the Disc Select Menu Disc Select C D C H 1 Disc Name 2 Disc Name 3 Disc Name 4 Disc Name 5 Disc Name 6 Disc Name DISP P 2 3 5 1 3 2 3 1 Plays the displayed disc 2 Selects the Disc Name or Disc Text mode for text display 3 Scrolls the list It is not displayed when a disc changer having 6 or less discs is used 3 Select the desired disc 1...

Page 31: ... MPEG Folder File 2 Enter a track number 0 9 WXYZ 3 Search When searching for a track POSITION 38 During play on an external in disc player or disc changer 1 Enter a disc or track number 0 9 WXYZ 2 Search When searching for a track 4 When searching for a disc BAND The operation ends automatically if you do not operate within 10 seconds CD WMA MP3 JPEG MPEG Disc Changer Play Control B64 3103 00 00 ...

Page 32: ...the Source Select screen page 49 p Calls the Setup Menu page 51 q Switches to the FM1 2 3 band w Switches to the AM band e Tunes in a station Use the Seek Mode page 34 to change the frequency switching r Switches between 1 to 6 buttons and Function buttons to use t Turns the Local Seek function On or Off y Selects the Auto Memory mode see page 34 for the Auto Memory u Switches the Seek mode see pa...

Page 33: ...ous function menus g Returns to the Tuner Control screen The available functions vary depending on the model used the tuner specifications and the broadcasting system that can be received Displaying the Tuner Menu screen You can select menu options using various functions Me n u Tuner Menu screen T U N E R PTY Search Preset Select Radio Text 24 25 B64 3103 00 00 E En indd 33 B64 3103 00 00 E En in...

Page 34: ...to store in memory FM AM 2 Select the Auto Memory mode AME If AME is not shown touch Next Next 3 Start Auto Memory Touch or Auto Memory terminates when 6 stations are stored or when all stations are tuned in The operation ends automatically if you do not operate within 10 seconds Manual Memory Stores the current receiving station in memory 1 Select a station you wish to store in memory AM FM 2 Sto...

Page 35: ... 5 MHz FM1 2 90 1 MHz FM1 3 98 1 MHz FM1 4 106 1 MHz FM1 5 108 0 MHz FM1 6 87 5 MHz F M 9 8 1 1 4 3 2 2 1 Tunes in the displayed station The station name is displayed if previously set 2 Switches the band of the displayed station list 3 Shows the band and frequency 4 Returns to the Tuner Menu B64 3103 00 00 E En indd 35 B64 3103 00 00 E En indd 35 05 5 19 10 00 22 AM 05 5 19 10 00 22 AM ...

Page 36: ...n the traffic bulletin starts The Traffic Information screen appears automatically Traffic Information screen T U N E R 13 50 Traffic Information 2 1 1 Adjusts the volume 2 Calls the Sound Effects Menu page 78 88 3 Calls the Setup Menu page 51 If you continue to listen to the audio source during traffic bulletin It is necessary to have Traffic Information function set to On in order to have the Tr...

Page 37: ...olls the program type list 3 Searches for the program type It is displayed when the Program Type is selected 4 Returns to the Tuner Menu 3 Select a program type News etc 4 Search for the program type SRCH Radio Text You can display the radio text Only when receiving the FM broadcast 1 Call the Tuner Menu Me n u 2 Display the Radio Text Radio Text T U N E R R a d i o Te x t F M 9 8 1 2 1 1 Displays...

Page 38: ...ter approximately 5 seconds Also the information can be displayed automatically when it is updated page 68 G r o u p 1 G r o u p 1 T V 1 2 c h P r e s e t 1 2 c h P r e s e t 1 TV TV1 MODE FULL AV OUT DVD 1 2 3 5 6 7 8 Displaying the Easy Control Panel The Control Panel is displayed in a floating position of the TV picture F Displaying the Easy Control Panel 9 Adjusts the volume p Switches the sou...

Page 39: ...the Seek mode see page 40 for the Seek Mode h When 1 to 6 buttons appear you can recall channels on memory For memory of broadcasting stations see Auto Memory page 40 or Manual Memory page 40 j Indicates current Seek mode k TV Area Group Display page 73 l Memory Number Display Displaying theTV Menu screen You can select menu options using various functions Me n u TV Menu screen Selects option from...

Page 40: ...stations are tuned in The operation ends automatically if you do not operate within 10 seconds Manual Memory Stores the current receiving channel in memory 1 Select a channel you wish to store in memory TV 2 Store in memory 1 6 If 1 to 6 are not shown touch Next Next Continue to touch until the memory number appears Preset Select Lists and tunes in stations in memory one after the other 1 Select a...

Page 41: ...ct the Set Name mode Name Set 4 Enter a name For character entry details see Character Entry see page 48 5 Exit the Set Name mode O k You can store up to 20 stations in memory You can set a station name only after you have applied the parking brake B64 3103 00 00 E En indd 41 B64 3103 00 00 E En indd 41 05 5 19 10 00 44 AM 05 5 19 10 00 44 AM ...

Page 42: ...ls the DAB Tuner Menu 9 Calls the Sound Effects Menu page 78 88 p Displays the Source Select screen page 49 q Calls the Setup Menu page 51 w Switches the band to DAB1 2 3 e Selects a service r Selects the Ensemble t Switches between 1 to 6 buttons and Function button to use y Selects the Auto memory mode see page 44 for the Auto Ensemble memory u Switches the Seek mode see page 44 for the Seek Mod...

Page 43: ...ts option from various function menus d Returns to the DAB Tuner Control screen For DAB Tuner function details see the Instruction Manual of DAB Tuner optional accessory 19 D A B Service Select Language Filter PTY Search DAB Information 22 23 B64 3103 00 00 E En indd 43 B64 3103 00 00 E En indd 43 05 5 19 10 00 50 AM 05 5 19 10 00 50 AM ...

Page 44: ...cally 1 Select a band you wish to store in memory Band 2 Select the Auto Memory mode AME If AME is not shown touch Next Next 3 Start Auto Memory Touch or Auto Memory terminates when 6 stations are stored or when all stations are tuned in Service Preset Memory The current receiving service is stored in memory 1 Select a service you wish to store in memory Band Service Service 2 Store in memory 1 6 ...

Page 45: ... Scrolls the service list 3 Returns to the DAB Tuner Menu 3 Select a service Service Name Language Filter The languages are list for your selection 1 Call the DAB Tuner Menu Me n u 2 Call the Language Filter Menu Language Filter D A B Language E n g l i s h SRCH 2 2 0 0 9 4 M H z 3 2 1 1 1 Selects a language 2 Searches for the selected language 3 Returns to the DAB Tuner Menu 3 Select a language y...

Page 46: ...ype 3 Displays the Language select screen 4 Returns to the DAB Tuner Menu 3 Select a program type Select a Language Display the Language select screen LANG D A B PTY N e w s Language E n g l i s h Re t u r n SRCH 2 2 0 0 9 4 M H z 2 1 1 3 1 Selects a Language 2 Searches for the program type 3 Returns to the PTY Search Menu Select a Language 4 Search for the program type SRCH B64 3103 00 00 E En in...

Page 47: ...y Region label and Dynamic label 2 Scrolls the information display 3 Returns to the DAB Tuner Menu DAB Announcement When the Announcement you have turned on starts any source is switched to the Announcement automatically When the announcement starts The Announcement screen appears automatically Announcement screen D A B 13 50 Traffic News 2 1 3 1 1 Adjusts the volume 2 Calls the Sound Effects Menu...

Page 48: ...er locate the cursor on it and touch this button 3 Enters characters 4 Scrolls up or down the character button display 5 Exits the Character Entry mode and returns to the previous screen You can enter characters only after you have applied the parking brake O k S p a c e K E N W O O D a b c d e f g h i j k l m n o p q r s t u v w x y z 1 2 3 4 5 1 4 B64 3103 00 00 E En indd 48 B64 3103 00 00 E En ...

Page 49: ...rom the control screen of any source DVD VIDEO 13 50 IN T i t l e 1 C h a p 3 T 0 0 5 2 0 K E N W O O D T REP Next Next PBC SCRL TIME REP Displaying the Source Select screen Source Select screen 1 Adjusts the volume 2 Select the source 3 Returns to the Control screen previously displayed TUNER STANDBY DVD VIDEO CD CH AUX EXT 3 1 2 1 1 1 B64 3103 00 00 E En indd 49 B64 3103 00 00 E En indd 49 05 5 ...

Page 50: ...bient becomes dark 8 Returns to the previous screen The Screen Control screen is displayed only when you have applied the parking brake The picture quality can be set for each source Displaying the Angle Control screen You can set the monitor position and open close speed Angle Control screen 9 Monitor Angle Adjustment p Forward Backward Monitor Position Adjustment q Monitor Open Close Setup When ...

Page 51: ...usts the volume 2 Scrolls the Setup Menu 3 Calls each Setup Menu 4 Calls the Sound Effects Menu page 78 88 5 Returns to the Control screen of the previous source Your setup on the Sound Effects menu is adjusted automatically according to your Audio Set Up page 52 58 on the Setup menu We recommend you to complete the Audio Set Up first then set up the Sound Effects menu The available functions vary...

Page 52: ...e Speaker Set Up screen When the speaker type and size are set the speaker crossover network and equalizer curve are set automatically Speaker Set Up screen 8 Selects a speaker to be set see Speaker Set Up page 54 9 Selects a speaker type see Speaker Set Up page 54 p Displays the Speaker Crossover Setup screen see Crossover Network Setup page 57 You can adjust the crossover setup that was set auto...

Page 53: ...r to be set see Channel Level page 55 t Sets the speaker volume see Channel Level page 55 y Starts or stops test signal tone output for setup check u Displays the Speaker Set Up screen Channel Level 5 d B Front Left T e s t 16 17 15 15 14 B64 3103 00 00 E En indd 53 B64 3103 00 00 E En indd 53 05 5 19 10 01 20 AM 05 5 19 10 01 20 AM ...

Page 54: ...kers OEM 10cm 13cm 16cm 17cm 18cm 4x6 inches 5x7 inches 6x8 inches 6x9 inches 7x10 inches Rear speakers NONE OEM 10cm 13cm 16cm 17cm 18cm 4x6inches 5x7inches 6x8 inches 6x9 inches 7x10 inches Subwoofer NONE 16cm 20cm 25cm 30cm 38cm over Select NONE if you have no speakers If you set the center speaker to NONE even in a short time when you are setting the Surround Control page 82 to Bypass Center t...

Page 55: ...wish to adjust Page 53 r Channel Level setup screen Channel Level 5 d B Front Left T e s t 1 2 3 5 4 1 Center speaker 2 Left front speaker 3 Right front speaker 4 Left rear speaker 5 Right rear speaker 6 Subwoofer 2 Adjust the volume 6 B64 3103 00 00 E En indd 55 B64 3103 00 00 E En indd 55 05 5 19 10 01 23 AM 05 5 19 10 01 23 AM ...

Page 56: ...t Up screen 2 Select a speaker you wish to adjust 2 3 4 1 2 3 1 Center speaker 2 Front speaker 3 Rear speaker 4 Subwoofer 3 Set a delay time The speakers are virtually moved to the desired distance When the values of center speaker and front speakers increase they are virtually moved forward When the values of rear speakers and subwoofer increase they are virtually moved backward 1 B64 3103 00 00 ...

Page 57: ...Over LPF Page 52 p X O v e r L P F Re t u r n FREQ Slope 8 0 H z 1 8 d b N o r m a l SUB Phase 2 3 4 1 1 2 1 Sets a crossover frequency 2 Sets a crossover slope 3 Returns to the Speaker Set Up screen 4 Sets the phase of subwoofer output it is displayed when the subwoofer crossover frequency is set The phase is reversed 180 degrees when set to Reverse When you select a speaker type on the Speaker S...

Page 58: ... 4 Calls the Setup Menu 5 Displays the X Over setup screen page 59 6 Sets up the front speaker type to fine tune for the optimal equalizer curves Standard Setup for general diameter speakers Narrow Setup for small diameter speakers Middle Setup for middle diameter speakers Wide Setup for large diameter speakers 7 Set the use or no use of Subwoofer 1 2 3 4 6 5 1 1 1 6 7 B64 3103 00 00 E En indd 58 ...

Page 59: ... 80 100 120 150 180 220 Hz 3 Sets a Subwoofer Low Pass Filter frequency You can select any of the following frequency 50 60 80 100 120 Through Hz 4 Sets the phase of subwoofer output The phase is reversed 180 degrees when set to Reverse 5 Returns to the Speaker setup screen Set in both the front channel and rear channel simultaneously when using high pass filter function You cannot set a correct c...

Page 60: ...Sets the dynamic range Wide The dynamic range is reduced by changing from Wide to Normal and from Normal to Midnight You can easy to listen a small sound when the dynamic range is narrow This is effective only when you are using a Dolby Digital software 8 Displays the DVD SETUP 2 screen If is not shown touch or to display it 1 Disabled when a DVD is being played Menu LANG Sub t i t l e LANG Aud i ...

Page 61: ...up page 63 w Displays the DVD SETUP 1 screen e Displays the DVD SETUP 3 screen 1 Disabled when a DVD is being played Angle Mark Screen Ratio Parental Level 16 9 Off Set Off On Set Set DVD SETUP 2 10 9 12 10 11 9 Displaying the DVD SETUP 3 screen DVD SETUP 3 screen r Selects the picture display time 1 Middle The Display of a JPEG picture is changed Short Middle Long t Selects the Picture Effect 1 R...

Page 62: ...l Dutch bo Tibetan no Norwegian br Breton oc Occitan ca Catalan om Afan Oromo co Corsican or Oriya cs Czech pa Punjabi cy Welsh pl Polish da Danish ps Pashto Pushto de German pt Portuguese dz Bhutani qu Quechua el Greek rm Rhaeto Romance en English rn Kirundi eo Esperanto ro Romanian es Spanish ru Russian et Estonian rw Kinyarwanda eu Basque sa Sanskrit fa Persian sd Sindhi fi Finnish sg Sangho fj...

Page 63: ...number you enter first is set as your code number You can clear the code number by pressing the Reset button 3 Display the Parental Level Setup screen E n t e r Pa r e n t a l L e v e l R e t u r n L e v e l 5 1 2 1 1 Sets a parental level 2 Returns to the DVD SETUP 2 screen 4 Set a parental level 5 Complete the parental level setup R e t u r n If a disc has a higher parental lock level the audien...

Page 64: ...crolling of text display on the Source Control screen Manual Auto Scrolls the screen automatically Manual Allows you to scroll the screen manually 7 Selects a remote control signal On When turned Off the remote control of TV reception is rejected 8 Displays the System Set Up 2 screen If is not shown touch or to display it System Set Up 1 O f f O n O f f O n Remote Sensor Scroll Beep A u t o 1 2 3 ...

Page 65: ...at or if you cannot play a disc in the 1 position You cannot play an MP3 WMA VCD disc in the 2 position Also you may not play some music CDs in the 2 position Your setup is disabled when the disc is being played p Selects an illumination color of receiver keys Red Green Green Red Red q Displays the System Set Up 1 screen System Set Up 2 1 CD Read G r e e n Key ILLUMI 9 10 Setup Menu 11 B64 3103 00...

Page 66: ... set the navigation system connection to AV IN1 the display is fixed to NAV 7 Sets an image display of the system that is connected via the AV INPUT2 port 1 Off Off When the image source is switched an image entered via the AV INPUT2 port is displayed On When an image signal is entered via the AV INPUT2 port this image is displayed 8 Sets a name to be displayed when you select an image of the syst...

Page 67: ...isplaying the AV I F 3 screen AV I F 3 screen F L e f t 15 19 17 18 t Selects speakers used for voice guidance of the navigation system F Left F Left Uses the front left side speaker for voice guidance F Right Uses the front right side speaker for voice guidance Front All Uses both front speakers for voice guidance y Adjusts the volume for voice guidance of the navigation system 19 u Mutes the vol...

Page 68: ...d when you touch on the screen 8 Sets an on screen display of the video playback screen Auto Auto Information is displayed for 5 seconds when updated MANU Information is displayed when you touch on the screen 9 Sets an on screen display of the DVD playback screen MANU Auto Information is displayed for 5 seconds when updated MANU Information is displayed when you touch on the screen p Sets an on sc...

Page 69: ...itions Touch the center of left lower and right upper when requested Clock You can adjust the clock time 1 Display the Clock screen Clock If Clock is not shown touch or to display it C l o c k O f f O n RDS SYNC 1 1 2 5 2 1 3 1 1 1 4 5 6 7 8 9 6 7 9 1 Adjusts the volume 2 Returns to the Control screen of the previous source 3 Calls the Sound Effects Menu page 78 88 4 Calls the Setup Menu 5 Clock t...

Page 70: ...ted the code registration S e t is not available 2 Start the security code registration S e t P a s s Wo r d E n t e r C a n c e l C l e a r 1 s t 1 2 3 4 5 6 7 8 9 0 2 3 4 1 1 Enters the numbers to your security code 2 Clears your entry 3 Cancels the registration and returns to the Security Code Setup screen 4 Registers your security code 3 Enter a security code 0 9 Input a four digit number 4 Re...

Page 71: ... security code as that you have entered in Step 3 above 2 Enter the security code E n t e r Now you can use your Receiver If you enter an incorrect security code you cannot use your Receiver for a while Incorrect entry count Receiver inoperable time 1 2 5 minutes 3 1 hour 4 or more 24 hours B64 3103 00 00 E En indd 71 B64 3103 00 00 E En indd 71 05 5 19 10 02 09 AM 05 5 19 10 02 09 AM ...

Page 72: ...ppears again 2 Display the Memory screen Please Select the Desired Function from the Choices Below 1 2 3 4 1 Recalls the memorized settings 2 Memorizes the current Audio Set Up and AV Interface settings 3 Clears the currently memorized settings 4 Returns to Set Up Memory screen 3 Memorize or recall the settings When memorizing the Audio Set Up and AV Interface settings If settings have already bee...

Page 73: ...t screen If TV Set Up is not shown touch or to display it Displaying theTV2 Area Set screen TV2 Area Set screen 7 Sets the present TV2 receiving area 8 Displays the TV1 Area Set screen Me n u T V 1 A r e a S e t Austria Norway Yougoslavia Spain Germany Belgium Finland Netherlands Sweden Denmark Switzerland Iceland Portugal 1 2 3 4 5 6 1 2 4 1 1 1 3 5 6 Me n u T V 2 A r e a S e t Austria Norway You...

Page 74: ...on Restriction function On or Off On 8 Turns the Auto TP Seek function On or Off On 9 Displays the RDS Set Up 2 screen If RDS Set Up is not shown touch or to display it Displaying the RDS Set Up 2 screen RDS Set Up 2 screen p Selects a display language for the PTY function q Displays the RDS Set Up 1 screen RDS Set Up 2 Me n u G e r m a n Language Select 10 RDS Set Up 1 Me n u O f f News A F O f f...

Page 75: ...source 5 Setup option and value display 6 Selects a setup option 7 Selects a set value 8 Enters the set value If AMP Ctrl is not shown touch or to display it For the model name of amp you can control from the system see the amp s catalog For the options and values you can change and for the amp s operation when changed see the amp s instruction manual A M P C o n t r o l Me n u A M P 1 V O LT 1 4 ...

Page 76: ...ange Control function On or Off 7 Turns the Regional Announcement function On or Off 8 Sets a program type to be selected automatically when the receiving ensemble starts 9 Displays the Announcement Selection screen page 77 If DAB Set Up is not shown touch or to display it D A B S e t U p Me n u P T Y W a t c h O f f P T Y W a t c h R e g i o n a l I N T D A B P r i o r i t y O f f O f f D R C O f...

Page 77: ...the DAB Set Up screen 2 Set the announcement parameters Traffic News etc Traffic News Traffic information Transport News Time table information of public transportation services Warning Lower priority items than alarms power failure cutoff of water supply and others News News flash Weather Weather forecasting Events Event information Special Events Undetermined event information Radio Info Program...

Page 78: ...p on the Sound Effects Menu is adjusted automatically according to your Audio Set Up page 52 on the Setup menu We recommend you to complete the Audio Set Up first then set up the Sound Effects Menu Displaying the Control screen F Control screen DVD VIDEO 13 50 IN T i t l e 1 C h a p 3 T 0 0 5 2 0 K E N W O O D T REP Next Next PBC SCRL TIME REP Displaying the Sound Effects Menu screen Sound Effects...

Page 79: ... generated if you suddenly switch to another source may be extremely loud 8 Displays the Audio Control 2 screen Displaying the Audio Control 2 screen Audio Control 2 screen 9 Adjusts the bass boost of the B M S power amplifier optional accessory You may not set some models of power amp boost to 18 See the catalog or instruction manual of power amplifier p Sets the center frequency of bass boost yo...

Page 80: ...ound Effects Menu 5 Displays the Parametric Equalizer screen page 81 You can adjust the value set for the Equalizer Curve Type 6 Selects an equalizer curve type You can select any of the following equalizer curves Natural Rock Pops Easy Top40 Jazz Equalizer curve can be set for each source Pops KBS P EQ Equalizer 1 2 4 1 1 1 3 6 6 5 B64 3103 00 00 E En indd 80 B64 3103 00 00 E En indd 80 05 5 19 1...

Page 81: ... a frequency 7 Sets a gain level 8 Sets a Q value 9 Tone curve becomes flat 0 Select a channel to be adjusted Exits the Parametric Equalizer setup and returns to the Equalizer screen 2 Select a channel you wish to adjust F R C 3 Select a frequency band you wish to adjust You can adjust the following frequency bands Band1 60 80 100 120 160 200 Hz Band2 250 315 400 500 630 800 1k Hz Band3 1 25k 1 6k...

Page 82: ...nnels and sampling frequency are displayed 7 Displays the Surround Control Adjustment screen See Surround Control Adjustment page 83 When you have selected the TV or TUNER source and when you set the Dolby PL we recommend you to select the Dolby PLII Matrix mode If you select another Dolby PLII mode the sound is NOT output from rear speakers when you receive monaural broadcasting sounds Surround C...

Page 83: ...evel 4 Turns the Panorama mode On or Off 5 Enters your setup and returns to the Surround Control Control screen If the sound field of SRS CS II has been set Re t u r n MIX to Rear Front MIX to Rear Center 1 3 6 6 7 7 6 Sets the surround position by adjusting the front and rear volume balance 7 Adjusts the center audio mix to rear volume You cannot use the Surround Control Adjustment during playbac...

Page 84: ... 85 It is not effective though SRS WOW can be set besides Off when you set Surround Control to Dolby PLII Set Surround Control to Bypass or SRS CS II if you expect SRS WOW sound effect SRS WOW Middle SRS WOW Adjust 1 2 4 1 1 1 3 6 5 5 Input Channels Surround Function SRS 3D FOCUS TruBass Front Rear Front Rear Center Front Rear Center Multi 2ch Bypass Bypass Center Dolby PLII SRS CS II The SRS 3D e...

Page 85: ...s the FOCUS effect level 5 Sets the SRS 3D effect level 6 Returns to SRS WOW Control screen FOCUS Adjusts the vertical position of the speaker and sound image by virtual adjustment TruBass Assists the playback for the super bass sound SRS 3D Makes a natural 3D sound field You cannot set SRS 3D in tuner source 2 Select a speaker you wish to adjust Front Rear Center 3 Adjust the sound effect level 4...

Page 86: ...7 7 Stores the present adjustment setup in memory or calls it from memory page 87 The final distance is adjusted to the total of Car Type Set Up value page 52 and Position Setup both Position and Position Fine Control value If you change the Car Type Set Up value page 52 the position is set to All Only the adjusted distance of position setup Position and Position Fine Control values is stored in m...

Page 87: ...nce to each speaker 5 Exits the Position Adjust setup and returns to the Position screen 2 Select a speaker you wish to adjust 1 6 3 2 4 5 1 Center speaker 2 Left front speaker 3 Right front speaker 4 Left rear speaker 5 Right rear speaker 6 Subwoofer 3 Set a delay time 4 Close the Position Adjust Screen R e t u r n Stores the Preset adjustment setup To store your adjustment in memory P1 P3 Contin...

Page 88: ...SCRL TIME REP Displaying the Sound Effects Menu screen Sound Effects screen 1 Adjusts the volume 2 Calls the Sound Effects Menu 3 Calls the Setup Menu page 51 4 Returns to the Control screen of the previous source Your setup on the Sound Effects Menu is adjusted automatically according to your Audio Set Up page 58 on the Setup menu We recommend you to complete the Audio Set Up first then set up th...

Page 89: ...the subwoofer volume 9 Turns the Loudness control function On or Off If turned On high and low tones are automatically enhanced during low volume On p Displays the Audio Control 2 screen Displaying the Audio Control 2 screen Audio Control 2 screen q Adjusts the bass boost of the B M S power amplifier optional accessory You may not set some models of power amp boost to 18 See the catalog or instruc...

Page 90: ... Selects an equalizer curve type You can select any of the following equalizer curves Natural Rock Pops Easy Top40 Jazz 6 Selects items to be adjusted for tone curve setup If turned Off only Level can be setup for tone curves 7 Displays the Tone curve setup screen page 91 Equalizer curve can be set for each source Me n u N a t u r a l System Q To n e Equalizer O n System Q EX 1 2 3 4 5 6 7 1 1 1 5...

Page 91: ...r frequency to the low register by approximately 20 6 Tone curve becomes flat 7 Returns to the Equalizer screen Tone curve can be set for each source 2 Select a frequency band you wish to adjust You can adjust the following frequency bands Bass 40 50 60 70 80 100 120 150 Hz Middle 500 1k 1 5k 2k Hz Treble 10k 12 5k 15k 17 5k Hz 3 Set a center frequency FREQ 4 Set a level Level 5 Set a Q factor Q F...

Page 92: ...T terminal is also switched to the same source However if you have set the Area to Reverse the audio source that is output at the AV OUTPUT terminal is switched depending on the front sound source 7 Switches the front and rear audio sources This button appears when the Zone function is On Use Reverse to change over the front and rear audio sources 8 Adjusts the volume of the rear channel This butt...

Page 93: ...called The Phone Call CALL screen appears and systemis paused Phone Call CALL screen C A L L 13 50 If you want to continue to listen to the audio source during phone call The system resumes audio play during the phone call When the call ends Hang up the phone The system resumes playing automatically B64 3103 00 00 E En indd 93 B64 3103 00 00 E En indd 93 05 5 19 10 03 13 AM 05 5 19 10 03 13 AM ...

Page 94: ...D It usually corresponds to a single movie of video software or an album some times a piece of music of music software The numbers assigned to individual titles are referred to as the title numbers Chapter number DVD The chapter is a section of video and audio record ed in a DVD A title is composed of several chap ters The numbers assigned to individual chapters are referred to as the chapter numb...

Page 95: ...ss Center The Center Level of Surround Control Adjust cannot be set The Center Width Control of Surround Control Adjust cannot be set The center speaker for DTA cannot be set The Position Fine Control of the center speaker cannot be set The Channel Level of the center speaker cannot be set The center speaker has been set to NONE on the Speaker Set Up screen page 54 The Surround Control Adjust cann...

Page 96: ... the vehicle is moving Engaging the parking brake will cause images to be displayed The screen is dark The unit is in a location where temperature is low If the temperature of the monitor unit drops the screen may appear darker when power is first turned on due to the characteristics of a liquid crystal panel Wait a while after turning power on for the temperature to rise Normal brightness will re...

Page 97: ...ith P B C Menu playback is available only with VCD discs recorded with P B C The subtitle is not displayed The DVD disc being played does not contain the recording of subtitles The subtitle cannot be displayed when the DVD disc being played does not contain the recording of subtitles The voice or subtitle language cannot be changed The DVD disc being played does not contain the recording of more t...

Page 98: ... not cancelled The settings for these functions remain on until the setting to off or the disc ejected even if the power is turned off or the source changed Can notremove disc The cause is that more than 10 minutes has elapsed since the vehicle ACC switch was turned OFF The disc can only be removed within 10 minutes of the ACC switch being turned OFF If more than 10 minutes has elapsed turn the AC...

Page 99: ...ature falls below 60 C 140 F the disc will start playing again Mecha Error The disc player is malfunctioning Eject the disc and try inserting it again Contact the Kenwood dealer if this indicator continues blinking or the disc cannot be ejected Disc Error The unplayable discs is inserted Read Error The disc is upside down Load the disc with the labeled side up The disc is quite dirty Clean the dis...

Page 100: ... 20 24bit DSP Section 4 BAND Parametric equalizer BAND1 frequency 60 80 100 120 160 200Hz BAND2 frequency 250 315 400 500 630 800 1kHz BAND3 frequency 1 25k 1 6k 2k 2 5k 3 15k 4kHz BAND4 frequency 5k 6 3k 8k 10k 12 5k 16kHz Gain 9 7 5 3 2 1 0 1 2 3 5 7 9dB Q control 0 25 0 5 1 0 2 0 X over High pass filter frequency Through 30 40 50 60 70 80 90 100 120 150 180 220 250Hz slope Through 12 18 24dB oc...

Page 101: ...ower Front Rear DIN 45324 B 14 4V 30W 4 Preout level V 5V 10kΩ Preout impedance 80Ω General Operating voltage 14 4V 11V 16V Current consumption 15A Dimensions W H D Main Unit Installation 182mm 53mm 161mm Hideaway unit 225mm 40mm 168mm Operational temperature range 10 C 60 C Storage temperature range 20 C 85 C Weight Main unit 2 2kg Hideaway unit 1 2kg B64 3103 00 00 E En indd 101 B64 3103 00 00 E...

Page 102: ...5Ω Frequency response 3 0dB 30Hz 15kHz S N dB MONO 65dB Selectivity 400kHz 80dB Stereo separation 35dB 1kHz LW Tuner section Frequency range 9kHz 153kHz 281kHz Usable sensitivity 45μV MW Tuner section Frequency range 9kHz 531kHz 1611kHz Usable sensitivity 25μV Video section Color system of external video input NTSC PAL External video input level RCA jacks 1Vp p 75Ω External audio max input level R...

Page 103: ...protected by U S patents and other intellectual property rights Use of this copyright protection technology must be authorized by Macrovision and is intended for home and other limited viewing uses only unless otherwise authorized by Macrovision Reverse engineering or disassembly is prohibited Manufactured under license from Dolby Laboratories Dolby ProLogic and the double D symbol are trademarks ...

Page 104: ...B64 3103 00 00 E En indd 104 B64 3103 00 00 E En indd 104 05 5 19 10 03 23 AM 05 5 19 10 03 23 AM ...

Reviews: