background image

8


|


English

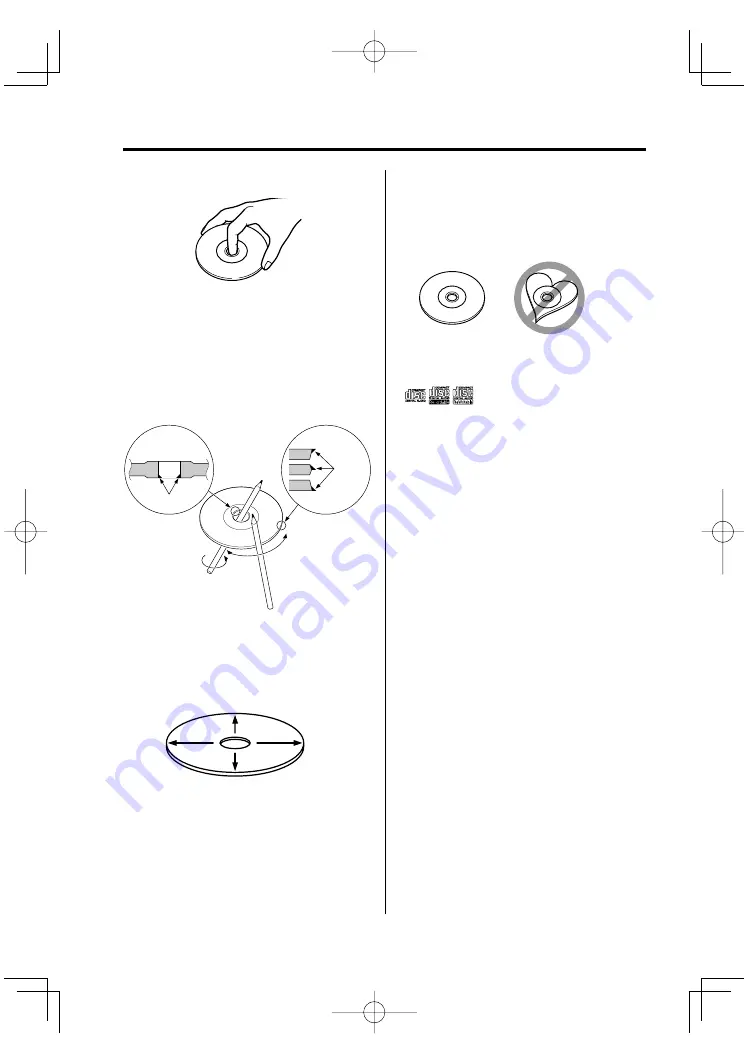
Handling discs

•  Don’t touch the recording surface of the disc.

•  CD-R/RW and DVD-R are easier to damage than a 

normal music CD. Use a CD-R/RW or a DVD-R after 
reading the caution items on the package etc.

•  Don’t stick tape etc. on the disc.

Also, don’t use a disc with tape stuck on it.

When using a new disc

If the disc center hole or outside rim has burrs, use 
it after removing them with a ball pen etc.

Disc accessories

Don’t use disc type accessories.

Disc cleaning

Clean from the center of the disc and move 
outward.

About discs

Burrs

Burrs

Removing discs

When removing discs from this unit pull them out 
horizontally.

Discs that can’t be used

•  Discs that aren’t round can’t be used.

•  Discs with coloring on the recording surface or 

that are dirty can’t be used.

•  This unit can only play the CDs with 

  It may not correctly play discs which do not have 

the mark.

•  A CD-R or CD-RW that hasn’t been finalized can’t 

be played. (For the finalization process refer to 
your CD-R/CD-RW writing software, and your CD-
R/CD-RW recorder instruction manual.)

Disc storage

•  Don’t place them in direct sunlight (On the seat 

or dashboard etc.) and where the temperature is 
high.

•  Store discs in their cases.

KDV-S210P̲09.Indd   8

04.5.25, 4:27:00 PM

Summary of Contents for KDV-S210P

Page 1: ...the best performance from your new DVD player For your records Record the serial number found on the back of the unit in the spaces designated on the warranty card and in the space provided below Refer to the model and serial numbers whenever you call upon your KENWOOD dealer for information or service on the product Model KDV S210P Serial number KDV S210P 10 Indd 1 04 8 25 10 27 38 AM ...

Page 2: ...ect DVD Picture Angle select DVD Zoom DVD PBC VCD Digest Screen DVD CD MP3 features 15 MP3 Folder List MP3 Program Play Direct Skip Play Play Time Search CD MP3 Play Mode MP3 Random Play Setup menu 18 Setup menu General Setup Speaker Setup Audio Setup Preferences Accessories 21 Installation 21 Connecting Wires to Terminals 22 Troubleshooting Guide 23 Specifications 24 DVD Function of during DVD pl...

Page 3: ...is equipment has been tested and found to comply with the limits for a Class B digital device pursuant to Part 15 of the FCC Rules These limits are designed to provide reasonable protection against harmful interference in a residential installation This equipment may cause harmful interference to radio communications if it is not installed and used in accordance with the instructions However there...

Page 4: ...us complies with Canadian ICES 003 2WARNING To prevent injury or fire take the following precautions Insert the unit all the way in until it is fully locked in place Otherwise it may fall out of place when jolted To prevent a short circuit never put or leave any metallic objects such as coins or metal tools inside the unit If the unit starts to emit smoke or strange smells turn off the power immed...

Page 5: ...unction The number in the icon indicates the number of angles Max 9 angles 16 9 LB Aspect ratios that can be selected LB stands for Letter Box and PS for Pan Scan In the example on the left the 16 9 video can be converted into letter box video Playable discs DVD Video Audio Disc CD MP3 format Disc CD CD R RW format Disc Video CD Disc Also you cannot play back the DVD R discs if not recorded in the...

Page 6: ...al writing For recording on an empty disc up to the maximum capacity at once check Disc at Once ID3 tag display The ID3 tag cannot be displayed Entering file and folder names The code list characters are the only file names and folder names that can be entered and displayed If you use any other character for entry the file and folder names are not displayed correctly They may neither be displayed ...

Page 7: ...r the brake pedal etc it will hinder your driving causing danger Do not set the remote on hot places such as above the dashboard The provided batteries are intended for use in operation checking and their service life may be short When the remote controllable distance becomes short replace both of the batteries with new ones is a trademark of DVD Format Logo Licensing Corporation registered in the...

Page 8: ... move outward About discs Burrs Burrs Removing discs When removing discs from this unit pull them out horizontally Discs that can t be used Discs that aren t round can t be used Discs with coloring on the recording surface or that are dirty can t be used This unit can only play the CDs with It may not correctly play discs which do not have the mark A CD R or CD RW that hasn t been finalized can t ...

Page 9: ...Power Press the POWER button Unplug the cigarette lighter plug when you turn off the ignition in order to prevent the battery from running out POWER EJECT DISPLAY MUTE A B REPEAT 4 38 1 7 KDV S210P 09 Indd 9 04 5 25 4 27 01 PM ...

Page 10: ...ing the volume down quickly Press the MUTE button Each time the button is pressed the Mute turns ON or OFF Skip Skips a chapter select track or song Press the 4 or button To skip on a VCD turn the PBC function off by pressing the PBC button Fast Forward and Reverse Press the 1 or button The speed changes at 4 levels X2 X4 X6 X8 each time the button is pressed To restart playback press the 38 butto...

Page 11: ...utton is pressed the display switches as shown below In DVD source Display Information TITLE CHAPTER Title chapter elapsed time TITLE REMAIN Title remaining time CHAPTER ELAPSED Chapter elapsed time CHAPTER REMAIN Chapter remaining time OFF Not displayed In VCD with PBC on MP3 source Display Information SINGLE ELAPSED Song elapsed time SINGLE REMAIN Song remaining time OFF Not displayed In VCD wit...

Page 12: ... scene you want to play Press the 0 9 button Starts playing the scene you entered during VCD playback 4 For DVD start Search Play Press the ENTER button Starts playing the scene you entered Slow Motion play Press the 2I or I3 button Each time the button is pressed it plays in slow motion as shown below Disc Button Movement DVD 2I The speed of slow reverse changes in order of 2X 4X and 8X DVD I3 Th...

Page 13: ...orded on the disc in order If no more than one language is recorded on the disc it does not switch Picture Angle select DVD Press the ANGLE button Switches the angles recorded on the disc in order If no more than one angle is recorded on the disc it does not switch Zoom DVD Zooms the image 1 Select the zoom ratio Press the ZOOM button Each time the button is pressed the zoom ratio changes at 3 lev...

Page 14: ...ss the 7 button 5 Display Digest Screen Press the MENU button Press the 7 button to return to the previous screen 6 Play the scene you want to see Press the 1 9 button Press the 1 9 button corresponding to the number displayed on the Digest screen Press the 4 or button to go to the previous or next page 7 Play the scene you selected Press the ENTER button Press the 7 button to return to the previo...

Page 15: ...older List Press the 2 3 button Folder List File List 3 Select the folder Press the 5 button 4 Finalize your selection Press the ENTER button 5 Select the file Press the 5 button Press the 4 or button to scroll the list up or down 6 Play back the selected file Press the ENTER button 0 9 SEARCH ENTER RANDOM PROG 38 7 KDV S210P 09 Indd 15 04 5 25 4 27 09 PM ...

Page 16: ...e 7 button to exit the Program mode 6 Start Program Play Press the 38 button Plays the registered songs in order Canceling Program Play for CD Press the 7 PROG and ENTER buttons in order Canceling Program Play for MP3 Press the 7 and PROG buttons in order Direct Skip Play Directly calls the song you want to play 1 Enter the Track File or Folder number you want to play Press the 0 9 button 2 Play P...

Page 17: ...dom order 4 Select the song s Press the 2 5 3 button Select the file or folder you want to play 5 Play Press the ENTER button Plays the song s in the selected play method Random Play Songs are chosen from those recorded on the disc opened at random and are played 1 Stop playback Press the 7 button 2 Select the Random Play mode Press the RANDOM button Each time the button is pressed the Random Play...

Page 18: ... is displayed 5 Select the setup item and the option Press the 2 5 3 button Refer to the subsequent descriptions for the setup items and options on each menu 6 Finalize your selection Press the ENTER button 7 Exit the Setup menu Press the 2 5 3 and ENTER buttons Select and execute MAIN PAGE and EXIT SETUP in order General Setup TV DISPLAY Use the procedure described below to set the output screen ...

Page 19: ...tput to the 2 channel stereo port Display Setting LT RT Outputs the sound mixed to the Dolby Surround audio STEREO Outputs the sound mixed to the stereo sound Audio setup AUDIO OUT Display Setting ANALOG Outputs an analog sound No digital signal is output SPDIF RAW Outputs a 5 1ch S PDIF Bitstream digital sound No analog signal is output SPDIF PCM Outputs a 2ch S PDIF PCM digital sound No analog s...

Page 20: ... CHINESE Chinese JAPANESE Japanese PARENTAL Set the parental level The higher the level is the higher protection you get Display Setting 1 G G rated movies for children can only be played 2 3 PG 4 PG 13 5 6 PG R 7 NC 17 8 ADULT NO_PARENTAL Cancels the parental protection 1 Press the Enter button on the remote 2 Set up the parental level 3 Enter the password 4 Press the Enter button on the remote T...

Page 21: ...crews provided If you use the wrong screws you could damage the unit Do not install the unit to an unatable place and a place where it vibrates You can mount the unit at any angle between the regular horizontal position and the vertical position on its back 0 through 90 You cannot mount the unit with the disc slot facing downwards angled or upside down Installation using the Brackets Installation ...

Page 22: ...the attachment location attach the Remote Control Sensor Wipe off the dirt or oil from the surface to which the Sensor is attached Avoid locations under direct sunlight or near the TV monitor where signals from the remote controller are not received easily DVD Player back view Power Cable 1 Video output Audio left output Audio right output Digital output Cigarette Lighter Plug Fuse 3A built in Gro...

Page 23: ...e dirty Clean the disc The disc is upside down Load the disc with the labeled side up The disc is severely scratched Try another disc instead Cannot perform operations for MP3 Folder List MP3 Play Mode Program Play or Random Play during MP3 playback FOLDER LIST is set to NO MENU on the Setup menu Set FOLDER LIST to WITH MENU see page20 The messages shown below display your systems condition THERMA...

Page 24: ...ith MPEG 1 2 Audio Layer 3 DISC Format DVD VIDEO VIDEO CD CD DA MP3 Output Composite Video Output Level V 1V p p 75Ω Audio 2ch Output Level V 1 2 V 10 kΩ DVD CD Coaxial Digital Audio Interface Output Level V 0 5 V 75 Ω General Operating voltage 14 4 V 11 16 V Current consumption 2 A Dimensions WxHxD 194 mm x 54 mm x 245 mm Weight 1 85 kg Specifications subject to change without notice Specificatio...

Reviews: