Kenwood KDV-MP735 Instruction Manual Download Page 37

English


|


37

Installation

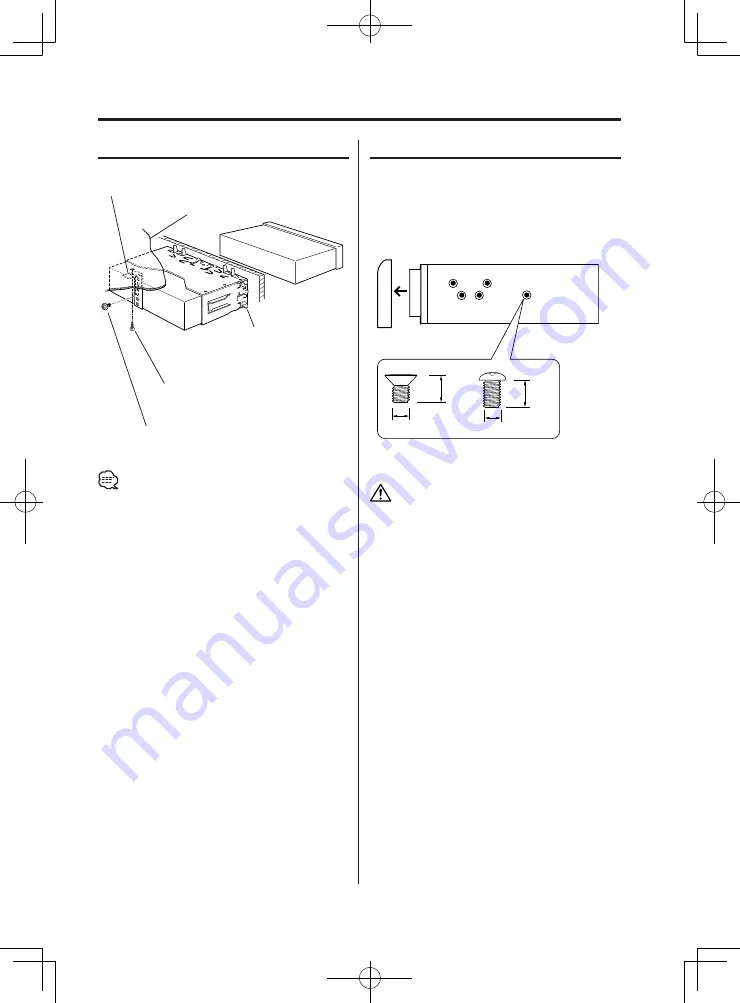
•  Make sure that the unit is installed securely in place. If 

the unit is unstable, it may malfunction (for example, the 
sound may skip).

non-Japanese cars

Japanese cars

1

  Refer to the section 'Removing the hard rubber 

frame' (page 38) and then remove the hard 

rubber frame.

2

  Align the holes in the unit (two locations on each 

side) with the vehicle mounting bracket and 

secure the unit with the accessory screws.

•   During installation, do not use any screws except for 

those provided. The use of different screws might result 
in damage to the main unit.

•   Damage may occur if a screwdriver or similar tool is used 

with excessive force during the installations.

Firewall or metal support

Screw (M4X8)
(commercially available)

Self-tapping screw 
(commercially available)

Metal mounting strap
(commercially available)

Bend the tabs of the 
mounting sleeve with a 
screwdriver or similar utensil 
and attach it in place.

� ��

����

����

����

� ��

����

T

N

T

N

T/N

T: Toyota cars
N: Nissan cars

Accessory

3

...for Nissan car

Accessory

4

 ...for Toyota car

3

4

1.KDV-MP735̲US.indd

04.1.5, 11:53 AM

37

Summary of Contents for KDV-MP735

Page 1: ...KDV MP735 KDV MP765 DVD RECEIVER INSTRUCTION MANUAL B64 2832 00 00 M C DIGITAL VIDEO COMPACT 1 KDV MP735 US indd 04 1 5 11 52 AM 1 ...

Page 2: ...layback DVD VCD Direct Track Search VCD CD DA MP3 GOTO Search DVD VCD CD DA PBC function On Off VCD Using DVD Menu DVD Switching the Viewing Angle DVD Selecting the Sub Title Language DVD Selecting the Audio Language DVD Switching the Vocal sound VCD CD DA Set a TV type Switching Time Display for Discs Title Information Digest screen DVD DVD Setup Menu features 23 DVD setup mode Setting the Genera...

Page 3: ...he wrong screws you could damage the unit Do Not Load 3 in DVD CDs in the DVD CD slot If you try to load a 3 in DVD CD with its adapter into the unit the adapter might separate from the DVD CD and damage the unit 2WARNING To prevent injury or fire take the following precautions Insert the unit all the way in until it is fully locked in place Otherwise it may fall out of place when jolted When exte...

Page 4: ... MP735 will playback any disc whose region number is ALL 3 4 6 or ALL The KDV MP765 will playback any disc whose region number is ALL 3 4 6 or ALL DVD R discs recorded in the standard DVD Video disc format VCD discs Video CDs Marked music CDs including the finalized CD R RW discs CD ROM R RW discs recorded in the formats listed on Page 6 A DVD R or CD R RW disc may not be played back due to its re...

Page 5: ... class There is no danger of hazardous radiation outside the unit Region codes in the world The DVD players are given a region code according to the country or area it is marketed as shown in the following map 1 2 4 1 5 4 5 2 1 2 6 3 This product incorporates copyright protection technology that is protected by method claims of certain U S patents and other intellectual property rights owned by Ma...

Page 6: ...320 kbps Sampling frequency MP3 16 22 05 24 32 44 1 48 kHz When you use your CD writer to record MP3 up to the maximum disc capacity disable additional writing For recording on an empty disc up to the maximum capacity at once check Disc at Once Entering file and folder names When entering file and folder names use the alphanumeric characters described above only If you use any other character for ...

Page 7: ...set the order in which MP3 are to be played by writing them onto a medium such as a CD R with their file names beginning with play sequence numbers such as 01 to 99 depending on your CD writer For example a medium with the following folder file hierarchy is subject to File Search as shown below Example of a medium s folder file hierarchy When a File Search is executed with file being played Operat...

Page 8: ...e center of the disc and move outward About DVD CDs Burrs Burrs Removing Discs When removing Discs from this unit pull them out horizontally Discs that can t be used Discs that aren t round can t be used Discs with coloring on the recording surface or that are dirty can t be used A DVD R CD R or CD RW that hasn t been finalized can t be played For the finalization process refer to your DVD R CD R ...

Page 9: ...e languages recorded with the subtitle function The number in the icon indicates the number of subtitle languages Max 32 languages 9 Number of angles provided by the angle function The number in the icon indicates the number of angles Max 9 angles 16 9 LB Aspect ratios that can be selected LB stands for Letter Box and PS for Pan Scan In the example on the left the 16 9 video can be converted into ...

Page 10: ...mages are outputted in the DVD source mode only The front video output produces video images when the parking brake is set correctly Volume Increasing Volume Turn the VOL knob clockwise Decreasing Volume Turn the VOL knob counterclockwise Mute Mutes or cuts the sound level temporarily Press the MUTE button Each time the button is pressed the Mute turns ON or OFF When it s ON the MUTE indicator bli...

Page 11: ...y Range Front left level FrontL 10 10 Center level Center 10 10 Front right level FrontR 10 10 Rear left level RearL 10 10 Rear right level RearR 10 10 Subwoofer level SUBW 10 10 Volume Volume 00 40 Before adjusting the volume of each speaker complete the procedure of Setting the Speaker setup page 26 Sound may not be outputted due to the setting conditions Please see Section Select audio output c...

Page 12: ...closes Do not apply excessive force to the faceplate It can cause damage Adjusting Clock 1 Select the clock display Press the DISP button 2 Enter clock adjustment mode Press the DISP button for at least 1 second The clock display blinks 3 Select an item you wish to adjust Press the 2 or 3 button 4 Set the clock time Press the 5 or button Repeat Steps 3 and 4 to adjust the clock 5 Exit clock adjust...

Page 13: ...utton During reception of stereo stations the ST indicator is ON Manual Tuning 1 Enter manual tuning mode Press the 4 or button for at least 1 second 2 Tune up or down band Press the 4 or button When operation stops for 5 seconds the manual tuning mode closes When you start another operation band switching volume control or others the Manual Tuning mode is released ST indicator LO S indicator SCN ...

Page 14: ...the end of frequency band the Auto Memory Entry completes automatically Preset Tuning Calling up the stations in the memory 1 Select the band Press the BAND button 2 Call up the station Press the desired 1 6 button Scan Tuning Tunes the receivable stations one by one every approximately 5 seconds 1 Select the band Press the BAND button 2 Start Scan Tuning Press the ENT button When it s ON SCN indi...

Page 15: ...essed the song pauses or plays Eject the disc 1 Eject the disc Press the 0 button 2 Return the panel to the original position Press the 0 button 3 in 8cm disc can t be played Using an adapter and inserting them into this unit can cause damage Video images are outputted in the DVD source mode only The front video output produces video images when the parking brake is set correctly The MP3 media tha...

Page 16: ...below Setting Display 2 times FF 2X FR 2X 4 times FF 4X FR 4X 6 times FF 6X FR 6X 8 times FF 8X FR 8X Normal play PLAY Audio output of DVDs and video CDs is disabled during fast forward and fast rewind Audio output of audio CDs is disabled at the 6 8 speed operation Canceling Fast Forwarding Reversing Press the ENT button Repeat Play Press the REP button Each time the button is pressed the Repeat ...

Page 17: ...dio is a DVD s 5 1 ch Dolby digital sound and a DTS audio sound When you have set the FRONT CENTER REAR and SUBWOOFER items to OFF or NONE by Setting the Speaker setup page 26 no sound is output by its speaker For Dolby Pro Logic function setup see the PRO LOGIC section of Setting the Audio setup page 25 Random Play VCD CD DA Play all the songs on the disc in random order Press the RDM button Each...

Page 18: ...y mode selection Press the 2 or 3 button 3 Selects a play Press the 5 or button Display Setting SINGLE Pauses after play of a single music REP ONE Repeats to play a single music FOLDER Pauses after play of music in a folder FOLDER REP Repeats to play music in a folder DISC SCAN Play the beginning of music on a disc one after another approximately 10 seconds DISC Pauses after play of music on a dis...

Page 19: ...rse of 1 2 times SR 2X Reverse of 1 4 times SR 4X Reverse of 1 8 times SR 8X Normal play PLAY VCD Setting Display Forward of 1 2 times SF 2X Forward of 1 4 times SF 4X Forward of 1 8 times SF 8X Pause STEP BWD Direct Track Search VCD CD DA MP3 Doing Track Search by entering the track file number Press the number buttons Press 10 button to input two digits or more You can return to the normal play ...

Page 20: ...ailable in DVDs with title menus root menus 1 Enter Top Menu root menu mode Press the MENU button DVD MENU is displayed Enter Title Menu mode Press the TITLE button TITLE MENU is displayed 2 Selecting the menu item Press the 2 3 5 or button or press the number buttons 3 Setting the menu item Press the ENTER button See your disc s operating instructions for information on the menu operation PBC fun...

Page 21: ...lor signals are output in the standard NTSC system PAL The color signals are output in the standard PAL system The setup can be changed temporarily by the Remote Commander Set the TV type using the TV TYPE item of Setting the Speaker setup page 28 Switching Time Display for Discs Switch the display that appears while discs are playing Press the DISP button Each time the button is pressed the displ...

Page 22: ...t title 3 Play Title Press the ENTER button Press the BAND 7 button to stop playing 4 Display Digest Screen Press the MENU button Press the BAND 7 button to return to the Title Information screen 5 Select Chapter Press the desired 1 9 button Press the BAND 7 button to stop playing Press the 4 or button to change the display page 6 Canceling the title information Press the PBC button Some titles or...

Page 23: ...cting the Stop 2 Select the Setup page Press the 5 or button The selected item is displayed in white characters 3 Set the Setup page Press the ENTER button 4 Select the setup item Press the 5 or button See the setup operations for Setup Items and their set values 5 Set the setup item Press the 3 button 6 Select the setting Press the 5 or button 7 Set the setting Press the ENTER button The value yo...

Page 24: ...e original image recorded on the DVD is the Video mode N FLICKER The original image recorded on the DVD is the Movie Picture mode ANGLE MARK When multiple image angles are recorded on a DVD they are shown by the mark during playback Display Setting ON Displays the Angle mark OFF Does not display the Angle mark OSD LANG Set the setup message or other display languages Display Setting ENGLISH Set th...

Page 25: ...ight L R DYNAMIC Sets the dynamic range of playback sound recorded on a Dolby Digital system DVD Display Setting FULL For more powerful sound at regular volumes 7 8 Large Compression rate Small 6 8 3 4 5 8 4 8 1 2 3 8 2 8 1 4 1 8 OFF For the regular sound PRO LOGIC Set the use of Dolby Pro Logic for the Dolby Digital 2 channel DVD VCD CD DA or MP3 Display Setting OFF Turns the Dolby Pro Logic func...

Page 26: ...ange including bass SMALL Used for speakers that cannot play the bass enough CENTER Display Setting LARGE Used for speakers that can play the wide frequency range including bass SMALL Used for speakers that cannot play the bass enough OFF No center speaker is used REAR Display Setting LARGE Used for speakers that can play the wide frequency range including bass SMALL Used for speakers that cannot ...

Page 27: ...output the test tone 4 Adjusts the sound level of each speaker See the Audio Control section page 11 and adjust each speaker to output the same level of sounds 5 Turns the Test tone off Select OFF and press the ENTER button 6 Exit Setup page Select MAIN PAGE and press the ENTER button TEST TONE See Test tone page 27 3 Exit Setup page Select MAIN PAGE and press the ENTER button When you set the DOW...

Page 28: ...etup Use it as it is AUDIO Set the audio language produced from the speakers Display Setting ENGLISH English FRENCH French SPANISH Spanish CHINESE Chinese JAPANESE Japanese SUBTITLE Set the language of the subtitles displayed on the screen Display Setting ENGLISH English FRENCH French SPANISH Spanish CHINESE Chinese JAPANESE Japanese OFF No subtitle is displayed DISC MENU Set the language used for...

Page 29: ...1 Select the PASSWORD See Setting the Preferences page 28 to select PASSWORD 2 Select the CHANGE Select CHANGE and press the ENTER button 3 Changes the password Press the number buttons Display Setting OLD PASSWORD To enter your current password correctly NEW PASSWORD To enter a new password CONFIRM PWD To enter the new password again for confirmation 4 Set the password Press the ENTER button The ...

Page 30: ...s the 2 or 3 button 4 Set the menu item Press the 5 or button 5 Exit Menu mode Press the MENU button When operation stops for 5 seconds the Menu mode closes Clock Display Select the Clock Display mode as follows Display Setting Clock 12H Sets the 12 hour system time display Clock 24H Sets the 24 hour system time display Touch Sensor Tone Setting the operation check sound beep sound ON OFF Display ...

Page 31: ...Contrast 07 Naviga Mute the navigatio Display LINEMUT LINEMUT Line Mute When the phone is called or when the Voice Guidance of navigation system starts the audio sound is muted Display Setting LINEMUTE ON Mutes the sound LINEMUTE OFF Does not mute the sound 1 KDV MP735 US indd 04 1 5 11 52 AM 31 ...

Page 32: ...t the remote on hot places such as above the dashboard Basic operations PWR button Turning OFF the Power Turn on the power by pressing the switch on the main unit The remote controller cannot be used Page 14 VOL buttons Adjusting the volume SRC button Each time the button is pressed the source switches For the source switching order refer to Selecting the Source page 10 MUTE button Turning the vol...

Page 33: ...ime the button is pressed it switches between the FM1 FM2 FM3 AM1 and AM2 bands 4 buttons Tune the station having better receiving signals automatically 1 buttons Tune the receiving station manually The receiving frequency is increased for one step each time you press the button 0 6 buttons Press buttons 1 6 to recall preset stations MENU button When pressed the DVD displayed the Title Menu For de...

Page 34: ...as with battery wires the battery may die If the console has a lid make sure to install the unit so that the faceplate will not hit the lid when closing and opening If the fuse blows first make sure the wires aren t touching to cause a short circuit then replace the old fuse with one with the same rating Insulate unconnected wires with vinyl tape or other similar material To prevent a short circui...

Page 35: ...e White Motor antenna control wire Blue When using the optional power amplifier connect to its power control terminal Depending on what antenna you are using connect either to the control terminal of the motor antenna or to the power terminal for the booster amplifier of the film type antenna Video output for rear seats Yellow Subwoofer output Brown Center output Gray Monitor unit for front seats ...

Page 36: ...onnector 2 Plug the parking brake detection wire into the relay connector 3 Lock the cable clamp 4 Press down using pliers until the conductive metal is even with the plastic surface 5 Lock the lid 1 2 Detection wire Vehicle harness 3 Relay connector 4 5 Cable clamp Lid Conductive metal 1 KDV MP735 US indd 04 1 5 11 53 AM 36 ...

Page 37: ...ws During installation do not use any screws except for those provided The use of different screws might result in damage to the main unit Damage may occur if a screwdriver or similar tool is used with excessive force during the installations Firewall or metal support Screw M4X8 commercially available Self tapping screw commercially available Metal mounting strap commercially available Bend the ta...

Page 38: ...ace upward and the one having wider claws must face downward Removing the Unit 1 Refer to the section Removing the hard rubber frame page 38 and then remove the hard rubber frame 2 Remove the screw M4 8 on the back panel 3 Insert the two removal tools deeply into the slots on each side as shown Be careful to avoid injury from the catch pins on the removal tool 4 Pull the unit all the way out with ...

Page 39: ...er and balance settings The input output wires or wiring harness are connected incorrectly Reconnect the input output wires or the wiring harness correctly See the section on Connecting Wires to Terminals The sound quality is poor or distorted One of the speaker wires is being pinched by a screw in the car Check the speaker wiring The speakers are not wired correctly Reconnect the speaker wires so...

Page 40: ...es not contain the recording of the selected voice or subtitle language Use a DVD disc containing the recording of the selected voice or subtitle language MP3 source Cannot play an MP3 WMA The media is scratched or dirty Clean the media referring to the CD cleaning of the section on About DVD CDs page 8 The sound skips when an MP3 is being played The media is scratched or dirty Clean the media ref...

Page 41: ... kHz Total harmonic distortion 1 kHz 0 01 Signal to Noise ratio 110 dB Dynamic range 90 dB MP3 decode Compliant with MPEG 1 2 Audio Layer 3 Disc format DVD VIDEO VIDEO CD CD DA MP3 Audio section Maximum output power 40 W 4 Full Bandwidth Power 4 Ω 1 kHz 10 THD 28 W 4 Tone action Bass 100 Hz 10 dB Treble 10 kHz 10 dB Video output level 1 Vp p 75 Ω Audio output level during disc play 1800 mV 10 kΩ A...

Page 42: ...1 KDV MP735 US indd 04 1 5 11 53 AM 42 ...

Reviews: