


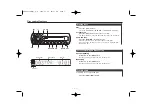


— 3 —
Take the following precautions to prevent
fire and avoid personal injury:
• When extending the ignition wire, battery
wire, or ground wire, use 0.75mm
2
(AWG18)
or larger automotive grade wire to avoid wire
deterioration or damage to the covering.
• Check that no metal objects (coins, tools,
etc.) are left inside the unit to avoid short
circuits.
• If you smell or see smoke, turn the power off
immediately and consult your Kenwood
dealer.
• Do not touch the liquid crystal fluid if the LCD
is damaged or broken due to shock. The
liquid crystal fluid may be dangerous to your
health or even fatal.
If the liquid crystal fluid from the LCD
contacts your body or clothing, wash it off
with soap immediately.
Take the following precautions to
keep the unit in proper working order.
• Be sure the unit is connected to a 12V DC
power supply with a negative ground
connection.
• Do not open the top or bottom cover.
• Do not install the unit in places it is exposed
to direct sunlight, high heat or humidity,
water may splash over it, or dust exists.
2
CAUTION
2
WARNING
• When replacing a fuse, only use a new one
with the prescribed rating. Using a fuse with
the wrong rating may cause your unit to
malfunction.
• To prevent a short circuit when replacing a
fuse, first disconnect the wiring harness.
• If you have difficulty in installing this unit in
your vehicle, contact your Kenwood dealer.
• If it doesn’t seem to be working properly,
first press the Reset button. If the
malfunction persists, consult your Kenwood
dealer.
• Some car stereos cause the sound of the
tuner to make for a moment when an
engine is activated.
• The reception of the tuner may be reduced
a little if the KDC-C521FM is used.
• If the sound is lower than the tuner sound,
raise up the volume level of the CD with
using the receiver.
• Do not use your own screws. Use only the
screws provided. If you use the wrong
screws, you could damage the unit.
NOTE
Cleaning the Unit
If the front panel gets dirty, turn off the
power and wipe the panel with a dry silicon
cloth or soft cloth.
Do not use hard cloths or paint thinner,
alcohol, or other volatile solvents. These
may damage external surfaces or remove
indicator characters.
Lens fogging
In cold climates, there may be a period after
you turn on your vehicle’s heater when the
lens that guides the laser beam used in your
CD player fogs up. If this happens, you
cannot play compact discs. Take out discs
and the fogging will disappear. If it does not
return to normal after several hours, contact
your Kenwood dealer.
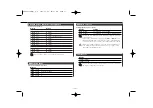
The marking of products using lasers
(Except for some areas)
The label is attached to the chassis/case and
says that the component uses laser beams
that have been classified as Class 1. It
means that the unit is utilizing laser beams
that are of a weaker class. There is no
danger of hazardous radiation outside the
unit.
CLASS 1
LASER PRODUCT
2
CAUTION
Safety Precautions
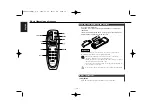
Reset button
KDC-C521FM(M)_U.S 2004.03.05 08:37 AM Page 3


