background image

28

Symptom

Cause

Remedy

The follow ing messages are displayed w hen certain problems are occurring in your
system. Take the recommended actions.

01 E:

No disc magazine has been loaded in the changer. The disc magazine is not completely 
loaded.

>

Load the disc magazine properly.

02 E:

No disc has been loaded in the disc magazine..

>

Load a disc into the disc magazine.

04 E:

No disc has been loaded in the disc magazine.

>

Load a disc into the disc magazine

The CD is quite dirty. The CD is upside-dow n. The CD is scratched a lot.

>

Clean the CD and load it correctly.

77 E:

The unit is malfunctioning for some reason.

>

Press the reset button on the unit. If the "E- 77"code does not disappear, consult 
your nearest service center.

99 E:

Something is w rong w ith the disc magazine. Or the unit is malfunctioning for some 

>

reason.Check the disc magazine. And then, press the reset button on the unit. 
If the "E- 99" code does not disappear, consult your nearest service center.

0d E:

The protective circuit in the unit activates w hen the temperature inside the automatic
disc changer exceeds 60°C (140°F), stopping all operation.

>

Cool dow n the unit by opening the w indow s or turning on the air conditioner. As the 

temperature falls below  60°C (140°F), the disc w ill start playing again.

The system is not connected properly.

Connect the system properly.
See "Connections" .(Page 22)

The specified track is not
played.

The player is set to RANDOM
PLAY/M AGAZINE RANDOM  PLAY.

Turn off RANDOM  PLAY/M AGAZINE
RANDOM  PLAY.

The microcomputer does not function
correctly.

Press the Reset button of the display
unit.

No sound is heard even
though the information
concerning the CD auto-
changer is displayed.

Volume is set to minimum level.

Raise the volume level.

Sound quality is poor.

The recording of the disc is poor.

Try playing another disc.  If the sound is
good, the fault w as w ith the original disc.

The disc is dirty or damaged.

Check and, if possible, clean the disc.
See "Cleaning your discs. (Page 6)"

T

ro

u

b

lesh

o

o

ti

n

g

 g

u

id

e

Troubleshooting guide

Downloaded from: 

http://www.usersmanualguide.com/
Summary of Contents for KDC-C510FM

Page 1: ...on procedures will help you obtain the best performance from your new compact disc auto changer For your records Record the serial number found on the back of the unit in the spaces designated on the warranty card and in the space provided below Refer to the model and serial numbers whenever you call upon your KENWOOD dealer for information or service on the product Model KDC C510FM Serial number ...

Page 2: ...k Disc search 11 Direct track disc search 12 Track repeat 13 Disc repeat 14 Track scan 15 Disc scan 16 Disc random play 17 Magazine random play 18 Installation Changing the transmission frequency 19 Modulation level Dynamic control 20 Installation procedure 21 Connections 22 Installation 23 Troubleshooting guide 27 Specifications 29 Downloaded from http www usersmanualguide com ...

Page 3: ...ause harmful interference to radio communications if it is not installed and used in accordance with the instructions However there is no guarantee that interference will not occur in a particular installation If this equipment does cause harmful interference to radio or television reception which can be determined by turning the equipment off and on the user is encouraged to try to correct the in...

Page 4: ...or humidity water may splash over it or dust exists When replacing a fuse only use a new one with the prescribed rating Using a fuse with the wrong rating may cause your unit to malfunction on hot places such as above the dashboard If you have difficulty in installing this unit in your vehicle contact your Kenwood dealer If it doesn t seem to be working properly first press the Reset button If the...

Page 5: ...lassified as Class 1 It means that the unit is utilizing laser beams that are of a weaker class There is no danger of hazardous radiation outside the unit Do not set the remote on hot places such as above the dashboard Replacing the Lithium Battery Use one lithium battery CR2025 Remove the case following the instructions as illustrated Insert the battery with the and poles aligned properly followi...

Page 6: ...xposed to direct sunlight such as on the seat and dashboard or high heat If you do not use your unit for an extended time remove the discs from the unit and put them in their cases Do not leave them lying around without cases piled up or leaning on a wall and so on Cleaning your discs If there are stains on a disc wipe them off with a cleaning cloth or a soft cotton cloth wiping from the center to...

Page 7: ...tion is turned on the disc you are listening to is played repeatedly Track scan Page 15 When this function is turned on the first part of each track on the disc you are listening to is played automatically to help you find the one you want Disc scan Page 16 When this function is turned on the first part of each disc in the Disc changer is played automatically to help you find the one you want from...

Page 8: ...c on the tray with the label facing upwards Insert the tray into the disc magazine until it locks The discs are numbered from the bottom from 1 to 10 Take care to insert the tray into the correct grooves in the disc magazine 8 cm discs cannot be used If an 8 cm disc adapter is used the disc cannot be ejected Keep all the trays in the magazine even when empty KENWOOD Projection 2CAUTION Before use ...

Page 9: ...hanger 6 Magazine ejection Open the CD changer door and press the EJECT button Be sure to open the door completely before pressing the EJECT button If the door is not completely open the magazine may hit the door and cause damage of malfunction NOTE NOTE Before use Downloaded from http www usersmanualguide com ...

Page 10: ... temporarily paused If you press the switch once more the disc is replayed from the paused part Be sure to turn down the volume whenever you listen to the radio or a cassette tape after stopping the disc play During the disc play is being conducted you are not able to receive ordinary Radio broadcasting because antenna output is switched into compact disc player s side Set the car radio FM station...

Page 11: ...hen the 3 button on the display unit is held down the player fast forwards while playing the track If you try forward track search while playing the last track on a disc the Forward track search function does not work Reverse disc search Press the button Each time you press this button the disc number on the display decreases The player plays the disc with the disc number shown on the display Forw...

Page 12: ...the last two entered digits shown on the display are valid Direct disc search Press the or button while the number is blinking The player starts playing the disc specified in step 1 When two digits are displayed the direct disc search is made to the disc number corresponding to the number on the right side To cancel To cancel search in the middle press the button The Direct track disc search is ca...

Page 13: ...appears and the Track repeat function is cancelled When disc play stops Track repeat is cancelled Track repeat 13 REP TRACK DISC ON Repeat Repeat 1 2 3 4 5 6 7 8 9 0 RANDOM MAGA DISC POWER 6 REPEAT DISC TRACK SCAN DISC TRACK 4 TRACK DISC PLAY PAUSE CD AUTO CHANGER CONTROLLER REP RDM 3 4 PWR M RDM D REP T R A C K D I S C 8 D SCN M Hz DISC TRACK NOTE Disc changer control features Downloaded from htt...

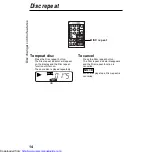
Page 14: ... Press the Disc repeat button The Disc repeat indicator disappears and the Disc repeat function is cancelled When disc play stops Disc repeat is cancelled Disc repeat 14 D REP TRACK DISC ON DISC repeat 1 2 3 4 5 6 7 8 9 0 RANDOM MAGA DISC POWER 6 REPEAT DISC TRACK SCAN DISC TRACK 4 TRACK DISC PLAY PAUSE NOTE Disc changer control features Downloaded from http www usersmanualguide com ...

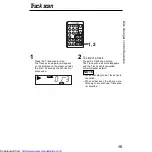
Page 15: ...indicator disappears and the Track scan is cancelled Normal playback starts When disc play stops Track scan is cancelled When all tracks on the disc you are listening to are scanned Track scan is cancelled Trackscan 15 NOTE SCN TRACK DISC 1 2 1 2 3 4 5 6 7 8 9 0 RANDOM MAGA DISC POWER 6 REPEAT DISC TRACK SCAN DISC TRACK 4 TRACK DISC PLAY PAUSE Disc changer control features Downloaded from http www...

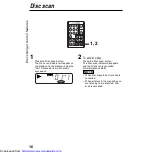
Page 16: ...icator disappears and the Disc scan is cancelled Normal playback starts When disc play stops Disc scan is cancelled When all discs in the magazine you are listening to are scanned Disc scan is cancelled Disc scan 16 NOTE D SCN TRACK DISC 1 2 1 2 3 4 5 6 7 8 9 0 RANDOM MAGA DISC POWER 6 REPEAT DISC TRACK SCAN DISC TRACK 4 TRACK DISC PLAY PAUSE Disc changer control features Downloaded from http www ...

Page 17: ...ll the tracks on a disc have been played the player will randomly select the next disc 2 To select another track Press the 3 button The player will randomly choose another track To cancel Press the Disc random button The Random indicator disappears and Random play is cancelled Normal disc play starts When the disc play stops the Disc random play function is cancelled Disc random play 17 RDM TRACK ...

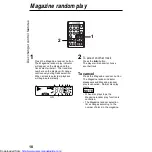
Page 18: ... another track To cancel Press the Magazine random button The Magazine random indicator disappears and Magazine random play is cancelled Normal disc play starts When disc play stops the Magazine random play function is cancelled The Magazine random selection time changes according to the number of discs in the magazine Magazine random play 18 NOTE M RDM TRACK DISC ON 1 2 1 2 3 4 5 6 7 8 9 0 RANDOM...

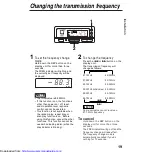
Page 19: ...le loading a disc while the play indicator is blinking 2 To change the frequency Press the 4 or 3 button on the display unit The transmission frequency will change as follows 87 7MHz 89 9MHz 87 9MHz 89 7MHz 88 1MHz 89 5MHz 88 3MHz initial value 89 3MHz 88 5MHz 89 1MHz 88 7MHz 88 9MHz Some car radios cannot receive a 87 7 MHz frequency To cancel Hold down the REP button on the display unit for more...

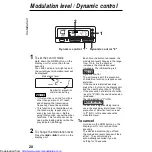
Page 20: ...s 2 Dynamic control The unit comes with the prevention of distortion function to reduce sound distortion If the sound is distorted severely press the button on the display unit and then set the function to 2 ON If the prevention of distortion function is set to 2 ON the sound extension is reduced The initial setting is 1 OFF If a disc with a high recording level is used the sound may distort even ...

Page 21: ... or connectors are touching the car body Do not remove caps from unconnected cables or connectors to prevent short circuits After installation check that the brake lamps winkers and wipers work properly Insulate unconnected ends of cords with vinyl tape or similar Use only the supplied screws for installation Use of any other screws may damage the unit 2CAUTION Transportation screws Remove all 3 t...

Page 22: ...t with the vehicle chassis ground only connect the power supply after making the fuse box connections FM AM antenna output Control output Display unit RF modulator unit Antenna plug for automobile Car stereo with FM tuner CD auto changer input Control input Output NOTE Do not install an antenna of radio equipment or distribute the antenna cable near the changer output cable for this could cause ma...

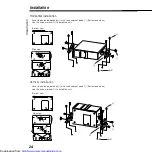
Page 23: ... installation of the CD auto changer Set both of the two switches to the same position If the switches are not set properly sound skip or other malfunction may occur Set the angle adjustment switches with a coin or other flat object Change the switch step by step by detaching and reusing the object at the end of each step Angle adjustment switches Right side Left side Accessories Installation A 2 ...

Page 24: ...unit Bottom view 3 3 3 3 3 3 90 0 45 90 0 45 3 3 3 3 3 3 3 3 Vertical installation Bottom view 3 3 3 3 3 3 90 0 45 90 0 45 3 3 3 3 3 3 3 3 90 45 0 Cover the holes indicated by 3 with the dustproof seals E Bottom and sides Use the holes marked Å ú to install the unit B C A φ 4 Side view Side view A φ 4 B C Installation Downloaded from http www usersmanualguide com ...

Page 25: ...w C too securely at the time of installation but tighten it securely after having fixed the bracket A B C φ 4 A 2CAUTION Installation G φ 3 Installation of RF modulator unit Install the RF modulator unit beneath the front seat using Metal fixture and Bind head screw as shown in the above figure 2CAUTION Take sufficient care so that the cables are not caught under the seat If they are caught they m...

Page 26: ...play unit may not be able to receive the signals from the controller unit Install them after confirming that the signals can be received Install the unit in such a way that it does not disturb driving Å úInstallation without using the trim mount plateH Display unit F Installation CD AUTO CHANGER CONTROLLER D I S C T R A C K REP RDM 3 4 1 RWR M RDM D REP D SCN D I S C T R A C K 8 Å úInstallation us...

Page 27: ...t Connect the CD auto changer input to the unit The disc is loaded upside down Eject the disc magazine and insert the disc correctly Two discs are inserted in a slot Eject the disc magazine and insert the discs correctly The disc is severely damaged Use another disc The number of the slot into which the disc is inserted is different from the number of the specified disc Eject the disc magazine and...

Page 28: ... your nearest service center 0d E The protective circuit in the unit activates when the temperature inside the automatic disc changer exceeds 60 C 140 F stopping all operation Cool down the unit by opening the windows or turning on the air conditioner As the temperature falls below 60 C 140 F the disc will start playing again The system is not connected properly Connect the system properly See Con...

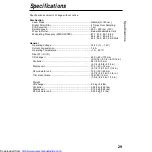
Page 29: ...nt consumption 1 4 A Operating Temperature 10 50 C Size W H D CD changer 250 80 173 mm Installation size W X H X D 9 13 16 3 1 8 6 13 16 in Controller 54 85 5 mm Installation size W X H X D 2 1 8 3 3 8 3 16 in Display unit 105 40 18 mm Installation size W X H X D 4 1 8 1 9 16 11 16 in RF modulator unit 150 30 80 mm Installation size W X H X D 5 7 8 1 3 16 3 1 8 in Trim mount plate 188 58 2 mm Inst...

Page 30: ... tv dvd and othes Manual users user manuals user guide manual owners manual instruction manual manual owner manual owner s manual guide manual operation operating manual user s manual operating instructions manual operators manual operator manual product documentation manual user maintenance brochure user reference pdf manual Downloaded from http www usersmanualguide com ...

Reviews: