Kenwood KDC-9026R Instruction Manual Download Page 38

38


|


English

Menu system

Menu System

Setting during operation beep sound etc. 
functions.
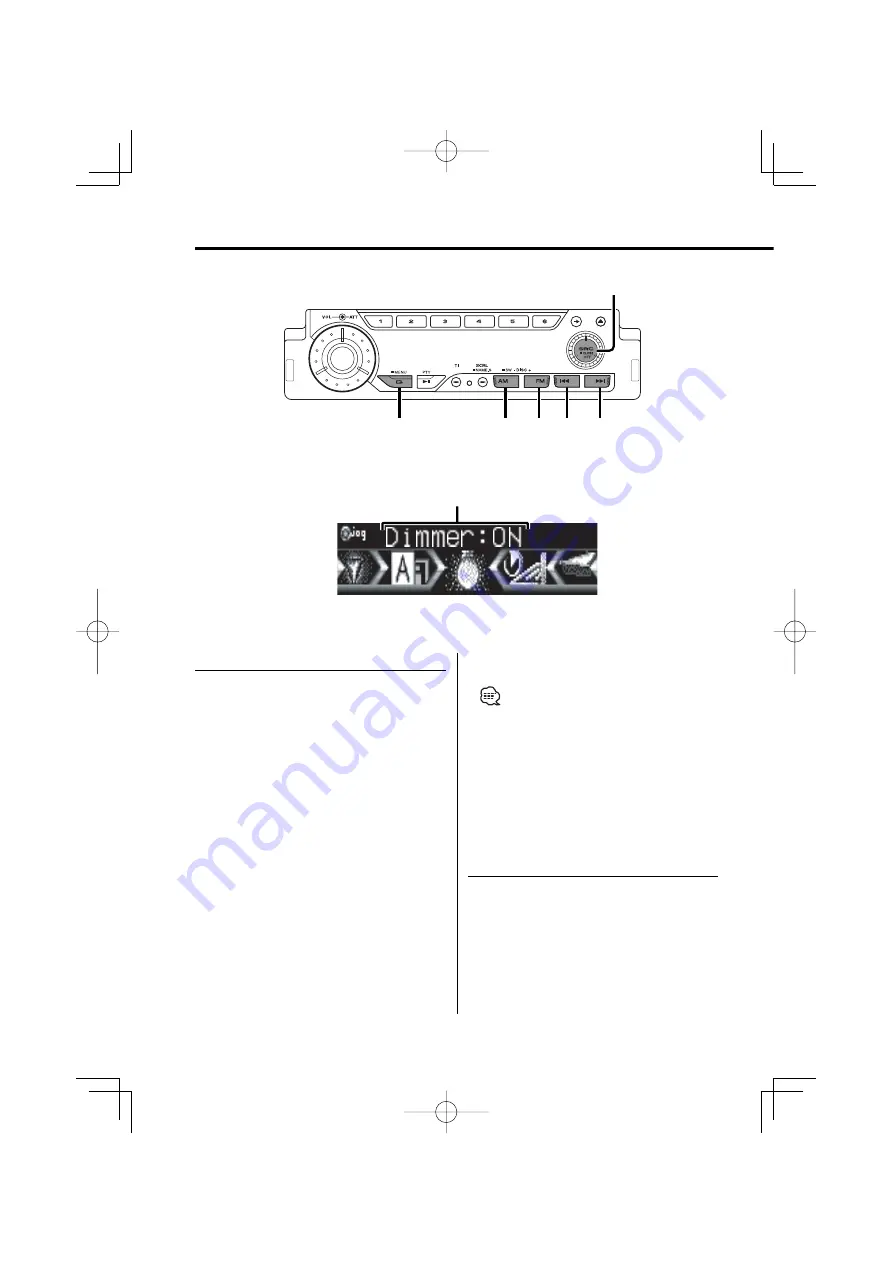
The Menu system basic operation method is 
explained here. The reference for the Menu items 
and their setting content is after this operation 
explanation.

1

  Enter Menu mode

Press the [MENU] button for at least 1 second.

"MENU" is displayed.

2

  Select the menu item

Press the [FM] or [AM] button.

Example:  When you want to set the beep sound 

select the "Beep" display.

3

  Set the menu item

Press the [

4

] or [

¢

] button.

Example:  When "Beep" is selected, each time the 

button is pressed it switches "Beep: ON" 
or "Beep: OFF". Select 1 of them as the 
setting.

You can continue by returning to step 2 and 
setting other items.

4

  Exit Menu mode

Press the [MENU] button.

•  When other items that are applicable to the basic 

operation method above are displayed afterwards 
their setting content chart is entered. (Normally the 
uppermost setting in the chart is the original setting.)
Also, the explanation for items that aren’t applicable 
('Manual Clock Adjustment' etc.) are entered step by 
step.

In Standby mode

Security Code

Because authorization by the Security Code is 
required when it’s removed from the vehicle, 
personalizing this unit is by using the Security 
Code is a help in preventing theft.

SRC

4

¢

AM

MENU

FM

Menu display

KDC-9026R(M)̲U.S ̲r5   38

03.11.28, 10:04:47 PM

Summary of Contents for KDC-9026R

Page 1: ...KDC 9026R CD RECEIVER INSTRUCTION MANUAL B64 2758 00 00 MV KDC 9026R M U S r5 1 03 11 28 10 02 57 PM ...

Page 2: ...eatures 22 Audio control Audio Setup Easy mode Audio Setup PRO mode Audio Setup Memory PRO mode Audio Setup memory Recall Tuner TV control features 27 Tuning Direct Access Tuning Station Preset Memory Auto Memory Entry Preset Tuning SNPP Station Name Preset Play TV Tuning Preset TV Tuning RDS features 30 Traffic Information Radio Text Scroll PTY Program Type Program Type preset Changing Language f...

Page 3: ...lock DSI Disabled System Indicator Selectable Illumination Triangle indicator setting Font Type Select Dimmer OFF Wait Time Setting Eject angle setting Panel action setting Audio Setup Built in Amp Mute Setting B M S Bass Management System B M S Frequency Offset News Bulletin with Timeout Setting Local Seek Tuning Mode Auto Memory Entry AF Alternative Frequency Restricting RDS Region Region Restri...

Page 4: ...rs of the unit Do not install the unit in a spot exposed to direct sunlight or excessive heat or humidity Also avoid places with too much dust or the possibility of water splashing Do not set the removed faceplate or the faceplate case in areas exposed to direct sunlight excessive heat or humidity Also avoid places with too much dust or the possibility of water splashing To prevent deterioration d...

Page 5: ...isc and wait for the condensation to evaporate If the unit still does not operate normally after a while consult your Kenwood dealer About CD players disc changers connected to this unit KENWOOD disc changers CD players released in 1998 or later can be connected to this unit Refer to the catalog or consult your Kenwood dealer for connectable models of disc changers CD players Note that any KENWOOD...

Page 6: ... You can enjoy surround channels as full band sounds from 20 Hz to 20 kHz and stereo sources as real 5 1 channel sounds The Movie mode Music mode Matrix mode can be selected according to the playback source When the Dolby Pro Logic II mode is selected the sound level is slightly dropped due to its characteristics Manufactured under license from Dolby Laboratories Dolby Pro Logic and the double D s...

Page 7: ... outward About CDs Burrs Burrs Removing CDs When removing CDs from this unit pull them out horizontally CDs that can t be used CDs that aren t round can t be used CDs with coloring on the recording surface or that are dirty can t be used This unit can only play the CDs with It may not correctly play discs which do not have the mark A CD R or CD RW that hasn t been finalized can t be played For the...

Page 8: ... 05 24 32 44 1 48 kHz WMA 32 44 1 48 kHz When you use your CD writer to record MP3 WMA up to the maximum disc capacity disable additional writing For recording on an empty disc up to the maximum capacity at once check Disc at Once Play mode may not be possible when portions of the functions of Windows Media Player 9 or higher are used Entering ID3 tag The Displayable ID3 tag is ID3 version 1 x For...

Page 9: ...ur CD writer For example a medium with the following folder file hierarchy is subject to Folder Search File Search or Folder Select as shown below Example of a medium s folder file hierarchy Folder Level 2 Level 4 Level 1 Level 3 Level 5 File Root When a File Search is executed with file being played Operation of the button Current file 4 Button Beginning of file Button When a Folder Search is exe...

Page 10: ...le to be set with the 2 5 button they are divided into multiple function groups referred to as sections in this manual for registration Press the NEXT button to switch the sections If the display of the desired function is not shown press the NEXT button 1 to 3 times to switch the sections until the wanted function display is shown Example Function display of CD External disc source MRDM H F SYNC ...

Page 11: ...e set in the audio setup Easy mode Refer to Audio Setup PRO mode page 24 First set up the sound field in your car by Audio setup Easy mode page 24 Proceed to the following steps for sound field setup 1 Enter Audio Setup mode Press the NEXT button Repeatedly press the button until AD SET is displayed above the 3 button Refer to Notes on Multi function Key System page 10 2 Set the cabin size of your...

Page 12: ...he panel during operation It can cause damage Hiding the Control Panel Prevents tampering with the unit while your car is being serviced etc Hiding the control panel Press the SRC button for at least 1 second When the time set in OFF Wait Time Setting page 41 lapses the panel is hidden and the power turns OFF Showing the control panel Press the left part at the lower side of the panel The panel is...

Page 13: ...ed for the following setup Menu system Item selection Audio Control Adjustment of setup value Audio Setup Adjustment of setup value Display control Display switching Disc Naming Character selection Folder select Folder search You can select the Rotary Volume Operation mode only when the indicator is displayed above the 1 button during any function setup When the indicator is ON you cannot use the ...

Page 14: ...tput from the internal source channel The Dual Zone System can be used with the sources shown below Internal auxiliary input KCA S210A CA C1AX External disc changer player While Dual Zone System is ON the setting of Dual Zone System Front or Rear is disabled Set Dual Zone System Front or Rear first and then set the Dual Zone System to ON When the Dual Zone System is ON there is no Dual zone channe...

Page 15: ...y C mode The indicator appears only when the Clock is displayed in the upper or lower position during Display A mode Display A Side Graphic Display Switching Switching the Side graphic Display 1 Select the key function section Press the NEXT button Repeatedly press the button until DISP is displayed above the 4 button Refer to Notes on Multi function Key System page 10 2 Enter display control mode...

Page 16: ...e Upper text display part cannot display the same information as Lower text display part The Album name cannot be displayed during WMA play The text display in the Upper text display part In Tuner source Information Display Program Service name or Frequency BAND ch PS Radio text or Frequency R TEXT Date DATE Clock CLOCK Spectrum Analyzer Clock S ANA CLOCK Displaying the frequency during Program Se...

Page 17: ...liary input source Information Display KENWOOD Logo LOGO Clock CLOCK Spectrum Analyzer Clock S ANA CLOCK Date DATE If Dual Zone System page 14 is turned ON while the spectrum analyzer is displayed the spectrum analyzer disappears from the display If the Disc title Track title Song title Artist name or Album name Artist name is selected when the disc which does not have Disc title Track title Song ...

Page 18: ...de Display B Display C Display D Wallpaper selecting Select a wallpaper to display when Display Type is set to Display B Display C Display D 1 Select the wallpaper display Refer to Graphic part Spectrum Analyzer Display Switching page 18 2 Select the wallpaper Display the wallpapers one after another and select one 1 Turn the wallpaper scan ON Press the 38 button Each time the button is pressed th...

Page 19: ...LE Track title TRACK TITLE Track number Play time P Time Disc name DNPS Date DATE Clock CLOCK In MP3 WMA source Information Display Song title Artist name TITLE ARTIST Album name Artist name ALBUM ARTIST Folder name FOLDER NAME File name FILE NAME Play time File number P Time Date DATE Clock CLOCK In Auxiliary input source Information Display Auxiliary input name AUX NAME Date DATE Clock CLOCk In ...

Page 20: ...tting mode Press the 5 PNL button 3 Select the item for adjustment Press the desired 2 5 button Each time the button is pressed the items that can be adjusted switch as shown below Adjustment Item Button Display The panel tilts upwards 2 ANG The panel tilts downwards 3 ANG The panel slides backward 4 SLD The panel slides forward 5 SLD 4 Exit Panel Position Setting mode Press the 6 RTN button The c...

Page 21: ...ears and the audio system comes back ON System Q You can recall the best sound setting preset for different types of music 1 Select the source to set Press the SRC button 2 Select the Sound type Press the Q button Each time the button is pressed the sound setting switches Sound setting Display Natural Natural Rock ROCK Pops POPS Easy EASY Top 40 TOP 40 Jazz JAZZ User memory USER Installer INSTALLE...

Page 22: ...justment item is displayed above the 2 5 button 5 Select the Audio Control item for adjustment Press the 2 5 button Each time the 2 5 button is pressed the adjustable audio items are switched among ranges of all stage section s tables on the following pages 1st section Multi function key operation Audio control item 2 PLII Dolby ProLogic II setting 3 WOW SRSWOW setting 4 OFF OFF setting 5 FINE 2 P...

Page 23: ...control R3 R1 Neutral F1 F3 Center width control 0 7 FOCUS setting OFF 1 9 SRSTruBass Front setting SRSTruBass Rear setting OFF 1 4 SRS 3D setting OFF 1 4 2nd section Audio Control Item Range Position setting ALL Front L Front R Front Balance setting L15 R15 Fader setting R15 F15 Volume offset 8 0 Subwoofer level 10 10 Subwoofer Phase setting Normal Reverse The Adjustment item can also be controll...

Page 24: ...L Refer to Audio Setup memory Recall page 26 You can listen to the T TONE when you have tuned it The sound level is reduced when T TONE is selected The sound returns to the normal level when the original source is selected 6 Adjust the Audio setup item Press the 4 or button Each time the button is pressed the setting switches as shown below Audio setup Item Range Cabin setting OFF Compact Sedan Wa...

Page 25: ... Alignment Manually set the sound output timing of each channel EQ Equalizer You can manually set the equalizer curve SP LEV Speaker Level Set the volume at each setup position 2nd section Multi function key operation Audio setup item 2 MEMORY 2 USER 3 INST User Memory User Insttaller 3 CALL 2 USER 3 INST Call User Call Insttaller You can store an adjusted audio setup value by selecting MEMORY Als...

Page 26: ...e 2 button 8 Select the Memory item Press the 2 MEMORY button 9 Stores the adjusted audio setup value in memory Press the 2 USER 3 INST button for at least 2 seconds The MEMORY display blinks 1 time USER The values are erased from memory if the battery is removed or if the reset button is pressed INST The values are held in memory even if the battery is removed or if the reset button is pressed 10...

Page 27: ... remote Direct Access Tuning Entering the frequency and tuning 1 Select the band Press the FM or AM button 2 Enter Direct Access Tuning mode Press the DIRECT button on the remote is displayed 3 Enter the frequency Press the number buttons on the remote Example Desired frequency Press button 92 1 MHz FM 0 9 2 1 810 kHz AM 0 8 1 0 Canceling Direct Access Tuning Press the DIRECT button on the remote ...

Page 28: ...ncy page 42 is ON only RDS stations are put in the memory When Auto Memory Entry is done in the FM2 band the RDS stations preset in the FM1 band aren t put in the memory Likewise when it is done in the FM3 band RDS stations preset in FM1 or FM2 aren t put in the memory Preset Tuning Calling up the stations in the memory 1 Select the band Press the FM or AM button 2 Select the key function section ...

Page 29: ... LX BUS Television optional accessory can be selected The action depends on the setting of the connected LX BUS Television Refer to the user instruction of the LX BUS Television for details 1 Select TV source Press the SRC button Select the TV display 2 Select the TV band and Video input Press the FM button Each time the FM button is pressed TV bands and Video input switch 3 Select the TV channel ...

Page 30: ...on is turned ON it switches to an FM station During reception of traffic information the adjusted volume is automatically remembered and the next time it switches to traffic information it s automatically the remembered volume Radio Text Scroll Scrolling the displayed radio text Press the SCRL button PTY Program Type Selecting the Program Type and searching for a station 1 Enter PTY mode Press the...

Page 31: ...ech and Music include the Program type shown below Music No 12 17 26 30 Speech No 3 11 18 25 31 The Program Type can be put in the 1 6 button memory and called up quickly Refer to the Program Type preset page 31 The display language can be changed Refer to Changing Language for PTY Function page 32 3 Search for the selected Program Type station Press the 4 or button When you want to search for oth...

Page 32: ...de Press the SCRL button 3 Select the language Press the FM or AM button Each time the button is pressed the language switches as shown below Language Display English English Spanish Spanish French French Dutch Dutch Norwegian Norwegian Portuguese Portuguese Swedish Swedish German German 4 Exit Changing Language mode Press the SCRL button KDC 9026R M U S r5 32 03 11 28 10 04 27 PM ...

Page 33: ...ay Pause and play Press the 38 button Each time the button is pressed the song pauses or plays Eject the disc 1 Eject the disc Press the 0 button 2 Return the panel to the original position Press the 0 button 3 in 8cm disc can t be played Using an adapter and inserting them into this unit can cause damage The MP3 WMA media that this unit can play are CD ROM CD R and CD RW The medium formats must b...

Page 34: ...Search Selecting the disc set in the Disc changer or the folder recorded on the MP3 WMA media Press the DISC or DISC button Function of remote Direct Track File Search Doing Track File Search by entering the track file number 1 Enter the track file number Press the number buttons on the remote 2 Do Track File Search Press the 4 or button Canceling Direct Track File Search Press the 38 button Funct...

Page 35: ...sc or MP3 WMA folder in random order 1 Select the key function section Press the NEXT button Repeatedly press the button until RDM is displayed above the 3 button Refer to Notes on Multi function Key System page 10 Function of disc changer Magazine Random Play Play the songs on all the discs in the disc changer in random order 1 Select the key function section Press the NEXT button Repeatedly pres...

Page 36: ... in the folder being displayed is played The methods for moving to other folders in the folder select mode are different from those in the folder search mode See Notes on playing MP3 WMA page 8 for details Disc Naming DNPS Attaching a title to a CD 1 Play the disc you want to attach a name to A title can t be attached to MD or MP3 WMA media Refer to the Text Display Switching page 16 18 and select...

Page 37: ...Scrolling the displayed CD text or MD title Press the SCRL button Function of disc changers with remote DNPP Disc Name Preset Play Selecting the CD displayed in the DNPS of the CDs set in the Disc changer 1 Enter DNPP mode Press the DNPP button on the remote When DNPP is displayed the DNPS display in order Forward Reverse display Press the DISC or DISC button 2 When the disc you want is displayed ...

Page 38: ...hes Beep ON or Beep OFF Select 1 of them as the setting You can continue by returning to step 2 and setting other items 4 Exit Menu mode Press the MENU button When other items that are applicable to the basic operation method above are displayed afterwards their setting content chart is entered Normally the uppermost setting in the chart is the original setting Also the explanation for items that ...

Page 39: ...ou have to start over from step 4 Press the Reset button and when it s removed from the battery power source 1 Turn the power ON 2 Do the step 4 through 7 step operation and reenter the security code APPROVED is displayed The unit can be used If an incorrect code is input WAITING is displayed and the input prohibited time shown below is generated After the input prohibited time lapses CODE is disp...

Page 40: ...o synchronize the clock DSI Disabled System Indicator A red indicator will blink on the unit after the faceplate is removed warning potential thieves Display Setting DSI ON LED flashes DSI OFF LED OFF Selectable Illumination Selecting the button illumination color as green or red Display Setting Button Green The illumination color is green Button Red The illumination color is red Triangle indicato...

Page 41: ...nel position Audio Setup Switches between the Easy mode and PRO mode for detailed setup during Audio setup Display Setting Audio Setup Easy Selects the quick Audio setup Audio Setup PRO Selects the detailed Audio setup Refer to Audio Setup Easy page 24 and Audio Setup PRO page 24 Audio Setup Easy CABIN SP SEL SP LEV CALL Audio Setup PRO X over DTA EQ SP LEV MEMORY CALL In Standby mode Built in Amp...

Page 42: ...ding PTY code for news bulletin When the News Bulletin Interrupt function is ON it switches to an FM station In Tuner mode Local Seek Only stations whose reception is good are searched for in auto seek tuning Display Setting Local Seek OFF The local seek function is OFF Local Seek ON The local seek function is ON In Tuner mode Tuning Mode Sets the tuning mode Tuning mode Display Operation Auto see...

Page 43: ... can be reduced when stereo broadcasts are received as monaural Display Setting MONO OFF The monaural reception is OFF MONO ON The monaural reception is ON Text Scroll Setting the displayed text scroll Display Setting Scroll Manual Doesn t scroll Scroll Auto Scrolls when the display changes The text scrolled is shown below CD text Folder name File name Song title Artist name Album name MD title Ra...

Page 44: ...button The number of files that can be downloaded Downloaded movie 1 file Wallpaper 1 file When a new movie is downloaded it is overwritten to the currently downloaded movie Also when a new wallpaper is downloaded it is overwritten to the currently downloaded wallpaper There is no way to delete the downloaded pictures The downloaded pictures can be used for display Graphic part Spectrum Analyzer D...

Page 45: ...Display Setting Rotary SEL ON The rotary volume knob can be used for item setup Rotary SEL OFF The rotary volume knob cannot be used for item setup To use the rotary volume knob for item setup select Rotary SEL ON and press the 1 button in each setup mode KDC 9026R M U S r5 45 03 11 28 10 05 08 PM ...

Page 46: ...battery is accidentally swallowed Do not set the remote on hot places such as above the dashboard Basic operations VOL buttons Adjusting the volume SRC button Each time the button is pressed the source switches For the source switching order refer to Selecting the Source page 13 ATT button Turning the volume down quickly When it is pressed again it returns to the previous level ATT DIRECT OK 0 9 S...

Page 47: ...e In Disc source 4 buttons Doing track file forward and backward DISC DISC buttons Doing disc folder forward and backward 38 button Each time the button is pressed the song pauses and plays DNPP button Enters and cancels the DNPP Disc Name Preset Play page 37 mode 0 9 buttons When in Direct Track File Search page 34 and Direct Disc Search page 34 enter the track file disc number In TV source FM bu...

Page 48: ...ignition does not have an ACC position or if the ignition wire is connected to a power source with constant voltage such as a battery wire the power will not be linked with the ignition i e it will not turn on and off along with the ignition If you want to link the unit s power with the ignition connect the ignition wire to a power source that can be turned on and off with the ignition key If the ...

Page 49: ... come out from the tab Power control Motor antenna control wire Blue White TEL mute wire Brown Connect either to the power control terminal when using the optional power amplifier or to the antenna control terminal in the vehicle Connect to the terminal that is grounded when either the telephone rings or during conversation A 7 Pin Red A 4 Pin Yellow Connector A Connector B Fuse 10A See next page ...

Page 50: ... the connection as illustrated Please be sure to reconnect the cable as shown 2 below to install this unit to the Volkswagen vehicles etc 1 Default setting The A 7 pin red of the vehicle s ISO connector is linked with the ignition and the A 4 pin yellow is connected to the constant power supply Unit Vehicle A 7 Pin Red A 4 Pin Yellow Ignition cable Red Battery cable Yellow 2The A 7 pin red of the ...

Page 51: ...ning or closing the panel may result The hollow at the center of the rubber frame is designed to make it easier to remove discs If you do not want the hollow to be visible mount the rubber frame in the opposite direction with the flat side at the top instead of the bottom Japanese cars 1 Refer to the section Removing the hard rubber frame page 53 and then remove the hard rubber frame 2 Align the h...

Page 52: ...on Theft Deterrent Panel page 20 and remove the Backpanel 2 Insert the panel lock screws into the holes at the sides of the panel Accessory6 3 Reattach the Backpanel Never insert the panel lock screws in any other screw holes than the one specified If you insert them in another hole it will contract and may cause damage to the mechanical parts inside the unit KDC 9026R M U S r5 52 03 11 28 10 05 2...

Page 53: ...Removing the hard rubber frame page 53 and then remove the hard rubber frame 2 Remove the screw M4 8 on the back panel 3 Insert the two removal tools deeply into the slots on each side as shown 4 Lower the removal tool toward the bottom and pull out the unit halfway while pressing towards the inside Be careful to avoid injury from the catch pins on the removal tool 5 Pull the unit all the way out ...

Page 54: ...ute wire is touching a metal part of the car Pull the TEL mute wire away from the metal part of the car No sound can be heard or the volume is low The fader or balance settings are set all the way to one side Center the fader and balance settings The input output wires or wiring harness are connected incorrectly Reconnect the input output wires or the wiring harness correctly See the section on Co...

Page 55: ...ted in the FM band is to 0 1 MHz It isn t the set Traffic information sound volume The set sound volume is less than the tuner sound volume If the tuner sound volume is louder than the set sound volume the tuner sound volume is used Disc source AUX EXT is displayed without achieving External disc control mode Unsupported disc changer is connected Use the disc changer mentioned in the About CD play...

Page 56: ...disc magazine TOC Error No disc has been loaded in the disc magazine Load a disc into the disc magazine The CD is quite dirty The CD is upside down The CD is scratched a lot Clean the CD and load it correctly E 05 The CD is upside down Load the CD correctly Blank Disc Nothing has been recorded on the MD No Track Disc No tracks are recorded on the MD although it has a title E 15 Media was played th...

Page 57: ...D If the CD cannot be ejected or the display continues to flash even when the CD has been properly reinserted please switch off the power and consult your nearest service center Unsupported File A MP3 WMA is played with a format that this unit can t support Protected File A copy protected file is played Can t Download Download Error This unit does not work properly for some reason Press the reset ...

Page 58: ...uency response 1 dB 10 Hz 20 kHz Total harmonic distortion 1 kHz 0 01 Signal to Noise ratio 1 kHz 105 dB Dynamic range 93 dB Channel separation 95 dB MP3 decode Compliant with MPEG 1 2 Audio Layer 3 WMA decode Compliant with Windows Media Audio Specifications subject to change without notice Audio section Maximum output power 50 W x 4 Full Bandwidth Power at less than 1 THD 22 W x 4 Tone action Ba...

Reviews: