background image

26

IMPORTANT

• 

The appliance should be installed by a QUALIFIED INSTALLATION TECHNICIAN. 

The appliance must be installed in compliance with regulations in force.

• 

You need the following housing area to fit your oven correctly.

• 

The double oven is designed to fit into a cabinet of 600 mm width.

• 

The double oven can be built in the kitchen units, but you must ensure that it is pro-

perly ventilated.

• 

In the diagram the appliance is ventilated by means of the space in the top of the 

kitchen cabinet.

• 

Lift the appliance into position onto the shelf, taking care NOT to lift it by the door 

handles.

• 

Remember the housing should not be free standing but be secured to the wall and/or 

adjacent fittings.

WARNING

• 

We would point out that the adhesive which bonds the plastic laminate to the furniture 

must withstand temperatures not less than 150° C to avoid delamination.

• 

The appliance must be housed in heat resistant units.

• 

The walls of the units must be capable of resisting


temperatures of 75 °C above room temperature.

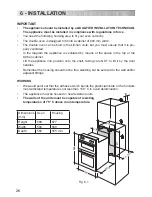
Dimensions

(mm)

Oven

Housing

Height

888

877

Width

594

560

Depth

560

555 min.

560

50

877

888

min.

 555

536

595

564

Fig. 6.1

  6 - INSTALLATION

Summary of Contents for KD 150

Page 1: ...DOUBLE OVEN model KD 150 Instructions for use Installation advice Before operating this oven please read these instructions carefully ...

Page 2: ...e used in a commercial environment This appliance guarantee will be void if the appliance is used within a non domestic environment i e a semi commercial commercial or communal environment Read the instructions carefully before installing and using the appliance CAUTION This apparatus must only be installed in a permanently ventilated room in compliance with the applicable regulations ...

Page 3: ...08 EC Requirements of EU Directive 93 68 EEC CONTENTS Page Number Introduction Important Safeguards Recommendations Control Panel How to use the conventional top oven How to use the multifunction bottom main oven Digital electronic programmer main oven only Cleaning Maintenance Advice for the Installer Installation Electrical installation Guarantee After Sales Service 4 5 6 7 8 10 11 15 16 18 19 2...

Page 4: ...us The manufacturer declines all responsibility in the event of damage caused by improper incorrect or illogical use of the appliance IMPORTANT INFORMATION FOR CORRECT DISPOSAL OF THE PRODUCT IN ACCORDANCE WITH EC DIRECTIVE 2002 96 EC At the end of its working life the product must not be disposed of as urban waste It must be taken to a special local authority differentia ted waste collection cent...

Page 5: ...MENDATIONS After having unpacked the appliance check to ensure that it is not damaged and that the oven door closes correctly In case of doubt do not use it and consult your supplier or a professionally qualified technician Packing elements i e plastic bags polystyrene foam nails packing straps etc should not be left around within easy reach of children as these may cause serious injuries Do not a...

Page 6: ...clines all liability for injury to persons or damage to property cau sed by incorrect or improper use of the appliance Always use oven gloves when removing the shelves and food trays from the oven whilst hot Clean the oven regularly and do not allow fat or oils to build up in the oven base or trays Remove spillages as soon as they occur Do not line the oven walls with aluminium foil Do not place b...

Page 7: ...Main oven only 4 Function selector knob Main oven 5 Oven temperature knob Main oven 6 Main oven temperature indicator light 7 Top oven temperature indicator light NB Your appliance has been fitted with a cooling fan to achieve optimum efficiency of the controls and to ensure lower surface temperatures are maintained 1 2 3 4 5 6 7 Fig 1 1 ...

Page 8: ...15 minutes in the mode in order to eliminate any traces of grease from the electrical elements WARNING The door is hot use the handle During use the appliance becomes hot Care should be taken to avoid touching heating elements inside the oven OPERATING PRINCIPLES Heating and cooking in the conventional oven are obtained a by natural convection The heat is produced by the upper and lower heating el...

Page 9: ...ctions TRADITIONAL CONVECTION COOKING The upper and lower heating elements are switched on The heat is diffused by natural convection and the temperature must be regulated between 50 C and the maximum position with the thermostat knob It is necessary to preheat the oven before introducing the foods to be cooked Recommended for For foods which require the same cooking temperature both internally an...

Page 10: ...and for no longer than 30 minutes at any one time Attention the oven door becomes very hot during operation Keep children away OVEN COOKING Before introducing the food preheat the oven to the desired temperature For a correct preheating operation it is advisable to remove the tray from the oven and introduce it together with the food when the oven has reached the desired temperature Check the cook...

Page 11: ...al convection The heat is produced by the upper and lower heating elements b by forced convection A fan sucks in the air contained in the oven muffle which sends it through the circular heating element and then sen ds it back through the muffle Before the hot air is sucked back again by the fan to repeat the described cycle it envelops the food in the oven provo king a complete and rapid cooking I...

Page 12: ...OR KNOB Rotate the knob clockwise to set the oven for one of the following functions OVEN LIGHT By turning the knob onto this setting we light the oven cavity The oven remains alight while any of the functions is on TRADITIONAL CONVECTION COOKING The upper and lower heating elements are switched on The heat is diffused by natural convection and the temperature must be regulated between 50 C and 25...

Page 13: ...be defrosted HOT AIR COOKING The circular element and the fan are on The heat is diffused by forced convection and the temperature must be regulated between 50 and 250 C with the thermostat knob It is not necessary to preheat the oven Recommended for For foods that must be well done on the outside and tender or rare on the inside i e lasa gna lamb roast beef whole fish etc VENTILATED GRILL COOKING...

Page 14: ... reach OVEN COOKING Before introducing the food preheat the oven to the desired temperature For a correct pre heating operation it is advisable to remove the tray from the oven and introduce it together with the food when the oven has reached the desired temperature Check the cooking time and turn off the oven 5 minutes before the theoretical time to recu perate the stored heat STERILIZATION Steri...

Page 15: ... C that the cooking time depends on the quantity and the type of foods GRILLING AND COOKING AU GRATIN Grilling may be done using the grill fan setting in this setting the hot air completely surrounds the food that is to be cooked to give a more even and rapid cooking process Set the temperature knob between 50 C and 200 C preheat the oven then simply place the food on the grid Close the door until...

Page 16: ...usly for more than 2 seconds setting the clock setting the timer vo lume by touching once along with the MODE key to cancel automatic cooking at any time MODE Function selection tou ched for more than 2 se conds setting the clock only after first connection or after a power fai lure timer automatic cooking dur duration how long the food will take to cook by touching the MODE key again automatic co...

Page 17: ...tic program after setting the clock the oven starts to operate in the selected function manual co oking The symbol is steady illuminated USING THE TIMER You can use the timer at any time even when the oven is not in use The timer does not turn the oven off The timer can be set for up to 23 hours and 59 minutes To set the timer touch the MODE key for more than 2 seconds the symbol flashes than the ...

Page 18: ...cooking time Note while dur is displayed you can change to End just by touching one time the MODE key within 8 seconds from the last selection If there is time to wait before cooking starts the current time of day and AUTO will show in the clock display The oven will switch off but is now set for automatic cooking If you are already at home to turn the oven on and only want the oven to turn off au...

Page 19: ...n juice tomato sauce vinegar etc can damage the ena mel if left too long STAINLESS STEEL ALUMINIUM PARTS AND SILK SCREEN PRINTED SURFACES Clean using an appropriate product Always dry thoroughly IMPORTANT these parts must be cleaned very carefully to avoid scratching and abra sion You are advised to use a soft cloth and neutral soap CAUTION Do not use abrasive substan ces or non neutral detergents...

Page 20: ...ig 5 1a 5 1b Slide into the guides the shelf and the tray fig 5 2a 5 2b The shelf must be fitted so that the safety catch which stops it sliding out faces the inside of the oven To dismantle operate in reverse order Fig 5 1b Fig 5 2a Fig 5 2b Fig 5 1a TOP OVEN BOTTOM MAIN OVEN ...

Page 21: ...l accept no responsibility for damage cau sed by chemical or abrasive cleaning B C REPLACING THE OVEN LIGHT WARNING Ensure the appliance is switched off before replacing the lamp to avoid the possibility of electric shock Let the oven cavity and the heating elements to cool down Switch off the electrical supply Unscrew the protective cover C fig 5 3 Unscrew and replace the bulb B with a new one su...

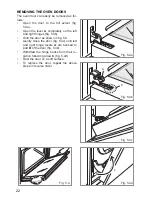
Page 22: ... right hinges fig 5 4b Hold the door as shown in fig 5 4 Gently close the door fig 5 4c until left and right hinge levers A are hooked to part B of the door fig 5 4b Withdraw the hinge hooks from their lo cation following arrow C fig 5 4d Rest the door on a soft surface To replace the door repeat the above steps in reverse order Fig 5 4 Fig 5 4d Fig 5 4c Fig 5 4b Fig 5 4a ...

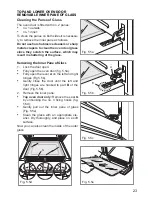
Page 23: ... of the glass Removing the Inner Pane of Glass 1 Lock the door open Fully open the oven door fig 5 5a Fully open the lever A on the left and right hinges Fig 5 5b Gently close the door until the left and right hinges are hooked to part B of the door Fig 5 5b 2 Remove the inner pane Top oven door only Remove the seal G by unhooking the no 3 fixing hooks fig 5 5d Gently pull out the inner pane of gl...

Page 24: ...inner pane Check that the four rubber pads are in place D in Fig 5 6a Check that you are holding the pane the correct way You should be able to read the wording on it as it faces you Insert the pane in the left E and right F slide guides fig 5 6b and gently sli de it to the retainers H fig 5 6c Top oven door only Reassemble the seal G in the correct way fig 5 6d by hooking the no 3 fixing hooks in...

Page 25: ...r handle s WARNING When correctly installed your product meets all safety requirements laid down for this type of product category However special care should be taken around the rear or the underneath of the ap pliance as these areas are not designed orintended to be touched and may contain sharp or rough edges that may cause injury INSTALLATION SERVICE REGULATIONS UNITED KINGDOM It is a legal re...

Page 26: ... of the kitchen cabinet Lift the appliance into position onto the shelf taking care NOT to lift it by the door handles Remember the housing should not be free standing but be secured to the wall and or adjacent fittings WARNING We would point out that the adhesive which bonds the plastic laminate to the furniture must withstand temperatures not less than 150 C to avoid delamination The appliance m...

Page 27: ...y Note It is essential that when installing your oven adequate air circulation is allowed for within the installation Inadequate air circulation may greatly impair the performance of your oven and may effect adjacent cabinets due to an increase in temperature Caution Do not lift this oven by the door handles Adjust the hinges of furniture doors adjacent to the oven to allow a 4 5 mm gap between th...

Page 28: ... trim is not damaged due to the appliance being placed on the floor the ap pliance should be suitably supported as in below illustrations After installation the appliance door should be slowly opened to ensure no damage has occurred No responsibility for lower trim damage will be accepted if these instructions have not been followed OVEN DOOR LOWER TRIM AIR FLOW Air Flow Oven Door Lower Trim Fig 6...

Page 29: ...etween the contacts of 3 mm betwe en the appliance and the mains The power supply cable must not touch the hot parts and must be posi tioned so that it does not exceed 75 C at any point Once the appliance has been installed the switch must always be accessible The connection of the appliance to earth is mandatory The manufacturer declines all respon sability for any inconvenience resul ting from t...

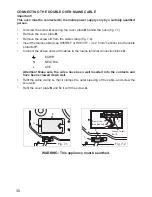
Page 30: ... F or H05VV F 3 x 2 5 mm2 section into the cable protector P Connect the phase and earth cables to the mains terminal connection block D EARTH N NEUTRAL L LIVE Attention Make sure the wires have been well inserted into the contacts and have been screwed down well Refit the cable clamp so that it clamps the outer sleeving of the cable and screw the screws C Refit the cover plate B and fix it with t...

Page 31: ... it The appliance has been installed as per the instructions contained within this book let This guarantee does not affect your statutory rights If you require After Sales Service please contact the Currys Product Support Line on 0844 561 6263 8 GUARANTEE 9 AFTER SALES SERVICE Descriptions and illustrations in this booklet are given as simply indicative The manufacturer reserves the right consider...

Page 32: ...Code 1103822 ß2 ...

Reviews: