background image

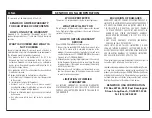
 CAUTION

•  Do not install in the below locations;
  (Unstable location, In a location that interferes with driving, In a location 

that gets wet, In a dusty location, In a place that gets hot, In a place that 
gets direct sunlight, In a location that gets hit by hot air)

•  Do not install the unit under the carpet. Otherwise heat build-up occurs 

and the unit may be damaged.

•  Install this unit in a location which allows heat to easily dissipate. Once 

installed, do not place any object on top of the unit.

•  The surface temperature of the amplifi er will become hot during use. 

Install the amplifi er in a place where people, resins, and other substances 
that are sensitive to heat will not come into contact with it.

•  When making a hole under a seat, inside the trunk, or somewhere else in 

the vehicle, check that there is nothing hazardous on the opposite side 
such as a gasoline tank, brake pipe, or wiring harness, and be careful not 
to cause scratches or other damage.

•  Do not install near the dashboard, rear tray, or air bag safety parts.
•  The installation to the vehicle should securely fasten the unit to a place in 

which it will not obstruct driving. If the unit comes off  due to a shock and 
hits a person or safety part, it may cause injury or an accident.

•  After installing the unit, check to make sure that electrical equipment 

such as the brake lamps, turn signal lamps and windshield wipers oper-
ate normally.

 Installation procedure

Read the instruction manual well to select the proper connection and 
setting.

1. Remove the ignition key and disconnect the negative

terminal of 

the battery to prevent short circuits. 

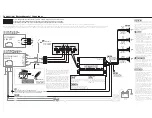
2. There are two options:

* Refer to “Connection” as below.

Type A: RCA INPUT connection

A-1

 Connect the battery wire.

A-2

 Connect the ground wire to chassis ground of vehicle.

A-3

 Connect the power control wire.

A-4

 Connect the speakers.

A-5

 Connect the DC cable into the connector at KAC-M1814.

A-6

 Connect the RCA cable.

Type B: SPEAKER INPUT connection

B-1

 Connect the battery wire.

B-2

 Connect the ground wire to chassis ground of vehicle.

B-3

 Connect the speakers.

B-4

 Connect the DC cable into the connector at KAC-M1814.

B-5

 Cut off the RCA cable, then connect the correct corresponding 

speaker output from the FACTORY INSTALLED HEAD UNIT directly.

3. Attach the unit.
4. Connect the negative

terminal of the battery.

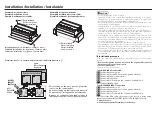
Installation / Installation / Instalación

Installation board, etc. (thickness: 15 mm or more)
Tableau d’installation, etc. (épaisseur: 15 mm ou plus)
Tablero de instalación, etc. (grosor: 15 mm o más)

Example A: using the screws
Exemple A: utilisation des vis
Ejemplo A: utilizando los tornillos

Example B: using the wire bands
Exemple B: utilisation des serre-câbles
Ejemplo B: utilizando los atadura de cables

  Parts included

Pièces comprises
Partes incluidas

 Parts included

 Pièces 

comprises

 Partes 

incluidas


(350 mm (13-3/4”))

Protective cover 

 / Couvercle de protection 

 / Cubierta protectora 

Spare
De rechange 
Repuesto

MOISTURE

HUMIDITÉ

HUMEDAD

DUST

POUSSIÈRE

POLVO

After setting up the unit, put the protective 
cover 

 on the control panel.

Après avoir confi guré l’unité, placez le couvercle 
de protection 

 sur le panneau de commande.

Después de confi gurar la unidad, coloque la 
cubierta protectora 

 sobre el panel de control.

Summary of Contents for KAC-M1814

Page 1: ...the best performance from your new power amplifier For your records Record the serial number found on the back of the unit in the spaces designated on the warranty card and in the space provided below Refer to the model and serial numbers whenever you call upon your Kenwood dealer for information or service on the product Model KAC M1814 Serial number US Residence Only Register Online Register you...

Page 2: ...ie nominale B 14 4 V Stéréo 2 Ω 45 W 4 1 kHz 1 0 THD Pont 4 Ω 90 W 2 1 kHz 1 0 THD Impédance d enceinte 4 Ω 2 Ω à 8 Ω admissible Connexions en pont 4 Ω à 8 Ω admissible Réponse en fréquence 0 1 dB 20 Hz 20 kHz Sensibilité d entrée RCA 0 2 V 5 0 V Taux de signal bruit 98 dB Impédance d entrée 10 kΩ Fréquence du filtre passe bas 12 dB oct 50 Hz 200 Hz variable Fréquence du filtre passe haut 12 dB oc...

Page 3: ... L B R L A R L B R System examples Exemple de configuration Ejemplos del sistema 4 channel system Système 4 voies Sistema de 4 canales High power 2 channel system Système 2 voies puissance élevée Sistema de 2 canales de alta potencia 2 channel Subwoofer system Système 2 voies enceinte d extrêmes graves Sistema de 2 canales Altavoz de subgraves Front left speaker Haut parleur avant gauche Altavoz d...

Page 4: ...ant JVC KENWOOD Corporation 3 12 Moriya cho Kanagawa ku Yokohama shi Kanagawa 221 0022 JAPAN Représentants dans l UE JVCKENWOOD Europe B V Amsterdamseweg 37 1422 AC Uithoorn PAYS BAS Declaración de conformidad con respecto a la Directiva EMC 2014 30 UE Declaración de conformidad con respecto a la Directiva RoHS 2011 65 UE Fabricante JVC KENWOOD Corporation 3 12 Moriya cho Kanagawa ku Yokohama shi ...

Page 5: ...Cable RCA 2 100 mm 3 15 16 Wire band Serre câble Atadura de cables 2 Ø4 16 mm Self tapping screws Vis taraudeuses Tornillo autorroscantes 4 Protective cover Couvercle de protection Cubierta protectora 2 Compact 4 Channel Digital Amplifier KAC M1814 157 mm 6 3 16 169 mm 5 5 8 45 mm 1 3 4 145 mm 5 11 16 99 mm 3 7 8 76 mm 3 Dimensions Dimensions Dimensiones KENWOOD ...

Page 6: ...gine ON it depletes the battery Use it after starting the engine Protection function The protection function is activated in the following situations This unit is equipped with a protection function for protecting this unit and your speakers from various acci dents or problems that can occur When the protection function is triggered the amplifier stops operating When a speaker wire may be short ci...

Page 7: ...nect the negative terminal of the battery to prevent short circuits 2 There are two options Refer to Connection as below Type A RCA INPUT connection A 1 Connect the battery wire A 2 Connect the ground wire to chassis ground of vehicle A 3 Connect the power control wire A 4 Connect the speakers A 5 Connect the DC cable into the connector at KAC M1814 A 6 Connect the RCA cable Type B SPEAKER INPUT c...

Page 8: ...stema eléctrico del vehículo Consulte a su proveedor para obtener más detalles WARNING Particular attention must be given to making good electrical contact at the amplifier output and speaker terminals Poor or loose connections can cause sparking or burning at the terminals because of the very high power that the amplifier can deliver CAUTION If sound is not output normally immediately turn power ...

Page 9: ...se haut Le filtre laisse passer les fréquences supérieures à la fréquence précisée au moyen de la commande FILTER FREQUENCY Position OFF Le filtre n agit pas autrement dit tout le spectre des fréquences est présent en sortie Position LPF Filtre passe bas Le filtre laisse passer les fréquences inférieures à la fréquence précisée au moyen de la commande FILTER FREQUENCY Borne LINE IN entrée de ligne...

Page 10: ... e endereço do cliente Name address of customer Attention This card and receipt or invoice are necessary to purchase a new panel in case of theft or damage Attention Vous aurez besoin de cette carte et du reçu ou de la facture pour acheter un nouveau panneau en cas de vol ou d endommagement Atenção Em caso de dano ou perda do painel frontal este Certificado de Garantia e a Nota Fiscal de compra ser...

Page 11: ...on of the problem ifyouareuncertainastowhetheraServiceCenter isauthorized pleasecall1 800 KENWOODforthenearest Service Center 1 800 536 9663 2 Althoughyoumustpayanyshippingchargesifitisnecessary toshiptheproductforwarrantyservice wewillpaythereturn shipping charges if the repairs are covered by the warranty within the United States 3 Whenever your units are taken or sent for warranty service you m...

Page 12: ...Center Damages or deteriorations caused during shipment Claims must be presented to the carrier Damages or deteriorations resulting from removal and or replacement PURCHASER S RESPONSIBILITIES As the purchased of a new Kenwood brand product you are requested to do the following in order to obtain Kenwood warranty service 1 Retainyoursalessliporotherevidenceofpurchaseforproving your eligibility for...

Reviews: