background image

23

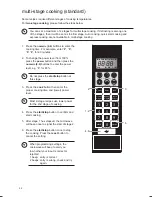
3.  Press the 

cook

 button.

4.  Press the 

numeric (0-9)

 buttons to enter 

the cooking time and power level. And then 

press the 

power

 button.

5.  Press the 

start/stop 

button to begin the 

2-stage cooking programme with defrost as 

the 1st stage. 

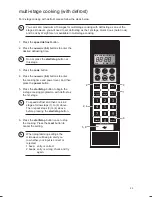
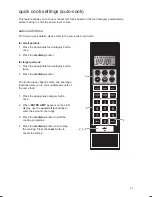
multi-stage cooking (with defrost)

For 2-stage cooking with defrost, please follow the steps below.

You can set a maximum of 3 stages for multi-stage cooking with defrosting as one of the 

stages. However, you will need to set defrosting as the 1st stage. Quick Cook (Auto Cook) 

and Cook by Weight are not available in multi-stage cooking.

To speed defrost and then cook in 2 

stages, follow steps (1) to (4) above. 

Then repeat steps (3) to (4) above 

before pressing the 

start/stop

 button.

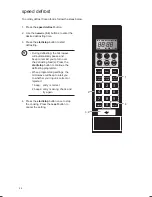
1.  Press the 

speed defrost

 button.

2.  Press the 

numeric (0-9)

 buttons to enter the 

desired defrosting time. 

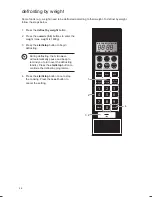
6.  Press the 

start/stop

 button once to stop 

the cooking. Press the 

reset

 button to 

cancel the setting.

Do not press the 

start/stop 

button at 

this stage.

When programming settings, the 

microwave will beep to alert you 

to whether your input is correct or 

rejected:

1 beep:  entry is correct

2 beeps:  entry is wrong, check and try 

again.

1

2

3

4

5

6

7

8

9

clock

0

reset

power

timer

cook

cook by

weight

defrost by

weight

speed

defrost

start

stop

TIME

AMT COOK

CODE

TIMER

ENTER

LOCK

MEM G

DEF

CLOCK

popcorn baked potato

pizza

beverage

reheat

frozen dinner

5, 6

2, 4

4

6

1

3

K25MB12_IB_130807_Shaun.indd   23

07/08/2013   5:14 PM

Summary of Contents for K25MB12

Page 1: ... instruction manual 1 2 3 4 5 6 7 8 9 clock 0 reset power timer cook cook by weight defrostby weight speed defrost start stop TIME AMT COOK CODE TIMER ENTER LOCK MEM G DEF CLOCK popcorn baked potato pizza beverage reheat frozen dinner ...

Page 2: ......

Page 3: ...s 14 steam 15 condensation 15 product overview 16 the main unit 16 the control panel 16 checking your microwave 17 clock setting 18 oven timer 19 setting the child lock 20 microwave cooking 21 multi stage cooking standard 22 multi stage cooking with defrost 23 speed defrost 24 cook by weight 25 defrosting by weight 26 quick cook settings auto cook 27 auto cook menu 27 auto cook menu table 28 clean...

Page 4: ...d from 8 years and above and persons with reduced physical sensory or mental capabilities or lack of experience and knowledge if they have been given supervision or instruction concerning use of the appliance in a safe way and understand the hazards involved Children shall not play with the appliance Cleaning and user maintenance shall not be made by children unless they are older than 8 and super...

Page 5: ...ontent gathering inside the microwave cavity open the door immediately after the cooking function has stopped to allow steam to escape Only use utensils that are suitable for microwave use Care should be taken when using paper plastic wooden or other combustible materials in the microwave as they can catch fire Oil fat for deep frying should not be heated in the microwave Only use cling film desig...

Page 6: ...r cold running water for at least 10 minutes Cover with a clean dry dressing Do not use creams oils or lotions cleaning your microwave The microwave should be cleaned regularly and food deposits removed Failure to maintain the microwave in a clean condition can affect the life of the microwave and possibly result in a hazardous situation See cleaning your microwave do not use these in your microwa...

Page 7: ...s in a microwave Damaged glass can explode When heating food in plastic or paper containers keep an eye on the microwave due to the possibility of ignition delayed boiling Liquids heated in a microwave can boil up when removing them from the microwave Take the following precautions Always stir liquids before and after cooking Allow them to stand Use containers that are wider at the top than at the...

Page 8: ...in doubt whether the appliance is properly earthed Never modify the plug provided with the appliance If the plug does not fit properly in the mains socket have a qualified electrician install a proper mains socket The appliance is not intended to be operated by means of an external timer or separate remote control system CAUTION RISK OF ELECTRIC SHOCK DO NOT OPEN The lightning flash with arrowhead...

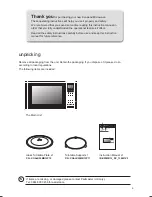
Page 9: ...ly before use and keep this instruction manual for future reference Glass Turntable Plate x 1 P N XGALK25MB12P12 Turntable Support x 1 P N XGALK25MB12P11 If items are missing or damaged please contact Partmaster UK only Tel 0844 800 3456 for assistance 1 2 3 4 5 6 7 8 9 clock 0 reset power timer cook cook by weight defrostby weight speed defrost start stop TIME AMT COOK CODE TIMER ENTER LOCK MEM G...

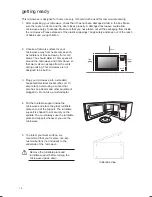
Page 10: ...reach of babies and young children 3 Plug your microwave into a standard household electrical socket 230 volt 13 amp rated Avoid using a socket that also has an adaptor and other equipment plugged in Do not use a multi adaptor 4 Put the turntable support inside the microwave and place the glass turntable plate on top of the support The turntable support is shaped to sit securely on the spindle You...

Page 11: ...age gives some of the basic guidelines for microwave cooking If you are unfamiliar with using a microwave there is more information at the back of this instruction manual cooking with a microwave If you are unsure how long the food should cook for begin cooking at the lowest recommended time then add more time if necessary The moisture content of food can vary Ensure food is thoroughly cooked all ...

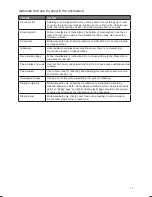
Page 12: ...d or film cover Always use the glass turntable plate Use shallow containers with a large surface area Do not use containers that are more than 1 25in 3 5cm deep Use gloves when handling hot aluminium foil containers Do not completely cover food with aluminium foil The microwave energy cannot pass through the aluminium foil so the food will not cook Do not let aluminium foil touch the inside of the...

Page 13: ... use cracked or chipped dishes Oven cooking bags Follow manufacturer s instructions Do not close with metal tie Make slits to allow steam to escape Paper plates and cups Use for short term cooking warming only Do not leave oven unattended while cooking Paper towels Use to cover food for reheating and absorbing fat Use with supervision for a short term cooking only Greaseproof paper Use as a cover ...

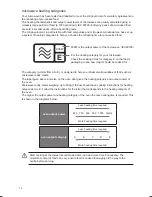
Page 14: ...es the heating category and output power of the oven Microwave ready meals weighing up to 500g 1lb 2oz should have cooking instructions for heating categories A to E Follow the instructions for the letter that corresponds to the heating category of the oven The higher the output power and heating category of the oven the less heating time is required This is shown in the diagrams below oven output...

Page 15: ...hat condensation gathers in small pools inside your microwave and on the work surface beneath the door and vents Always dry the microwave after cooking foods with a high moisture content Your microwave is designed to let steam escape from the vents and around the door without microwave energy escaping There is no danger of microwave energy escaping with the steam 1 2 3 4 5 6 7 8 9 clock 0 reset po...

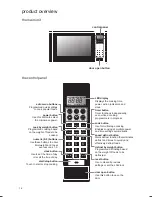
Page 16: ...is in progress cook button Use for multi stage cooking Enables cooking at multiple power and time settings automatically auto menu buttons Programmed quick settings to cook popular foods power button Use this button to select the microwave power numeric 0 9 buttons Use these buttons to enter time weight and to set express cook 1 9 clock button Use to set the time of day or recall the time of day c...

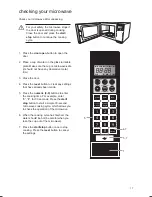
Page 17: ...y been made 5 Press the numeric 0 9 buttons to enter the cooking time For example enter 3 0 for 30 seconds Press the start stop button to start a simple 30 second microwave cooking cycle which allows you to check the operation of the microwave 6 When the cooking cycle has finished the water should be hot be careful when you take the cup out of the microwave 7 Press the start stop button once to st...

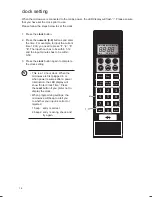
Page 18: ...ss the numeric 0 9 buttons and enter the time For example to input the current time 12 30 you need to press 1 2 3 0 The input hour has to be within 1 12 and the input minutes has to be within 0 59 3 Press the clock button again to complete the clock setting This is a 12 hour clock When the microwave is first plugged in or when power resumes after a power interruption the LED display will show Ente...

Page 19: ...ress the timer button 2 Press the numeric 0 9 buttons and enter the timer time 3 Press the start stop button to confirm the setting The time countdown can be seen on the LED display for 5 seconds before returning to showing the clock or cooking time 4 Press the timer button and then the reset button to cancel the oven timer during the timing process During kitchen timer programmes cannot be set Wh...

Page 20: ... is correct or rejected 1 beep entry is correct 2 beeps entry is wrong check and try again setting the child lock This feature prevents the electronic operation of the microwave by locking the operation of the control panel until you have cancelled it Please follow the steps below to set the child lock 1 Press and hold the reset button for 3 seconds Lock will show on the LED display 2 To cancel th...

Page 21: ...n and then press the numeric 0 9 buttons to enter the power level e g 8 for 80 The default microwave power is 100 You may skip Step 2 if you plan to use 100 microwave power for cooking When 0 is selected i e 0 no microwave power is present Stop the microwave before removing food Operating the microwave without food in it can result in overheating and damage to the magnetron When programming settin...

Page 22: ...k start cooking and express cooking are not available in multi stage cooking 1 Press the numeric 0 9 buttons to enter the cooking time For example enter 2 0 0 0 for 20 minutes 2 To change the power level from 100 press the power button and then press the numeric 0 9 buttons to enter the power level e g 8 for 80 Do not press the start stop button at this stage When programming settings the microwav...

Page 23: ... and then cook in 2 stages follow steps 1 to 4 above Then repeat steps 3 to 4 above before pressing the start stop button 1 Press the speed defrost button 2 Press the numeric 0 9 buttons to enter the desired defrosting time 6 Press the start stop button once to stop the cooking Press the reset button to cancel the setting Do not press the start stop button at this stage When programming settings t...

Page 24: ...ave will automatically pause and beep to remind you to turn over the defrosting food s Press the start stop button to continue the defrosting programme When programming settings the microwave will beep to alert you to whether your input is correct or rejected 1 beep entry is correct 2 beeps entry is wrong check and try again 1 2 3 4 5 6 7 8 9 clock 0 reset power timer cook cook by weight defrostby...

Page 25: ... the numeric 0 9 buttons to enter the weight microwave button control code type max weight 1 Beef 2 700g 2 Mutton 2 700g 3 Pork 2 300g Meat must be defrosted from frozen During defrosting the microwave will automatically pause and beep to remind you to turn over the defrosting food s Press the start stop button to continue the defrosting programme 1 2 3 4 5 6 7 8 9 clock 0 reset power timer cook c...

Page 26: ...ight Some foods e g weight need to be defrosted according to their weight To defrost by weight follow the steps below 1 Press the defrost by weight button 2 Press the numeric 0 9 buttons to enter the weight max weight is 1800g 3 Press the start stop button to begin defrosting 1 2 3 4 5 6 7 8 9 clock 0 reset power timer cook cook by weight defrostby weight speed defrost start stop TIME AMT COOK COD...

Page 27: ... button The frozen dinner baked potato and beverage functions allow you to cook multiple amounts of the same food 1 Press the appropriate category button once 2 When ENTER AMT appears on the LED display use the numeric 1 4 buttons to enter the amount of servings 3 Press the start stop button to start the cooking programme 4 Press the start stop button once to stop the cooking Press the reset butto...

Page 28: ...ing regularly to ensure the water does not boil over 2 2 10 3 3 10 4 4 10 260 310g per coffee mugs press twice 1 2 00 2 3 30 3 5 00 4 6 30 frozen dinner 198 255g per share press once 1 6 00 Make sure food is cooked thoroughly before consuming Additional cooking time may be required for thicker piece of meat or those with sauce Stir well before additional cooking Check the cooking regularly to ensu...

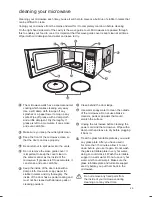
Page 29: ...eep the cover clean in the same manner as the inside of the microwave If grease is left to accumulate it can smoke and even catch fire 5 Keep the inside of the door clean with a damp cloth Use warm soapy water for stubborn marks and dry thoroughly The inside of the door has a special coating and must not be cleaned with abrasive pads or cleaning powders 6 Clean behind the door ledge 7 Treat the gl...

Page 30: ... Why do I get condensation on the inside of the door Condensation is perfectly normal especially when you are cooking food with a high moisture content such as potatoes Does the microwave energy get through the window on the door No The door has a special metal screen with holes in that lets you see inside but stops microwave energy from getting out Steam comes out of the side of the door and vent...

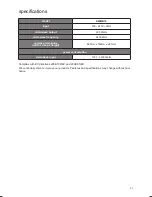
Page 31: ...requency 2450 MHz outside dimensions width x deep x height 483mm x 390mm x 281mm power consumption microwave input 1300 1400 Watts Complies with EC directives 2004 108 EC and 2006 95 EC We continually strive to improve our products Features and specifications may change without prior notice ...

Page 32: ...local authority or your retailer where you purchased the product IB K25MB12_RC_130807V2 Visit Partmaster co uk today for the easiest way to buy electrical spares and accessories With over 1 million spares and accessories available we can deliver direct to your door the very next day Visit www partmaster co uk or call 0844 800 3456 UK customers only Calls charged at National Rate DSG Retail Ltd co ...

Reviews: