How to Wire
6
MENU/OK button
z
Turns the camera's power on and off when
pressed and held.
z
Displays the MENU screen.
z
Functions as the enter button when the menu
is displayed.
z
During playback, the mode switches between
pause and playback each time the button is
pressed.
z
When pressed and held while pausing, protects
the file. (Files created with continuous recording
cannot be protected.)
z
When pressed and held while playing, changes
the volume.
z
When pressed while the monitor screen
power-saving function is activated, cancels
the power-saving function.
7
button
z
When pressed while the menu is displayed,
moves to the next item.
z
When pressed and held recording, takes a
photo. (It is not possible to take photos during
parked recording.)
z
When pressed during recording, turns automatic
still image capture on and off. (This cannot be
set during parked recording.)
z
When pressed during playback, plays the next file.
z
Fast-forwards when pressed and held during
playback, slow-forwards when pressed and held
while paused. Switches to playback when the
button is released while fast-forwarding, to pause
when released during slow-forward playback.
8
Microphone
Records audio.
9
button
z
When the menu is displayed, functions as the
cancel, return or stop button.
z
When pressed during recording, turns the
audio recording setting on and off.
z
When pressed and held while pausing, deletes
the file.
(
0
REC button
z
When pressed during continuous recording,
starts manual recording.
z
When pressed during playback, zooms playback.
z
When pressed and held during playback, returns
to continuous recording.
!
SD card slot 2
z
Insert an SD card for recording here.
(
z
SD card slot 2 is extend storage capacity for
continuous recording data.
@
MIC indicator
z
Lights (green) when the audio recording setting
is on while in the recording mode.
#
Monitor screen
$
REC indicator
z
Lights (blue) during recording.
%
SD card slot 1
z
Insert an SD card for recording here.
(
z
Be sure to insert the SD card into SD card
slot 1 before using the camera.
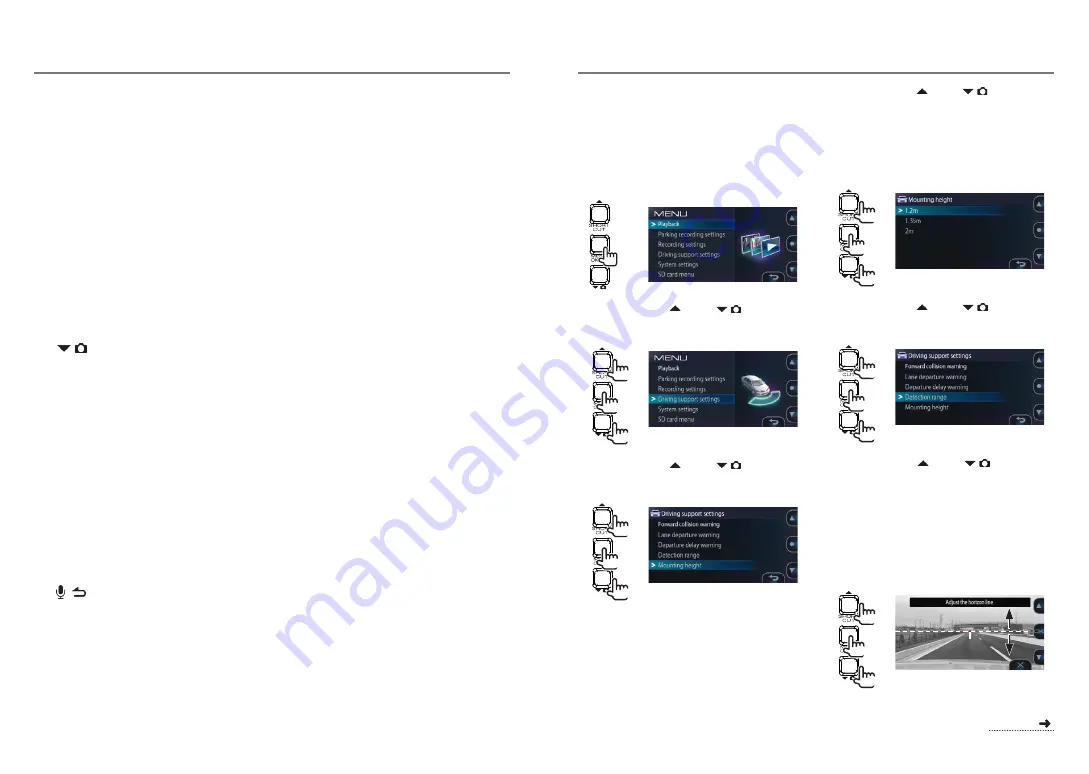
Adjust according to the vehicle
Before using the driving support functions, adjust
the mounting height from the road surface to the
camera, the horizon, the position of the tip of the
engine hood according to the vehicle body, etc.
1.
Press the [MENU/OK] button.
The menu is displayed.
2.
Operate the [ ] and [
] buttons
to select <Driving support settings>,
then press the [MENU/OK].
2
1
1
3.
Operate the [ ] and [
] buttons to
select <Mounting height>, then press
the [MENU/OK] button.
2
1
1
4.
Operate the [ ] and [
] buttons to
select the mounting height from the
road surface to the camera, then press
the [MENU/OK] button.
Set the mounting height to about 1.2 m for a
passenger car or compact SUV, about 1.35 m for
a large SUV or minivan, about 2 m for a large truck.
2
1
1
5.
Operate the [ ] and [
] buttons to
select <Detection range>, then press
the [MENU/OK] button.
2
1
1
6.
Operate the [ ] and [
] buttons to
fine-adjust the guide line (the white line)
so that it is lined up with the horizon, then
press the [MENU/OK] button.
Line up the red line in the center of the picture
with the center of the driving lane .
The explanations on the screen turn off when a
button is operated.
Adjust as shown on the diagram.
2
1
1
Before Using the Driving Support Functions
continued
16
17


