Kenwood DNX577S Instruction Manual Download Page 74

Bluetooth Control

74

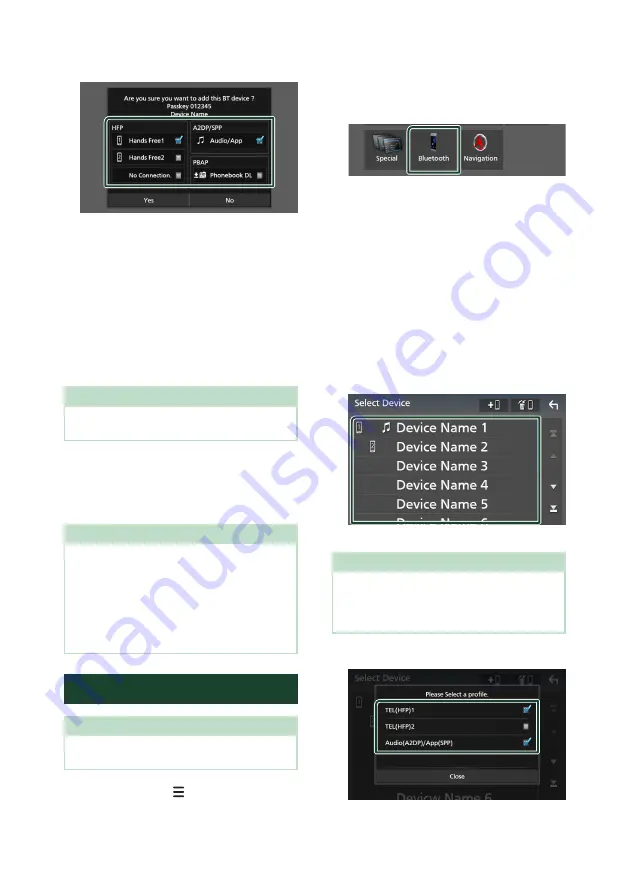
Select the function you want to use.


HFP 

[

Hands Free1

]

/

[

Hands Free2

]

/

[

No 

Connection.

]

Select the hands-free number to connect.


A2DP/SPP 

[

Audio/App

]

Select if you want to use the audio player 
app in your smartphone over A2DP, and the 
other apps in your smartphone over SPP.


PBAP 

[

Phonebook DL

]

Select if you want to transfer your 
phonebook data.

NOTE

•  To select 

[

Phonebook DL

]

, first select 

[

Hands 

Free1

]

 or 

[

Hands Free2

]

 for HFP.

Touch 

[

Yes

]

.

When data transmission and connection 
have completed, the Bluetooth connection 
icon appears on the screen.

NOTE

•  When registering the iPhone that is available for 

Apple CarPlay wirelessly, a confirmation message 
appears. 


[

Yes

]

: Displays the Apple CarPlay screen for 

wireless connection.


[

No

]

: Apple CarPlay is not connected. When 

using Apple CarPlay, see 

Select an Apple 

CarPlay device (P.39)

.

Bluetooth Setup

NOTE

•  The Bluetooth Setup is disabled while using 

Apple CarPlay.

Press the 

[

MENU

]

/

[

]

 button.

h

h

Popup menu appears.

Touch 

[

SETUP

]

.

h

h

SETUP Menu screen appears.

Touch 

[

Bluetooth

]

.

h

h

Bluetooth Setup screen appears.
See the following section for each 

setting.

•  Connect the Bluetooth device (P.74)
•  Change the PIN Code (P.75)
•  Change the device name (P.75)


Ñ

Connect the Bluetooth device

Touch 

[

Select Device

]

 on the Bluetooth 

Setup screen.

Touch the name of the device you want 
to connect.

h

h

Profile select screen appears.

NOTE

•  If the icon is lighted, it means that the unit will 

use that device.

•  You cannot select an Android smartphone 

connected as an Android Auto device.

Set each profile as follows.

Summary of Contents for DNX577S

Page 1: ...d in the space provided below Refer to the model and serial numbers whenever you call upon your KENWOOD dealer for information or service on the product Model DNX997XR DNX697S DNX577S Serial number US Residence Only Register Online Register your KENWOOD product at www kenwood com usa Updated information the latest Instruction Manual system updates new functions etc is available from https www kenw...

Page 2: ...GPL LGPL embedded in this product are encouraged to read the terms of the corresponding license before use Because each individual license is prescribed by a third party other than JVCKENWOOD Corporation the original English of the license is presented EULA Ñ Ñ Software License Agreement JVCKENWOOD Corporation hereinafter called Licensor holds either the copyright to the embedded software or the r...

Page 3: ...prior written consent from Licensor Article 8 Cancellation of the Agreement Licensor reserves the right to cancel this agreement forthwith and claim compensation from User for the damages caused by such cancellation when User 1 Breaches any of the provisions of this agreement or 2 Has received a petition for seizure provisional seizure provisional disposition or any other kind of compulsory execut...

Page 4: ... Widget 27 Widget SETUP 28 Disc 29 Playing a disc 29 DVD VCD Basic Operation 30 Music CD Disc media Basic Operation 31 File search Operation 33 DVD Disc Menu Operation 33 DVD SETUP 34 APPS 36 Wireless Mirroring Operation 36 USB Mirroring Operation 36 Apple CarPlay Operation 38 Android Auto Operation 41 USB SD 44 Connecting a USB device 44 Inserting the SD 44 USB SD Basic Operation 45 Search Operat...

Page 5: ... audio video players AV IN 87 OEM Features Operation 88 Setup 89 Monitor Screen Setup 89 System Setup 89 User Interface Setup 90 Special Setup 91 Display Setup 92 AV Setup 94 Controlling Audio 95 3 way speaker system setup 95 Speaker X over setup 96 Controlling General Audio 98 Equalizer Control 98 Volume Offset 99 Zone Control 100 Sound Effect 100 Listening Position DTA 101 Audio Setup memory 103...

Page 6: ...ner directly to the unit may damage its mechanical parts Wiping the faceplate with a hard cloth or using a volatile liquid such as thinner or alcohol may scratch the surface or erase the screened print Ñ Ñ Lens fogging When you turn on the car heater in cold weather dew may form on the lens in the disc player of the unit due to condensation This condensation on the lens also called lens fogging ma...

Page 7: ...ent or collision resulting in death or serious injury When navigating carefully compare information displayed on the navigation system to all available navigation sources including information from street signs visual sightings and maps For safety always resolve any discrepancies or questions before continuing navigation Always operate the vehicle in a safe manner Do not become distracted by the n...

Page 8: ...servation This navigation system can be used when the ignition key is turned to ON or ACC To preserve the battery however it should be used with the engine running whenever possible Using the navigation system for a long time with the engine switched off can cause the battery to run down Map Data Information One of the goals of Garmin is to provide customers with the most complete and accurate car...

Page 9: ...Basic Operations 9 English Basic Operations Functions of the Buttons on the Front Panel DNX997XR 9 8 1 2 3 4 5 6 7 DNX697S DNX577S 4 2 3 5 6 10 1 8 ...

Page 10: ...creen P 80 When neither Apple CarPlay Android Auto nor a Bluetooth Hands Free phone is connected pressing and holding displays Bluetooth pairing waiting dialog P 73 7 G Displays the Angle Adjust screen DISC EJECT Ejects the disc OPEN Fully opens the panel to the location of the SD card slot When the panel is opened closes the panel To forcibly eject the disc press it for 2 seconds and then touch D...

Page 11: ...erent depending on the model 1 Press the HOME button DNX997XR DNX697S DNX577S h h The unit is turned on To turn off the unit 1 Press the HOME button for 1 second NOTE If it is your first time to turn the unit on after installation it will be necessary to perform Initial SETUP P 12 ...

Page 12: ...it is hard to see the image on the screen even adjust the viewing angle 1 Touch Display 2 Touch Key Color 3 Select the desired color 4 Touch DNX997XR only 5 Touch Display Adjustment 6 Adjust a viewing angle and a tilt position 7 Touch For details see Display Adjustment P 14 DNX697S DNX577S only 5 Touch Viewing Angle 6 Select a viewing angle 7 Touch For details see Viewing Angle P 14 For details se...

Page 13: ...4 Hour Clock NAV SYNC Default Synchronizes the clock time with navigation GPS data Manual Set the clock manually Time Zone If you have selected Manual for Clock select the time zone Clock Adjust If you select Manual for Clock adjust the date and time manually P 91 NOTE Please set the date and time If they are not set some functions may not work Adjusting the volume You can adjust the volume 0 to 4...

Page 14: ...position you want to set up Default is 0 3 Off Position You can store the current monitor angle as the angle during power off Touch Memory when the desired angle is selected Viewing Angle DNX697S DNX577S You can adjust the viewing angle when the image on the screen is difficult to see evenly The smaller the negative value the more whitish the image on the screen looks 1 Press the button h h Popup ...

Page 15: ...nger quickly to the left or right on the screen to change the page You can scroll a list screen by flicking up down on the screen Swipe Slide your finger up or down on the screen to scroll the screen HOME screen descriptions Most functions can be performed from the HOME screen 1 3 2 1 Widget P 25 You can change the widget by flicking left or right on the widget area Touch the widget to display the...

Page 16: ...s icon appears only when Android Auto is connected and two or more devices can be used as Android Auto source DNX997XR DNX697S only 1 Short cut source icons The source changes to the one you have set with a short cut For the short cut setting refer to Customize Short cut source icons on HOME screen P 18 Turn off the screen 1 Select Display OFF on the popup menu NOTE Touch the display to turn on th...

Page 17: ... an SD card P 44 Switches to an external component connected to the AV IN input terminal 2 P 87 Switches to the Wireless Mirroring screen from the connected Android smartphone P 36 DNX997XR only Switches to the USB Mirroring screen from the connected iPhone Android smartphone P 36 Displays the Audio screen P 95 Puts the unit in standby P 18 For sources and information displayed when an ADS adapter...

Page 18: ...k source Put the unit in standby 1 Press the HOME button h h HOME screen appears 2 Touch 3 Touch STANDBY Customize Short cut source icons on HOME screen You can arrange the positions of the source icons as you like 1 Press the HOME button h h HOME screen appears 2 Touch 3 Touch and hold the icon which you want to move in the customizing mode 4 Drag the icon to the desired position Changes the page...

Page 19: ...to the navigation screen when you touch here Short cut source icons The source changes to the one you have set with a short cut For the short cut setting refer to Customize Short cut source icons on HOME screen P 18 3 Content list Displays the track file station channel list 4 Connected Bluetooth device information 5 Artwork information You can select whether to display an artwork and song informa...

Page 20: ...rolls the displayed text 4 etc Keys with various functions are displayed here Plays all tracks in the folder containing the current track Jumps to the letter you entered alphabetical search Moves to the upper hierarchy level 5 Page scroll You can change pages to display more items by touching Displays the top or bottom page 6 Return Returns to the previous screen NOTE Depending on the current sour...

Page 21: ...he letters 3 Follow your route to the destination NOTE The speed limit icon feature is for information only and does not replace the driver s responsibility to abide by all posted speed limit signs and to use safe driving judgment at all times Garmin and JVCKENWOOD will not be responsible for any traffic fines or citations that you may receive for failing to follow all applicable traffic laws and ...

Page 22: ...es Garmin and JVCKENWOOD are not responsible for the accuracy or timeliness of the traffic information You can receive INRIX traffic information and weather forecast by connecting your iPhone or Android smartphone in which the KENWOOD Traffic Powered By INRIX application is installed For details see KENWOOD Traffic Powered By INRIX application Updating maps You can purchase updated map data from G...

Page 23: ...tion Setup 1 Press the MENU button h h Popup menu appears 2 Touch SETUP h h SETUP Menu screen appears 3 Touch Navigation h h Navigation Setup screen appears 4 Set each item as follows NAV Mute 2 way speaker system only Mutes the volume of rear speakers during voice guidance of the navigation system Default is ON NAV Interrupt Speaker Selects speakers used for voice guidance of the navigation syste...

Page 24: ...ogle play to find and install the most current version For details see KENWOOD Traffic Powered By INRIX application 1 Connect the device To connect a device via Bluetooth register it as the Bluetooth device and do the App SPP profile setting of the connection beforehand See Register the Bluetooth device P 73 and Connect the Bluetooth device P 74 Connect an iPhone using KCA iP103 via the USB Black ...

Page 25: ...e multi widget screen 3 This can be selected when a compatible ADS adapter is connected Multi Widget You can place a widget on each of the following areas Up to 4 widgets can be placed per a multi widget screen 1 Press the HOME button 2 Flick the widget area to the left right to display the multi widget 1 2 3 4 1 Widget L 2 Widget M 3 Widget S1 4 Widget S2 Ñ Ñ Replace the widget To move the widget...

Page 26: ...n of the source select the Mirroring Widget 4 This can be selected when using Wireless Mirroring DNX997XR only USB Mirroring 5 You cannot play the video file on the USB SD Disc media when using Wireless Mirroring DNX997XR only USB Mirroring 6 This can be selected when a compatible ADS adapter is connected NOTE and the widget list popup disappear when no operation is done for 5 seconds When the scr...

Page 27: ...the USB memory SD card on the Home screen Ñ Ñ Preparation Select ON for Photo Frame Widget See Widget SETUP P 28 Acceptable Picture files Max Picture size JPEG jpg jpeg 1 5 000 5 000 PNG png 1 000 1 000 BMP bmp 1 000 1 000 This unit can only play back files which are less than 50 MB The maximum number of files per device is 500 Picture files may not be played depending on their condition 1 A progr...

Page 28: ...e whether to use the photo frame widget ON Default OFF Photo Frame SETUP Make settings related to display of the photo frame widget 6 Touch To Photo Frame Setup Make settings related to display of the photo frame widget 1 Touch Photo Frame SETUP on the Widget SETUP screen 2 Set each item as follows Sort Order Specify a file sorting criterion By Name Ascending By Name Descending By Date Newest Firs...

Page 29: ...moving a disc pull it horizontally 3 Press the G button h h The panel closes NOTE To forcibly eject the disc press and hold the G button for 2 seconds and then touch DISC EJECT after the message is displayed DNX697S DNX577S 1 Press the button h h Popup menu appears 2 Touch When removing a disc pull it horizontally NOTE This is not displayed on the popup menu screen of Apple CarPlay or Android Auto...

Page 30: ... Function panel Touch the left side of the screen to display the function panel Touch again to close the panel I Stops playback Touching twice will play the disc from the beginning when you play it next time Fast forwards or fast backward the disc Each time you touch the key the speed changes 2 times 10 times DVD only Plays in slow motion forward or backward SETUP DVD only Touch to display the DVD...

Page 31: ...ouch to search for the next previous content 7 Key display area Touch to display the control screen 8 MENU CTRL DVD only Touch to display the DVD VIDEO disc menu control screen See DVD Disc Menu Operation P 33 NOTE The control screen disappears when no operation is done for 5 seconds If you use a remote control you can jump directly to the desired image by entering the chapter number scene number ...

Page 32: ... only Searches files For details on search operation see File search Operation P 33 E F Searches for the previous next content Touch and hold to fast forward or fast backward the disc It will be cancelled automatically after about 50 seconds DH Plays or pauses Displays the Graphic Equalizer screen P 98 5 Content list Touch the right side of the screen to display the Content list Touch again to clo...

Page 33: ... the DVD VIDEO disc menu 1 Touch the framed area during playback h h Menu Control screen appears 2 Perform your desired operation as follows To display the top menu Touch TOP To display the menu Touch MENU To display the previous menu Touch Return To enter selected item Touch Enter To enable direct operation Touch Highlight to enter the highlight control mode P 34 To move the cursor Touch R S C D ...

Page 34: ...led automatically if you do not operate for a predetermined period of time DVD SETUP You can set up the DVD playback functions 1 Touch the framed area during playback 2 Touch on the left side of the screen Touch SETUP h h DVD SETUP screen appears 3 Set each function as follows Menu Language Subtitle Language Audio Language See Language setup P 35 Dynamic Range Control Sets the dynamic range Wide T...

Page 35: ...ng pictures cut at the right and left ends Ñ Ñ Language setup This setting is for the languages used for the menu subtitle and voice 1 Touch the desired item Menu Language Subtitle Language Audio Language h h Language Set screen appears 2 Select a language For language codes refer to DVD Language Codes P 124 Touch Close to set the entered language and return to the DVD SETUP screen NOTE To set the...

Page 36: ...not register or reconnect a Bluetooth device Switch the Apps source to another source and then operate the Bluetooth device USB Mirroring Operation With Mirroring for KENWOOD application installed on your smartphone you can display the screen of your smartphone on the screen of this unit and listen to either the audio of your smartphone or current source of this unit You may access your smartphone...

Page 37: ...ndroid smartphone you may need to enable virtual keyboard setting on your smartphone to display software keyboard on the screen of this unit and on your smartphone Mirroring for KENWOOD application is discontinued by the following operations if you use the application with an iPhone Receiving an incoming call iPhone s screen recording function is stopped iPhone screen is turned off To resume the m...

Page 38: ... Plus iPhone 7 iPhone SE iPhone 6s Plus iPhone 6s Ñ Ñ Connecting an iPhone Preparation To register an iPhone by the connection via the USB Black terminal Connect an iPhone via the USB Black terminal and operate the iPhone according to the confirmation messages displayed on the iPhone The iPhone is registered in Apple CarPlay Device List Removing the iPhone from the USB Black terminal and selecting...

Page 39: ...lection screen P 17 Touch the following connection message if the message appears NOTE The connection message appears when The iPhone you used previously is connected again The screen other than HOME and the source selection screen is displayed The connection message is displayed for about 5 seconds Ñ Ñ Select an Apple CarPlay device DNX997XR If two or more iPhones compatible with Apple CarPlay ha...

Page 40: ...ay You can use the Apps of the connected iPhone The items displayed and the language used on the screen differ among the connected devices To enter the Apple CarPlay mode touch Apple CarPlay icon on the source selection screen P 17 3 1 2 1 Displays the home screen of Apple CarPlay Touch and hold to activate Siri 2 Application keys Starts the application 3 HOME Exits the Apple CarPlay screen and di...

Page 41: ...Wi Fi connection Android 8 0 or later NOTE Android Auto may not be available on all devices and may not be available in all countries or regions About the placement of smartphone Install the smartphone connected as Android Auto device in the place where it can receive the GPS signals When using the Google Assistant install the smartphone in the place where the smartphone easily catch a voice by th...

Page 42: ...en the Wi Fi connection becomes unavailable the HOME screen is displayed Ñ Ñ Select an Android smartphone DNX997XR DNX697S If two or more Android smartphones have been registered select the Android smartphone to be used as the Android Auto source 1 Press the HOME button 2 Touch 3 Touch Android Auto P 17 4 Press the MENU button 5 Touch 6 Select an Android smartphone The registered Android smartphon...

Page 43: ...1 second To cancel 1 Press the button Ñ Ñ Switch to the Android Auto screen while listening to another source 1 Press the button DNX997XR DNX697S DNX577S NOTE When listening to another source with the Android Auto screen displayed playing music in the Android Auto mode will switch the current source to the Android Auto source ...

Page 44: ...FAT32 exFAT NTFS NOTE Install the USB device in the place where it will not affect safe driving You cannot connect a USB device via a USB hub and Multi Card Reader Take backups of the audio files used with this unit The files can be erased depending on the operating conditions of the USB device We shall have no compensation for any damage arising from any erased data Inserting the SD DNX997XR 1 Pr...

Page 45: ...he MultiMedia Card MMC cannot be used DNX697S DNX577S The unit is capable of playback of microSD microSDHC microSDXC memory cards complying with the microSD microSDHC or microSDXC standard USB SD Basic Operation Most functions can be controlled from the source control screen and playback screen NOTE Set the remote controller mode switch to AUD mode before starting operation see Switch the operatio...

Page 46: ... cancelled automatically after about 50 seconds DH Plays or pauses Displays the Graphic Equalizer screen P 98 5 Content list Touch the right side of the screen to display the Content list Touch again to close the list Displays the playing list When you touch a track file name on the list playback will start 6 Artwork VU meter Displays hides artwork area The jacket of the currently playing file is ...

Page 47: ...select the desired item in the list Repeat this step until you find the desired file Ñ Ñ Link search You can search for a file of the same artist album genre as that in the current track 1 Touch Link Search 2 Touch the desired tag type You can select from artists albums and genres h h The list corresponding to your selection appears 3 Touch the desired item in the content list Ñ Ñ Folder search Yo...

Page 48: ...up method contact the manufacturer of the terminal Plug the iPod iPhone into the gray USB terminal with the KCA iP103 optional accessory DNX997XR DNX697S only Plug the iPod iPhone into the USB terminal with the KCA iP103 optional accessory DNX577S only Only one iPod iPhone can be connected 1 Connect the iPod iPhone using the KCA iP103 P 115 2 Press the HOME button 3 Touch 4 Touch iPod P 17 To disc...

Page 49: ... E F Searches for the previous next track file Touch and hold to fast forward or fast backward It will be cancelled automatically after about 50 seconds DH Plays or pauses Displays the Graphic Equalizer screen P 98 5 Content list Touch the right side of the screen to display the Content list Touch again to close the list Displays the playing list When you touch a track file name on the list playba...

Page 50: ...o select the desired item in the list Repeat this step until you find the desired file Ñ Ñ Link search You can search for a file of the same artist album genre composer as that in the current track 1 Touch Link Search 2 Touch the desired tag type You can select from artists albums genres and composers h h The list corresponding to your selection appears 3 Touch the desired item in the content list...

Page 51: ... the User Interface screen P 90 2 Seek mode Touch to switch seek mode in the following sequence AUTO1 AUTO2 MANUAL AUTO1 Tunes in a station with good reception automatically AUTO2 Tunes in the memorized stations one after another MANUAL Switches to the next frequency manually 3 Operation keys E F Tunes in a station The method of switching frequencies can be changed see 2 Seek mode Displays the Gra...

Page 52: ...on White TP is being received Orange TP is not being received Memory Operation Ñ Ñ Auto memory You can store stations with good reception in the memory automatically 1 Touch desired band key 2 Touch on the left side of the screen Touch AME 3 Touch Yes h h Auto memory starts Ñ Ñ Manual memory You can store the currently being received station in the memory 1 Select the station you wish to store in ...

Page 53: ...ly You can listen to and watch traffic information automatically when a traffic bulletin starts However this feature requires a Radio Broadcast Data System that includes TI information 1 Touch on the left side of the screen Touch TI h h Traffic information mode is set Ñ Ñ When the traffic bulletin starts The Traffic Information screen appears automatically NOTE It is necessary to turn on the Traff...

Page 54: ...when the Small Audio Text is set to ON in the User Interface screen P 90 2 Seek mode Touch to switch seek mode in the following sequence AUTO1 AUTO2 MANUAL AUTO1 Tunes in a station with good reception automatically AUTO2 Tunes in the memorized stations one after another MANUAL Switches to the next frequency manually 3 Picture Displays hides picture area The picture data or station Logo data is dis...

Page 55: ...etween FM and AM 9 Indicator Items MC A multicast digital broadcast is being received ANALOG An analog broadcast is being received DIGITAL A digital broadcast is being received ST A stereo broadcast is being received EA White Emergency Alert is on No light Emergency Alert is off Orange Interrupting or in snooze ignore state Adjacent to traditional main stations are HD2 HD3 Channels providing new o...

Page 56: ...on in the memory automatically 1 Touch desired band key 2 Touch on the left side of the screen Touch AME 3 Touch Yes h h Auto memory starts Ñ Ñ Manual memory You can store the currently being received station or channel in the memory 1 Select the station or channel you wish to store in the memory 2 Touch FM 1 15 or AM 1 5 in which you want to store the station or channel for 2 seconds until a beep...

Page 57: ...specify the desired channel 1 Touch 1 2 Select the desired content from the list NOTE Touch Info Change in the channel list Select the sequence of the list Song title artist name album name Ñ Ñ Search by program type FM only You can tune in the station broadcasting the specified type of program when listening to FM 1 Touch on the left side of the screen Touch PTY h h TUNER PTY Mode screen appears ...

Page 58: ...okmarks can be registered to this unit Ñ Ñ Bookmark list Displaying a list of registered bookmarks and detailed information and QR code of the song 1 Touch 2 Select the desired bookmark from the list h h The bookmark information appears Delete Deletes the bookmarks being displayed Bookmark delete Deleting a bookmark 1 Touch Delete 2 Select the bookmark to delete from the list þ All Select all book...

Page 59: ... displayed for next 10 minutes Ignore The alert message is erased Same alert message cannot be displayed for next 12 hours Allow Alert Touch to tune to that channel of HD Radio source Ñ Ñ Display of the received Alert Message You can read the received alert message afterward 1 Touch on the left side of the screen Touch Alert Message Log 2 Select the desired Alert Message from the list h h The Aler...

Page 60: ...ethods below For users in U S A Online Visit www siriusxm com activatenow Phone Call SiriusXM Listener Care at 1 866 635 2349 For users in Canada Online Visit https www siriusxm ca help activation help Phone Call XM customer Care at 1 877 438 9677 NOTE Set the remote control mode switch to AUD mode before starting operation see Switch the operation mode P 104 To use SiriusXM Satellite Radio the op...

Page 61: ... details see SiriusXM SETUP P 66 Replay Live Touch to turn on or off the replay mode See Replay P 63 Traffic Weather For SXV300 1 Traffic Weather Now allows you to access the latest report whenever you want to hear it Select your city from the set up menu see Select a City for Traffic Weather P 71 and touch Traffic Weather to check the latest report It will start from the beginning White Played al...

Page 62: ...u want to store the channel for 2 seconds until a beep sounds Preset select You can list and select memorized channels To select from the preset list 1 Touch on the right side of the screen Select a channel from the list Direct search You can tune in a channel directly 1 Touch on the left side of the screen Touch Direct Channel 2 Enter the channel number and touch Enter NOTE To clear the number yo...

Page 63: ... Featured Favorite channels are dynamic and can change often allowing you to discover new channels You can set whether to be notified when the featured seasonal theme is updated P 71 Replay You can replay the last 60 minutes of the program from the current channel 1 Touch L or Replay on the function panel E F Press to skip to the previous next track Press and hold to rewind or fast forward It will...

Page 64: ...kground You can rewind and replay up to 30 minutes of any of the missed news talk sports or music content on SmartFavorites channels See Replay P 63 When tuning in a SmartFavorites channel songs will be played from the beginning of each track TuneStart You can enable disable TuneStart See TuneStart P 71 NOTE Compatible with SXV200 or later tuner models TuneScan TuneScan is a feature that plays sam...

Page 65: ...nnel touch it again Indicator display White Played already Green New information arrived Purple Playing Gray No information NOTE Compatible with SXV300 or later tuner models Content Alerts When a broadcast program related to the registered artist song or team starts an Alert Content List screen appears to allow you to switch the current channel to the relevant channel 1 When the broadcast of the r...

Page 66: ...for this game Cancel Touch to cancel SportsFlash alert No alerts for this game will be displayed afterward NOTE Compatible with SXV300 or later tuner models To learn how to set up the SportsFlash alert function see SportsFlash setup P 70 SiriusXM SETUP 1 Touch on the left side of the screen Touch SETUP h h SiriusXM SETUP screen appears See the following sections for each setting Set up the parenta...

Page 67: ...ure content and user selected channels 1 Touch Parental Control on the SiriusXM SETUP screen 2 Touch User Mature or OFF User Locks only the selected channels Mature Locks channels classified as mature only OFF Deactivates the parental mature and user locks 3 Enter the parental code you originally input in as stated in Parental code P 67 and touch Enter When selecting User This allows you to limit ...

Page 68: ...ory 3 Touch each channel in the list and set to ON or OFF NOTE To delete the skip channel setting touch Disable All and then touch YES on the confirmation screen Touch Info Change Select a desired item content info channel name artist name song title category name Direct Channel and Preset Memory functions allow you to select channels Ñ Ñ Content Alerts setup Activating content alert 1 Touch Conte...

Page 69: ...the list you want to select þ All Selects all contents All Clears all check marks 3 Touch Delete and then touch YES on the confirmation screen To select a Team Get alerted when your favorite sports team is playing on another SiriusXM channel with GameAlert 1 Touch My Games 2 Touch the desired league in the list 3 Touch the team s in the list you want to select NOTE You can select þ up to 30 teams ...

Page 70: ...he SiriusXM SETUP screen h h Team Set screen appears 2 Touch Edit 3 Touch the desired league in the list 4 Touch each team s in the list you want to select 5 Touch twice Edit Sets and removes teams Priority Sets the priority of a team Clear Removes all teams that have been set Touch Clear When the confirmation screen appears touch YES NOTE SportsFlash is available on SXV300 or later tuner models U...

Page 71: ...Select on the SiriusXM SETUP screen 2 Touch T and U to select a city Ñ Ñ Selecting Featured Bands Update Messages You can set whether to be notified when the featured seasonal theme is updated 1 Touch Featured Bands Update Messages on the SiriusXM SETUP screen Featured Bands Update Messages is turned on or off Ñ Ñ TuneStart 1 Touch Tune Start on the SiriusXM SETUP screen The TuneStart is turned on...

Page 72: ...necting conditions may vary depending on your environment Some Bluetooth devices are disconnected when this unit is turned off The Bluetooth devices cannot be used while using Apple CarPlay The Bluetooth currently connected with other device is disconnected when an iPhone compatible with Apple CarPlay is connected Ñ Ñ About the cell phone and Bluetooth audio player This unit conforms to the follow...

Page 73: ...egisters the smartphone as a Bluetooth device 1 Press the MENU button h h Popup menu appears 2 Touch SETUP h h SETUP Menu screen appears 3 Touch Bluetooth h h Bluetooth Setup screen appears 4 Touch Select Device on the Bluetooth Setup screen 5 Touch on the Select Device screen h h Bluetooth pairing waiting dialog appears NOTE You can also register an iPhone on the Apple CarPlay Device List screen ...

Page 74: ...s Displays the Apple CarPlay screen for wireless connection No Apple CarPlay is not connected When using Apple CarPlay see Select an Apple CarPlay device P 39 Bluetooth Setup NOTE The Bluetooth Setup is disabled while using Apple CarPlay 1 Press the MENU button h h Popup menu appears 2 Touch SETUP h h SETUP Menu screen appears 3 Touch Bluetooth h h Bluetooth Setup screen appears See the following ...

Page 75: ... cannot select an Android smartphone connected as an Android Auto device 3 Touch Delete h h Confirmation message appears 4 Touch Yes h h All the selected device s is deleted NOTE If the device compatible with wireless Apple CarPlay is deleted the same device is deleted from the Apple CarPlay device list screen Ñ Ñ Change the device name 1 Touch Device Name on the Bluetooth Setup screen h h Change ...

Page 76: ... audio devices can be switched easily to play music See KENWOOD Music Mix P 77 5 Repeats the current track folder Each time you touch the key repeat modes are switched in the following sequence File repeat Folder repeat All songs repeat Repeat off Randomly plays all tracks in the current folder Each time you touch the key random modes are switched in the following sequence Folder random All random...

Page 77: ... be played white changes to purple and starts playback Gray Not connected White Connected Purple During playback 4 Touch NOTE If a connected Bluetooth audio device is operated to play music connections are switched When a Bluetooth source is switched to another one its settings are deleted and the connection is restored to the connection before source switching You cannot select an Android smartph...

Page 78: ... your cell phone supports PBAP you can display the phonebook and call lists onto the touch panel screen when the cell phone is connected Phonebook up to 1000 entries Up to 50 entries including dialed calls received calls and missed calls 4 Select a dialing method Call using call records Call using the phonebook Call using the preset number Call by entering a phone number Select the cell phone to u...

Page 79: ...searched for with a non accent character u A character with an accent character in a sentence cannot be searched for 4 Select the person you want to call from the list 5 Select the phone number from the list NOTE You can sort the phone numbers in the list by last name or first name For details see Hands Free Setup P 82 Call using the preset number 1 Touch 2 Touch the name or phone number Call by e...

Page 80: ...touching on the Hands Free screen You can use the voice recognition function for the connected cell phone if you selected Hands Free1 or Hands Free2 for HFP when registered Ñ Ñ Receive a call 1 Touch to answer a phone call or to reject an incoming call NOTE When shifting the gear to the reverse R position and monitoring the picture from the rear view camera this screen does not appear even if a ca...

Page 81: ...touch the caller will change to the other one When you touch the current call will end to be switched to the call waiting on hold To close the Hands Free popup screen Touch to close the Hands Free popup screen To display it again 1 Press the HOME button 2 Touch 3 Touch TEL Ñ Ñ Phone number preset You can register frequently used phone numbers in this unit 1 Touch 2 Touch Edit 3 Select where to pre...

Page 82: ...1 Touch 2 Touch the name to check þ All Checks all boxes All Clears all check marks 3 Touch Delete h h Confirmation message appears 4 Touch Yes Hands Free Setup You can make various settings for the Hands Free function 1 Press the MENU button h h Popup menu appears 2 Touch SETUP h h SETUP Menu screen appears 3 Touch Bluetooth h h Bluetooth Setup screen appears 4 Touch TEL SETUP h h TEL SETUP scree...

Page 83: ...unction is turned on to automatically register the iPod touch or iPhone connected to this unit ON Default Turns on the Apple Auto Pairing function OFF Turns off the Apple Auto Pairing function Sort Order Set how to sort the data in the cell phone phonebook First Sorts data by the first name Last Default Sorts data by the last name Either the auto response time set on this unit or the time set on t...

Page 84: ...a assignment settings P 85 2 Camera off Touch to exit the camera screen 3 Switching the Guideline 2 Touching each time turns on or off the guideline 4 Switching the Angle 2 Touching each time changes camera angles 1 When two or more cameras of rear front dashboard left right and 3rd are connected with this unit 2 Only when the rear camera screen is displayed and CMOS 3xx series is connected with t...

Page 85: ... the camera assignment settings 1 Touch Camera Assignment Settings on the Camera screen P 84 2 Select the item to set up REAR VIEW CAMERA DNX997XR Change the HD camera picture quality setting when an HD camera is connected FRONT VIEW CAMERA DASH CAM Set the camera assignment from view camera connected to Front view camera Dashboard camera input terminal Change the HD camera picture quality setting...

Page 86: ...t the car from moving 1 Touch Parking Guidelines in the Camera screen and set to ON P 84 2 Touch Guidelines SETUP on the Camera screen 3 Adjust the parking guidelines by selecting the mark 4 Adjusting the position of the selected mark A B C D Make sure that lines A and B are horizontally parallel and that lines C and D are of the same length NOTE Touch Initialize and then touch Yes to set all the ...

Page 87: ...d camera control keys Ñ Ñ Added function Display the map while playing the recorded file 1 Play the recorded file See the instruction manual of the Dashboard Camera 2 Touch Return to the recorded file playback screen 1 Touch External audio video players AV IN 1 Connect an external component to the AV IN input terminal P 113 2 Select AV IN as the source P 17 3 Turn on the connected component and st...

Page 88: ...e provided for the vehicle Displays the control screen of the media player source provided for the vehicle Displays the control screen of the Bluetooth streaming source provided for the vehicle Displays information about the Radar Detector Displays information about the instruments such as a speedometer Displays information about the air conditioner of the vehicle Displays information about the Pa...

Page 89: ... fully on the screen Normal Displays video at the ratio of 4 3 Auto DVD VCD and disc media 16 9 video is displayed in the Full mode and 4 3 video is displayed in the Regular mode USB device and SD card Displays video fully vertically or horizontally with no ratio change NOTE Settings to adjust vary depending on the current source System Setup 1 Press the MENU button h h Popup menu appears 2 Touch ...

Page 90: ...ion Select where to display information about obstacles on the screen left or right Left Right Default This can be set when the iDataLink commercially available is connected Language Select Mode Selects the mode to select a language Easy Default Selects a language easily Advanced Allows you to select languages for respective items Language Select Select a language Touch Panel Adjust Except DNX997X...

Page 91: ...6 Adjust the date then adjust the time 7 Touch Set Special Setup You can setup special parameters 1 Press the MENU button h h Popup menu appears 2 Touch SETUP h h SETUP screen appears 3 Touch Special h h Special screen appears 4 Set each parameter as follows DEMO Select the demonstration mode Default is ON Software Information Confirm the software version of this unit P 91 Open Source Licenses Dis...

Page 92: ...e key illumination color P 92 Wallpaper Customize You can change the wallpaper image or color P 93 Viewing Angle DNX697S DNX577S If it is hard to see the image on the screen evenly adjust the viewing angle The smaller the negative value the more whitish the image on the screen looks 0 Default 1 2 3 Screen transition effect Select whether to use the screen transition effect when the source control ...

Page 93: ... on the image If you select Scan at Key Color you cannot select this image 3 Touch To register an original image You can load an image from the connected USB device and set it as the wallpaper image Before starting this procedure it is necessary to connect the device which has the image to load 1 Touch User1 Select or User2 Select on the Wallpaper Customize screen 2 Select the image to load 3 Touc...

Page 94: ... AV IN if the AV IN input terminal is used for camera You cannot select iPod if it is connected via Bluetooth If you select USB SD iPod DISC Music CD Disc media Bluetooth audio Radio or HD Radio as the main source you cannot select USB SD iPod or DISC Music CD Disc media as the AV output source If you select Wireless Mirroring Apple CarPlay or Android Auto as the main source you cannot select DISC...

Page 95: ...ton h h HOME screen appears 2 Touch h h Source selection screen appears 3 Touch STANDBY 4 Press the button 1 followed by the button 2 for 1 second at the same time DNX997XR 2 1 DNX697S 2 1 h h Speaker system select screen appears 5 Select the crossover network mode h h A confirmation screen appears 6 Touch Yes NOTE When the 3 way speaker system is selected the following functions are disabled Fron...

Page 96: ...ted the speaker crossover network is set automatically Location Only for Front Rear Select the speaker position you have installed Tweeter Only for Front You can set up the tweeter when you are selecting front speakers None Small Medium Large Xʼover Display the speaker crossover setup screen You can adjust the crossover frequency that was set automatically when you selected the speaker type For de...

Page 97: ...l Medium Large in Speaker Setup 3 Only when Subwoofer is set to a mode other than None in Speaker Setup When Speaker network is set to 3 way FREQ High Pass High Pass Filter adjustment HPF FREQ LPF FREQ Band Pass Band Pass Filter adjustment When Mid Range Speaker is selected on the Speaker Select screen FREQ Low Pass Low Pass Filter adjustment When Woofer is selected on the Speaker Select screen Sl...

Page 98: ...egory 1 Press the MENU button h h Popup menu appears 2 Touch Audio h h Audio screen appears 3 Touch EQ SW Level 4 Touch the screen and set the Graphic Equalizer as desired Gain level area in dotted frame Adjust the gain level by touching each frequency bar You can select a frequency bar and adjust its level by R S Preset Select Display the screen for selecting the preset equalizer curve P 99 Memor...

Page 99: ...ected wirelessly Ñ Ñ Save the EQ curve 1 Adjust the EQ curve 2 Touch Memory 3 Select where to save Volume Offset Finely adjust the volume of the current source to minimize the difference in volume between different sources 1 Press the MENU button h h Popup menu appears 2 Touch Audio h h Audio screen appears 3 Touch Volume Offset 4 Touch or to adjust the level Initialize Returns to the initial sett...

Page 100: ...are not available Output from the subwoofer Subwoofer Level Bass Boost P 100 Equalizer Control Sound Effect Listening Position P 98 100 101 Speaker Setup P 96 High resolution Sound Source File Playback You cannot select AV IN if the AV IN input terminal is used for camera You cannot select iPod if it is connected via Bluetooth If you select USB SD iPod DISC Music CD Disc media Bluetooth audio Radi...

Page 101: ... 1 2 3 Stage EQ You can adjust the height of speakers virtually to suit your listening position OFF Low Middle High Listening Position DTA Listening Position DTA allows you to improve the sound field depending on the position of the seat you sit Listening Position DTA allows you to set Listening Position and Front Focus You cannot set both at the same time 1 Press the MENU button h h Popup menu ap...

Page 102: ...on which side you want to put the imaginary sound image NOTE When the 3 way speaker system is selected front focus feature is disabled Ñ Ñ Front Focus fine adjustment 1 Touch Adjust 2 Touch Delay 3 Set each parameter as follows Sound Image LR Front Focus the sound image on the front of front seats Sound Image LR Rear Focus the sound image on the front of rear seats Size of the Virtual Sound Field ...

Page 103: ...ess the MENU button h h Popup menu appears 2 Touch Audio h h Audio screen appears 3 Touch Audio Memory SETUP Memory Lock or unlock the Audio SETUP Memory Recall Clear Audio SETUP Memory Memorize the current audio settings Fader Balance Speaker X over User Preset SW Level Position DTA Sound Effect P 95 Audio SETUP Recall Recall the memorized audio setting Audio SETUP Clear Clear the Audio SETUP Mem...

Page 104: ...t operate at all it is possible that the batteries are depleted In such instances replace the both batteries with new ones 1 Insert two AAA R03 size batteries with the and poles aligned properly following the illustration inside the case Functions of the Remote control Buttons Ñ Ñ Switch the operation mode The functions operated from the remote control differ depending on the position of the mode ...

Page 105: ...3 MENU DVD Stops playing and memorizes the last point where the disc stopped The last point is deleted by pressing twice NAV Displays Main menu 4 OUT IN NAV Zooms in or out the navigation map 5 POSITION AUD DVD Pauses the track or file and resumes playing by pressing twice For the Radio DNX577S only and HD Radio DNX997XR DNX697S only sources in AUD mode switches the seek mode NAV Displays the curr...

Page 106: ...to enter the track number when Playback control PBC is on and the menu is displayed If the track number is one digit press the number If the track number is two digits switch to the direct search mode to enter the numbers DVD For the DVD source in DVD mode allows you to enter the number to search in the direct search mode For details on the direct search mode see Direct search mode P 104 For the D...

Page 107: ... protection function may have been activated Therefore the speaker wire should be checked If your car s ignition does not have an ACC position connect the ignition wires to a power source that can be turned on and off with the ignition key If you connect the ignition wire to a power source with a constant voltage supply such as with battery wires the battery may be drained If the console has a lid...

Page 108: ... x 8 mm x6 7 M5 x 8 mm x6 8 x1 9 3 5 m x1 0 x1 1 x1 1 DNX997XR DNX697S only Ñ Ñ Installation procedure 1 To prevent a short circuit remove the key from the ignition and disconnect the terminal of the battery 2 Make the proper input and output wire connections for each unit 3 Connect the speaker wires of the wiring harness 4 Connect the wiring harness wires in the following order ground battery ign...

Page 109: ...ress the metal plate accessory 0 down firmly on your dashboard or other mounting surface You can bend the metal plate accessory 0 to conform to a curved surface if necessary 4 Remove the separator of the GPS antenna accessory 9 and stick the antenna to the metal plate accessory 0 0 9 NOTE Use the supplied GPS antenna Using the GPS antenna other than the supplied one may cause a drop in positioning...

Page 110: ...ape or other desired method 5 Adjust the direction of the microphone accessory 4 to the driver 4 Fix a cable with a commercial item of tape Ñ Ñ Removing the trim plate 1 Engage the catch pins on the extraction key accessory 5 and remove the two locks on the lower level Lower the trim plate accessory 8 and pull it forward as shown in the figure DNX997XR 5 8 Lock Catch DNX697S DNX577S 5 8 Lock Catch...

Page 111: ...y accessory 5 deeply into the slots on each side as shown 5 3 Lower the extraction key toward the bottom and pull out the unit halfway while pressing towards the inside NOTE Be careful to avoid injury from the catch pins on the extraction key 4 Pull the unit all the way out with your hands being careful not to drop it ...

Page 112: ...SENS tag or failure may result Light Blue Yellow Steering remote control wire Connect to vehicle s reverse lamp harness when using the optional rear view camera To steering remote To use the steering wheel remote control feature you need an exclusive remote adapter not supplied matched to your car If no connections are made do not let the cable come out from the tab Purple Black To rear right spea...

Page 113: ...he system and external components P 113 and Connecting wires to terminals P 112 Ñ Ñ 3 way speaker system setup DNX997XR DNX697S Ñ Ñ Connecting the system and external components 11 12 13 5 6 7 8 9 2 1 3 4 10 1 AV Audio output ø3 5 mini jack 2 FM AM antenna input 3 When connecting to an external amplifier connect its ground wire to the car s chassis to avoid damaging the unit Rear Audio Preout Left...

Page 114: ...P 85 13 VIDEO Output Yellow 1 Connecting Mini plug to RCA cable to AV IN terminal enables you to use cameras only If you connect CA C3AV optional accessory AV IN for visual or the camera is available 2 Connect an HD camera to Rear view camera input terminal to use HD video DNX997XR only 3 Connect an HD camera to Front view camera Dashboard camera input terminal to use HD video DNX997XR only Ñ Ñ Co...

Page 115: ...03 0 8m 3 iPod iPhone 2 iPhone with Apple CarPlay 2 USB Gray terminal 1 5 USB Black terminal 1 Accessory 2 Black 1 m 4 Accessory 3 Gray 1 m 4 DNX577S KCA iP103 0 8m 3 KCA iP103 0 8m 3 iPod iPhone 2 iPhone with Apple CarPlay 2 USB Black terminal 1 Accessory 2 Black 1 m 4 1 USB maximum power supply current DC 5 V 1 5 A 2 Sold separately 3 Optional accessory 4 See Securing the USB extension cable P 1...

Page 116: ...erminal 1 4 USB Black terminal 1 Accessory 2 Black 1 m 3 Accessory 3 Gray 1 m 3 DNX577S Micro USB to USB cable 2 Android smartphone 2 USB Black terminal 1 Accessory 2 Black 1 m 3 1 USB maximum power supply current DC 5 V 1 5 A 2 Sold separately 3 See Securing the USB extension cable P 115 4 USB Gray terminal does not support USB Mirroring ...

Page 117: ...6 1 Optional accessory 2 Sold separately 3 Up to 3 cameras of Dashboard camera Front view camera Left side view camera and Right side view camera can be connected For more information see Camera Assignment Settings P 84 4 Insulate audio input terminals of CA C3AV optional accessory when connecting to the Camera 5 CMOS 3xx series optional accessory or commercially available camera 6 For HD video an...

Page 118: ...uring VCD playback The PBC function is enabled Turn off the PBC function The specified disc does not play but another one plays instead The disc is quite dirty Clean the disc See Precautions on handling discs P 6 The disc is severely scratched Try another disc instead The sound skips when an audio file is being played The disc is scratched or dirty Clean the disc See Precautions on handling discs ...

Page 119: ...u wanted to play has a region code that cannot be played with this unit See Region Codes in the World P 123 or try another disc Error 07 67 The unit is not operating correctly due to some reason or other Turn the power off and on again If the Error 07 67 message does not disappear contact your nearest KENWOOD dealer No Device USB device The USB device is selected as a source although no USB device...

Page 120: ...l Locked The selected channel has been locked by the parental controls Enter the unlock code when you are asked See Parental Control P 67 Incorrect Pass Code entered The selected channel is a mature or parental lock channel and locked by the parental lock or user lock code Enter the correct lock code Ñ Ñ Apple CarPlay The GPS antenna must be connected to use Apple CarPlay wirelessly Please verify ...

Page 121: ...RW v DTS CD Video CD VCD v Super video CD Photo CD CD EXTRA r Only music CD session can be played HDCD r Normal music CD sound quality CCCD Others Dualdisc Super audio CD r Only CD layer can be played v Playback is possible r Playback is partly possible Playback is impossible 1 Incompatible with 8 cm 3 inch discs Use of DualDisc When playing a DualDisc on this unit the surface of the disc that is ...

Page 122: ... It is recommended that a car audio system should be configured with all High Resolution Audio compatible products from player to speaker to enjoy its high quality sound Acceptable Video files Profile Max Picture size Max bit rate Audio format MPEG 1 mpg mpeg 352 240 352 288 1 5 Mbps MPEG Audio Layer 2 MPEG 2 mpg mpeg MP ML 720 480 720 576 8 Mbps MPEG Audio Layer 2 H 264 MPEG 4 AVC mp4 m4v avi flv...

Page 123: ... shot from multiple angles you can select a favorite angle 16 9 LB Indicates the type of screen for the image The left mark indicates that a wide image picture 16 9 is displayed on a standard TV set screen 4 3 with a black band at both the top and bottom of the screen letter box Operation regulatory marks With this DVD some functions of this unit such as the play function may be restricted dependi...

Page 124: ... Kannada ko Korean ks Kashmiri ku Kurdish ky Kirghiz la Latin lb Luxembourgish ln Lingala lo Laotian lt Lithuanian lv Latvian Lettish mg Malagasy mi Maori mk Macedonian ml Malayalam mn Mongolian mo Moldavian mr Marathi ms Malay mt Maltese my Burmese na Nauru ne Nepali nl Dutch no Norwegian oc Occitan om Afan Oromo or Oriya pa Punjabi pl Polish ps Pashto Pushto pt Portuguese qu Quechua rm Rhaeto Ro...

Page 125: ... 4 WMV H 264 MKV Wow Flutter Below Measurable Limit Frequency Response 96 kHz 20 44 000 Hz 48 kHz 20 22 000 Hz 44 1 kHz 20 20 000 Hz Total Harmonic Distortion 0 010 1 kHz S N Ratio dB 90 5 dB DVD Video 96 kHz Dynamic Range 89 dB DVD Video 96 kHz Disc Format DVD Video VIDEO CD CD DA Quantifying Bit Number 16 bit 20 bit 24 bit USB interface section USB Standard USB 2 0 High Speed File System FAT 16 ...

Page 126: ...e support HFP V1 7 Hands Free Profile SPP Serial Port Profile A2DP Advanced Audio Distribution Profile AVRCP V1 6 Audio Video Remote Control Profile PBAP Phonebook Access Profile DSP section Graphics equalizer Band 13 Band Frequency BAND1 13 62 5 100 160 250 400 630 1k 1 6k 2 5k 4k 6 3k 10k 16k Hz Gain 9 8 7 6 5 4 3 2 1 0 1 2 3 4 5 6 7 8 9 dB 2 way X Over High pass filter Frequency Through 30 40 5...

Page 127: ...z S N Ratio dB 65 dB MONO Selectivity 400 kHz Over 80 dB Stereo Separation 45 dB 1 kHz AM tuner section Frequency Range step 530 kHz 1700 kHz 10 kHz Usable Sensitivity 28 dBμ Video section Color System of External Video Input NTSC PAL External Video Input Level mini jack 1 Vp p 75 Ω External Audio Max Input Level mini jack 2 V 25 kΩ Video Input Level RCA jacks 1 Vp p 75 Ω Video Output Level RCA ja...

Page 128: ... meters CEP at 130 dBm Velocity 0 1 meter sec Position Method DNX997XR GPS GLONASS DNX697S DNX577S GPS Antenna DNX997XR External GNSS Antenna DNX697S DNX577S External GPS antenna General Operating Voltage 12V DC car battery Installation Dimensions W H D DNX997XR 178 100 160 mm 7 3 15 16 6 5 16 inch DNX697S DNX577S 178 100 155 mm 7 3 15 16 6 1 8 inch With Sleeve DNX997XR 182 112 163 mm 7 3 16 4 7 1...

Page 129: ... trademarks of Sirius XM Radio Inc All rights reserved HD Radio Technology manufactured under license from iBiquity Digital Corporation U S and Foreign Patents For patents see https dts com patents HD Radio and the HD HD Radio and ARC logos are registered trademarks or trademarks of iBiquity Digital Corporation in the United States and or other countries INRIX is a registered trademark of INRIX In...

Page 130: ...otice this list of conditions and the following disclaimer Redistributions in binary form must reproduce the above copyright notice this list of conditions and the following disclaimer in the documentation and or other materials provided with the distribution Neither the name of the Xiph org Foundation nor the names of its contributors may be used to endorse or promote products derived from this s...

Page 131: ...oductions of labels on or inside the product relating to laser product safety JVCKENWOOD Corporation 2967 3 ISHIKAWA MACHI HACHIOJI SHI TOKYO JAPAN THIS PRODUCT COMPLIES WITH DHHS RULES 21 CFR SUBCHAPTER J IN EFFECT AT DATE OF MANUFACTURE Location Bottom plate DNX997XR Top plate DNX697S DNX577S This transmitter must not be co located or operated in conjunction with any other antenna or transmitter...

Page 132: ...o del reciclaje y la eliminación de residuos ayuda a conservar los recursos y evita al mismo tiempo efectos perjudiciales en la salud y el medio ambiente Informação sobre a eliminação de pilhas Este produto não deve ser eliminado como lixo doméstico geral Devolva a pilha usada ao revendedor ou entidade autorizada para que a mesma seja devolvida ao fabricante ou importador A reciclagem e a eliminaç...

Page 133: ...Hi Res Audio logo and Hi Res Audio Wireless logo are used under license from Japan Audio Society ...

Page 134: ...DNX997XR DNX697S DNX577S GPS NAVIGATION SYSTEM INSTRUCTION MANUAL 2020 JVCKENWOOD Corporation IM402_Nav_K_En_00 ...

Page 135: ... to by End User you or your on the one hand and the Navigation Provider and its licensors and affiliated companies of the Navigation Provider and its licensors on the other hand The Navigation Provider s licensors including the licensors service providers channel partners suppliers and affiliated companies of the Navigation Provider and its licensors are each a direct and intended third party bene...

Page 136: ...imitations so to that extent the above may not apply to you ANY CONTENT OR MATERIAL DOWNLOADED OR UPLOADED OR OTHERWISE OBTAINED THROUGH THE SOFTWARE IS DONE AT YOUR OWN DISCRETION AND RISK YOU WILL BE SOLELY RESPONSIBLE FOR ANY DAMAGE TO YOUR ELECTRONIC COMMUNICATION DEVICE OR ANY LOSS OF DATA THAT MAY RESULT FROM THE DOWNLOAD OR UPLOAD OF ANY SUCH CONTENT OR MATERIAL OR THE USE OF THE SOFTWARE P...

Page 137: ...lated to the HERE Data The above terms and conditions shall be governed by the laws of Kansas without giving effect to i its conflict of laws provisions or ii the United Nations Convention for Contracts for the International Sale of Goods which is explicitly excluded You agree to submit to the jurisdiction of Kansas for any and all disputes claims and actions arising from or in connection with the...

Page 138: ... a Detour 5 Stopping the Route 5 Using Suggested Routes 5 School Zone Alerts 5 About Exit Services 5 Finding Exit Services 6 Navigating to an Exit 6 Avoiding Road Features 6 About Custom Avoidances 6 Avoiding an Area 6 Avoiding a Road 6 Disabling a Custom Avoidance 6 Deleting Custom Avoidances 6 Enabling Advanced Detours 6 Taking a Detour 6 Custom Points of Interest 6 Installing POI Loader Applica...

Page 139: ...Your Route 12 Taking an Alternate Route 12 Viewing Traffic on the Map 12 Traffic in Your Area 12 Searching for Traffic Delays 12 Viewing a Traffic Incident on the Map 12 Understanding Traffic Data 12 Customizing the Device 12 Map and Vehicle Settings 12 Enabling Maps 12 Navigation Settings 12 Changing the Route Calculation Mode 13 Display Settings 13 Changing the Color Mode 13 Traffic Settings 13 ...

Page 140: ...oving a Shortcut 1 Select Where To Remove Shortcut s 2 Select a shortcut to remove 3 Select the shortcut again to confirm 4 Select Save Adding a Shortcut You can add shortcuts to the Where To menu A shortcut can point to a location a category or a search tool The Where To menu can contain up to 36 shortcut icons 1 Select Where To Add Shortcut 2 Select an item Using Multi touch Controls You can use...

Page 141: ...a type of business enter a category name for example movie theaters To search for a business name enter all or part of the name To search for an address near you enter the house number and street name To search for an address in another city enter the house number street name city and state To search for a city enter the city and state To search for coordinates enter latitude and longitude coordin...

Page 142: ...Select View Map 2 Drag and zoom the map to display the area to search 3 If necessary select to filter the displayed points of interest by category Location markers or a blue dot appear on the map 4 Select an option Select a location marker Select a point such as a street intersection or address location 5 Select Go Finding a Location Using Quick Search After you have performed a search for a point...

Page 143: ...egory or select All Saved Places 3 Select a location 4 Select Go Editing a Saved Location 1 Select Where To Saved 2 If necessary select a category 3 Select a location 4 Select 5 Select Edit 6 Select an option Select Name Select Phone Number Select Categories to assign categories to the saved location Select Change Map Symbol to change the symbol used to mark the saved location on a map 7 Edit the ...

Page 144: ...elect Add to Active Route Taking a Detour While navigating a route you can use detours to avoid obstacles ahead of you such as construction zones While navigating select Detour Stopping the Route From the map select Stop Using Suggested Routes Before you can use this feature you must save at least one location and enable the travel history feature Device and Privacy Settings Using the myTrends fea...

Page 145: ...ion of road to avoid and select Next 4 Select the ending point of the road section and select Next 5 Select Done Disabling a Custom Avoidance You can disable a custom avoidance without deleting it 1 Select Settings Navigation Custom Avoidances 2 Select an avoidance 3 Select Disable Deleting Custom Avoidances 1 Select Settings Navigation Custom Avoidances 2 Select an option To delete all custom avo...

Page 146: ...the POI loader refer to the Help file With the POI loader open click Help Finding Extras 1 Select Where To Categories Custom POIs 2 Select a category Map Pages Customizing the Map Customizing the Map Layers You can customize which data appear on the map such as icons for points of interest and road conditions 1 From the map select 2 Select Map Layers 3 Select which layers you want to include on th...

Page 147: ...ays When you approach a junction in a route the image of that junction appears briefly if available NOTE This feature is not available on all models From the map select to view the junction if available Viewing the Trip Information Page The trip information page displays your speed and provides statistics about your trip NOTE If you make frequent stops leave the device turned on so it can accurate...

Page 148: ...ecoChallenge ecoChallenge helps you maximize the vehicle fuel economy by scoring your driving habits The higher your ecoChallenge scores the more fuel you have saved ecoChallenge collects data and calculates a score whenever your vehicle is moving Viewing ecoChallenge Scores Select Apps ecoRoute ecoChallenge About the ecoChallenge Score The leaf color on the ecoChallenge icon changes depending on ...

Page 149: ... 1 Select Apps Trip Planner 2 Select a saved trip 3 Select Go 4 Select your next destination 5 If prompted select a route Editing a Saved Trip 1 Select Apps Trip Planner 2 Select a saved trip 3 Select 4 Select an option Select Edit Destinations to add and delete a location or to change the order of locations Select Delete Trip Select Rename Trip Select Optimize Order to arrange the stops on your t...

Page 150: ...VCKENWOOD are not responsible for the accuracy or timeliness of traffic information Your navigation system can receive traffic information with a subscription to INRIX Traffic Service The traffic receiver must be in data range of a station transmitting traffic data to receive traffic information The traffic subscription activates automatically after your navigation system acquires satellite signal...

Page 151: ...vice Map and Vehicle Settings To open the Map and Vehicle settings from the main menu select Settings Map Vehicle Vehicle Sets the icon that represents your position on the map Driving Map View Sets the perspective on the map Map Detail Sets the level of detail on the map More detail may cause the map to draw slower Map Theme Changes the color of the map data Map Buttons Sets which icons are inclu...

Page 152: ...ends Enables the trafficTrends feature trafficTrends Traffic Voice Prompts Enables voice prompts for traffic events trafficTrends When the trafficTrends feature is enabled your device uses historic traffic data to calculate more efficient routes NOTE Different routes may be calculated based on traffic trends for the day of the week or the time of day Disabling trafficTrends To prevent your device ...

Page 153: ...y Alerts Settings NOTE You must have custom points of interest POIs loaded for proximity points alerts to display NOTE This feature is not available in all areas Select Settings Proximity Alerts Audio Sets the style of alert that plays when you approach proximity points Alerts Sets the type of proximity points for which alerts are played Restoring Settings You can restore a category of settings or...

Page 154: ...ersections finding 3 J junction view 8 K keyboard language 13 layout 13 L language keyboard 13 voice 13 latitude and longitude 3 locations 2 10 current 4 8 recently found 3 saving 4 searching for 2 setting home 3 simulated 4 M map 5 data field 7 map view 2 D 7 3 D 7 maps 3 12 detail level 12 theme 12 traffic conditions 12 viewing routes 8 mileage reports 9 myTrends routes 5 N navigation 5 previewi...

Page 155: ...trafficTrends 13 trafficTrends 13 disabling 13 travel history 13 trip information 10 resetting 8 viewing 8 trip log viewing 7 trip planner 10 turn list 8 U unit ID 13 V vehicle profile 9 W weather 10 11 Where Am I 4 8 16 Index ...

Page 156: ......

Page 157: ...To download free navigation software updates and purchase updated maps for your product go to www garmin com kenwood 190 02653 00_0B ...

Page 158: ...nctions etc isavailablefrom https www kenwood com cs ce The Instruction manual is subject to change for modification of specifications and so forth Be sure to download the latest edition of the Instruction manual for reference http manual kenwood com edition im402 Des informations actualisées le dernier mode d emploi les mises à jour du système les nouvelles fonctions etc sont disponibles sur le s...

Page 159: ...GPL LGPL embedded in this product are encouraged to read the terms of the corresponding license before use Because each individual license is prescribed by a third party other than JVCKENWOOD Corporation the original English of the license is presented EULA Ñ Ñ Software License Agreement JVCKENWOOD Corporation hereinafter called Licensor holds either the copyright to the embedded software or the r...

Page 160: ...prior written consent from Licensor Article 8 Cancellation of the Agreement Licensor reserves the right to cancel this agreement forthwith and claim compensation from User for the damages caused by such cancellation when User 1 Breaches any of the provisions of this agreement or 2 Has received a petition for seizure provisional seizure provisional disposition or any other kind of compulsory execut...

Page 161: ...fix your eyes on the unit s display when you are driving for any extended period If you experience problems during installation consult your KENWOOD dealer Ñ Ñ Precautions on using this unit When you purchase optional accessories check with your KENWOOD dealer to make sure that they work with your model and in your area Contents 4 Before Use 4 About the Quick start guide 4 How to read this manual ...

Page 162: ...with tape stuck on it Do not use disc type accessories Clean the disc from the center toward the outside rim When removing a disc from this unit pull it out horizontally If the disc center hole or outside rim has burrs use the disc only after removing the burrs with a ballpoint pen etc Discs that are not round cannot be used 8 cm 3 inch discs cannot be used Discs with coloring on the recording sur...

Page 163: ...ture Using the navigation system at extreme temperatures can lead to malfunction or damage Also note that the unit can be damaged by strong vibration by metal objects or by water getting inside the unit CAUTION Failure to avoid the following potentially hazardous situations may result in injury or property damage The navigation system is designed to provide you with route suggestions It does not r...

Page 164: ...djusts the volume The volume will go up to 15 when you keep pressing R 3 NAV Displays the navigation screen Pressing and holding switches view camera display on off The camera whose view is displayed first changes according to the Camera Setup setting and the shift lever position in the shift gate The camera whose view was displayed last is kept and the same camera view will be displayed the next ...

Page 165: ...card 1 An SD card slot for upgrading the map For how to upgrade the map refer to the instruction manual of the navigation system 2 1 If the map update file remains in the SD card you cannot play audio visual files 2 The system of the unit is rebooted after inserting removing the MAP SD DNX997XR only 10 microSD card slot A slot to insert a microSD card You can play audio visual files in the card 1 ...

Page 166: ...play 2 Touch Key Color 3 Select the desired color 4 Touch DNX997XR only 5 Touch Display Adjustment 6 Adjust a viewing angle and a tilt position 7 Touch DNX697S DNX577S only 5 Touch Viewing Angle 6 Select a viewing angle 7 Touch Viewing Angle You can adjust the viewing angle when the image on the screen is difficult to see evenly The smaller the negative value the more whitish the image on the scre...

Page 167: ...If you select Manual for Clock adjust the date and time manually NOTE Please set the date and time If they are not set some functions may not work Touch screen operations To perform operations on the screen you need to touch touch and hold flick or swipe to select an item display a setting menu screen or change pages Touch Touch the screen gently to select an item on the screen Touch and hold Touc...

Page 168: ...on the widget area Touch the widget to display the detailed screen 2 Displays the source selection screen P 12 3 Short cut playback source icons P 13 Display the HOME screen 1 Press the HOME button DNX997XR DNX697S DNX577S h h HOME screen appears Widget 1 Press the HOME button h h HOME screen appears 2 You can change the widget by flicking left or right on the widget area ...

Page 169: ...only when Android Auto is connected and two or more devices can be used as Android Auto source DNX997XR DNX697S only 1 Short cut source icons The source changes to the one you have set with a short cut For the short cut setting refer to Customize Short cut source icons on HOME screen P 13 Source selection screen description You can display icons of all playback sources and options on the source se...

Page 170: ...onnected Android smartphone DNX997XR only Switches to the USB Mirroring screen from the connected iPhone Android smartphone Displays the Audio screen P 26 Puts the unit in standby P 13 1 When connecting as Apple CarPlay or Android Auto it works as a phone provided in Apple CarPlay or Android Auto If Apple CarPlay or Android Auto are connected during talking by the Bluetooth device or iDataLink pho...

Page 171: ...ion screen when you touch here Short cut source icons The source changes to the one you have set with a short cut For the short cut setting refer to Customize Short cut source icons on HOME screen P 13 3 Connected Bluetooth device information List screen There are some common function keys in the list screens of most sources Display the list screen 1 Touch 1 h h The list screen appears 4 1 2 3 1 T...

Page 172: ...version of the Owner s Manual from http manual kenwood com edition im402 2 Enter your destination and start the guidance Finding points of interest 1 Touch Where To 2 Select a category and a subcategory 3 Select a destination 4 Touch Go NOTE To enter letters contained in the name touch the Search bar and enter the letters 3 Follow your route to the destination NOTE The speed limit icon feature is ...

Page 173: ... route touch 2 Touch Manually avoiding traffic on your route 1 From the map touch 2 Touch Traffic On Route 3 If necessary touch the arrows to view other traffic delays on your route 4 Touch Avoid Viewing the traffic map The traffic map shows color coded traffic flow and delays on nearby 1 From the map touch 2 Touch Traffic Conditions About traffic Traffic service is not available in some areas or ...

Page 174: ...h DISC EJECT When removing a disc pull it horizontally 3 Press the G button h h The panel closes DNX697S DNX577S 1 Press the button h h Popup menu appears 2 Touch When removing a disc pull it horizontally NOTE This is not displayed on the popup menu screen of Apple CarPlay or Android Auto source Change Apple CarPlay or Android Auto source to other one to display the popup menu screen DVD VCD Basic...

Page 175: ...old to fast forward or fast backward the disc It will be cancelled automatically after about 50 seconds DH Plays or pauses Displays the Graphic Equalizer screen P 26 3 Searching area Touch to search for the next previous content 4 Key display area Touch to display the control screen 5 MENU CTRL DVD only Touch to display the DVD VIDEO disc menu control screen P 18 DVD Disc Menu Operation You can se...

Page 176: ...ss the G button 2 Touch OPEN to the panel fully opens 3 Insert the SD card into the slot until it clicks 4 Press the G button DNX697S DNX577S 1 Insert the microSD card into the slot until it clicks Ñ Ñ Remove the SD card DNX997XR 1 Press the G button 2 Touch OPEN to the panel fully opens 3 Push the SD card until it clicks and then remove your finger from the card The card pops up so that you can p...

Page 177: ...pple CarPlay and an iPod iPhone are not connected via USB Ñ Ñ Connectable iPod iPhone The following models can be connected to this unit Made for iPhone XS Max iPhone XS iPhone XR iPhone X iPhone 8 Plus iPhone 8 iPhone 7 Plus iPhone 7 iPhone SE iPhone 6s Plus iPhone 6s iPod touch 6th generation USB SD iPod Basic Operation 1 Press the HOME button 2 Touch 3 Touch USB SD or iPod P 12 Control screen 2...

Page 178: ...Seek mode CHS CHR Selects a channel 1 Display the Channel List screen Display a list of registered bookmarks Displays the Graphic Equalizer screen P 26 4 Preset list Touching allows you to change the display size Recalls the memorized station or channel When touched for 2 seconds stores the currently being received station or channel in the memory 5 Band keys Switches bands between FM and AM 6 Fun...

Page 179: ...splay size Recalls the memorized station When touched for 2 seconds stores the currently being received station in the memory 5 Band keys Switches bands between FM and AM 6 Function panel Touch the left side of the screen to display the function panel Touch again to close the panel TI FM only Selects the traffic information mode AME Presets stations automatically P 22 PTY FM only Searches for a pr...

Page 180: ...onfirm the request both on the smartphone cell phone Input the PIN Code in your smartphone cell phone PIN Code is set to 0000 as the default 8 Select the function you want to use HFP Hands Free1 Hands Free2 No Connection Select the hands free number to connect A2DP SPP Audio App Select if you want to use the audio player app in your smartphone over A2DP and the other apps in your smartphone over S...

Page 181: ... onto the touch panel screen when the cell phone is connected Phonebook up to 1000 entries Up to 50 entries including dialed calls received calls and missed calls 4 Select a dialing method Call using call records Call using the phonebook Call using the preset number Call by entering a phone number Select the cell phone to use When you connect two cell phones 1 Touch to select the phone you want to...

Page 182: ...ew camera this screen does not appear even if a call comes in To end call 1 While talking touch Ñ Ñ Operations during a call Adjust the volume of your voice 1 Touch Speech Quality 2 Touch T or U for Microphone Level Adjust the receiver volume Press the S or R button Mute your voice Touch to mute or not to mute your voice Output the dial tone Touch DTMF to display the tone input screen You can send...

Page 183: ...timized setting for each category 1 Touch EQ SW Level 2 Touch the screen and set the Graphic Equalizer as desired Gain level area in dotted frame Adjust the gain level by touching each frequency bar You can select a frequency bar and adjust its level by R S Preset Select Display the screen for selecting the preset equalizer curve Memory Saves the adjusted equalizer curve as User1 to User4 Initiali...

Page 184: ...ction function may have been activated Therefore the speaker wire should be checked If your car s ignition does not have an ACC position connect the ignition wires to a power source that can be turned on and off with the ignition key If you connect the ignition wire to a power source with a constant voltage supply such as with battery wires the battery may be drained If the console has a lid make ...

Page 185: ...x 8 mm x6 8 x1 9 3 5 m x1 0 x1 1 x1 1 DNX997XR DNX697S only Ñ Ñ Installation procedure 1 To prevent a short circuit remove the key from the ignition and disconnect the terminal of the battery 2 Make the proper input and output wire connections for each unit 3 Connect the speaker wires of the wiring harness 4 Connect the wiring harness wires in the following order ground battery ignition 5 Connect ...

Page 186: ...a screwdriver or similar utensil and attach it in place Ñ Ñ Japanese cars 6 or 7 6 or 7 Car Bracket NOTE Make sure that the unit is installed securely in place If the unit is unstable it may malfunction eg the sound may skip Ñ Ñ Trim plate 1 Attach accessory 8 to the unit DNX997XR 8 DNX697S DNX577S A B 8 B Narrow A Wide ...

Page 187: ... of car reception of the GPS satellite signals might not be possible with an inside installation Please install this GPS antenna in an area away from any antennas that are used with CB radios or satellite televisions The GPS antenna should be installed at a position that is spaced at least 12 inch 30 cm from cellular phone or other transmitting antennas Signals from the GPS satellite may be interf...

Page 188: ...can be removed from the top side in the same manner 2 When the lower level is removed remove the upper two locations Ñ Ñ Removing the unit 1 Remove the trim plate P 31 2 Insert the two extraction key accessory 5 deeply into the slots on each side as shown 5 3 Lower the extraction key toward the bottom and pull out the unit halfway while pressing towards the inside NOTE Be careful to avoid injury f...

Page 189: ...SENS tag or failure may result Light Blue Yellow Steering remote control wire Connect to vehicle s reverse lamp harness when using the optional rear view camera To steering remote To use the steering wheel remote control feature you need an exclusive remote adapter not supplied matched to your car If no connections are made do not let the cable come out from the tab Purple Black To rear right spea...

Page 190: ...than speaker terminals and Preout terminals see Connecting the system and external components P 33 and Connecting wires to terminals P 32 Ñ Ñ 3 way speaker system setup DNX997XR DNX697S Ñ Ñ Connecting the system and external components 11 12 13 5 6 7 8 9 2 1 3 4 10 1 AV Audio output ø3 5 mini jack 2 FM AM antenna input 3 When connecting to an external amplifier connect its ground wire to the car s...

Page 191: ...he camera is available 2 Connect an HD camera to Rear view camera input terminal to use HD video DNX997XR only 3 Connect an HD camera to Front view camera Dashboard camera input terminal to use HD video DNX997XR only Ñ Ñ Connecting a USB device USB device 2 USB Gray terminal 1 4 USB Black terminal 1 Accessory 2 Black 1 m 3 Accessory 3 Gray 1 m 3 4 1 USB maximum power supply current DC 5 V 1 5 A 2 ...

Page 192: ...ory 2 Black 1 m 4 Accessory 3 Gray 1 m 4 5 1 USB maximum power supply current DC 5 V 1 5 A 2 Sold separately 3 Optional accessory 4 See Securing the USB extension cable P 35 5 DNX997XR DNX697S only 6 USB Gray terminal does not support USB Mirroring Ñ Ñ Securing the USB extension cable Secure the USB extension cable with insulating tape or the like so that its connectors are not disconnected ...

Page 193: ... also used as Rear view camera DNX997XR only 7 For HD video an HD camera is also used as Front view camera DNX997XR only 8 DNX997XR DNX697S only Ñ Ñ To set up the camera assignment settings 1 Press the MENU button h h Popup menu appears 2 Touch SETUP h h SETUP Menu screen appears 3 Touch Camera h h Camera screen appears 4 Touch Camera Assignment Settings 5 Select the item to set up REAR VIEW CAMER...

Page 194: ...2 V DC car battery Speaker Impedance 4 8 Ω 6 Select the view camera to set up 6 3 7 4 1 2 5 1 Picture quality settings DNX997XR 1 2 Picture from view camera 2 3 Front 2 4 Dashboard Camera 2 5 Right 2 6 Left 2 7 None 2 1 The REAR VIEW CAMERA and FRONT VIEW CAMERA DASH CAM setting screens only 2 Except the REAR VIEW CAMERA setting screen 7 Touch Enter ...

Page 195: ...nder license from iBiquity Digital Corporation U S and Foreign Patents For patents see https dts com patents HD Radio and the HD HD Radio and ARC logos are registered trademarks or trademarks of iBiquity Digital Corporation in the United States and or other countries INRIX is a registered trademark of INRIX Inc Google Android Google Play and Android Auto are trademarks of Google LLC To use Android...

Page 196: ...ns in binary form must reproduce the above copyright notice this list of conditions and the following disclaimer in the documentation and or other materials provided with the distribution Neither the name of the Xiph org Foundation nor the names of its contributors may be used to endorse or promote products derived from this software without specific prior written permission THIS SOFTWARE IS PROVI...

Page 197: ...HAPTER J IN EFFECT AT DATE OF MANUFACTURE Location Bottom plate DNX997XR Top plate DNX697S DNX577S This transmitter must not be co located or operated in conjunction with any other antenna or transmitter IC Industry Canada Caution This device contains licence exempt transmitter s receiver s that comply with Innovation Science and Economic Development Canada s licence exempt RSS s Operation is subj...

Page 198: ...laciones que puedan dar el tratamiento adecuado a estos productos y a sus subproductos residuales correspondientes Póngase en contacto con su administración local para obtener información sobre el punto de recogida más cercano Un tratamiento correcto del reciclaje y la eliminación de residuos ayuda a conservar los recursos y evita al mismo tiempo efectos perjudiciales en la salud y el medio ambien...

Page 199: ...Hi Res Audio logo and Hi Res Audio Wireless logo are used under license from Japan Audio Society ...

Page 200: ... is subject to export controls imposed by Japan and the United States of America 3 User agrees to comply with all the international and domestic laws that apply to this software U S Export Administration Regulations and regulations established by the U S Japan and their governmental agencies regarding usage by end users and export destinations Correct ICorrecto 1 Licensed Software and the associat...

Page 201: ... warranty service orshipyour unit initsoriginal carton box or equivalent fully insured and shipping charges prepaid to the authorized Kenwood Service Center Dear Customer LIMITATION OF IMPLIED WARRANTIES Any and all implied warranties including warranties of merchantability and fitness for aparticular purpose shall be limited in duration to the length of thiswarranty EXCLUSION OF CERTAIN DAMAGES K...

Page 202: ...ups which do not disclose any defects cc vered by this warranty_ GARANTIE KENWOOD JVCKENWOOD CanadaInc ci apresappet e KENWOOD donne par ecrit la garantie suivante al acheteur original de chaque nouveau produit Kenwood distrlbue au Canada par KENWOOD et achete a un concessionnaire autorise par KENWOOD KENWOODgarantit sous reservedestermesetdesconditions enonces ci dessous que chaque nouveau produi...

Reviews: