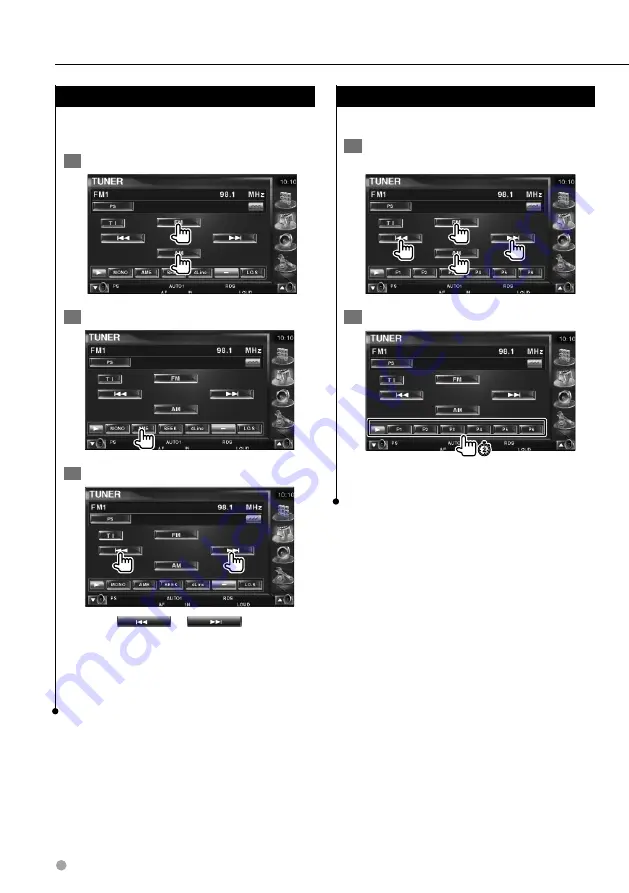
background image

32  

  DDX7039

Radio Listening

Manual Memory

Stores the current receiving station in memory.

  1  

  Select a station you wish to store in 

memory

  2  

  Store in memory

Continue to touch until the memory number 
appears.

Auto Memory

Stores stations with good reception in memory 
automatically.

  1  

  Select a band you wish to store in memory


  2  

  Select the Auto Memory mode

  3  

  Start Auto Memory

Touch 

 or 

 .

Auto Memory terminates when 6 stations are 
stored or when all stations are tuned in.

•  The operation ends automatically if you do not operate 

within 10 seconds.

Summary of Contents for DDX7039

Page 1: ...ction manual is used to describe 3 types listed below Model availability and features functions may differ depending on the country and sales area Type X Oceanian DVD Region Code 4 area Type V China DVD Region Code 6 area Type M Other country DVD Region Code 3 area DDX7039M DVD Region Code 2 area ...

Page 2: ...ile Displaying the Control Screen 17 DVD Disc Menu 18 VCD Zoom Control 20 Direct Search 20 Music Disc Audio File Listening 21 Functions When Displaying the Easy Control Panel 21 Functions While Displaying the Control Screen 22 Set Disc Name 25 Folder Select Function of Audio File 25 Disc Select Function of Disc Changer 26 Direct Search 26 iPod Control 36 Connecting an iPod 36 Functions when Displa...

Page 3: ...61 Language Setup 62 Parental Level Setup 63 DivX Setup 64 Software Information 64 iPod Setup 65 System Setup 65 AV Interface Setup 66 User Interface 67 Entering background 68 Background Delete 69 Background Select 69 Touch panel Adjustment 70 Clock Setup 70 Monitor Setup 71 Security Code Setup 72 TV Setup Function of Type M PAL TV type Type X Type V 74 RDS Setup Function of Type M 74 AMP Control ...

Page 4: ...y be different The above operation example with the mark differs from the actual operation Seek mode Sets a station selection The mode is switched in following order each time you touch the button Display Setting AUTO1 Tunes in a station with good reception automatically AUTO2 Tunes in stations in memory one after another MANU Switches to the next frequency manually Manual Memory Stores the curren...

Page 5: ...English 5 ...

Page 6: ...crews you could damage the unit Do Not Load 3 in CDs in the CD slot If you try to load a 3 in CD with its adapter into the unit the adapter might separate from the CD and damage the unit Safety precautions About CD players disc changers connected to this unit Kenwood disc changers CD players released in 1998 or later can be connected to this unit Refer to the catalog or consult your Kenwood dealer...

Page 7: ...a silicon cloth If the faceplate is stained badly wipe the stain off with a cloth moistened with neutral cleaner then wipe it again with a clean soft dry cloth Applying spray cleaner directly to the unit may affect its mechanical parts Wiping the faceplate with a hard cloth or using a volatile liquid such as thinner or alcohol may scratch the surface or erases characters TV tuner that can be conne...

Page 8: ...struction manual List of playable discs Disc types Standard Support Remark DVD DVDVideo DVD Audio DVD R MP3 WMA AAC JPEG MPEG DivX Playback Multi border Multisession Playback depends on authoring conditions Compatible with 8 cm 3 inch discs DVD RW DVD R DVD RW DVD R DL Double layer OnlyVideo format DVD R DL Double layer DVD RAM CD Music CD CD TEXT 8 cm 3 inch discs supported CD ROM MP3 WMA AAC JPE...

Page 9: ...lay type with AM PM displayed or in the 24 hour clock display type without AM PM displayed depending on the sales area The display type cannot be changed In this instruction manual screens of the 24 hour display type are used as examples 1 2 4 1 5 4 5 2 1 2 6 3 DVD disc marks Symbol Description ALL Indicates a region number The discs with this mark can be played with any DVD player 8 Indicates the...

Page 10: ...n the example of folder file tree shown below the files are played in the order from 1 to 0 CD v Folder v Audio fi v v v v v Folder Audio file The Audio file plays in the order which is written by CD writing software You may be able to set the playing order by writing the play sequence numbers such as 01 to 99 at the beginning of the file name Audio files are played in the order the files are writ...

Page 11: ...00 W 1200 H pixels Enlarges and reduces images up to the size shown above to fit to the screen The picture files with information attached such as Exif may not be displayed or operated e g rotation display properly Extensions Picture files must have one of the following extensions jpg jpeg jpe Acceptable discs disc formats file and folder names and playing order are the same as those for audio fil...

Page 12: ...disc press 0 Eject button to close the operation panel F Adjusts the volume B Attenuates the volume Press it again to cancel muting A Turns power ON OFF Press the button to turn on the power When the button is pressed and held down for 1 second or more the power is turned off E Listening the traffic information Function of Type M Press it for more than 1 second to turn the Traffic Information func...

Page 13: ...ouch displayed at bottom right of various screens to return to the original screen Playing a USB device When connecting a USB device playback starts automatically Remove the USB device Press on the USB control screen to enter the USB suspend mode and then remove the USB device Refer to USB Device Control page 39 Removing the USB device before entering the USB suspend mode may result in damaging th...

Page 14: ... Video iPod Rear View Camera Navigation You can also turn off the video display by pressing the button longer than 1 second When you press the button again the previous video display comes back on The Rear view camera video is displayed when the vehicle s gear is in Reverse Set the NAVIGATION of the AV Interface Setup page 66 to RGB AV IN to display the Navigation video D ...

Page 15: ...al accessory page 21 Outputs a sound signal input to the external AUX terminal optional accessory Although nothing is played back the clock etc are displayed You cannot switch to a source that is not connected or inserted You can also play audio files video files and picture files with the Built in Disc Player Refer to List of playable discs page 8 for the type and format of these media It is nece...

Page 16: ...e next chapter 5 Backward Chapter Search Area Selects the previous chapter 6 DVD Disc Menu Control Buttons Area Displays the Disc Menu Control buttons page 18 7 Information Display Button Area Watching DVD VCD VCD playback screen 8 9 11 10 12 13 8 Scene Track Number Display 9 Play time Display p Forward Scene Track Search Area Selects the next scene when PBC is On or track when PBC is Off q Backwa...

Page 17: ... a chapter Scene Track Search during VCD play Selects a scene when PBC is On or a track when PBC is Off 5 Plays or pauses 6 Displays the Screen Control screen Refer to Screen Control page 51 7 Displays the external device control screen Refer to External Device Power Supply Control page 48 The Easy Control Panel is hidden when you touch a central part of the monitor Functions While Displaying the ...

Page 18: ... title remaining titles VCD Track disc remaining discs Effective only when the PBC function is off p Title Number Display during DVD play q Chapter Scene Track Number Display w Play Mode Display e Play Time Display r Volume Label Display When is appeared the text display is scrolled by pressing it t Function Indicator y Appears when a disc is inserted u Turns the PBC function of VCD On or Off only...

Page 19: ...s the picture angle during program playback only q Switches the subtitle language during program playback only w Switches the voice language during program playback only e Displays the Zoom Control screen r Clears the Disc Menu Control Zoom Control 15 16 16 16 16 17 18 t Changes the zoom ratio at 4 levels 2 times 3 times 4 times or off each time you touch y Scrolls the screen in the direction you ...

Page 20: ...hapter Time Direct number VCD when PBC is On Scene Direct number VCD when PBC is Off Track However the direct search may not be supported for some discs 2 Enter a number or time R VOL 1 2ABC 3DEF 4GHI 7 PQRS BS 5JKL 8TUV 0 9WXYZ 6MNO 1 ATT 2ZONE Y 1 CLEAR DIRECT When playing back a VCD enter a PBC scene number if PBC is On or a track number if PBC is Off To clear your incorrect entry press CLEAR C...

Page 21: ...ayback on disc changer 1 7 7 4 4 5 1 Switches the source 2 Stops playing 3 Fast Forwards or Fast Backwards only when a CD is played back on the built in disc player 4 Selects a music When you continue to touch button Fast Forwards or Fast Backwards Disabled when a CD built in disc player are being played 5 Plays or pauses 6 Selects a folder only when an Audio file is played back on the built in di...

Page 22: ...layed from its beginning when you play it in the next time 5 Selects a track 6 Plays or pauses 7 Switches the button display 8 Starts or stops Scan Play that plays the beginning of each music one after the other 9 Repeats to play the present track p Starts or stops Random Play to play music in random order q Switches the number of lines displayed in the Information Display w Switches the play time...

Page 23: ...n Play that plays the beginning of each music or data one after the other l Repeats to play the preset files or data Starts or stops Random Play to play files of the present folder in random order z Switches the number of lines displayed in the Information Display x Folder and File Number Display c Play Mode Display v Play Time Display b Function Indicator n Appears when a disc is inserted 37 m Re...

Page 24: ...y Disc Number Display Function of Disc Changer A Track Number Display S Play Time Display D Function Indicator F Appears when a disc is inserted 55 56 G Repeats to play a disc the present disc Function of Disc Changer H Starts or stops Magazine Random Play to play songs of the disc changer in random order Function of Disc Changer 57 58 59 J Sets a name to the disc being played page 25 K Displays a...

Page 25: ... Name set Folder Select Function of Audio File Searches folders and Audio files stored in media and devices according to hierarchy 1 Start Folder Select 2 Selects a song 3 4 1 1 5 2 1 Scrolls the list 2 Lists folders and Audio files Folder opens when touched and the Audio file is played 3 Moves to the top hierarchy level 4 Moves up a hierarchy level 5 Returns to the original screen ...

Page 26: ... it is pressed CD Track number Total play time Audio file Folder File Music Disc Audio File Listening 2 Enter a track number R VOL 1 2ABC 3DEF 4GHI 7 PQRS BS 5JKL 8TUV 0 9WXYZ 6MNO 1 ATT 2ZONE Y 1 CLEAR DIRECT 3 Search When searching for a track V SEL OUT MENU IN ENTER ZOOM DVD T V AUD DISP POSITION SRC O O O During play on an external in disc player or disc changer 1 Enter a disc or track number ...

Page 27: ...een or SRC 1 2 5 6 4 3 1 Folder File Number Display 2 Play Time Display 3 Forward File Search Area Selects the next file 4 Backward File Search Area Selects the previous file 5 JPEG Picture Control Button Area page 29 DivX Sub Off Audio 1 1 MPEG Not effective 6 Information Display Button Area Functions When Displaying the Easy Control Panel Displays a floating control panel in the screen SRC 1 2 3...

Page 28: ... 6 Plays or pauses 7 Selects a folder 8 Switches the button display 9 Starts or stops Scan Play that plays the beginning of each song or data one after the other p Repeats to play the preset files or data q Starts or stops Random Play to play files of the present folder in random order w Switches the number of lines displayed in the Information Display e Folder and File Number Display r Play Mode ...

Page 29: ...ds Picture Control Folder Select Searches folders and Video files Pictures stored in media and devices according to hierarchy 1 Start Folder Select 2 Selects a file 3 4 1 1 5 2 1 Scrolls the list 2 Lists folders and Video files Picture files Folder opens when touched and the Video file Picture file is played 3 Moves to the top hierarchy level 4 Moves up a hierarchy level 5 Returns to the original ...

Page 30: ... Source mode For the basic method of receiver button operations refer to Basic Operations page 12 Set the remote controller mode switch to AUD mode before starting operation refer to Remote Controller mode switch page 82 Functions While Displaying the Control Screen Switch to control screen to use various functions SRC SRC 2 5 5 3 7 8 9 10 6 4 1 11 1 Radio station information display Selects the P...

Page 31: ...for the Auto Memory 9 Switches the Seek mode Refer to page 31 for the Seek mode p Switches the number of lines displayed in the Information Display Function of Type M q Turns the Local Seek function On or Off Function of Type M 12 w When to buttons appear you can recall the stations on memory For memory of broadcasting stations refer to Auto Memory page 32 or Manual Memory page 32 14 15 13 17 16 e...

Page 32: ...ouch until the memory number appears Auto Memory Stores stations with good reception in memory automatically 1 Select a band you wish to store in memory 2 Select the Auto Memory mode 3 Start Auto Memory Touch or Auto Memory terminates when 6 stations are stored or when all stations are tuned in The operation ends automatically if you do not operate within 10 seconds ...

Page 33: ...Artist name Station Name Radio Text Plus or Radio Text for text display When is appeared the text display is scrolled by pressing it 2 Scrolls the Radio text plus display 3 Returns to the original screen Preset Select Lists and selects memorized station 1 Start Preset Select 2 Selects a station 1 1 2 4 3 1 Scrolls the list 2 Memorized stations are displayed Touch to tune in 3 Switches the list dis...

Page 34: ...en you receive FM 92 1 MHz 0 9WXYZ 2ABC 1 Example When you receive AM 810 kHz 0 8TUV 1 0 The operation ends automatically if you do not operate within 10 seconds Set Station Name Function of Type X Type V Assigns a name to a station 1 Tune in to the station to name 2 Start Name set 3 Enter the name See Character Entry page 50 for information on how to enter a name 4 End Name set You can enter char...

Page 35: ...ected Program Type Traffic Information Function of Type M When a traffic bulletin starts any source is switched to the traffic information and it is displayed automatically 1 Set the Traffice information mode When the traffic bulletin starts The Traffic Information screen appears automatically Traffic Information screen It is necessary to have Traffic Information function set to On in order to hav...

Page 36: ... Signal is displayed on the video screen While connecting an iPod KENWOOD appears on the iPod and the iPod s control is disabled You can control and listen to songs in your iPod by connecting iPod with video or iPod nano to this unit with KCA iP300V optional accessory You can also display video contents on this unit when connecting an iPod with video Functions when Displaying the Easy Control Pane...

Page 37: ... or video one after the other 7 Repeats to play the preset files or data 8 Starts or stops Random play 1 9 Total number of music in the iPod and the music number display p Play Mode Display q Play Time Display 12 w Starts or stops Album Random Play plays randomly from current album 1 15 16 17 13 14 e Display the list of music category See iPod List page 38 r Display the list of video category See ...

Page 38: ...o 1 3 4 5 2 1 1 Switches list page 2 Categories and music are listed Touch a category name to move its lower level If music title is displayed the music is played by touching it If is touched all the music in its category is played 3 Returns to previous category 4 Moves to the top category 5 Displays the currently playing category ...

Page 39: ...Mode 3 Selects a file 4 Plays or pause 5 Display the Screen Control screen see Screen Control page 51 6 Displays the external device control screen See External Device Power Supply Control page 48 The Easy Control Panel display is hidden when you touch a central area of the monitor Next page 3 Functions while displaying the Control Screen Switches to control screen to use various playback function...

Page 40: ...y Time Display 14 r Repeats to play the music or data of the present folder Only in Folder Select mode 15 16 17 18 t Displays the folder list Refer to Folder Select page 41 y Displays the list of category Refer to USB List page 40 u Displays information screen of music being played i Displays the external device control screen See External Device Power Supply Control page 48 1 Disable during play ...

Page 41: ...rarchy 1 Start Folder Select 2 Selects a song 1 1 2 3 4 5 6 1 Scrolls the list 2 Lists folders and Audio files Folder opens when touched and the Audio file is played 3 Moves to the top hierarchy level 4 Moves up a hierarchy level 5 Displays the currently playing file 6 Returns to the original screen ...

Page 42: ...formation can be displayed automatically when it is updated Various control screens appear in the TV Source mode You can only operate TV with the optional accessory TV Tuner connected TV Watching Functions When Displaying the Easy Control Panel Displays a floating control panel in the screen SRC 1 2 3 3 4 5 6 1 Switches the source 2 Switches the TV band to TV1 or TV2 3 Select a channel Use the See...

Page 43: ...etup page 74 9 Memory Number Display p Channel Number Display 11 q When to buttons appear you can recall channels on memory For memory of broadcasting stations see Auto Memory page 44 or Manual Memory page 44 12 13 14 w Sets a name to the tuned station page 45 e Lists and selects memorized station See Preset Select page 45 r Displays the external device control screen See External Device Power Sup...

Page 44: ...ory mode 3 Start Auto Memory Auto Memory terminates when 6 stations are stored or when all stations are tuned in The operation ends automatically if you do not operate within 10 seconds Manual memory Stores the current receiving channel in memory 1 Select a station you wish to store in memory 2 Store in memory Continue to touch until the memory number appears ...

Page 45: ...HI 7 PQRS BS 5JKL 8TUV 0 9WXYZ 6MNO 1 ATT 2ZONE Y 1 CLEAR DIRECT When you enter a channel number signal reception starts Example When you receive Channel 06 0 6MNO Direct Search ends automatically if you do not operate within 10 seconds Press for seconds Preset Select Lists and selects memorized station 1 Start Preset Select 2 Selects a station 1 1 Memorized stations are displayed Touch to tune in...

Page 46: ...ol screen See External Device Power Supply Control page 48 3 Displays the Screen Control screen page 51 for the Screen Control The Easy Control Panel display is hidden when you touch a central area of the monitor Video Watching Functions While Displaying the Control Screen SRC SRC 1 1 Displays the external device control screen See External Device Power Supply Control page 48 ...

Page 47: ...lls the source display 3 Displays the external device control screen See External Device Power Supply Control page 48 4 Switches the skin 3 types 5 Displays the Hands Free Control screen See Hands Free Unit Control page 52 The displayed source depends on the type of device connected In addition you cannot press the button of currently unavailable source The source you wish to listen to can be sele...

Page 48: ...nal device power supply 1 1 2 1 You can turn on or off the external device power supply 2 Returns to the original screen You must connect a commercially available relay unit in order to use this function Connect the external device to be controlled to that relay unit Refer to EXT SW Setup page 76 for information on setting the power on or off specification Controlling the external device power sup...

Page 49: ...all CALL screen If you want to continue to listen to the audio source during phone call SRC The system resumes audio play during the phone call When the call ends Hang up the phone The system resumes playing automatically To use the TEL Mute feature you need to hook up the MUTE wire to your telephone using a commercial telephone accessory Refer to INSTALLATION MANUAL Muting Audio Volume upon Recep...

Page 50: ...Entry screen 1 1 2 4 4 5 3 1 Shifts the cursor 2 Enters a space If you erase a character locate the cursor on it and touch this button 3 Enters characters 4 Scrolls up or down the character button display 5 Exits the Character Entry mode and returns to the previous screen You can enter characters only after you have applied the parking brake Character Entry ...

Page 51: ... on the TV Video iPod or Rear View Camera screen only 4 Contrast Control 5 Black Level Adjustment 6 Dimmer Mode Setup SYNC Turning the Dimmer function On or Off when the vehicle light control switch is turned On or Off On The display dims Off The display doesn t dim 7 Returns to the previous screen The Screen Control screen is displayed only when you have applied the parking brake The picture qual...

Page 52: ... See Redialing page 56 4 Displays the Incoming Calls screen See Redialing page 56 5 Switches between the private and hands free modes only when a call in progress 6 Displays the Hands Free Set Up screen See Setting up the Hands Free Phone page 57 7 Enters three phone numbers for quick dialing See Quick Dialing page 54 8 Enters a phone number See When Dialing page 53 9 Displays the signal strength ...

Page 53: ...splayed on the cell phone No status is displayed if information about it cannot be obtained Setting the cell phone in the private mode can disable the hands free function When Called When you receive a call you can use the hands free phone 1 Respond to a call When a call arrives the Hands Free Control screen appears automatically 2 End the call The previous screen reappears When Dialing Make a cal...

Page 54: ...he phone numbers can be registered for Quick Dialing Therefore the destination subscriber name and others are not displayed during dialing Calling by Phone Book You can call a person using his her phone number that you have registered in the Phone Book 1 Display the Phone Book screen The Initial Input screen appears Initial Input screen 1 1 3 2 1 Scrolls the character array display 2 Displays the ...

Page 55: ...displayed 5 Make a call You can start talking when the destination responds 6 End the call The previous screen reappears To use the Phone Book it must have been downloaded from the cell phone For more details see the instruction manual of your bluetooth Hands Free Box and your cell phone Up to 20 characters can be displayed for each name in the Phone Book Initials including no corresponding name w...

Page 56: ...en 5 numbers display and single number display 4 Enters the destination data and returns to the Hands Free Control screen 5 Returns to the Hands Free Control screen 2 Select a destination you wish to call 3 Confirm the destination The Hands Free Control screen appears again The selected destination data is displayed 4 Make a call You can start talking when the destination responds 5 End the call T...

Page 57: ...ing call On On Beep is heard Off Beep is canceled 4 Displays the Phone Select screen 5 Displays the Phone Delete screen 6 Returns to the Hands Free Control screen Either the time interval for automatic answer set on this unit or the time interval set on the cell phone whichever is shorter takes effect Select the speaker which is further from the microphone in order to prevent howling or echoes Sel...

Page 58: ...nds Free Set Up screen 2 Display the Phone Delete list Phone Delete screen 1 2 1 Selects the cell phone to be deleted from the list 2 Returns to the Hands Free Set Up screen 3 Select a Hands Free phone you wish to delete The Phone Book outgoing call list and incoming call list are deleted together with the deleted Hands Free phone ...

Page 59: ...English 59 ...

Page 60: ...y the Audio SETUP screen Touch Audio SETUP in the SETUP Menu page 60 Audio SETUP cannot be selected when no source is selected 2 Setup each item 5 1 2 3 4 1 Selects the speaker to set the crossover See Crossover Network Setup page 61 2 Sets the availability of subwoofers 3 Selects the type of front speakers Standard Setup for general diameter speakers Narrow Setup for small diameter speakers Middl...

Page 61: ...e s dialog more clearly This is effective only when you are using a Dolby Digital software 5 Returns to the original screen 1 Disabled when a DVD is being played Next page 3 Crossover Network Setup You can set a crossover frequency of speakers 1 Select the speaker to set the crossover 4 1 3 1 2 2 5 1 Sets the High Pass Filter of the front speaker 2 Sets the High Pass Filter of the rear speaker 3 S...

Page 62: ...e 3 Enter a language code See DVD Language Codes page 90 and select the desired language 6 7 8 9 6 Sets an angle mark display On 7 Selects the screen display mode 1 16 9 16 9 Displays wide pictures 4 3 LB Displays wide pictures in the Letter Box format having black stripes at the top and bottom of screen 4 3 PS Displays wide pictures in the Pan Scan format showing pictures cut at the right and lef...

Page 63: ...l 2 Complete the parental level setup and returns to DVD SETUP 2 screen 4 Set the language you use Parental Level Setup Sets a parental level 1 Display the Parental Level code number screen Refer to DVD Setup page 61 and touch Parental Level 1 2 3 4 5 1 Enters a code number 2 Cancels the current setup and returns to the DVD SETUP 2 screen 3 Indicates the present parental lock level 4 Determines th...

Page 64: ...t Remaining number of viewing is displayed when playing a DivX VOD file with the viewing restriction When the remaining number of viewing reached 0 a warning message appears and the file cannot be played Software Information Checks the software version of this unit 1 Display the Software Information screen Touch Software Information in the SETUP Menu page 60 1 2 1 Displays the software version 2 R...

Page 65: ...isc a DVD or a music CD 2 Forcibly plays back a disc as a music CD Select 2 if you wish to play a music CD having a special format or if you cannot play a disc in the 1 position 5 Return to the original screen You cannot play an Audio file VCD disc in the 2 position Also you may not play some music CDs in the 2 position Your setup is disabled when the disc is being played iPod Setup Performs setup...

Page 66: ...igation system 21 p Mutes the volume during voice guidance of the navigation system On When turned On the volume level drops AV Interface Setup You can set audio and visual AV interface parameters 1 Display the AV Interface screen Touch AV Interface in the SETUP Menu page 60 2 Setup each item 1 4 2 3 1 Sets a name to be displayed when you select a system that is connected via the AV INPUT port VID...

Page 67: ... Sets a selecting method of audio source from the Navigation system Off On Allows you to select the audio source input from the Navigation system interface by pressing SRC or selecting it on Source Select screen Off The audio source cannot be selected using SRC or on Source Select screen User Interface You can set up user interface parameters 1 Display the User Interface screen Touch User Interfac...

Page 68: ...ns Up to 3 images can be loaded This operation is not possible when USB is selected as the source p Sets an on screen display of the TV screen Auto with the optional accessory TV tuner connected only Auto Information is displayed for 5 seconds when updated Manual Information is displayed when you touch on the screen q Returns to the original screen 12 13 14 w Sets whether to display animation when...

Page 69: ...und 3 Set the image as the background 10 10 Background Change Default Enter Cancel Background Delete Deletes the background image 1 Display Delete Image Select screen 2 Select the image to be deleted Background Delete Cancel 10 10 1 1 Returns to the original screen 3 Delete the image Background Delete Cancel Enter 10 10 4 Confirm 10 10 Background Delete Yes No Would You Like to delete Background 1...

Page 70: ...time data sent from the RDS station Off When turned On the synchronized mode starts and the clock cannot be adjusted manually Function of Type M 6 Returns to the original screen 3 Adjust the clock time Touch panel Adjustment You can adjust the touch panel operations 1 Display the Touch panel Adjustment screen Touch Touch in the SETUP Menu page 60 2 Starts Touch panel setup 1 1 Returns to the origi...

Page 71: ...of the TV screen You can select any of the following screen mode FULL JUST ZOOM NORMAL r Returns to the original screen Monitor Setup You can adjust the position picture quality and the screen mode of the monitor 1 Displaying the Monitor SETUP screen Touch Monitor SETUP in the SETUP Menu page 60 2 Setup each item 1 5 2 3 4 1 Brightness Control 2 Contrast Control 3 Black Level Adjustment 4 Dimmer M...

Page 72: ...rity code input screen 2 Turns the SI function on or off If turned On the burglar alarm lamp flashes when the vehicle ignition is off On 3 Returns to the original screen 2 Start Security Code setup If you have already completed the code registration cannot touch Set When you select the Menu Easy Control screen or Navigation the display is shown in the full size display mode automatically The scree...

Page 73: ...eiver inoperable time 1 2 5 minutes 3 1 hour 4 or more 24hours 3 Enter a security Code Input four digit number 4 Register your security code 5 Reenter the security code Reenter the same security code as that you have entered in Step 3 for confirmation If you enter a different security code the screen returns to Step 3 for the first code entry 6 Register the security code again Now your security co...

Page 74: ...the Auto TP Seek function On or Off On 5 Returns to the original screen 6 7 6 Selects a display language for the PTY function 7 Returns to the original screen TV Setup Function of Type M PAL TV type Type X Type V The TV signal receiving areas can be set with the optional accessory TV Tuner connected only 1 Displaying TV SETUP screen Touch TV SETUP in the SETUP Menu page 60 2 Setting up TV 1 2 1 Se...

Page 75: ...ncel the function touch No To cancel memorization touch No The Setup Menu screen appears again 3 Returns to the original screen 2 Start Set Up Memory AMP Control Sets the power amp connected via the LX bus with the optional accessory LX Power Amp connected only 1 Displaying the Amp Control screen Touch Amp Control in the SETUP Menu page 60 2 Setting up Amp Control 4 5 1 2 2 3 3 1 Setup option and ...

Page 76: ...e current Audio Set Up and AV Interface settings 6 Clears the currently memorized settings 7 Returns to Setup Memory screen 3 Memorize or recall the settings When memorizing the Audio Set Up and AV Interface settings If settings have already been memorized a confirmation message appears Touch Yes To cancel memorization touch No When recalling the memorized settings Touching the screen displays a c...

Page 77: ...ting EXT SW Control 1 EXT SW1 1 2 3 4 1 Sets the name of the external device See Character entry page 50 for information on how to enter the name 2 Sets the power signal output mode Pulse Generates a single power signal pulse Level Continues output of high power signal Sets to turn output on off each time the button on the EXT SW Control screen is pressed 3 Sets the Pulse signal output time Output...

Page 78: ...ont rear and right left audio balance 1 Display Audio Control Touch Audio Control in the Audio Control Menu page 78 2 Display the Audio Control screen 1 1 2 2 3 5 4 1 Adjusts the right and left volume balance 2 Adjusts the front and rear volume balance 3 Turns the Loudness control function On or Off If turned On high and low tones are automatically enhanced during low volume 4 Displays the present...

Page 79: ...Vol Offset the sound generated if you suddenly switch to another source may be extremely loud You may not set some models of power amp boost to 18 See the catalog or instruction manual of power amplifier Equalizer Control You can set up the equalizer 1 Display Equalizer Control Touch Equalizer in the Audio Control Menu page 78 2 Display the Equalizer screen 1 2 3 4 1 Selects an equalizer curve typ...

Page 80: ...frequency 7 Sets the level 8 Sets the Q factor Only Bass and Middle can be set 9 Returns to the original screen Audio Control Zone Control You can set the front and rear audio source 1 Display Zone Control Touch Zone Control in the Audio Control Menu page 78 2 Set the Zone Control 1 3 5 2 3 4 1 Turns the Zone Function that sets different source sounds for front and rear speakers On or Off 2 Switch...

Page 81: ...audio source that is output at the AV OUTPUT terminal is switched depending on the front sound source 4 Adjusts the volume of the rear channel This button appears when the Zone function is On 5 Returns to the original screen There are following limitations when zone function is set to On There is no output from the subwoofer Audio Setup page 60 and Equalizer Control page 79 are not available ...

Page 82: ...AAA R03 size batteries Slide the cover while pressing downwards to remove it as illustrated Insert the batteries with the and poles aligned properly following the illustration inside the case If the Remote Controller operates only over shorter distances or does not operate at all it is possible that the batteries are depleted In such instances replace the both batteries with new ones Remote Contro...

Page 83: ...s the display angle each time it is pressed FNC MENU PBC MODE TOP MENU AUDIO ANGLE RETURN NAVI VOL FM D O O VOICE CANCEL ROUTEM SUBTITLE AV OUT OPEN MAP DIR VIEW O O O Cursor key Moves the cursor when displaying menu OUT MENU IN ENTER ZOOM FNC MENU PBC MODE TOP MENU AUDIO RETURN DVD T V NAVI AUD POSITION O O O O ENTER Enters options OUT MENU IN ENTER ZOOM FNC MENU PBC MODE TOP MENU AUDIO RETURN DV...

Page 84: ...NU AUDIO ANGLE RETURN T V NAVI FM O O O O VOICE CANCEL ROUTEM SUBTITLE AV OUT OPEN MAP DIR VIEW O DVD VCD CD Audio files DVD mode Folder search Selects the folder to be played ANGLE ZOOM 1 2ABC 3DEF 2ZONE VOL FM AM D Y 1 O O O O O O Track search and file search Selects the track or file to be played ANGLE ZOOM 1 2ABC 3DEF 2ZONE VOL FM AM D Y 1 O O MAP DIR VIEW O O O O Play Pause Pauses the track P...

Page 85: ...ach time you press this key ENTER FNC MENU PBC MODE TOP MENU AUDIO ANGLE RETURN DVD T V NAVI O O O VOICE CANCEL ROUTEM SUBTITLE AV OUT OPEN MAP DIR VIEW TV TV mode Switching Band Video It switches between the station of the TV band to receive and video input ANGLE ZOOM 2ZONE VOL FM AM D Y O O VOICE CANCEL ROUTEM SUBTITLE AV OUT OPEN MAP DIR VIEW O O O O Channel Selection The TV channel to receive ...

Page 86: ...ammed broadcast station 1 6MNO Press the direct tuning key first then specify the frequency of the station to receive NAVI NAVI mode Joystick Scrolls the map or moves the cursor OUT MENU IN ENTER ZOOM FNC MENU PBC MODE TOP MENU AUDIO RETURN DVD T V NAVI AUD POSITION O O O O ENTER Performs the selected function OUT MENU IN ENTER ZOOM FNC MENU PBC MODE TOP MENU AUDIO RETURN DVD T V NAVI AUD POSITION...

Page 87: ...TER FNC MENU PBC MODE TOP MENU AUDIO ANGLE RETURN T V NAVI O O O O VOICE CANCEL ROUTEM SUBTITLE AV OUT OPEN MAP DIR VIEW MAP DIR Switches between the heading up navigation and north up navigation map displays FNC MENU PBC MODE TOP MENU AUDIO ANGLE ZOOM RETURN NAVI VOL FM D O O VOICE CANCEL ROUTEM SUBTITLE AV OUT OPEN MAP DIR VIEW O O O Hands free communication Enters the dialing method selection m...

Page 88: ...s enabled Zone Control page 80 What might seem to be a malfunction in your unit may just be the result of slight misoperation or miswiring Before calling service first check the following table for possible problems General The Touch Sensor Tone doesn t sound The preout jack is being used The Touch Sensor Tone can t be output from the preout jack Tuner source Radio reception is poor The car antenn...

Page 89: ... code that cannot be played with this unit Parental level Error The disc you wanted to play has a higher level than the parental level you set Error 07 67 The unit is not operating correctly due to some reason or other Push the unit s Reset button If the Error 07 67 message does not disappear see your nearest Kenwood dealer No Device USB device Disconnected iPod The USB device iPod is selected as ...

Page 90: ... Kannada ko Korean ks Kashmiri ku Kurdish ky Kirghiz la Latin lb Luxembourgish ln Lingala lo Laotian lt Lithuanian lv Latvian Lettish mg Malagasy mi Maori mk Macedonian ml Malayalam mn Mongolian mo Moldavian mr Marathi ms Malay mt Maltese my Burmese na Nauru ne Nepali nl Dutch no Norwegian oc Occitan om Afan Oromo or Oriya pa Punjabi pl Polish ps Pashto Pushto pt Portuguese qu Quechua rm Rhaeto Ro...

Page 91: ...English 91 ...

Page 92: ...frequency 48 kHz 20 22 000 Hz Sampling frequency 44 1 kHz 20 20 000 Hz Total Harmonic Distortion 0 01 1 kHz S N Ratio dB 98dB DVD Video 96k Dynamic Range 98dB DVD Video 96k DISC Format DVD Video VIDEO CD CD DA Sampling frequency 44 1kHz 48kHz 96kHz Quantifying bit number 16 20 24 bit USB IF section USB Standard USB 1 1 2 0 File System FAT 16 32 Maximum Power Supply Current 500mA D A Converter 24Bi...

Page 93: ...RCA jacks 1Vp p 75Ω Audio Output level RCA jacks 1 2V 10kΩ Audio section Maximum Power Front Rear 50W 4 Full Bandwidth Power Front Rear at Less than 1 THD 22Wx4 Preout level V 2V 10kΩ Preout impedance 600Ω Speaker impedance 4 8Ω Tone action Bass 100Hz 8 dB Middle 1 kHz 8 dB Treble 10 kHz 8 dB External SW Maximum Power Supply Current 500mA General Operating voltage 14 4 V 11 16 V allowable Current ...

Page 94: ...94 DDX7039 ...

Page 95: ...nology created by DivX Inc DivX media Files contain highly compressed video with high visual quality that maintains a relatively small file size DivX files can also include advanced media features like menus subtitles and alternate audio tracks Many DivX media files are available for download online and you can create your own using your personal content and easy to use tools from DivX com About D...

Page 96: ......

Reviews: