Kenwood DDX7015BT Instruction Manual Download Page 54

54

SETTINGS

SETTINGS


R

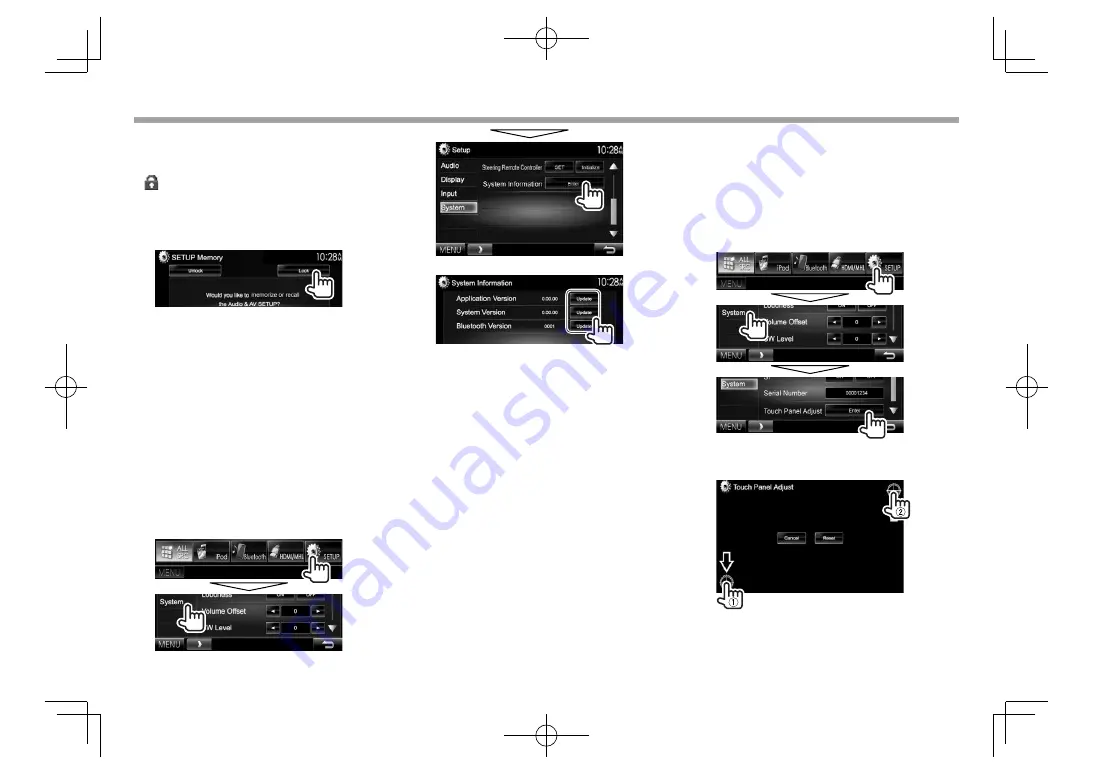
 Locking the settings

You can lock the settings to prevent them from 

being changed.

• 

 is shown beside the settings that can be 

locked.

1

  Display the 

<SETUP Memory>

 screen. 

(Page 53)

2


To unlock the setting:

 Press 

[Unlock]

.


R

 Updating the system

You can update the system by connecting a USB 

device containing an update file.

•  To update the system, visit <http://www2.

jvckenwood.com/cs/ce/>.

1

  Create an update file, copy it to a USB 

device, and connect it to the unit.

•  To connect a USB device, see page   65.

2

  Display the 

<System Information>


screen.

On the 

<TOP MENU>

 screen:

•  Press [

K

] repeatedly to change the page on 

the 

<System>

 menu screen.

   3


<Application 

Version>

Updates the system 

application.

<System Version>

Updates the system.

<Bluetooth 

Version>

Updates the Bluetooth 

application.

<DAB module 

Version>*


Updates the Digital Radio 

(DAB) module application.

 It may take a while.

If the update has been completed successfully, 

“Update Completed” appears. Reset the unit.

•  Do not disconnect the USB device while updating.

•  If the update has failed, turn the power off and 

then on, and retry the update.

•  Even if you have turned off the power during the 

update, you can restart the update after the power 

is turned on. The update will be performed from 

the beginning.

*


  Only for DDX5015DAB.


R

  Adjusting the touch position 

You can adjust the touch position on the touch 

panel if the position touched and the operation 

performed do not match.

1

  Display the 

<Touch Panel Adjust>

 screen.

On the 

<TOP MENU>

 screen:

•  Press [

K

] repeatedly to change the page on 

the 

<System>

 menu screen.


 2

  Touch the center of the marks at the lower 

left and at the upper right as instructed.

•  To reset the touch position, press 

[Reset]

.

•  To cancel the current operation, press 

[Cancel]

.

DDX̲Mid̲M.indb   54

DDX̲Mid̲M.indb   54

2014/12/06   15:46

2014/12/06   15:46

Summary of Contents for DDX7015BT

Page 1: ...s used to describe models listed below Model availability and features functions may differ depending on the country and sales area Region 2 DVD Region Code 2 area Region 3 DVD Region Code 3 area Region 4 DVD Region Code 4 area Region 5 DVD Region Code 5 area DDX515BT DDX515BTM DDX715WBT DDX715WBTM DDX Mid M indb 1 DDX Mid M indb 1 2014 12 06 15 46 2014 12 06 15 46 ...

Page 2: ...5 DDX7015BTM DDX515BT DDX515BTM DDX715WBT Region 3 DDX715WBTM see page 58 indicates the various screens menus operations settings that appear on the touch panel indicates the buttons on the touch panel Indication language English indications are used for the purpose of explanation You can select the indication language from the Setup menu Page 57 Updated information the latest Instruction Manual s...

Page 3: ...geye en yakın geri dönüşüm tesisinin yerini öğrenmek için yerel makamlara müracaat edin Uygun geri dönüşüm ve atık imha yöntemi sağlığımız ve çevremiz üzerindeki zararlı etkileri önlerken kaynakların korunmasına da yardımcı olacaktır V Cautions on the monitor The monitor built into this unit has been produced with high precision but it may have some ineffective dots This is inevitable and is not c...

Page 4: ...Only for DDX7015BT DDX7015BTM DDX715WBT DDX715WBTM Setting the security function RRegistering the security code You can set a security code to protect your receiver system against theft 1 Display the TOP MENU screen On the source control screen 2 Display the System setting screen 3 Display the Security Code Set screen Press K repeatedly to change the page on the System menu screen To clear the reg...

Page 5: ...urce control screen 2 Display the Setup screen 3 Display the Clock screen 4 Set the clock time NAV 1 Synchronizes the clock time with the connected navigation unit Radio Data System 2 Synchronizes the clock time with FM Radio Data System DAB 3 Synchronizes the clock time with the digital radio DAB OFF Sets the clock manually See below When selecting OFF Adjust the hour 1 then adjust the minute 2 P...

Page 6: ... setting Page 57 6 AUD V OFF button Displays the Equalizer screen Press Page 48 The function of the button when held varies depending on the AUD Key Long Press setting Page 57 7 B MENU button Displays the TOP MENU screen Press Page 10 Turns on the power Press Page 8 Turns off the power Hold Page 8 8 TEL VOICE button Displays the phone control screen Press Page 43 Activates voice dialing Hold Page ...

Page 7: ...en the security function is activated Page 5 2 Monitor panel 3 Screen touch panel 4 TEL VOICE button Displays the phone control screen Press Page 43 Activates voice dialing Hold Page 44 5 V OFF button Displays the phone book Press Page 43 The function of the button when held varies depending on the P BOOK Key Long Press setting Page 57 6 Volume button Adjusts the audio volume Page 8 ATT button Att...

Page 8: ...DAB DDX5015BT Turn to the right to increase and turn to the left to decrease DDX715WBT DDX715WBTM Press to increase and press to decrease Holding the button increases decreases the volume continuously To attenuate the sound only for DDX5015DAB DDX5015BT DDX715WBT DDX715WBTM DDX5015DAB DDX5015BT DDX715WBT DDX715WBTM The ATT indicator lights up To cancel the attenuation Press the same button again R...

Page 9: ... BOOK Key Long Press is set to V OFF Page 57 Common screen operations RCommon screen descriptions You can display other screens any time to change the source show the information or change the settings etc Source control screen Performs source playback operations The operation buttons vary depending on the selected source 2 1 4 3 Common operation buttons 1 Displays other operation buttons Disabled...

Page 10: ...nd items Page 11 3 Displays the Setup screen See the right column Setup screen Changes the detailed settings Page 55 3 1 2 4 Common operating buttons 1 Selects the menu category 2 Displays the TOP MENU screen 3 Changes the page 4 Returns to the previous screen RTouch screen operations 1 3 2 4 1 Displays the video control menu while playing a video 2 Displays the source control screen while playing...

Page 11: ...droid device Page 22 TEL Displays the phone control screen Page 43 AV IN1 AV IN2 Switches to an external component connected to the AV IN1 or iPod AV IN2 input terminal Page 35 1 When no navigation unit is connected No Navigation appears 2 Only for DDX5015DAB 3 Only for DDX7015BT Region 4 DDX5015DAB DDX5015BT DDX715WBT Region 4 RSelecting the playback source on the TOP MENU screen You can change t...

Page 12: ...removing a disc pull it horizontally You can eject a disc when playing another AV source If the ejected disc is not removed within 60 seconds the disc is automatically inserted again into the loading slot to protect it from dust Closing the monitor panel only for DDX7015BT DDX7015BTM DDX715WBT DDX715WBTM After removing the disc press M on the monitor panel The monitor panel closes Playback operati...

Page 13: ...ck information The information displayed on the screen differs depending on the type of disc file being played back 1 Media type 2 Track file information Pressing scrolls the text if not all of the text is shown 3 Current playback item information folder no file no track no 4 Playback status 5 Playing time 6 Playback mode Page 15 7 File type 8 IN indicator Operation buttons Available buttons on th...

Page 14: ... Available buttons on the screen and operations differ depending on the type of disc file being played back ZOOM Displays the picture size selection screen Page 51 Aspect Selects the aspect ratio Page 51 PictureAdjust Displays the picture adjustment screen Page 50 Audio Selects the audio type or channel for DVD VR Subtitle Selects the subtitle type Angle Selects the view angle MENU Displays the di...

Page 15: ... Available playback modes differ depending on the type of disc file being played back You cannot activate the repeat mode and the random mode at the same time Each time you press the button the playback mode changes The corresponding indicator lights up Available items differ depending on the type of disc file being played back C REP Repeats current chapter T REP Repeats current title program REP ...

Page 16: ...hide the angle mark Screen Ratio Select the monitor type to watch a wide screen picture on the external monitor 16 9 Initial 4 3 LB 4 3 PS Parental Level Set the parental level See the right column CD Read Select the files to play on a disc containing music files You cannot change the setting when a disc is inserted 1 Initial Automatically distinguishes between audio file discs and music CDs 2 For...

Page 17: ...5 Jacket picture Shown while playing if the file has tag data that includes the jacket picture 6 Playback mode See the right column 7 File type Operation buttons Available buttons on the screen and operations differ depending on the type of file being played back Displays the easy control screen Page 10 Displays the list selection screen Page 18 S T Selects a track O N Reverse forward search IW St...

Page 18: ...em 2 From Folder List Select the folder 1 then the item in the selected folder 2 iPod iPhone iPod iPhone Preparation RConnecting iPod iPhone For details about connecting iPod iPhone see page 65 For playable iPod iPhone types see page 73 Connect your iPod iPhone according to your purpose or the type of iPod iPhone Wired connection To listen to music USB Audio cable for iPod iPhone For iPod iPhone e...

Page 19: ... the iPod Settings screen On the TOP MENU screen If Enter for iPod Setup cannot be selected put the unit in standby Page 9 2 If you do not need to change the settings press OK to exit from the setup screen 3 Select the connection method 1 then press Next 2 USB AV IN Select this when the iPod iPhone is connected using KCA iP202 optional accessory USB 1 Wire Select this when the iPod iPhone is conne...

Page 20: ...Wide Screen ON Select this to display video compatible with wide screen display in wide screen OFF Select this to deactivate You cannot change the setting when iPod iPhone is connected Playback operations When the operation buttons are not displayed on the screen touch the area shown on the illustration To change settings for video playback see page 50 RIndications and buttons on the source contro...

Page 21: ...ns the same as Shuffle Songs Album Functions the same as Shuffle Albums MENU Displays the TOP MENU screen To cancel random mode press the button repeatedly until the indicator disappears RSelecting an audio video file from the menu 1 2 Select the menu audio or video 1 a category 2 then a desired item 3 Select an item in each layer until you reach and select the desired file You can change the page...

Page 22: ...on your iPod touch iPhone Android 2 Select APPs as the source Page 11 ROperation buttons on the source control screen I Starts playback W Pauses playback S T Selects an audio video file O N Reverse forward search IW Starts pauses playback MENU Displays the TOP MENU screen You can operate some functions of the App on the touch panel For some applications such as navigation applications the operatio...

Page 23: ...k operations You can operate Pandora using the remote controller Only playing pausing and skipping are available RIndications and buttons on the source control screen 2 1 4 3 Playback information 1 Picture data 2 Track information Pressing scrolls the text if not all of the text is shown 3 Playback status 4 Playing time Operation buttons Displays the easy control screen Page 10 Displays the list s...

Page 24: ...necting with a cable Use KCA iP202 KCA HD100 KCA iP102 optional accessory or KCA iP103 optional accessory When connecting via Bluetooth the following profiles must be supported SPP Serial Port Profile A2DP Advanced Audio Distribution Profile Android Visit Google play and search for Pandora to install Bluetooth must be built in and the following profiles must be supported SPP Serial Port Profile A2...

Page 25: ...d on the APP Settings screen Page 47 3 Select AUPEO as the source On the TOP MENU screen The AUPEO application is started Playback operations You can operate AUPEO using the remote controller Only playing pausing and skipping are available RIndications and buttons on the source control screen 2 1 3 Playback information 1 Picture data 2 Track information Pressing scrolls the text if not all of the ...

Page 26: ...DP Advanced Audio Distribution Profile Android Visit Google play and search for AUPEO to install Bluetooth must be built in and the following profiles must be supported SPP Serial Port Profile A2DP Advanced Audio Distribution Profile NOTE Ensure you are logged in to your smartphone application If you do not have an AUPEO account you can create one for free from your smartphone or at www aupeo com ...

Page 27: ...age 28 TI Activates deactivates TI standby reception mode Page 29 AME Presets stations automatically Hold Page 28 MONO Activates deactivates monaural mode for better FM reception Stereo effect will be lost The MONO indicator lights up while monaural mode is activated Changes the display information See the right column Displays the easy control screen Page 10 PTY Enters PTY search mode Page 29 AM ...

Page 28: ...y with strong signals Local Seek 1 2 ON Select this to tune in only to stations with sufficient signal strength The LO S indicator lights up OFF Deactivate the function Presetting stations RStoring stations in the memory You can preset 6 stations for each band Automatic presetting AME Auto Memory Hold Local stations with the strongest signals are found and stored automatically Manual presetting 1 ...

Page 29: ...uage Page 57 the text language is set to English RActivating deactivating TI News Standby Reception TI Standby Reception The unit is in standby to switch to Traffic Information TI if available The TI indicator lights up in white If the TI indicator is lit in orange tune into another station providing Radio Data System signals To deactivate TI Standby Reception Press TI The TI indicator turns off T...

Page 30: ...h stronger signals When shipped from the factory Network Tracking Reception is deactivated To change the Network Tracking Reception setting 1 2 AF Switch to another station The program may differ from the one currently received the AF indicator lights up AF Reg Switch to another station broadcasting the same program the AF indicator lights up OFF Deactivate the function The RDS indicator lights up...

Page 31: ... 7 RDS indicator Lights up when receiving a Radio Data System station 8 Text information Pressing scrolls the text if not all of the text is shown Pressing Now Playing switches the information Each time you press the button the information and the button switch between Audio Quality PTY Artists Title Now Playing and Next Program Operation buttons P Displays other preset numbers P1 P15 Selects a st...

Page 32: ...an change the page to display more items by pressing J K On the Service List You can change the page to display more items by pressing J K Press A Z to search for the initial letter Pressing A Z displays the A Z Search screen Select the initial to start the search If you want to search with non alphabetical characters press Press and hold to update the Service List Presetting services RStoring ser...

Page 33: ...next time the unit switches to Traffic Information the volume is set to the previous level The TI Standby Reception can also be activated or deactivated from TUNER source control screen Page 29 Using the Replay function You can temporarily record the broadcast from the current time and replay the recorded data You can not use the Replay function REPLAY button is not available in the following case...

Page 34: ...itches from any source to the announcement received 1 Set ON for the announcement items you need News flash Transport flash Warning Service Area weather flash Event announcement Special event Programme information Sport report Financial report To deactivate all announcements select All OFF Only English Spanish French German Dutch Portuguese Italian Turkish are available for the text language here ...

Page 35: ...oes not affect the source name AV IN 1 AV IN 2 displayed on the TOP MENU MENU Displays the TOP MENU screen RStarting playback 1 Connect an external component to the AV IN1 or iPod AV IN2 input terminal Page 66 2 Select AV IN1 or AV IN2 as the source Press K to change the page on the TOP MENU screen 3 Turn on the connected component and start playing the source Using a rear view camera To connect a...

Page 36: ...e easier parking when you shift the gear to the reverse R position Displaying the parking guidelines 1 Display the Display setting screen On the TOP MENU screen Press K repeatedly to change the page on the Display menu screen 2 To deactivate Select OFF for Parking Guidelines Adjusting the parking guidelines Adjust the parking guidelines according to the size of the car parking space and so on Inst...

Page 37: ...iewing pictures over a wireless connection For details about Miracast Dongle settings etc refer to the instructions supplied with the Miracast Dongle RDisplaying the screen of the smartphone You can display the screen of smartphones connected via the HDMI MHL input terminal 1 Connect your smartphone to the HDMI MHL input terminal Page 66 Use HDMI cable KCA HD100 optional accessory or MHL cable KCA...

Page 38: ...BT DDX7015BTM DDX5015DAB DDX5015BT DDX515BT DDX515BTM DDX715WBT DDX715WBTM RSettings for the navigation unit 1 Display the Input setting screen On the TOP MENU screen 2 Display the Navigation screen 3 Guidance Select which front speakers are used for the navigation guidance Volume Adjust the volume of the navigation guidance 0 to 35 NAV Mute Select ON to attenuate the sound coming out of speakers ...

Page 39: ...ice to the unit for the first time pair the unit and the device Pairing allows Bluetooth devices to communicate with each other The pairing method differs depending on the Bluetooth version of the device For devices with Bluetooth 2 1 You can pair the device and the unit using SSP Secure Simple Pairing which only requires confirmation For devices with Bluetooth 2 0 You need to enter a PIN code bot...

Page 40: ...the PIN code go to step 3 The PIN code is initially set to 0000 The maximum number of digits in the PIN code is 15 Press Clear to delete the last entry 3 Search for the unit DDX from your Bluetooth device 4 Select the unit DDX on your Bluetooth device If a PIN code is required enter 0000 initial When pairing is complete the device is listed on the Paired Device List To use the paired device connec...

Page 41: ...ON or OFF for the target Mobile phone Audio device The status is shown as follows Connected A connection has been established Connect Ready A connection can be established Disconnected No connection is established Press Change for APP Setup to display the APP Settings screen to configure settings for applications of iPod iPhone Android Page 47 When a Bluetooth mobile phone is connected the signal ...

Page 42: ...alls earpiece microphone While talking You can adjust the volume level between 0 to 15 initial 3 Use the monitor panel to adjust the call earpiece volume Page 8 RSwitching between handsfree mode and phone mode While talking Each time you press the button the talking method is switched handsfree mode g phone mode RAdjusting the echo cancel level reducing noise While talking To adjust the echo volum...

Page 43: ...u can show more items by pressing J K 1 From the phone book call lists 2 Direct number entry 3 From the preset list To preset see page 45 4 Voice dialing You can display the Bluetooth Setup screen by pressing When the mobile phone is not compatible with Phone Book Access Profile PBAP the phone book is not displayed From the preset list phone book call lists 1 From the preset list From the phone bo...

Page 44: ...You can enter up to 31 numbers Press to delete the last entry Press and hold 0 to add to the phone number Voice dialing Available only when the connected mobile phone has a voice recognition system 1 Activate voice dialing On the phone control screen Press K repeatedly to change the page on the phone control screen You can also activate voice dialing by holding TEL on the monitor panel 2 Say the n...

Page 45: ...n 1 2 3 4 The operation buttons indications and information displayed on the screen differ depending on the connected device Playback information 1 Playback status 2 Playing time 3 Tag data current track title artist name album title Pressing scrolls the text if not all of the text is shown 4 The signal strength and battery level only when the information is acquired from the device Operation butt...

Page 46: ...lect the speakers used for Bluetooth both phone and audio player Front Only Front speakers only All Initial All speakers Auto Response ON The unit answers the incoming calls automatically after 5 seconds OFF Initial The unit does not answer the calls automatically Answer the calls manually Auto Pairing ON Initial Establishes pairing automatically with the connected iOS device such as iPhone even i...

Page 47: ...ia Bluetooth Bluetooth Select this when the device is connected via Bluetooth For iPod iPhone USB AV IN Select this when the iPod iPhone is connected using KCA iP202 optional accessory USB 1 Wire Select this when the iPod iPhone is connected using KCA iP102 optional accessory or KCA iP103 optional accessory HDMI Bluetooth Select this when the iPod iPhone is connected using HDMI cable KCA HD100 opt...

Page 48: ...ng and holding the Volume ATT AUDIO knob for DDX5015DAB DDX5015BT on the monitor panel Storing your own adjustment Adjusting the sound precisely 1 Select a sound mode See the left column 2 Select a band and adjust the level of the selected band The number of bands depends on the model You can adjust the level by dragging the slider or using J K Repeat this step to adjust the level of other bands T...

Page 49: ... the front or rear speakers high pass filter 1 LPF FREQ Adjusts the crossover for the subwoofer low pass filter 2 Slope Adjusts the crossover slope Phase Selects the phase for the subwoofer 2 1 Appears only when the front or rear speakers are selected 2 Appears only when the subwoofer is selected RSetting the listening position You can adjust the sound effects according to your listening position ...

Page 50: ...nce from the center of the currently set listening position to every speaker the delay time will be automatically computed and set 1 Determine the center of the currently set listening position as the reference point 2 Measure the distances from the reference point to the speakers 3 Calculate the differences between the distance of the furthest speaker and other speakers 4 Set the DTA value calcul...

Page 51: ...ormal For 4 3 original pictures 4 3 signal 16 9 signal Just For viewing 4 3 pictures naturally on the wide screen 4 3 signal 16 9 signal Zoom1 Zoom3 Changes the magnification The aspect ratio is automatically selected to match the video source While DivX is played back with Screen Ratio set to 16 9 Page 16 the aspect ratio may not set correctly RZooming the picture You can zoom the picture Zooming...

Page 52: ...he dimmer setting for the color 1 then adjust the color 2 RStoring your favorite image for the background You can set your favorite image stored on the connected USB device Use a JPEG PNG BMP file with a resolution of 800 x 480 pixels The color of the captured image may look different from that of the actual scene 1 Connect the USB device on which the image is stored Page 65 2 Display the User Cus...

Page 53: ...em settings RMemorizing recalling the settings You can memorize the settings changed in the Setup menu and recall the memorized settings any time The memorized settings are kept even when the unit is reset 1 Display the SETUP Memory screen On the TOP MENU screen Press K repeatedly to change the page on the System menu screen 2 To cancel press No 3 Select an operation Recall Recalls the memorized s...

Page 54: ...sion Updates the Digital Radio DAB module application It may take a while If the update has been completed successfully Update Completed appears Reset the unit Do not disconnect the USB device while updating If the update has failed turn the power off and then on and retry the update Even if you have turned off the power during the update you can restart the update after the power is turned on The...

Page 55: ... The volume level will automatically increase or decrease when you change the source 15 to 6 Initial 0 SW Level Adjust the subwoofer level 50 to 10 Initial 0 Bass Boost Select your preferred bass boost level OFF Initial Level 1 Level 2 Level 3 Car Setting 2 Select a car type and speaker location Page 48 Car type Off Initial Compact Full Size Car Wagon Minivan SUV Minivan Long Speaker Location Sele...

Page 56: ...the brightness and blackness of the screen Press Enter to display the setting screen select DIM ON dimmer on DIM OFF dimmer off then change the following settings Bright Adjusts brightness 15 to 15 Initial 0 for dimmer on 15 for dimmer off Black Adjusts blackness 10 to 10 Initial 0 Angle 2 Adjust the panel angle Page 8 Parking Guidelines ON Initial Displays the parking guidelines Page 36 OFF Cance...

Page 57: ...ra Page 36 V OFF Turns off the screen Page 9 Voice Initial Activates voice dialing Page 44 AV OUT 2 You can determine the use of the external component connected to the AV OUT terminal OFF Initial AV IN1 AV IN2 DVD AV Key Long Press 2 Assigns the function of the AV button when held AV OUT Initial Selects the AV source for extra monitors or amplifiers APPs Displays the Apps screen Page 22 AUD Key L...

Page 58: ...ies with the and poles aligned properly following the illustration inside the case If the Remote Controller operates only over shorter distances or does not operate at all it is possible that the batteries are depleted In such instances replace both batteries with new ones RRemote Controller mode switch The functions operated from the remote controller differ depending on the position of the mode ...

Page 59: ...arts pauses playback 0 9 Specifies the number to search for in direct search DIRECT Enters direct search mode See the right column RRadio AUD mode AM FM Selects the band S T Searches for stations I W Changes the seek mode AUTO1 AUTO2 MANU 0 9 Specifies preset number Specifies the frequency of the station to receive to search for in direct search DIRECT Enters direct search mode See the right colum...

Page 60: ...lect a function to assign You can change the page to display more items by pressing J K 5 Repeat steps 3 and 4 as necessary 6 Finish the procedure The unit can register change all of the button s functions at the same time To do this press each button in turn and after pressing all of them press Done in the Steering Remote Control Setting screen However new functions cannot be learned after this o...

Page 61: ...DX715WBTM If the console has a lid make sure to install the unit so that the monitor panel will not hit the lid when closing and opening If the fuse blows first make sure the wires are not touching to cause a short circuit then replace the old fuse with one with the same rating Insulate unconnected wires with vinyl tape or other similar material To prevent a short circuit do not remove the caps on...

Page 62: ... disconnect the battery 2 Make the proper input and output wire connections for each unit 3 Connect the speaker wires of the wiring harness 4 Connect the wiring harness wires in the following order ground battery ignition 5 Connect the wiring harness connector to the unit 6 Install the unit in your car Make sure that the unit is installed securely in place If the unit is unstable it may malfunctio...

Page 63: ...or to the power terminal for the booster amplifier of the film type antenna Max 300 mA 12 V When using the optional power amplifier connect to its power control terminal Not used To use the steering wheel remote control feature an exclusive remote adapter not supplied matching your car is required To car light control switch To car chassis 1 White ª White with black stripe To front speaker left Gr...

Page 64: ...ntrol wire Brown Mute control wire Pin Color and functions of Connector A B and C A1 Orange White Dimmer A2 Yellow Battery A4 Red Ignition ACC A5 Blue Antenna control A6 Black Ground connection A8 A7 White ª White Black Left speaker front A10 A9 Gray ª Gray Black Right speaker front B2 B1 Green ª Green Black Left speaker rear B6 B5 Purple ª Purple Black Right speaker rear C6 Gray Red Ground C7 Lig...

Page 65: ...5C iPhone 5 commercially available KCA iP202 optional accessory 0 8 m 0 8 m 1 8 m Lightning Digital AV adapter accessory of the iPod iPhone HDMI MHL cable 8 9 If you connect the HDMI MHL connector fix the HDMI MHL cable using the fixture 8 and screw 9 iPod nano 7th Generation iPod touch 5th Generation iPhone 5S iPhone 5C iPhone 5 commercially available KCA iP103 optional accessory KCA iP103 option...

Page 66: ...ut AV IN1 Visual input Yellow Audio left input White Audio right input Red 2 AV OUT Video output Yellow 3 Rear view camera input Yellow 4 iPod Audio Visual input iPod AV IN2 1 5 NAVI I F input 6 TV tuner remote control output 7 HDMI MHL input 8 DAB antenna input 2 9 Subwoofer preout monaural output 3 Subwoofer left output White Subwoofer right output Red p Rear preout 3 Audio left output White Aud...

Page 67: ...dows Signal strength will decrease in the following locations On IR reflecting glass or where covered with mirror type glass film Where it overlaps with the standard radio antenna pattern Where it overlaps with window heating wires Where glass that blocks radio signals e g IR reflecting glass thermal insulation glass is used Poor reception may occur Due to noise when the windshield wipers air cond...

Page 68: ...talling the Digital Radio antenna V Caution When installing the antenna cable inside a front pillar that contains an air bag The front pillar cover is secured with a special clip which may need to be replaced when it is removed Contact your vehicle dealer for details on removing the front pillar cover and availability of replacement parts Clip Front pillar cover Install the amplifier unit above th...

Page 69: ...it metal part When installing the antenna on the left side Earth sheet 7 Remove the film covering the earth sheet and attach the earth sheet to the metal part of the vehicle Provide sufficient space for the earth sheet so that it does not obstruct the interior parts front pillar cover Also take care that the interior parts do not obstruct the amplifier unit Earth sheet Windscreen Front pillar cove...

Page 70: ...clean discs RTo play new discs New discs may have some rough spots around the inner and outer edges If such a disc is used this unit may reject the disc To remove these rough spots rub the edges with a pencil or ball point pen etc More information RFile playback Playing DivX files for discs only This unit can play back DivX files with the extension code divx div or avi regardless of the letter cas...

Page 71: ...PNG 800 x 480 resolution Data size less than 650 KB File type JPEG PNG BMP Playing H 264 WMV files for USB only This unit can play back files with the extension code mp4 wmv avi or mkv This unit can only play back files which are less than 2 GB The stream format should conform to MPEG system program stream RDisc playback Playable disc types Disc type Recording format file type etc DVD DTS sound ca...

Page 72: ...tored in a USB mass storage class device JPEG BMP PNG MPEG1 MPEG2 MP3 WMA WAV AAC FLAC H 264 WMV VC 1 This unit can recognize a total of 5 000 files and 250 folders a maximum of 999 files per folder Make sure all important data has been backed up to avoid losing the data Notes on using a USB device This unit may not play back files in a USB device properly when using a USB extension cable USB devi...

Page 73: ... Serbian AM Ameharic HA Hausa MN Mongolian SS Siswati AR Arabic HI Hindi MO Moldavian ST Sesotho AS Assamese HR Croatian MR Marathi SU Sundanese AY Aymara HU Hungarian MS Malay MAY SW Swahili AZ Azerbaijani HY Armenian MT Maltese TA Tamil BA Bashkir IA Interlingua MY Burmese TE Telugu BE Byelorussian IE Interlingue NA Nauru TG Tajik BG Bulgarian IK Inupiak NE Nepali TH Thai BH Bihari IN Indonesian...

Page 74: ...voice recognition system No Data No phone book data is contained in the connected Bluetooth phone Initialize Error The unit has failed to initialize the Bluetooth module Try the operation again Dial Error Dialing has failed Try the operation again Hung Up Error The call has not ended yet Park your car and use the connected mobile phone to end the call Pick Up Error The unit has failed to receive a...

Page 75: ...start The format of files is not supported by the unit No picture appears on the external monitor Connect the video cord correctly Select the correct input on the external monitor DivX MPEG1 MPEG2 MP3 WMA AAC discs cannot be played back Record the tracks using a compatible application on the appropriate discs Page 71 Add appropriate extension codes to the file names Tracks on the Recordable Rewrit...

Page 76: ... touch iPhone Android is not the latest version Update the application Only for DDX7015BT Region4 DDX5015DAB DDX5015BT DDX715WBT Region 4 RBluetooth Phone sound quality is poor Reduce the distance between the unit and the Bluetooth mobile phone Move the car to a place where you can get a better signal reception The sound is interrupted or skipped while using a Bluetooth audio player Reduce the dis...

Page 77: ... DVD Video 96 kHz Disc Format DVD Video DVD VR VIDEO CD CD DA Sampling Frequency 44 1 kHz 48 kHz 96 kHz Quantifying Bit Number 16 20 24 bit RUSB interface section USB Standard USB 2 0 High Speed File System FAT 16 32 Maximum Power Supply Current DC 5 V 1 A D A Converter 24 bit Audio Decoder MP3 WMA AAC WAV FLAC Video Decoder MPEG1 MPEG2 H 264 WMV JPEG BMP PNG RHDMI interface section Connector Type...

Page 78: ...sable Sensitivity S N 26 dB 6 2 dBf 0 56 μV 75 Ω Quieting Sensitivity S N 46 dB 15 2 dBf 1 58 μV 75 Ω Frequency Response 3 0 dB 30 Hz to 15 kHz Signal to Noise Ratio 68 dB MONO Selectivity 400 kHz 80 dB Stereo Separation 40 dB 1 kHz RAM tuner section Frequency Range 9 kHz 531 kHz to 1 611 kHz Usable Sensitivity 28 5 dBμ RDigital tuner DAB section DDX5015DAB Frequency Range L BAND 1 452 960 MHz to ...

Page 79: ...demarks and licenses Manufactured under license from Dolby Laboratories Dolby and the double D symbol are trademarks of Dolby Laboratories DVD Logo is a trademark of DVD Format Logo Licensing Corporation registered in the US Japan and other countries The AAC logo is a trademark of Dolby Laboratories Microsoft and Windows Media are either registered trademarks or trademarks of Microsoft Corporation...

Page 80: ...demarks of HDMI Licensing LLC in the United States and other countries MHL and the MHL logo are a trademark or registered trademark of MHL LLC Incorporates MHL 2 libFLAC Copyright C 2000 2001 2002 2003 2004 2005 200 6 2007 2008 2009 Josh Coalson Redistribution and use in source and binary forms with or without modification are permitted provided that the following conditions are met Redistribution...

Reviews: