


39
DDX6027/6027Y/7017
DDX7037/7047/7067
6. Touch Panel Adjustment
Adjustment Procedure
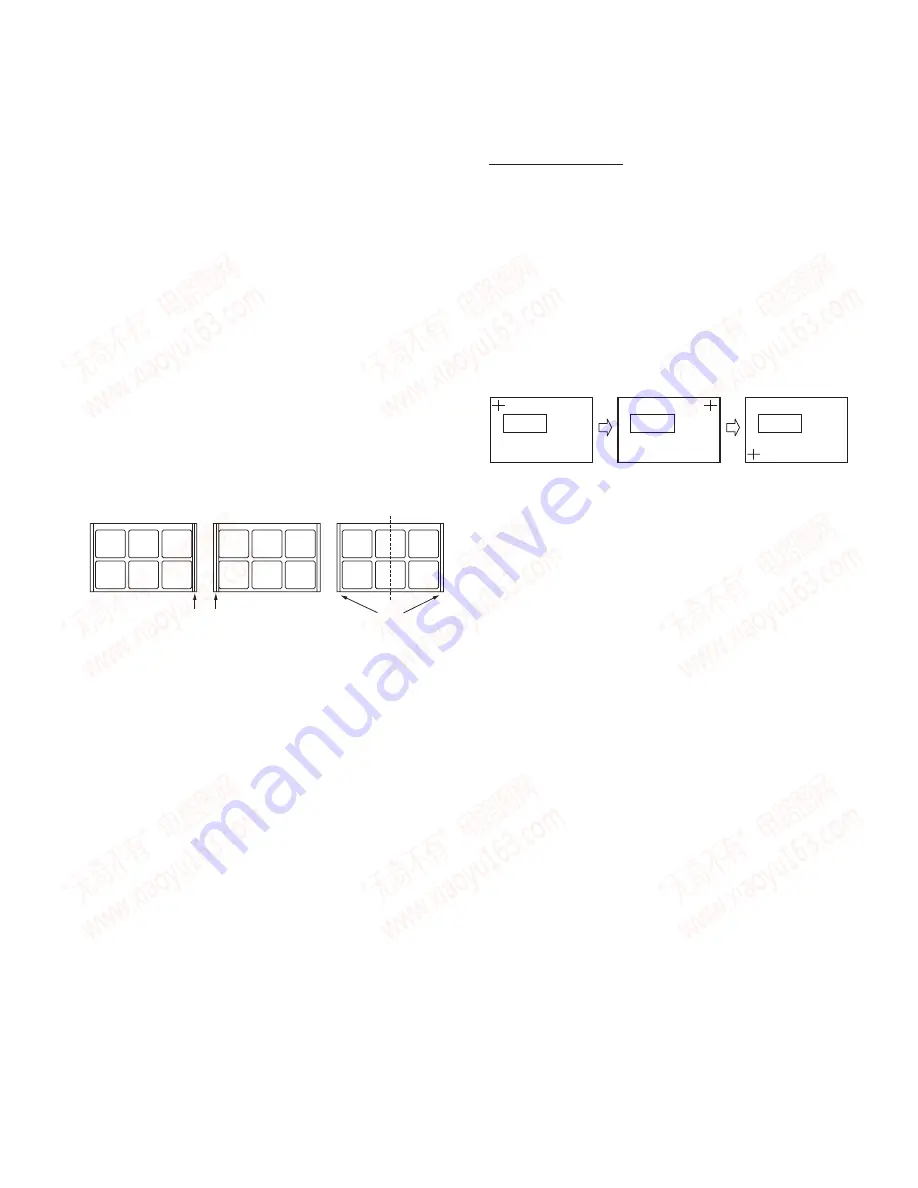
1. Press the Touch Key in the Menu screen of the Test Mode
and enter the Touch Panel Adjustment screen.
2. Touch the center section of the +-mark below in the follow-
ing order.
Upper left
→
Upper right
→
Lower left.
When making the touch, be use to use the touch stick des-
ignated.
3. After adjusting at three points, when “Write OK” is displayed,
the adjustment is complete.
By pressing Return, Touch adjustment will be exited.
Cancel
Cancel
Cancel
∗
If the central section of the +-mark has not be pressed ac-
curately, press Cancel and re-do from the beginning.
Note:
As far as the Touch Panel Adjustment data is concerned,
the data is finalized when the touch is let go.
For this reason, the knack for adjustment is not to let go the
touch after touching the center section of the +-mark.
After making the touch, first confirm that the touch is at the
dead center of the +-mark.
(This means that, if the touch is not at the dead center of
the +-mark, maintain the touch, and slide the stick to the
dead center of the +-mark. )
Then, let the touch go quickly, vertically upward.
NG
OK
NG
Right/Left symmetry
3-2. DVD
Insert TDV540 disk and, when a picture of an airplane ap-
pears, and press 4-key on the remote controller. (DVD Mode)
Then, Monoscope is displayed.
At first, use OSD key to adjust so that background is not
seen on both sides of screen.
Then, use the Screen Adjustment key so that the Monoscope
is symmetric on right and left sides.
3-3. TV/VIDEO
At first, use OSD key to adjust so that background is not
seen on both sides of screen.
Then, use the Screen Adjustment key so that the Monoscope
is symmetric on right and left sides.
3-4. NAVI
At first, use OSD key to adjust so that background is not
seen on both sides of screen.
Then, use the Screen Adjustment key so that the NAVI Menu
screen is symmetric on right and left sides.
After adjustment, press the [Next] key. If “Hposi OK” is dis-
played, the adjustment is complete.
Note: If the display does not come at the dead center when
adjusting the horizontal display start position (when adjust-
ing one step left, the picture is to the left and, when adjust-
ing one step to the right, the picture is to the right), press
[NEXT] key with the position to the right and finalize the
adjustment. (This is the condition in which the screen is to
the right by one or two dots. )
ADJUSTMENT
www. xiaoyu163. com
QQ 376315150
9
9
2
8
9
4
2
9
8
TEL 13942296513
9
9
2
8
9
4
2
9
8
0
5
1
5
1
3
6
7
3
Q
Q
TEL 13942296513 QQ 376315150 892498299
TEL 13942296513 QQ 376315150 892498299


