background image

7

SYSTEM CONTROL OPERATIONS

Remote Control

Lets you operate this unit with the system remote control unit supplied with the amplifier or receiver.

Automatic Operation

Automatically switches the input selector on the amplifier or receiver when you start playback from this unit.

Synchronized Recording

Lets you synchronize recording with the start of playback when recording from CD.
See the operating instructions supplied with your cassette deck for details.

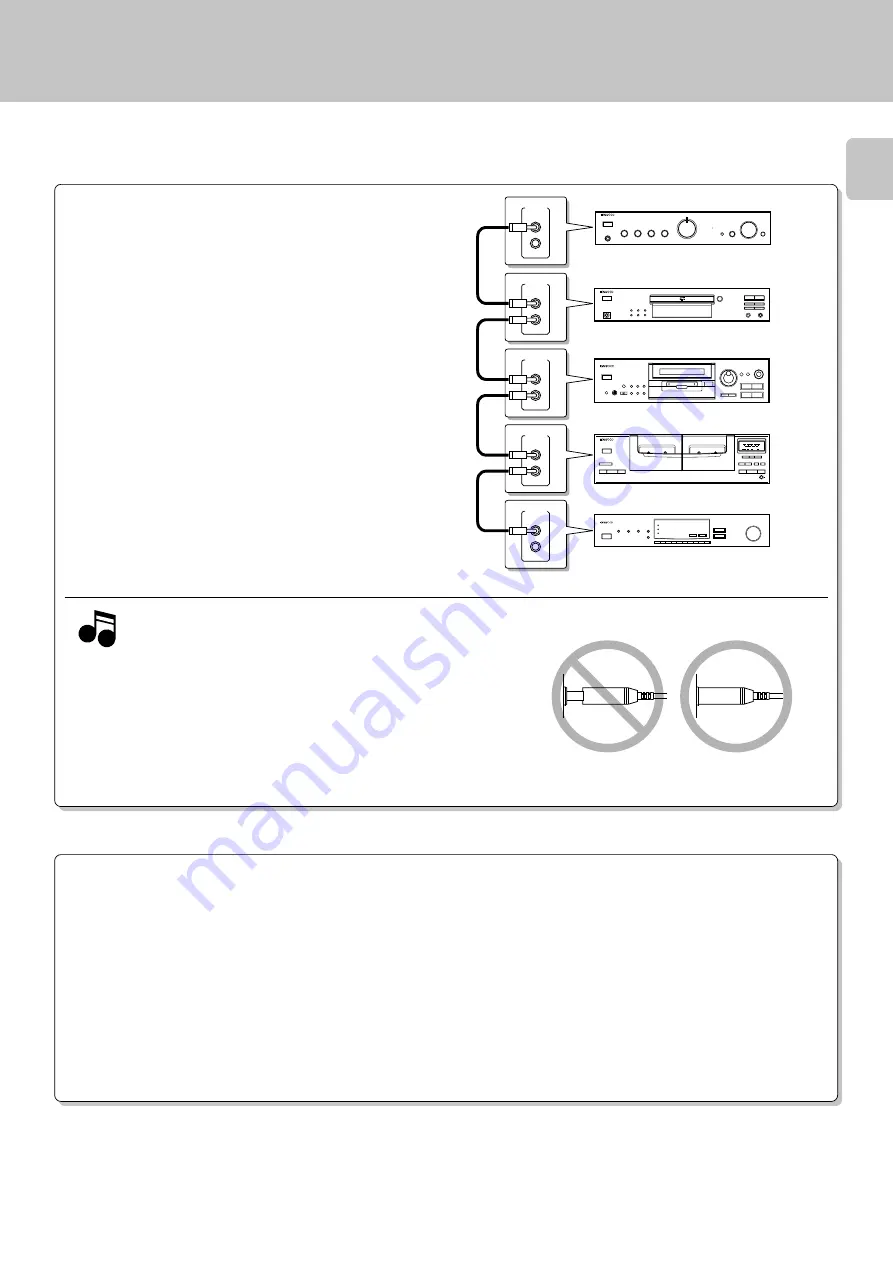
SYSTEM CONTROL CONNECTIONS

Connecting system control cords after connecting a KENWOOD
audio component system lets you take advantage of convenient
system control operations.

This unit is compatible only with the [SL16] mode. The system con-
trol operation is not available if the unit is connected in the [XS-8]
connection mode.

÷

Do this operation after completing all connections.

  (Ensure that the unit is set to POWER OFF.)

1. If your amplifier or receiver does not have a system control terminal,

do not connect any system control cords to the system control termi-
nals on the other components.

2. Do not connect system control cords to any components other than

those specified by Kenwood. It may cause a malfunction and damage
your equipment.

3. Be sure the system control plugs are inserted all the way in to the

system control terminals.

(dB)

 —5

0

+3

+6

(dB)

TAPE 

B

TAPE 

A


SYSTEM

CONTROL


SYSTEM

CONTROL


SYSTEM

CONTROL


SYSTEM

CONTROL


SYSTEM

CONTROL

Notes

Notes

Notes

System connections

Summary of Contents for CT-401

Page 1: ...KXF W1030 KXF W3030 CT 401 CT 403 STEREO CASSETTE TAPE DECK B60 4546 08 EN KENWOOD CORPORATION INSTRUCTION MANUAL ...

Page 2: ...RTANT OPERATING AND MAINTENANCE SERVIC ING INSTRUCTIONS IN THE LITERATURE ACCOMPANYING THE APPLIANCE Unpack the unit carefully and make sure that all accessories are put aside so they will not be lost Examine the unit for any possibility of shipping damage If your unit is damaged or fails to operate notify your dealer immediately If your unit was shipped to you directly notify the shipping company...

Page 3: ...connections 6 Controls and indicators CT 401 KXF W1030 8 Controls and indicators CT 403 KXF W3030 9 Listening to cassette tapes 10 Preparation 10 WARNING NOTICE IN MOST CASES IT IS AN INFRINGMENT OF COPY RIGHT TO MAKE COPIES OF TAPES OR DISCS WITH OUT THE PERMISSION OF THE COPYRIGHT OWNERS ANYONE WISHING TO COPY COMMERCIALLY AVAIL ABLE TAPES OR DISCS SHOULD CONTACT THE ME CHANICAL COPYRIGHT PROTEC...

Page 4: ...the instruction manual Follow all the safety and operating instructions These safety and operating instructions should be retained for future reference 1 Power sources The appliance should be connected to a power supply only of the type described in the instruction manual or as marked on the appliance If you are not sure of the type of power supply to your home consult your appliance dealer or loc...

Page 5: ...ge unit size of grounding conductors location of antenna discharge unit connection to grounding electrodes and requirements for the grounding electrode See Figure 18 Power lines An outside antenna system should not be located in the vicinity of overhead power lines or other electric light or power circuits or where it can fall into such power lines or circuits When installing an outside antenna sy...

Page 6: ...t rear of the unit Notes Notes Notes Except for U S A Canada Amplifier or Receiver Audio cord Turntable CD player To AC outlet Audio cord Caution Do not plug in the power lead until all connections are com pleted Make connections as shown below When connecting the related system components refer also to the instruction manuals of the related components Caution Be sure to adhere followings Or prope...

Page 7: ... control operations This unit is compatible only with the SL16 mode The system con trol operation is not available if the unit is connected in the XS 8 connection mode Do this operation after completing all connections Ensure that the unit is set to POWER OFF 1 If your amplifier or receiver does not have a system control terminal do not connect any system control cords to the system control termi ...

Page 8: ...Cassette holder Deck A Press the area marked PUSH OPEN 0 to load or eject a tape 5 Cassette holder Deck B Press the area marked PUSH OPEN 0 to load or eject a tape 6 Deck B operation keys 3 key Play key 1 key Rewind key for fast winding of tape toward the left reel seen from you 33 key Fast forward key for fast winding of tape toward the right reel seen from you 7 key Stop key REC ARM key Press in...

Page 9: ...f tape toward the left reel seen from you 33 key Fast forward key for fast winding of tape toward the right reel seen from you 7 key Stop key REC ARM key Press in stop mode to start recording or press in record mode to let the recording pause after leaving a non recorded blank of 4 seconds indicator Recording indicator 8PAUSE key Presstoletrecordingpausetemporarily 7 REC LEVEL control Adjusts the ...

Page 10: ... PUSH OPEN 0 dB 5 0 DOLB Y NR 7 7 1 8 REC PUSH OPEN 0 dB 5 DOLB Y NR 7 7 1 Be sure to remove tape slack before insertion The type of tape that is the Normal High position or Metal position playback only is selected automatically This unit cannot record sound on a Metal tape Be sure to close the cassette holder securely by pushing it DOLBY NR dB 5 0 3 6 dB dB 5 0 3 6 dB REV MODE Each press switches...

Page 11: ...lby NR on 2 Dolby NR off Relay playback CT 403 KXF W3030 only DOLBY NR dB 5 0 3 6 dB dB 5 0 3 6 dB REV MODE Each press switches the indication 1 Relay playback of two sides of tapes in decks A and B is repeated 2 Relay playback is not available with this setting 3 Relay playback of one side only for deck A and deck B and then playback stops 7 dB 5 0 3 6 dB Tapes are played in the directions indica...

Page 12: ...One single tune is played back repeatedly up to 16 times Space non recorded Tune being played To play a tune located immediately after the tune being played To play the tune being played from the beginning To play a tune located 4 tunes beyond Press 4 times during the playback Press once during the playback Press 5 times during the playback DPSS will not function properly with the following types ...

Page 13: ...es after repeating the same tune for 16 times Press the stop 7 key to stop playback and cancel this operation 1Play the tune to be repeated 2Press the play key of the same direction as the current tape transport direction 3 dB 5 0 3 6 dB dB 5 0 3 6 dB CT 403 KXF W3030 CT 401 KXF W1030 Convenient music search DPSS ...

Page 14: ...USE REC ARM TAPE B AUTO REVERSE PUSH OPEN 0 A DOLBY NR REV MODE Preparation Start recording 4 2 Enter the record pause mode 1 Play a music source 3 Adjust the recording level 1 Play the music source from the beginning 2 Press the REC ARM key Set the recording level 3 4 Stop playing the source Adjust so that seg ments around the 0 dB segment of the peak level meter light up at times Press once dB 5...

Page 15: ...ise reduction system The Dolby noise reduction system was developed to reduce the tape hiss noise generated during playback The optimum effect of the Dolby NR system is obtained when the same type NR system is used for both recording and playback If a different type NR system is used playback is not performed correctly Make sure that the same type noise reduction system is used for both recording ...

Page 16: ...N 0 A A Dubbing will start Start dubbing 2 Press the DUBBING key 1 The recording level cannot be adjusted for dubbing 2 The DOLBY NR switch does not function during dubbing The tape recorded by dubbing features the same NR system as the original tape in Deck A Notes Notes Notes Lights up dB 5 0 3 6 dB DUBBING DUBBING Press the 7 STOP key of deck B To stop dubbing dB 5 0 3 6 dB 7 The figure shows a...

Page 17: ... pressing the PAUSE key press the REC ARM key 3Adjusttherecordingrecording level How to record REC ARM 8PAUSE Start playing the CD 4 Press the 6 key of the CD player Synchro recording is not possible when tracks of more than one CD are programmed using a Carrousel type CD player Recording starts at this moment When the CD player has completed playback the cassette deck stops recording and enters t...

Page 18: ...ha nism of the unit Demagnetizing the head When the recording playback head is magnetized the sound quality will be deteriorated In such a case demagnetize the head using a commercially available demagnetizer head eraser There are precisely aligned parts around the heads including the tape guides When cleaning pay special attention so as not to apply shock to them Cleaning the heads and peripheral...

Page 19: ... deck mechanisms A small time difference is not regarded as a failure Press in the Stop mode The cassette holder does not open when the area marked PUSH OPEN 0 is pressed The area marked PUSH OPEN 0 is pressed during recording Clean the head referring to Cleaning the head section Replace the tape The head is dirty The tape is stretched or wrinkled Sound is hoarse or high frequencies are not audibl...

Page 20: ... 1 1 kΩ General Power Consumption 14 W Dimensions W 440mm 17 5 16 H 128 mm 5 1 16 D 270 mm 10 5 8 Weight Net 4 1 kg 9 0 lb Caution Read this page carefully to ensure safe operation 1 KENWOOD follows a policy of continuous advancements in development For this reason specifications may be changed without notice 2 The full performance may not be exhibited in extremely coud location under a water free...

Reviews: