background image

CD-206/204/203/DPF-R6010/R4010/R3010 (En)

2

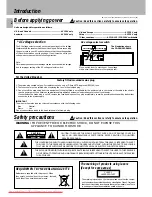
Before applying power

Caution : Read this section carefully to ensure safe operation.

Units are designed for operation as follows.

U.S.A. and Canada ......................................................... AC 120 V only
Australia .......................................................................... AC 240 V only

U.K. and Europe ............................................................. AC 230 V only
China ............................................................................... AC 220 V only
*Other countries ......................... AC 110-120 / 220-240 V switchable

The marking is located on the rear panel and says that the compo-
nent uses laser beams that have been classified as Class 1. It means
that the unit is utilizing laser beams that are of a weaker class. There
is no danger of hazardous radiation outside the unit.

CLASS 1

LASER PRODUCT

The marking of products using lasers
(Except for some areas)

REQUIREMENT BY NEDERLAND GAZETTE

Batteries are supplied with this product. When
they empty, you should not throw away.  Instead,
 hand them in as small chemical waste.

Introduction

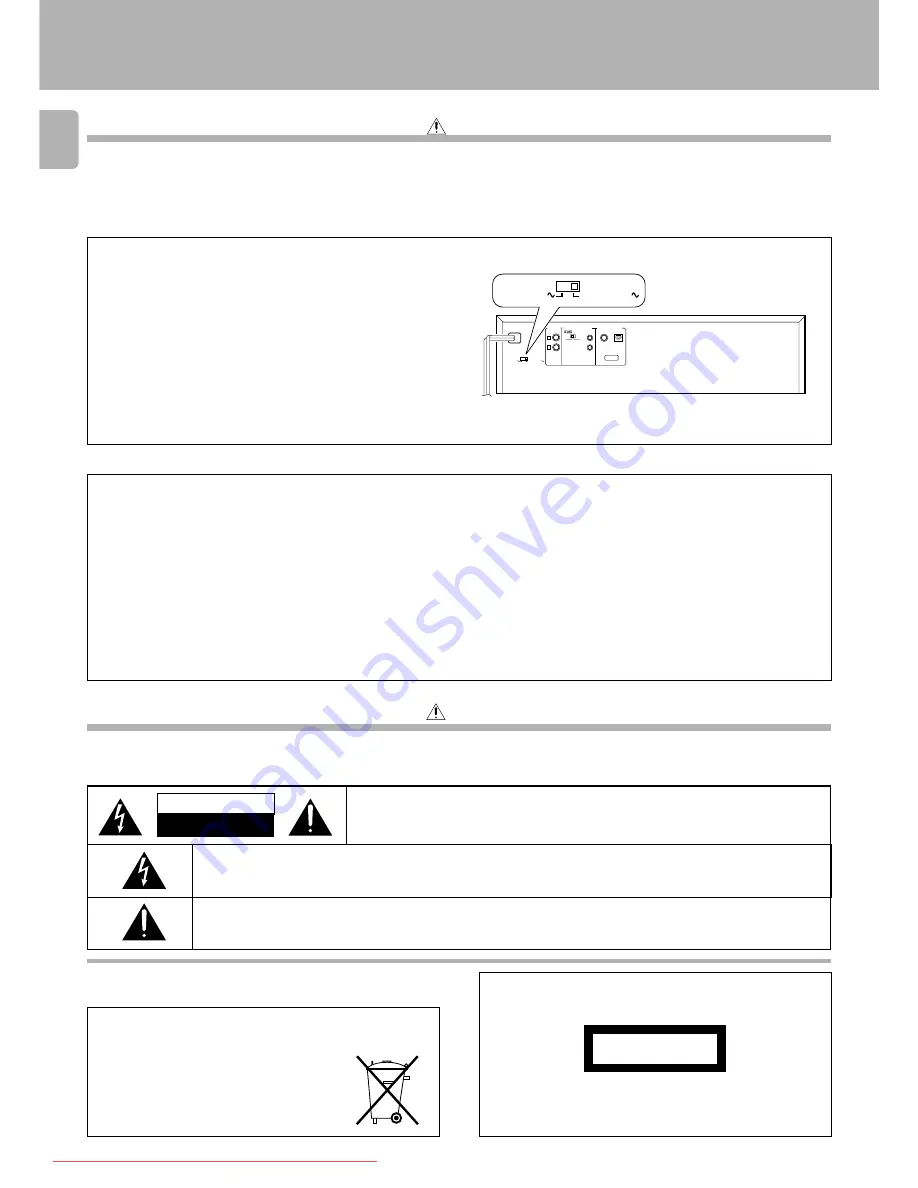
*AC voltage selection

The AC voltage selector switch on the rear panel is set to the voltage
that prevails in the area to which the unit is shipped.  Before connecting
the power cord to your AC outlet, make sure that the setting position
of this switch matches your line voltage.  If not, it must be set to your
voltage in accordance with the following direction.

Move switch lever to match your line voltage
with a small screwdriver or other pointed tool.

Note:
Our warranty does not cover damage caused by excessive line voltage
due to improper setting of the AC voltage selector switch.

For the United Kingdom

Factory fitted moulded mains plug

1. The mains plug contains a fuse. For replacement, use only a 13-Amp ASTA-approved (BS1362) fuse.
2. The fuse cover must be refitted when replacing the fuse in the moulded plug.
3. Do not cut off the mains plug from this equipment. If the plug fitted is not suitable for the power points in your home or the cable is too short to

reach a power point, then obtain an appropriate safety approved extension lead or adapter, or consult your dealer.
If nonetheless the mains plug is cut off, remove the fuse and dispose of the plug immediately, to avoid a possible shock hazard by inadvertent
connection to the mains supply.

IMPORTANT

The wires in the mains lead are coloured in accordance with the following code:

Blue

: Neutral

Brown

: Live

Do not connect those leads to the earth terminal of a three-pin plug.

Safety precautions

THE LIGHTNING FLASH WITH ARROWHEAD SYMBOL, WITHIN AN EQUILATERAL TRIANGLE, IS INTENDED TO ALERT

THE USER TO THE PRESENCE OF UNINSULATED “DANGEROUS VOLTAGE” WITHIN THE PRODUCT’S ENCLOSURE
THAT MAY BE OF SUFFICIENT MAGNITUDE TO CONSTITUTE A RISK OF ELECTRIC SHOCK TO PERSONS.

Caution : Read this section carefully to ensure safe operation.

THE EXCLAMATION POINT WITHIN AN EQUILATERAL TRIANGLE IS INTENDED TO ALERT THE USER TO THE PRESENCE

OF IMPORTANT OPERATING AND MAINTENANCE (SERVICING) INSTRUCTIONS IN THE LITERATURE ACCOMPANYING
THE APPLIANCE.

CAUTION

RISK OF ELECTRIC SHOCK

DO NOT OPEN

CAUTION: TO REDUCE THE RISK OF ELECTRIC SHOCK, DO NOT REMOVE COVER (OR

BACK). NO USER-SERVICEABLE PARTS INSIDE. REFER SERVICING TO QUALIFIED
SERVICE PERSONNEL.

AC voltage selector switch

WARNING : 

TO PREVENT FIRE OR ELECTRIC SHOCK, DO NOT EXPOSE THIS

APPLIANCE TO RAIN OR MOISTURE.

The illustration shows
the CD-206/DPF-R6010.

AC110-220V

L

R

VARIABLE

LINE OUTPUT

DIGITAL OUTPUT

SYSTEM CONTROL

OPTICAL

COAXIAL

SL16

XS 8

ƒ

TEXT

AC110-220V

AC220-240V

AC220-240V

Downloaded From DvDPlayer-Manual.com Kenwood Manuals

Summary of Contents for CD-203

Page 1: ...03 DPF R6010 DPF R4010 DPF R3010 DTS disclaimer clause When Playing DTS encoded CDs excessive noise will be exhibited from the analog stereo outputs The consumer should take proper precautions when the analog stereo outputs of the CD player is connected to an amplification system To enjoy DTS Digital Surround playback an external 5 1 channel DTS Digital Surround decoder system must be connected to...

Page 2: ...over must be refitted when replacing the fuse in the moulded plug 3 Do not cut off the mains plug from this equipment If the plug fitted is not suitable for the power points in your home or the cable is too short to reach a power point then obtain an appropriate safety approved extension lead or adapter or consult your dealer If nonetheless the mains plug is cut off remove the fuse and dispose of ...

Page 3: ...EDIT 21 Timer operations 23 Maintenance 24 In case of difficulty 25 Specifications 26 Introduction 2 Before applying power 2 Safety precautions 2 Special features 3 System connections 4 Controls and indicators 6 Operation of remote control unit 8 Preparing to play tracks 9 Normal play TRACK mode 10 Searching for tracks by title TITLE SEARCH 12 The text information disc title track titles names of ...

Page 4: ...on to digital amplifier or MD CD 206 DPF R6010 only Optical fiber cable When using an optical fiber cable to connect this unit to a digital amplifier insert the plug straight into the jack until a snap sound is heard Be careful not to bend coil or bundle the optical fiber cable Optical fiber cables available on the market may not always be able to be used with this player If your cord cannot be us...

Page 5: ...omponents other than those specified by KENWOOD It may cause a malfunction and damage your equipment 3 Be sure the system control plugs are inserted all the way in to the system control terminals SYSTEM CONTROL CONNECTIONS Connecting system control cords after connecting a KENWOOD audio component system lets you take advantage of convenient system control operations There are two KENWOOD system co...

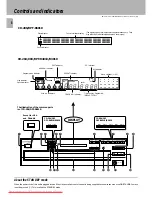
Page 6: ...4 3 2 1 0 REPEAT TRACK NO DISC NO MULTI EDIT FILE RANDOM PGM 5 4 3 2 1 NORMAL 8 8 8 8 8 8 _ 8 P C B A Play indicator Pause indicator Program mode indicator RANDOM indicator EDIT indicator REPEAT indicator Music calendar 1 20 ALL indicator P C indicator Disc No indicators TRACK NO indicator Time counter Program No SINGLE TOTAL CD 206 DPF R6010 CD 204 203 DPF R4010 R3010 CD 204 203 DPF R4010 R3010 C...

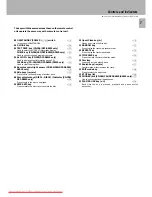
Page 7: ... to skip to the beginning of another track 7 Disc selector keys DISC1 DISC5 Indicator CD 206 DPF R6010 only 0 Press to select the disc to be played 8 DISC SKIP key 9 Press to rotate the disc tray or to select the disc Controls and indicators 9 Open Close key 0 9 Opens and closes the disc tray 0 RANDOM key Press to play the tracks in a random order REPEAT key Press to play the tracks repeatedly TIM...

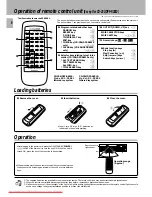
Page 8: ... TEXT DISPLAY key ALL INFO key TITLE SEARCH key CD 206 DPF R6010 M o d e l R C P 0 6 0 1 Infrared ray system When pressing more than one remote control key successively press the keys securely by leaving an interval of 1 second or more between keys After plugging in the power cord press the ON STANDBY POWER switch of the main unit to turn the unit ON When the unit is turned ON press the key of the...

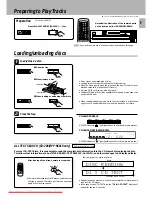
Page 9: ... when the tray is opened Therefore perform this operation again if the tray was opened After loading all the discs operate in stop mode Preparation Turn the unit ON Remote control unit only Do not touch the played side of disc Loading two discs together will cause malfunctioning Place the disc properly along the groove on the tray If the disc is not placed horizontally malfunction will result A si...

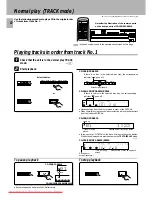
Page 10: ... playback Select the disc If there is no disc in the selected disc tray the corresponding indicator goes off Blinks during playback Hereafter the illustration of the common parts on the front panel is of CD 206 DPF R6010 DISC 1 DISC 2 DISC 3 DISC 4 DISC 5 DISC SKIP or Track NO being played Elapsed time of track being played Disc indicator during Playback 1 0 CD 206 DPF R6010 CD 204 203 DPF R4010 R...

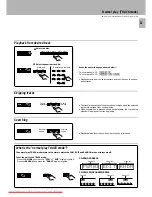
Page 11: ...ter track No 40 0000 Playback starts from the selected track and continues on the subse quent tracks What is the normal play TRACK mode The normal play TRACK mode refers to the state in which the PGM EDIT and RANDOM mode displays are off To set the unit to the TRACK mode Press the P MODE key when the PGM or EDIT display is lighted Press the RANDOM key when the RNDM display is lighted Normal play T...

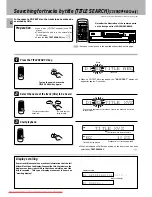
Page 12: ...ber skips forward The track number skips backward If no keys are operated for more than a second the track title is scrolled on the display What is displayed will differ depending on the item which has been selected by TEXT DISPLAY The letters move toward the left Track NO being played Elapsed time of track being played Display scrolling Some track titles contain so much text information that the ...

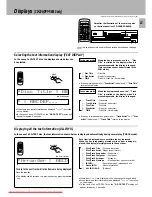
Page 13: ...n r e A C B D In the stop mode When the key is pressed once the 1 Disc Title is scrolled on the display when it is pressed repeatedly the display is changed This operation cannot be performed in the PGM mode 1 Disc Title Disc title 2 Disc Artist Singer or performer 3 TIME Disc No track No time display 1 Track Title Track title 2 Track Artist Singer or performer 3 Disc Title Disc title 4 Disc Artis...

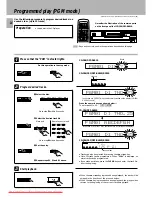
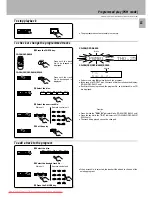
Page 14: ...ayback the play position returns to the beginning of the current track being played Start playback 3 4 Repeat steps 1 2 and 3 above Program desired tracks 2 1 Select the disc Go to step 2 within 8 seconds 3 Set the entry Go to step 3 within 8 seconds 2 Select the desired track No In the case of a CD TEXT disc the disc title is scrolled on the display CD 206 DPF R6010 only Press the numeric keys as...

Page 15: ...icator blinks CD 206 DPF R6010 only Press the key while the P C indicator is lit CD 204 203 DPF R4010 R3010 only The track being played cannot be changed Example When a track No is selected the track will be added to the end of the existing program The programmed contents remain in memory To stop playback Programmed play PGM mode REMOTE CONTROL UNIT RC P0601 7 Press until the track No to be change...

Page 16: ...n CD player TIME DISP Each press of the TIME DISP TIME DISPLAY key changes the displayed contents 1 1 23 Elapsed time of track being played 2 2 23 Remaining time of track being played 3 23 45T Elapsed time of entire disc T lights up 4 36 25T Remaining time on entire disc T lights up Only the display 1 and 2 will be displayed in PGM RANDOM and EDIT modes Dothisoperationintheplaymode TIME DISP CD 20...

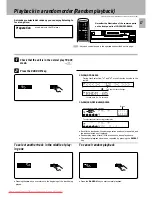
Page 17: ...that the unit is in the normal play TRACK mode During track selection and move from the outside to the inside To select another track in the middle of play ing one To cancel random playback Pressing the 4 key once returns to the beginning of the track being played Press the RANDOM key to start normal playback Hereafter the illustration of the common parts on the front panel is of CD 206 DPF R6010 ...

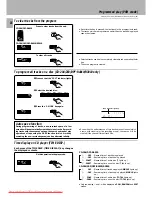
Page 18: ...ed therepeatONstatuscanbesettoOFF or vice versa All of the programmed tracks will be repeated In case only one track is programmed only that track will be repeated Up to 32 tracks can be programmed When FULL is displayed no more tracks can be programmed Hereafter the illustration of the common parts on the front panel is of CD 206 DPF R6010 P MODE DISC 1 DISC 2 DISC 3 DISC 4 DISC 5 4 1 2 3 4 5 6 7...

Page 19: ...ey 4Press the REPEAT key 5Start playback P MODE DISC 1 DISC 2 DISC 3 DISC 4 DISC 5 P MODE REPEAT 6 CD 206 DPF R6010 CD 204 203 DPF R4010 R3010 PGM 5 4 3 2 1 REPEAT TRACK NO DISC NO PGM 5 4 3 2 1 0 1 3 G P 0 M 1 1 0 PGM 5 4 3 2 1 E R E P T A ON REPEAT TRACK NO DISC NO PGM 5 4 3 2 1 0 1 3 E R E P T A O F F REPEAT TRACK NO DISC NO PGM 5 4 3 2 1 0 1 3 PGM indicator light up REPEAT indicator light up P...

Page 20: ...s the P MODE key and restart the procedure from the beginning Enter the recording time of the tape When using the numeric keys 2 Set the entry 1 Select the time Hereafter the illustration of the common parts on the front panel is of CD 206 DPF R6010 EDIT DISC 1 DISC 2 DISC 3 DISC 4 DISC 5 EDIT TIME DISP Main unit Remote control unit 4 1 2 3 4 5 6 7 8 9 0 10 When using the TIME DISPLAY key Normal E...

Page 21: ...e tracks to be recorded 4Start recording If you made a mistake press the CLEAR key and select the correct track The time remaining on side A or side B is indicated on the display When the time left on side A is less than the play time of the selected song that song will be programmed on side B If FULL is displayed no further programming can be accepted With the CCRS function the recording starts a...

Page 22: ...or discs having only one track or having tracks of long duration such as classical music Note Note Editing REMOTE CONTROL UNIT RC P0601 CHECK CHECK CD 206 DPF R6010 CD 204 203 DPF R4010 R3010 CD 206 DPF R6010 CD 204 203 DPF R4010 R3010 D E T I A 01 P C 5 TRACK NO A F I L E 4 DISC NO P C indicator light up During normal EDIT When the CHECK key is pressed the track Nos of edited songs will automatic...

Page 23: ...control cord select the CD input with the input selector Preparation Connect the power cords of the associated components so that their power can be turned ON through the audio timer Also be sure to read carefully the instruc tion manual of the timer This unit System control cord Audio cord Amplifier Audio timer To wall AC outlet Label side Adjusting the volume Set the volume the maximum 0 dB usin...

Page 24: ...pletely 4 Press the 0 OPEN CLOSE key again to close the tray 5 Wait a few seconds and set the unit to STANDBY mode NO I D C S Cleaning Do not use volatile solvents such as alcohol paint thinner gasoline or benzine etc to clean the cabinet Use a clean dry cloth Do not use contact cleaners because it could cause a malfunction Be specially careful against contact cleaners containing oil for they may ...

Page 25: ...d to reset the microcomputer and return it to normal condition CD player unit Remote control unit Please be aware that resetting the CD player will erase all stored information and return it to the factory settings Symptom Cause Remedy Unplug the power cord from the power socket and plug the power cord into the socket again Insert the power plug firmly to the AC outlet Turn the amplifier s power O...

Page 26: ...to Part 15 of the FCC Rules These limits are designed to provide reasonable protection against harmful interference in a residential installation This equipment may cause harmful interference to radio communications if it is not installed and used in accordance with the instructions However there is no guarantee that interference will not occur in a particular installation If this equipment does c...

Page 27: ...27 CD 206 204 203 DPF R6010 R4010 R3010 En Downloaded From DvDPlayer Manual com Kenwood Manuals ...

Page 28: ... on the back of the unit in the spaces designated on the warranty card and in the space provided below Refer to the model and serial numbers whenever you call upon your dealer for information or service on this product Model Serial Number Downloaded From DvDPlayer Manual com Kenwood Manuals ...

Reviews: