background image

42

C-707I

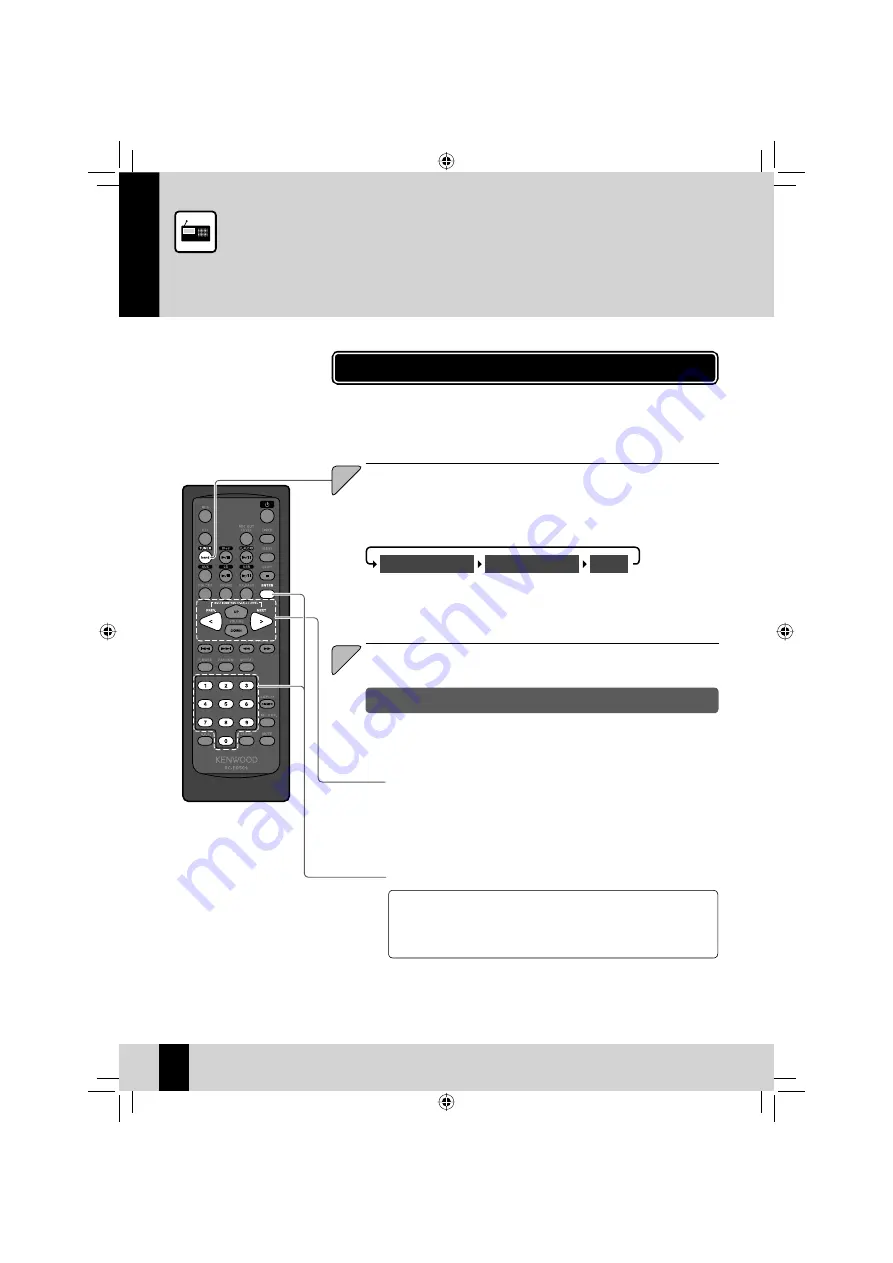
Listening to FM/AM Radio

Select a station. 

2

2

Simply pressing the 

[TUNER/band]

 key turns on the system and allows you to listen 

to the radio.

This section explains how to listen to the FM/AM radio and set radio stations. 

Receiving Radio Broadcasts

Select a reception mode. 

Press the 

[TUNER/band] 

key. 

1

1

Choosing from preset stations (Preset Call)

To select station P17, press the 

[1]

 key, press the 

[7]

 key, and then press 

the 

[ENTER]

 key. 

To select station P23, press the 

[2]

 key, press the 

[3]

 key, and then press 

the 

[ENTER]

 key. 

Selecting a preset station with the number keys

Select a preset station. 

You need to preset stations before you can perform these operations. 
(Page 44)

Selection with the 

[P.CALL]

 keys

Each press of the 

[<]

 or 

[>]

 key cycles sequentially through the preset 

stations. 

Holding down the 

[<]

 or 

[>]

 key will scan sequentially through the preset 

stations at a 5-second interval. 

The mode changes as shown below each time you press the key. 

“ST.” is displayed while a stereo broadcast is being received in FM 
(Stereo) reception mode. 

FM (Stereo)

FM (Monaural)

AM

en04_c-707i.indd   42

en04_c-707i.indd   42

12/20/2007   4:20:14 PM

12/20/2007   4:20:14 PM

Summary of Contents for C-707I

Page 1: ...4 108 EC Manufacturer Kenwood Corporation 2967 3 Ishikawa machi Hachioji shi Tokyo 192 8525 Japan EU Representative s Kenwood Electronics Europe BV Amsterdamseweg 37 1422 AC UITHOORN The Netherlands This model consists of a main unit RD C707 and a pair of speakers LS C707 en01_c 707i indd 1 en01_c 707i indd 1 1 10 2008 9 48 51 AM 1 10 2008 9 48 51 AM ...

Page 2: ... TO CONSTITUTE A RISK OF ELECTRIC SHOCK TO PERSONS THE EXCLAMATION POINT WITHIN AN EQUILATERAL TRIANGLE IS INTENDED TO ALERT THE USER TO THE PRESENCE OF IMPORTANT OPERATING AND MAINTENANCE SERVICING INSTRUCTIONS IN THE LITERATURE ACCOMPANYING THE APPLIANCE The marking of products using lasers The marking this product has been classified as Class 1 It means that there is no danger of hazardous radi...

Page 3: ...t the safety purpose of the polarized plug IMPORTANT SAFETY INSTRUCTIONS Caution Read this page carefully to ensure safe operation Read Instructions All the safety and operating instructions should be read before the product is operated Retain Instructions The safety and operating instructions should be retained for future reference Heed Warnings All warnings on the product and in the operating in...

Page 4: ...oduct c If the product has been exposed to rain or water d If the product does not operate normally by following the operating instructions e If the product has been dropped or damaged in any way and f When the product exhibits a distinct change in performance this indicates a need for service g If an abnormal smell or smoke is detected 14 Replacement Parts When replacement parts are required be s...

Page 5: ... the symbol crossed out wheeled bin cannot be disposed as household waste Old electrical and electronic equipment should be recycled at a facility capable of handling these items and their waste byproducts Contact your local authority for details in locating a recycle facility nearest to you Proper recycling and waste disposal will help conserve resources whilst preventing detrimental effects on o...

Page 6: ...play correctly while following types of discs are playing Discs recorded in Mix mode Discs recorded in multiple sessions Discs recorded in mixed formats of CD DA format and non music data formats Mix mode combines the CD DA format with audio files such as MP3 and WMA z Open the slide door and load the CD 1 Label surface Slide door Indicates CD is loaded Playback indicator Source Track number Elaps...

Page 7: ...lide door to the back panel playback will stop and the CD will be ejected z 2 A CD cannot be ejected while the system is in Standby mode Ejecting a CD deletes all program playback settings Page 39 z z Supported Media R Page 24 Audio Settings R Page 63 onwards Selecting Track Program Playback Mode R Page 39 z z z Slide the slide door towards the front panel to close it 3 Related functions that may ...

Page 8: ...sing the system with your Apple iPod Supports many types of components External Input Terminals An AUX input terminal supports connection of a cassette deck a video deck or other device Kenwood digital audio player support D AUDIO IN terminal This input terminal supports use of a Kenwood digital audio player which can be controlled using the system or remote control Supports recording from a varie...

Page 9: ... Radio Broadcasts RDS Radio Data System D AUDIO iPod External Components P 63 Audio Settings This chapter explains how to tailor the system to your audio preferences EX BASS SOUND P 67 Component Settings This chapter explains how to select the settings for the system Setting the System Clock Setting the Timer Display Settings Auto Power Save Maintenance P 77 This chapter explains how to store and ...

Page 10: ...ng or if the unit is damaged or fails to operate notify your dealer immediately If the unit was shipped to you directly notify your shipper immediately Kenwood recommends that you retain the original carton and packing materials in case you need to move or ship the unit in the future Keep this manual handy for future reference The speaker cords are connected at the factory en02_c 707i indd 10 en02...

Page 11: ...s or reverberation Position the speakers at the same height as your ears when you are using the system Getting the best acoustic effect Observe the following cautions when installing the system Insufficient heat radiation may build up internal heat and cause a malfunction or fire hazard Do not place any object on the system that may hinder heat radiation Leave spaces around the cabinets of the mai...

Page 12: ...ght speaker Left speaker Caution for Connection Do not plug the AC power cord into an AC wall outlet until all the connections are completed Before disconnecting any cords or cables always turn the system off and unplug the power cord from the AC wall outlet See Connecting the AC adapter Red band The speaker cords are connected at the factory Red band en02_c 707i indd 12 en02_c 707i indd 12 12 28 ...

Page 13: ...onnecting the AM loop antenna 1 2 3 Connecting the antenna cord Connect the AM antenna cord to the AM and MGND terminals as shown on the right Microcomputer malfunctions If the system does not operate normally or shows display errors reset the microcomputer Page 81 AC adapter cautions Do not cover or wrap the AC adapter with cloth blanket or other material Doing so will result in fire due to exces...

Page 14: ...er detaching or attaching speakers When attaching the speakers make sure they are attached securely Improper installation creates the risk of the speaker falling From the back of the speaker move it as indicated by the arrow Take care so you do not drop the speaker Detach the speaker from the main unit Placing a detached speaker on a flat surface Lay the speaker onto the flat surface with the side...

Page 15: ...nductor Diameter 0 511 mm 1 024 mm Strip about 1 cm of the vinyl insulation from the tips of both ends of the replacement speaker cords twist the ends of the wires together so they do not unravel when you connect them Preparing the ends of the speaker cords Twist the plastic sleeve on the end of the cord as you pull it off Notes on connecting the speaker cords Never short circuit the positive and ...

Page 16: ...Kenwood player that supports digital audio link using the dedicated cable you can control the player from the main unit and the remote control Page 48 It can also be connected using a 3 5 mm stereo mini plug cable commercially available unit When you are not using the digital audio player unplug the mini plug cable from the main unit Digital audio player USB Connect USB flash memory or USB mass st...

Page 17: ...IN terminal on the rear panel of the main unit iPod Connect an iPod to the iPod terminal on the front panel of the main unit To connect an iPod you will need a PNC iP120 iPod connection cable optional accessory When you are not using the iPod unplug the iPod connection cable from the main unit For information about supported iPod models see page 27 REC OUT Connect a Kenwood digital audio player wi...

Page 18: ...er TUNER band CDE USBE iPodE D AUDIOE remote control only or AUX remote control only If there is a disc loaded playback will begin Component Names and Functions Standby timer indicator Red Normal standby Orange Timer standby Display Page 19 CD slot Page 30 CDE Page 30 TUNER band Page 42 D AUDIO IN terminal Pages 16 48 Remote sensor Page 21 G H Pages 34 35 50 57 INPUT SEL Pages 48 60 STOPF Pages 34...

Page 19: ...ion mode Page 42 Displayed while the clock is displayed Page 68 PM Displayed while the clock is displayed Page 68 TOTAL Displayed during CD playback while the total elapsed time and remaining time are displayed Page 36 kHz Shows the AM frequency Page 42 MHz Shows the FM frequency Page 42 Displayed during CD or USB playback Pages 30 32 Lights when Auto Power Save A P S is set Page 75 Displayed duri...

Page 20: ...cklight Page 57 Adjusts display brightness Page 74 Clears settings Selects folders Page 34 35 37 50 Selects the radio station Page 42 Selects the album Page 57 Adjusts various levels Pages 51 62 68 70 Switches the source controls playback Pages 30 32 42 48 56 60 Skips back or forward through tracks Page 34 35 57 Selects the radio station Page 43 Mute Page 22 Switches the time indication shown on t...

Page 21: ...nlight or light from a high frequency fluorescent lamp such as an inverter type is shining on the remote sensor If this happens move the system to a different location to avoid this type of malfunction Approx 6 m 15 15 The batteries supplied with the system are for operational testing and may last only for a short time Always replace the batteries with two new ones Check the polarity of the batter...

Page 22: ...ume Lowers the volume Raises the volume Mute Press this key again to unmute the sound This section explains basic general operations and how to play music Adjusting the volume level en02_c 707i indd 22 en02_c 707i indd 22 12 28 2007 4 14 41 PM 12 28 2007 4 14 41 PM ...

Page 23: ...CD For other types non CD of playback proceed to step 3 See page 30 for information about how to load a CD 3 3 Start playback You can select the sound quality you want See Audio Settings pages 63 65 for details If the system is not operated for a specified period of time the display starts to scroll to protect the screen from image burn and uneven brightness Press the Play Pause key for the input ...

Page 24: ...s and file names may not be displayed correctly Playback for multi session discs or discs that contain large numbers of folders may take longer to begin than for normal discs If you write audio files and music CD tracks CD DA format to the same disc the disc may not play correctly Before writing audio files to a disc check that the files play back correctly on the PC being used to write the files ...

Page 25: ...lder 256 Maximum number of displayable characters File names 32 including file extension Folder names 32 Tag display Title Album Artist 30 This system is capable of displaying alphanumeric characters Other character types are displayed as pound marks Other notes Note that even where audio files comply with the above standards playback may fail due to factors such as the disc characteristics or rec...

Page 26: ... come with a USB device It is up to you to purchase a commercially available USB device separately The USB port on the front panel of the main unit supports USB2 0 Full speed Do not use a USB device connected via a USB hub Certain conditions while using a USB device can cause contents stored on the USB device to be lost Note that Kenwood will not be held liable for any losses arising out of loss o...

Page 27: ...ntrollable iPod iPod Software version iPod 4th Generation Click wheel 20GB 40GB 3 02 or more iPod mini 4GB 6GB 1 2 or more iPod 4th Generation Color display 20GB 30GB 40GB 60GB 1 0 or more iPod nano 1st Generation 1GB 2GB 4GB 1 0 or more iPod nano 2nd Generation 2GB 4GB 8GB 1 0 or more iPod video iPod 5th Generation 30GB 60GB 80GB 1 0 or more iPod nano 3rd Generation video 4GB 8GB 1 0 or more iPod...

Page 28: ... key and check to make sure that NO DISC appears on the display 3 Wait a few seconds and then turn the system off 4 If there are any other components connected to the system check to make sure they are all turned off before disconnecting the cables Whenever moving the system make sure you hold onto the main unit The main unit may fall if you hold onto the speakers Important Information en02_c 707i...

Page 29: ...m Playback Mode 41 Track Repeat Playback Mode 41 Receiving Radio Broadcasts Listening to FM AM Radio 42 Presetting Stations 44 Clearing All Preset Stations 45 RDS Radio Data System PS Program Service Name Display 46 Searching for a Desired Program Type PTY Search 47 D AUDIO Playing Back from a Digital Audio Player 48 Disconnecting the Digital Audio Player 49 Adjusting the Input Level 51 Recording ...

Page 30: ...a CD In addition to commercially available music CDs you also can play discs with MP3 and WMA audio files recorded on them For details see Supported Media page 24 CD Track numbers may not display correctly while following types of discs are playing Discs recorded in Mix mode Discs recorded in multiple sessions Discs recorded in mixed formats of CD DA format and non music data formats Mix mode comb...

Page 31: ...y into the slot Take care when using an 8 cm CD If a CD is already loaded opening the slide door will eject it z Removing a CD Slide the slide door cover towards the back panel to eject the CD Sliding the slide door will eject the CD If the CD is playing when you slide the slide door to the back panel playback will stop and the CD will be ejected z 2 2 A CD cannot be ejected while the system is in...

Page 32: ...P3 or WMA audio files on the connected device z z This section explains how to connect USB flash memory or a USB mass storage class compliant digital audio player to the system and play its MP3 or WMA audio files USB Before connecting a USB device to the system turn off both the system and the USB device z Depending on the connected device the number of files and other factors reading of files can...

Page 33: ...e 63 onwards Selecting Track Program Playback Mode R Page 39 z z Press the F key to stop playback 1 1 Disconnecting a USB device Disconnecting a USB device deletes all program playback settings Page 39 z When the message REMOVE OK appears disconnect the USB device 3 3 Press the F key again 2 2 en03_c 707i indd 33 en03_c 707i indd 33 12 19 2007 5 19 58 PM 12 19 2007 5 19 58 PM ...

Page 34: ...t To return to an earlier track Press the G key two or more times in succession To return to the beginning of a track Press the G key once Skipping tracks skipping back skipping to the start Playing the tracks in the previous next folder in Folder Playback mode To go to the previous folder press the PREV key To go to the next folder press the NEXT key CD USBPlaybackOperations This section explains...

Page 35: ... Folder Playback mode Press the USBE key Pausing and resuming playback Hold down the I key or J key Skipping forward back To skip to the previous or next track Press the G key previous or H key next To return to an earlier track Press the G key two or more times in succession To return to the beginning of a track Press the G key once Skipping tracks skipping back skipping to the start Stopping pla...

Page 36: ...displayed correctly Non supported characters are displayed as pound marks If clock settings are not configured the day clock screen is skipped z z z z Music CD The display changes as shown below each time you press the TIME DISP key During CD track playback Program playback During random playback repeat playback will appear when the time exceeds 400 minutes MP3 WMA The elapsed time for only 1 trac...

Page 37: ...o select folder playback mode The mode changes as shown below each time you press the key Press the CDE key or the USBE key to begin playback Press the PREV or NEXT key to select the folder to be played 2 2 4 4 3 3 MP3 WMA This mode plays the files in the selected folder only Selecting Folder Playback Mode Folder playback mode N displayed File playback mode displayed Press the F key to stop playba...

Page 38: ...p3 Track 9 F5_1 mp3 Track 10 F5_2 mp3 Track 11 F6_1 mp3 Track 12 F6_2 mp3 Track 13 F6_3 mp3 F0_1 mp3 F0_2 mp3 F0_3 mp3 ROOT Track file name F1_1 mp3 F1_2 mp3 Folder 2 F2_1 mp3 Folder 3 F3_1 mp3 F3_2 mp3 Folder 4 Folder name F5_1 mp3 F5_2 mp3 Folder 6 F6_1 mp3 F6_2 mp3 F6_3 mp3 Folder 7 Sample folder configuration Playback sequence for folders and track files MP3 WMA When you play a CD or music fro...

Page 39: ...ting Track Program Playback Mode 1 1 File playback mode Press the P MODE key to select programming mode The mode changes as shown below each time you press the key Folder playback mode MP3 WMA 1 Select the folder you want to use for program playback Select using PREV or NEXT Folder 8 selected Programming mode PGM not displayed PGM flashes Canceling programming mode 2 Press the P MODE key to select...

Page 40: ...e CLEAR key This erases the current program To remove a track from a program z Stop playback and then press the P MODE key z Next each press of the CLEAR key will sequentially delete the last track of the program Use the and keys to select a program number When the number of the track you want to delete is displayed press the CLEAR key To add a track to the end of the program Stop playback if it i...

Page 41: ... Pressing the G key skips back to the beginning of the track being played z z Random playback mode Random playback off displayed not displayed This mode repeats a particular track or all the tracks on a CD Track Repeat Playback Mode Press the CDE or USBE key to start playback of a track you want to repeat Press the REPEAT key to begin repeat playback The mode changes as shown below each time you p...

Page 42: ... the 2 key press the 3 key and then press the ENTER key Selecting a preset station with the number keys Select a preset station You need to preset stations before you can perform these operations Page 44 Selection with the P CALL keys Each press of the or key cycles sequentially through the preset stations Holding down the or key will scan sequentially through the preset stations at a 5 second int...

Page 43: ...s step until you find the station you want Using Manual Tuning Use the TUNINGI J key to change the frequency until you find the station you want Choosing from stations that are not preset Auto Manual Tuning There is no sound output while Auto Tuning is in progress The display changes as shown below each time you press the DISPLAY key If you want to display Day Clock screen configure time settings ...

Page 44: ... or Manual Tuning to tune in the desired station Page 43 Tune in the station you want to preset and then press the ENTER key Press the ENTER key Press the or key If the selected preset number is already assigned a station the existing station is overwritten by the new station The preset number flashes 1 1 Press the TUNER band key to switch the source To receive FM stereo broadcasts select FM Stere...

Page 45: ...ld down the CLEAR key for about 4 seconds The message TUNER CLEAR remains on the display for about 10 seconds Press the ENTER key While the TUNER CLEAR message is on the display press the ENTER key Clearing All Preset Stations This procedure deletes all of the currently preset stations 2 2 en04_c 707i indd 45 en04_c 707i indd 45 12 20 2007 4 20 16 PM 12 20 2007 4 20 16 PM ...

Page 46: ...rovided or be given different names depending on countries or areas NO PS is displayed if there is no Program Service name NO RT is displayed if there is no Radio Text Select the FM band Page 42 RDS Radio Data System This system is designed for RDS reception it can extract the information from the broadcast signal for use with various functions such as automatic display of the station name PS Prog...

Page 47: ...the desired type cannot be found NO PTY flashes then after several seconds the display returns to the original display Program Type Name Display Pop Music Pop M Rock Music Rock M Easy Listening Music Easy M Light Classical Light M Serious Classical Classics Other Music Other M News News Current Affairs Affairs Information Info Sport Sport Education Educate Drama Drama Culture Culture Science Scien...

Page 48: ... audio player using the dedicated cable allows you to operate the digital audio player using the main unit or the remote control z z Compatible Kenwood digital audio players As of November 2007 Memory audio player M2GD55 M1GD55 M1GC7 M2GC7 Turn on the digital audio player 2 2 Play back from a digital audio player 3 3 Always turn this system and the digital audio player off before connecting the di...

Page 49: ...ng the Input Level R Page 51 z z z Disconnecting the Digital Audio Player 2 2 Disconnect the digital audio player Disconnect the digital audio player s connection cable from the D AUDIO IN terminal z 1 1 Turn off this system and the digital audio player en05_c 707i indd 49 en05_c 707i indd 49 12 26 2007 10 47 35 AM 12 26 2007 10 47 35 AM ...

Page 50: ...he G key previous or H key next To return to an earlier track Press the G key two or more times in succession To return to the beginning of a track Press the G key once If you use the dedicated cable for the connection the volume and sound quality settings on the digital audio player are disabled If the digital audio player is not connected using the dedicated cable use the controls on the connect...

Page 51: ... when the volume from an external component is noticeably higher or lower than other input sources at the same volume setting Press the D AUDIOE key to switch the source 2 2 3 3 Adjust the Input Level Press the or key You can adjust the input level in a range from 3 to 3 z Turn off the digital audio player 1 1 Adjusting the input level also changes the volume of the external component connected to...

Page 52: ...layer You also can configure the digital audio player to detect silence and divide the recording into tracks automatically Always turn this system and the digital audio player off before connecting the digital audio player Refer to the instruction manual that comes with the digital audio player you are connecting also The following assumes that the source device is already connected to the system ...

Page 53: ...the radio Tune in the station you want to record Page 42 On the digital audio player perform the required operation to start recording 4 4 Start recording 5 5 CD USB iPod Press the CDE USBE or iPodE key to start playback Digital audio player Press the D AUDIOE remote control only to start playback Recording from the radio This step is not required To stop recording Press the F key Perform the requ...

Page 54: ...recording level for each device z M2GC7 M1GC7 connected This system HIGH M2GC7 M1GC7 Mid When the source is a digital audio player disconnect the digital audio player from the REC OUT terminal before adjusting the recording level z 1 1 Adjusting the Recording Level If you notice distortion or if the recorded sound is too low adjust the output level en06_c 707i indd 54 en06_c 707i indd 54 12 25 200...

Page 55: ...en06_c 707i indd 55 en06_c 707i indd 55 12 25 2007 11 43 19 AM 12 25 2007 11 43 19 AM ...

Page 56: ...d models see to page 27 z z z Connect the PNC iP120 connection cable optional accessory to connect the iPod to the iPod terminal on the main unit s front panel 1 1 2 2 Press the iPodE key to begin playback Perform main operations on the iPod z Always turn this system and the iPod off before connecting the iPod z Disconnecting an iPod 2 2 Disconnect the iPod After you are finished using the iPod di...

Page 57: ...the beginning To go to the previous album press the PREV key To go to the next album press the NEXT key The volume level and sound quality settings of the iPod are ignored while it is connected to the system Do not disconnect the iPod while playback is in progress Doing so can cause a malfunction Certain functions may not be supported depending on the iPod model z z z Playing the tracks in the pre...

Page 58: ...ess the key Check the iPod display to see the currently selected shuffle mode z This mode is not supported with the iPod classic 6th generation and iPod nano 3rd generation Pressing the G key skips back to the beginning of the track being played z z 1 1 Track random playback Album random playback OFF en07_c 707i indd 58 en07_c 707i indd 58 12 19 2007 5 19 05 PM 12 19 2007 5 19 05 PM ...

Page 59: ...1 This mode is not supported with the iPod classic 6th generation and iPod nano 3rd generation During album playback this mode repeatedly plays the album During random playback after all the tracks are played back randomly they are repeated in a different random sequence When both random playback and album playback are being used the tracks in the albums are repeatedly played in a different random...

Page 60: ...and Also refer to the instruction manual that comes with the external component being connected z z 2 2 Select AUX as the source 3 3 Begin playback on the connected external component Perform the required operation on the connected external component to start playback 1 1 Connect the external component to the AUX IN terminal on the back panel of the main unit Audio OUT Press the INPUT SEL key The ...

Page 61: ...s R Page 17 Audio Settings R Page 63 onwards Adjusting the Input Level R Page 62 z z z Disconnecting the External Component 2 2 Disconnect the external component 1 1 Turn off this system and the external component en08_c 707i indd 61 en08_c 707i indd 61 12 25 2007 11 44 54 AM 12 25 2007 11 44 54 AM ...

Page 62: ...put sources at the same volume setting Select AUX as the source 1 1 Adjusting the input level also changes the volume of the external component connected to the AUX IN terminal z 2 2 Adjust the input level Press the or key You can adjust the input level in a range from 3 to 3 z Press the INPUT SEL key The source changes as shown below each time you press the key Press the AUX key D AUDIO AUX en08_...

Page 63: ...ystem The EX BASS setting can be adjusted for enhanced bass and the SOUND setting can be adjusted to bring out the optimal sound quality of each track EX BASS Enhancing the Bass Range 64 SOUND Adjusting the High Range and Low Range 65 en09_c 707i indd 63 en09_c 707i indd 63 12 19 2007 5 18 42 PM 12 19 2007 5 18 42 PM ...

Page 64: ...nge EX BASS 1 1 Press the EX BASS key The setting changes as shown below each time you press the EX BASS key Turning on EX BASS disables the SOUND function automatically z EX BASS appears EX BASS disappears en09_c 707i indd 64 en09_c 707i indd 64 12 19 2007 5 18 42 PM 12 19 2007 5 18 42 PM ...

Page 65: ...e of sound you want SOUND BASS low range adjustment TREBLE high range adjustment Changing the SOUND setting disables EX BASS automatically z BASS TREBLE both can be adjusted within a range of 3 to 3 TONE appears on the display when the BASS or TREBLE setting is something other than 0 z z Adjusting the High Range and Low Range Returns to normal display after about 5 seconds z en09_c 707i indd 65 en...

Page 66: ...en09_c 707i indd 66 en09_c 707i indd 66 12 19 2007 5 18 43 PM 12 19 2007 5 18 43 PM ...

Page 67: ...splay Settings Setting the Display Brightness DIMMER 74 Auto Power Save 75 Component Settings This chapter explains basic timekeeping settings as well as settings for the timer display and other functions that help make the system easier to use en10_c 707i indd 67 en10_c 707i indd 67 12 27 2007 10 26 18 AM 12 27 2007 10 26 18 AM ...

Page 68: ... system clock time Pressing the DISPLAY key while the system is in the Standby mode OFF will display the time for 5 seconds Press the TIMER key Press the or key 1 1 Set the day of the week Use the and keys to set the day of the week 2 2 Press the ENTER key Select the timekeeping format 3 3 Press the ENTER key Press the or key Press the ENTER key Press the ENTER key Press the ENTER key 12 hour form...

Page 69: ...nation turns off while the Sleep Timer is on While the Sleep Timer is running you can check the remaining time by pressing the SLEEP key To cancel the Sleep Timer Press the power K key to turn the system off Standby or press the SLEEP key so Q is no longer displayed Setting the Sleep Timer SLEEP A Sleep Timer automatically turns the system off after a set interval while a Program Timer starts play...

Page 70: ...d preset the station before performing this procedure Page 44 Make sure the times for PROG 1 and PROG 2 are different by at least one minute to ensure that their operations do not overlap 2 2 3 3 1 1 Press the TIMER key Press the or key Select PROG 1 or PROG 2 Press the or key Select ON or OFF Press the or key Example PROGRAM 1 on Press the ENTER key Press the ENTER key Press the ENTER key Example...

Page 71: ...4 The timer runs every week Select EVERY WEEK or ONETIME Press the or key 5 5 Press the ENTER key Press the ENTER key The specified timer runs once only If you selected EVERYDAY MON FRI TUE SAT or SAT SUN proceed to step 6 Presetting Stations R Page 44 Setting the System Clock R Page 68 EVERYDAY SUNDAY MONDAY TUESDAY WEDNESDAY THURSDAY SAT SUN TUE SAT MON FRI SATURDAY FRIDAY Sunday Saturday Sunday...

Page 72: ...keys to select a preset number and then press the ENTER key This completes the setting procedure COMPLETE will appear on the display briefly followed by the normal display Playback is at the volume you set in step 9 You cannot use the VOLUME key to set the volume Specify the OFF TIME off time 7 7 Press the ENTER key Press the ENTER key Use the and keys to set the hour Use the and keys to set the m...

Page 73: ...time you hold down the TIMER key for about 2 seconds PROG 1 on PROG 2 on PROG 1 and 2 on Timer off 1 displayed 2 displayed 1 2 not displayed 1 2 displayed Even when a timer is off its settings are retrained The STANDBY TIMER indicator will light in red if there was a power failure or the system was unplugged from the wall outlet for some time If this happens set the system clock to the correct tim...

Page 74: ...f 2 levels Adjust the brightness according to your preferences and the conditions in the room 1 1 Hold down the DIMMER key for about 2 seconds The setting changes as shown below each time you press the key Display Dark Illumination On Display Dark Illumination Off Display Bright Illumination On en11_c 707i indd 74 en11_c 707i indd 74 12 20 2007 4 19 31 PM 12 20 2007 4 19 31 PM ...

Page 75: ...ds The setting toggles on and off each time you hold down the key 1 1 If the input source is TUNER D AUDIO iPod or AUX A P S is triggered whenever the volume is set to zero VOLUME 0 or when MUTE is on When recording to a device connected to the system s REC OUT terminal turn off A P S or set the volume so that it is higher than zero z z A P S appears A P S disappears en11_c 707i indd 75 en11_c 707...

Page 76: ...en11_c 707i indd 76 en11_c 707i indd 76 12 20 2007 4 19 32 PM 12 20 2007 4 19 32 PM ...

Page 77: ...or when problems arise It also describes how to store and maintain the system so it continues to provide enjoyment for many years to come Messages 78 Troubleshooting 79 Glossary 82 Care and Storage 83 Specifications 84 en12_c 707i indd 77 en12_c 707i indd 77 1 10 2008 9 49 38 AM 1 10 2008 9 49 38 AM ...

Page 78: ...ted WMA audio file or from an unsupported file format There are no playable MP3 or WMA audio files REMOVE OK The USB device can be removed safely R Disconnect the USB device from the USB port Page 33 USB NO MEDIA A USB device is not connected The USB device cannot be recognized R Check the connections Page 16 READING is the media name The media s TOC 1 information is being read Messages 1 In addit...

Page 79: ...68 The timer does not work Set a start time and end time for the program timer 70 73 Symptoms Solution Ref page Tuner No radio reception Connect the antennas Select the correct band reception mode Tune the radio to the frequency of the desired station Move the main unit antenna and AC adapter away from each other 12 42 43 12 13 Interference noise Install an outdoor antenna away from roads Turn off...

Page 80: ...ch TAG information can be displayed on this system 25 CD does not eject Slide the slide door towards the back of the main unit to stop playback and eject the disc If this does not cause the CD to eject perform the following procedure to eject it 1 Check that the source is CD If music is playing press the F key to stop playback 2 Slide the slide door towards the back of the main unit to open it 3 H...

Page 81: ...rue when shuffle is turned on for a large number of tracks which can cause poor response of the iPod itself 27 Symptoms Solution Ref page Remote control The remote control does not work Load new batteries Use the remote control within its effective range 21 21 Troubleshooting Symptoms Solution Resetting the microcomputer Microcomputer malfunction the system does not work the display is faulty etc ...

Page 82: ...ter to recognize a connected USB device as an external storage device 16 24 VBR Variable Bitrate A system that varies the amount of data per time segment in accordance with the music data volume 25 WMA An abbreviation for the Windows Media Audio audio compression and encoding system developed by Microsoft Corporation of the U S 25 Sampling frequency A value that indicates the number of times per s...

Page 83: ...oth Never use lacquer thinner benzine alcohol or contact revitalizer which will cause discoloration or deformation Care and storage of CDs Storing a CD If you do not plan to use a CD for a long time remove it from the main unit and store it in its case Cleaning a CD When a disc becomes soiled with fingerprints or other stains use a soft dry cloth to wipe it gently in a pattern radiating from the c...

Page 84: ...ormats MP3 sampling frequency 8 kHz to 48 kHz Bitrate CBR VBR 32 kbps to 320 kbps WMA WMA9 standard non DRM sampling frequency 32 kHz to 48 kHz Bitrate CBR VBR 64 kbps to 192 kbps ID3 tag Version 1 0 1 1 2 2 2 3 Max folders 255 Max folder nesting 8 levels Max files 65280 FAT 32 Supply current Max 500 mA VBR audio data may produce bitrates outside the above range which may make playback impossible ...

Reviews: