background image

Connect the AC power cord to the wall outlet

after all other connections have been made.

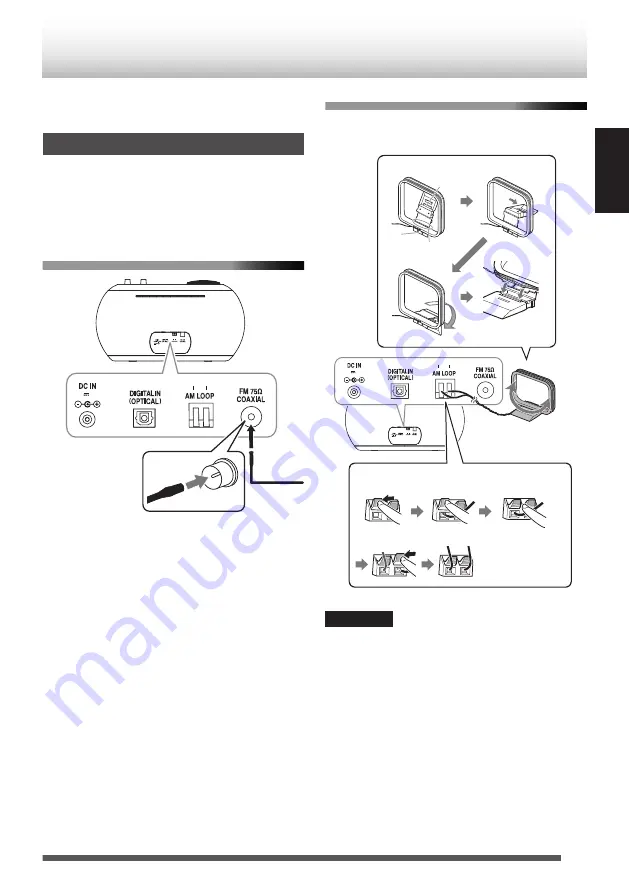
Connecting antennas

Make sure to connect the antenna before

listening to radio broadcast.

Generally, installing the antenna near a window

helps to improve reception.

Included FM antenna

.

3.35A

18V

Insert the wire into the 
center of the terminal.

After you untied the bundled string, extend the FM

aerial when connecting so that you can obtain the

best reception.

Included AM loop antenna

0

Place the AM loop antenna as near as possible

to the window to obtain the best reception.

.

3.35A

18V

Follow the same steps to insert the other wire

Insert the 
wire core

Press hard

Inserting the antenna wire

Adjust the connected AM loop 
antenna to the left or right to 
position it in the direction with 
the best reception.

Fit the tab into the groove 
until it clicks into place

Foldable part at 
the far end

Tab

Groove

Assembling the antenna

Release

① 

CAUTION

0

Use the AM loop antenna with the antenna wire

wound around the frame. Removing the wire

from the frame deteriorates the sensitivity of the

antenna.

0

Make sure that the antenna conductor is not in

contact with other terminals or cables. Position

the antenna away from other cables. Reception

may be interfered if they are placed too close to

the antenna.

11

ENGLISH

Connections

Summary of Contents for AP-300-B

Page 1: ... COMPACT Hi Fi COMPONENT SYSTEM AP 300 B AP 300 H ENGLISH ITALIANO LVT2504 002B E INSTRUCTION MANUAL ...

Page 2: ... operating the System Page 16 Play back files on your iPod or iPhone by operating the System Enjoy listening to music by adjusting the sound mode or the bass sound page 32 Play back an external device that does not support USB connection Page 29 Listening to FM AM radio Page 25 2 What you can do using the System ...

Page 3: ...ho Kanagawa ku Yokohama shi Kanagawa 221 0022 Japan EU Representative s Kenwood Electronics Europe BV Amsterdamseweg 37 1422 AC UITHOORN The Netherlands Hereby Kenwood declares that this unit AP 300 B AP 300 H is in compliance with the essential requirements and other relevant provisions of Directive 1999 5 EC Ways to press the buttons There are two ways of pressing the buttons on the System Short...

Page 4: ... obstructions and open spacing 2 Sides Top Back No obstructions should be placed in the areas indicated by the dimensions in the illustration 3 Bottom Place on a level surface Front view 15 cm 15 cm 15 cm Side view 15 cm Rear of the System Notes on installation Select a place which is level dry and neither too hot nor too cold between 5 C and 35 C 4 ...

Page 5: ... Listening to a BLUETOOTH device 23 Connecting a BLUETOOTH device 23 Playing back 24 Canceling the connection 24 Listening to the radio 25 Searching for stations 25 Presetting stations 26 Using Radio Data System 27 Listening to an external device 29 Connecting an external device 29 Listening to an external device 29 Using the timer 30 Setting the sleep timer 30 Setting the daily timer 30 Other fun...

Page 6: ...tended for checking system operation Replace them with new ones as soon as possible CAUTION 0 Danger of explosion if the battery is incorrectly replaced 0 Replace only with the same or equivalent type 0 Store the battery in a place where children cannot reach If a child accidentally swallows the battery consult a doctor immediately 0 To prevent the battery from overheating cracking or starting a f...

Page 7: ...E RANDOM pages 17 21 F REPEAT MEMORY pages 17 22 26 G CANCEL PTY pages 26 28 H EX BASS page 32 I SOUND MODE page 32 J SURROUND page 32 K DIMMER CONTRAST page 33 L PAIRING page 23 M DISPLAY pages 27 34 N I W pages 16 19 24 O o page 19 P VOLUME F G page 14 Q MUTING page 15 R J K H I SET pages 14 26 29 30 33 S FOLDER P CALL J K pages 19 26 T SLEEP page 30 U ON OFF page 31 V TIMER SET pages 14 30 W Nu...

Page 8: ... button page 19 H Standby indicator Lights up in red when the power of the System is off The light goes off when the power is on Lights up in orange when the timer is set I M Ejecting CD button page 18 J Remote control sensor K Display L PHONES jack Connect headphones page 13 M AUDIO IN jack Connect an external device page 29 N USB terminal Connect iPod iPhone or a USB device pages 16 18 O SOURCE ...

Page 9: ...Rear 4 3 2 3 35A 18V 1 A DC IN jack page 12 B DIGITAL IN OPTICAL terminal page 29 C AM LOOP antenna terminal page 11 D FM 75Ω COAXIAL antenna terminal 11 page 9 ENGLISH ...

Page 10: ... up when the remaining playback time of a track is displayed while the disc is played back F BLUETOOTH icon page 23 Lights up when BLUETOOTH device is connected to the System G iPod icon page 16 LightsupwheniPodisconnectedtotheSystem H STEREO icon page 25 Lights up when receiving an stereo broadcast I RDM icon page 21 Lights up during random playback CD USB J Timer icon pages 30 31 TIMER Lights up...

Page 11: ...t reception 3 35A 18V Follow the same steps to insert the other wire Insert the wire core Press hard Inserting the antenna wire Adjust the connected AM loop antenna to the left or right to position it in the direction with the best reception Fit the tab into the groove until it clicks into place Foldable part at the far end Tab Groove Assembling the antenna Release CAUTION 0 Use the AM loop antenn...

Page 12: ...k of electric shock and fire Do not use any other adapters except the supplied AC adapter Do not use the supplied AC adapter with any other products other than this System Do not use any power cords except the supplied power cord Do not use the supplied power cord with any other products other than this System About memory backup setting Backup function can protect the various settings even if the...

Page 13: ...he volume before connecting or putting on the headphones NOTE 0 Connecting the headphones deactivates the speakers 0 Use commercially available headphones with a standard 3 pin stereo mini plug Stereo mini plug Headphones not supplied 13 ENGLISH ...

Page 14: ... select CLOCK then press SET 3 Adjust the hour Press repeatedly 4 Repeat Step 3 to adjust the minute After adjusting the minute COMPLETE is displayed and the setting is completed NOTE 0 The clock may gain or lose 1 to 2 minutes per month You may need to readjust the clock periodically 0 Set the clock again if the AC power cord is unplugged or the System is turned off due to the power failure Getti...

Page 15: ...performing the setting A P S ON If no operation is performed for 15 minutes in the following situations the System turns off automatically The volume level is set to MIN or Muting is activated USB or BLUETOOTH is selected as the source and no device is connected USB or CD is selected as the source and playback is stopped AUDIO IN or DIGITAL IN is selected as the source and there is no sound input ...

Page 16: ...g the iPod Disconnecting during playback may cause damage to the files or file system of the iPod 0 You cannot send any data to iPod from the System Playing back 1 Set the source to USB Turn Main unit Remote control 2 Start playback Main unit Remote control iPod is turned on and starts playing To pause Main unit Remote control To cancel pause press the button again To select a track Press repeated...

Page 17: ...ction of iPod repeat songs NOTE 0 DependingonthetypeofiPod iPodmayoperate differently 0 Sound distortion may occur when playing back audio sources with high recording levels If distortion occurs it is recommended to turn off the equalizer of iPod 0 Operate iPhone or iPod touch itself in the following cases When operating the home button When selecting application icons on the home screen When drag...

Page 18: ...nnecting the USB device during playback may cause damage to the files and file system of the USB device 0 You cannot send any data from the System to the USB device To insert a disc 1 Set the source to CD Turn Main unit Remote control 2 Insert a disc Insert the CD with the label side facing the same direction as the front of the System 0 The CD will be inserted automatically when you insert it in ...

Page 19: ...on again To select a track Press repeatedly Press repeatedly Main unit Remote control 0 Press T once to skip to the beginning of the next track 0 Press S to skip to the beginning of the track being played Press twice to skip to the beginning of the previous track To select a track with the track number to Examples 0 To select track no 3 3 0 To select track no 17 1 7 0 To select track no 123 1 2 3 ...

Page 20: ...register to the program Press repeatedly To select a track with the track number to 0 For operations to select the track see To select a track on page 19 4 Repeat step 3 to add other tracks to the program 5 Start playback Main unit Remote control The tracks are played back in the programmed order To add tracks to a program Select a track to add to the program While in the stop mode Press repeatedl...

Page 21: ...om playback 1 Set the source to USB or CD Turn Main unit Remote control 2 Play back the USB device CD Main unit Remote control 3 Start random playback You can play back the tracks in random order 0 The RDM icon lights up during random playback 0 All tracks are played in random order instead of random playback within a group 0 During random playback pressing S does not bring you back to the previou...

Page 22: ...he current group REP ALL Repeats all the tracks on the disc or USB device MP3 WMA only 2 Start playback when playback is stopped Main unit Remote control To cancel repeat playback Turn off the REP icon Press repeatedly 0 Repeat playback is also canceled in the following cases When the power is turned off When the audio source is changed When the USB device is removed When the disc is ejected When ...

Page 23: ...em DISCONNECTED is displayed then the display disappears 2 Set the System to pairing standby Hold Main unit Remote control The icon BLUETOOTH icon flashes quickly I W on the main unit cannot be used while CONNECTING is displayed Use PAIRING on the remote control 3 Turn on the BLUETOOTH function on the BLUETOOTH device 0 Select Bluetooth from Settings on the iPod touch iPhone and Android device 0 R...

Page 24: ...onnection Hold Main unit Hold Remote control DISCONNECTED NOTE The connection is canceled automatically in the following cases 0 Connection is canceled on the BLUETOOTH device or BLUETOOTH function is set to OFF 0 When the System or the BLUETOOTH device is turned off 0 When the source is changed to another audio sources CAUTION 0 To connect the device to this System the device must be compatible w...

Page 25: ...ress the buttons again 0 Pressing the button repeatedly changes the reception frequency in steps of 0 1 MHz for FM broadcast and in steps of 9 kHz for AM broadcast 0 STEREO icon lights up when stereo broadcast signal is received CAUTION 0 No sound is heard during station tuning To improve the FM reception When an FM stereo broadcast is hard to receive or noisy select the monaural reception mode Ea...

Page 26: ...ered station is overwritten 4 Store the station To tune in to a preset station Press repeatedly Press repeatedly Main unit Remote control 0 You can also select by specifying the number using the number buttons to Examples 0 To select preset no 3 3 0 To select preset no 17 1 7 CAUTION 0 Depending on the signal condition you may have reception problems even for the preset stations To erase the prese...

Page 27: ...S Program Service Name Display Automatically displays the station name transmitted by the Radio Data System station 0 Radio Text function Displays the radio text data transmitted by some Radio Data System stations when you press the DISPLAY NO TEXT is displayed if no text data is transmitted NOTE 0 Some functions and function names may differ in certain countries and areas To change the Radio Data...

Page 28: ...ving conditions it may take more than 1 minute to complete the search 0 If the desired program type cannot be found NO PROGRAM is displayed then after several seconds the display returns to the original display Program type table Program Type Name Display News NEWS Current Affairs AFFAIRS Information INFO Sport SPORT Education EDUCATE Drama DRAMA Culture CULTURE Science SCIENCE Varied Speech VARIE...

Page 29: ...he digital input terminal set the digital audio output setting for the connected device TV BD recorder etc to PCM Listening to an external device 1 Select AUDIO IN or DIGITAL IN Turn Main unit Remote control 2 Start playback of the external device 0 Do not disconnect the digital audio player during playback It may cause malfunction 3 Adjust the volume To adjust the audio input level Adjust the aud...

Page 30: ...aily timer Using the daily timer you can wake up with your favorite music 0 Set the clock before setting the recording timer page 14 0 Tune into a station load a disc or connect a USB device iPod to the System and make sure that the source works properly beforehand 0 Preset the desired station before setting the daily timer 1 Display the timer setting screen 2 Select and confirm on TIMER Press rep...

Page 31: ...s Standby indicator lights up in orange 0 The daily timer works only when the System is on standby 0 While the daily timer is set TIMER icon lights up 0 While the daily timer is functioning TIMER icon flashes 0 Once set the daily timer works every day 0 You can not set the same time for the starting time and ending time To cancel the daily timer While the System is turned on The TIMER icon disappe...

Page 32: ...e surround effect is turned on or off SURROUND OFF SURROUND ON 0 The initial setting is SURROUND OFF To increase the bass sound Press repeatedly Each time you press the button the bass sound effect is turned on or off EX BASS ON EX BASS OFF EQ icon lights up when EX BASS is set 0 The initial setting is EX BASS ON NOTE 0 The sound mode surround and bass sound EX BASS also take effects on the sounds...

Page 33: ...he setting will be memorized even if the System is turned off 0 The initial setting is DIMMER OFF To adjust the color depth CONTRAST of the display window 1 Display the color depth setting screen Hold CONTRAST SET3 will be displayed 2 Adjust the color depth CONTRAST Press repeatedly Each time you press H I the color depth CONTRAST of the display window changes in five levels CONTRAST SET1 to CONTR...

Page 34: ...older name some characters cannot be displayed These characters may not be displayed correctly or is displayed 0 iPod cannot show the Tag data of MP3 WMA For audio CD T01 0 46 The elapsed time of the playing track REMAIN The remaining time of the playing track TOTAL The elapsed time of the whole CD TOTAL REMAIN The remaining time of the whole CD For MP3 WMA files T001 0 46 The elapsed time of the ...

Page 35: ...supporting status of the iPod iPhone refer to the product information on our home page Playable BLUETOOTH devices 0 To connect the device to this System via BLUETOOTH the device must be compatible with the A2DP and the AVRCP profiles Playable discs files 0 We do not guarantee the operation and sound quality of CDs that are not compliant with the CD DA standard Before playing a CD look for a CD log...

Page 36: ... is output suddenly it might cause the failure such as damage the speaker 0 For CD Rs CD RWs that contain MP3 WMA files it may take a longer time to read the disc compared to normal audio discs The amount of reading time needed varies with the configuration of the folders and files 0 If CD R CD RW that is printable on the label side is used the disc may not be ejected from the System due to the la...

Page 37: ... designed to connect specifically to iPod or iPhone respectively and has been certified by the developer to meet Apple performance standards Apple is not responsible for the operation of this device or its compliance with safety and regulatory standards Please note that the use of this accessory with iPod or iPhone may affect wireless performance 0 iPhone iPod iPod classic iPod nano and iPod touch...

Page 38: ...ut terminal DIGITAL IN B Connect the devices correctly B Check to ensure that the digital audio output setting of the connected device is set to PCM iPod operations iPod does not play B Connect the USB cable correctly B Check the compatibility of your iPod page 35 B Battery of iPod are exhausted Charge the battery of iPod B Reset your iPod after disconnecting it from the System unplug the power co...

Page 39: ...he System B Place the System away from the television BLUETOOTH device Unable to pair B Set the System in pairing standby and perform pairing from the target device such as a smartphone page 23 Unable to connect to BLUETOOTH device B Check that the BLUETOOTH function is set to ON B Check to ensure that the BLUETOOTH device supports the BLUETOOTH A2DP profile Unable to operate the BLUETOOTH device ...

Page 40: ...red to the factory default 1 Turn off the System Main unit Remote control Press 2 Resetting the System and Main unit Press and hold K and o on main unit at the same time until FACTORY RESET is displayed You can reset only on the main unit 3 When RESET FINISHED is displayed unplug the AC power cord from the wall socket The System have been reset 4 Plug the AC power cord of the System into the outle...

Page 41: ...ass storage class Compatible file systems FAT16 FAT32 Playable files MP3 WMA DIGITAL IN OPTICAL x 1 AUDIO IN Stereo mini ø 3 5 mm x 1 LEVEL 1 1 V 30 kΩ LEVEL 2 500 mV 30 kΩ LEVEL 3 250 mV 30 kΩ PHONES Stereo mini ø 3 5 mm x 1 BLUETOOTH Version BLUETOOTH Ver 3 0 Output power Class 2 Maximum service area About 10 m Communication range may vary depending on the environmental conditions Frequency band...

Page 42: ... 18 W during operation 1 00 W and below during standby Dimensions 360 mm 199 mm 225 mm W x H x D Weight 2 9 kg Speakers System Full range Bass Reflex type Speakers unit 7 cm cone speaker Impedance 8 Ω Maximum input 20 W Specifications and appearance of this unit are subject to change without prior notice for improvement 42 ...

Page 43: ...Memo 43 ENGLISH ...

Page 44: ...found on the back of the unit in the spaces designated on the warranty card and in the space provided below Refer to the model and serial numbers whenever you call upon your dealer for information or service on this product Model Serial Number ...

Reviews: